« August 2009 »
S M T W T F S
1
2 3 4 5 6 7 8
9 10 11 12 13 14 15
16 17 18 19 20 21 22
23 24 25 26 27 28 29
30 31
You are not logged in. Log in
Entries by Topic
All topics  «
3D paperwork
A - Z challenge 5
A - Z challenge 7
A - Z challenge round 4
A to Z challenge round 3
A to Z round 2
A to Z round 6
A-Z round 1
Around the House
Art Challenges
Artist Trading Cards
Backgrounds
Beads
Bible Journaling
Books
Boxes
Collage
Color Challenge
Coloring
cookbook
Die Cuts
Digital Projects
Digital Stamps
Drawing
Dry Embossing
Fabric Stuff
Fantastic Folds
Field Trip
Home Decor
How Does Your Garden Grow?
Hymnal Art
In The Kitchen
In the studio
Jewelry
Lettering
Links
Multi-Technique
Music to Work By
Musings
Nail Art
New Work
Online Class
Other Hobbies
Other Projects
Painting
Paper Embroidery
Paper Piecing
Photo
Pretty Paper
Quilting
Random
reading
Scrap Recovery
scrapbooking
Sewing
Sketch Challenge
Some Backlog
Stamping
Stencils
Stickers
Supplies
Teabag Folding
Techniques
Testing
tips and tricks
Tutorial
Web resources
Welcome to my Blog
Work By My Friends
workflow
Writing
Blog Tools
Edit your Blog
Build a Blog
RSS Feed
View Profile
Group One
In & Out of Studio 3D
Monday, 10 August 2009
On the Edge
Topic: New Work

I should have taken into consideration the difficulty of photographing whites and pastels before embarking on this long journey of card-making with rubber stamps!

After stamping and watercoloring the image I ran it throught the Distressed Stripes folder for texture. Punching the corners of the green panel allowed me to tuch the corners of the white panel into it. Then I trimmed the right edge with a border made with a Fiskars border punch.

Attached to a folded white card base it left a white block on the left which I filled with a silver peel-off greeting.

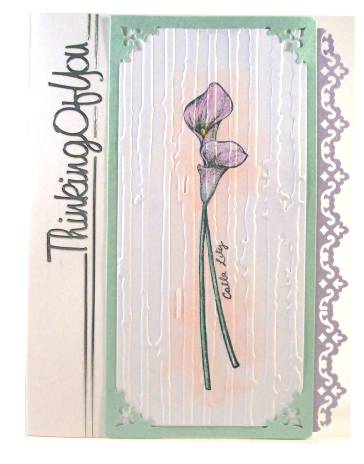
The text looked odd just hanging out there so I added some stripes of silver to anchor it.

Ddd


Posted by studio3d@ccgmail.net at 6:00 AM PDT

View Latest Entries