Topic: Stamping
The caption refers to the CARD, not me!
I've had this collage stamp for a L-o-o-o-n-g time (got it in a used stamp grab-bag) but it isreally not my style, so I hadn't used it before. I used watercolor pencils for the flowers and to edge the 'papers' in the image.
NOW WHAT? It sat in my pile of stuff for months waiting for inspiration to strike. When none did, I finally just grabbed it and started right in. I tore around the edges and then inked them in black. Then I focused on a 'postage stamp' in the upper right and suddenly had inspiration.
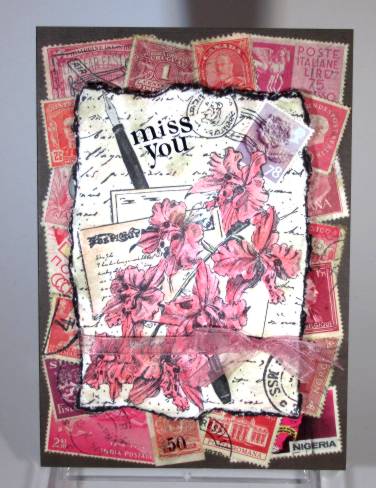
I pulled out my box of foreign postage stamps and sorted out ones with a similar color palette to the flowers. These I glued all over the brown base cardstock and then used 'old paper' distress ink to tone down all the white parts of them. I added the same to the stamped image. I cut around the upper right flower and inserted a real stamp over the image that was there (yes, the one that started the inspiration) and used a black pen to enhance the cancellation mark.
I used a rub-on to add the text and mounted the image over the postage stamp background with foam tape. The last step was to pull an organza ribbon around the front layer and tie a bow.
The colors and the distress ink give this a vintage look but, trust me, it's brand new!
Ddd
I
