Topic: Bible Journaling
On the plan for lettering lessons, whose books that have a 1st and 2nd are combined into one lesson. So here we are covering BOTh books of Peter.
Here are the daily lessons:
1 & 2 PETER: Day #1 – Filled Block Letters – Intro
Let’s have some fun this week including artwork right in our letters. The base of these will be the now-familiar basic block letters.
For the intro today, write out the letters for the book(s) of Peter, change the outlines to casual double lines. You can then draw patterns within the letters – using either different patterns in each one or a consistent pattern throughout the word.
You also have the option of leaving the word in black and white or coloring in the patterns.

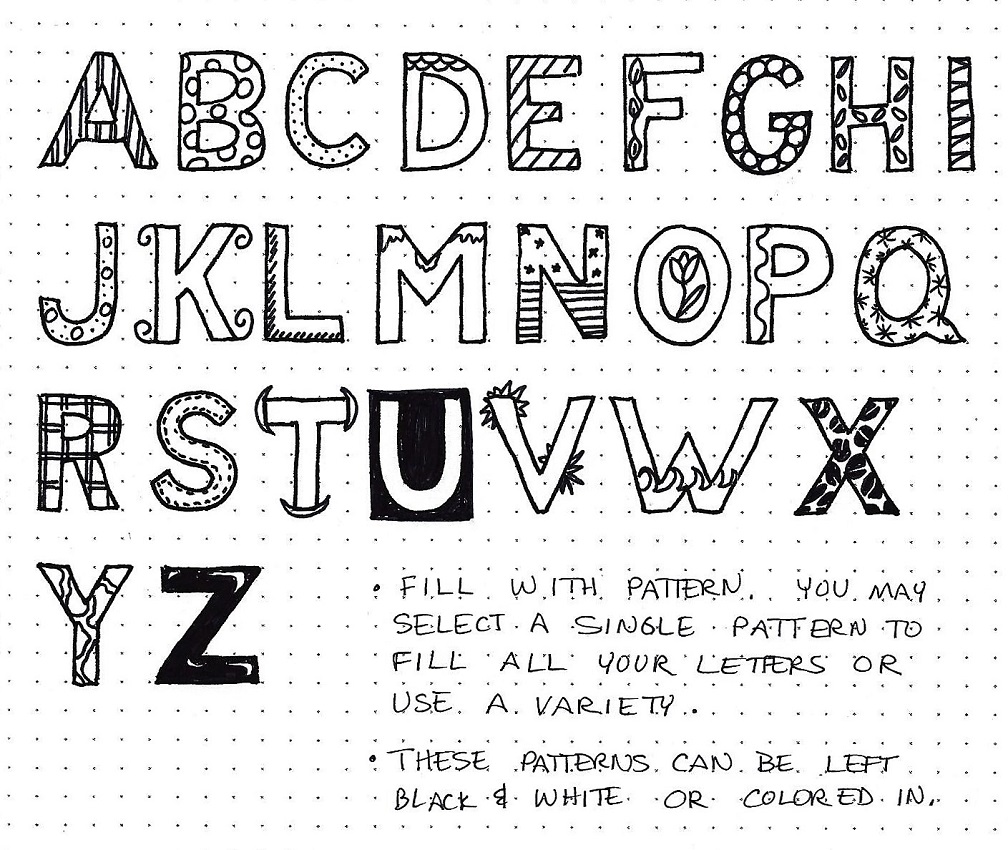
1 & 2 PETER: Day #2 – Fills For Block Letters – Alphabet
As shown yesterday, the first alphabet we will practice this week is basic block letters filled with patterns.
In this sample alphabet, I did not use the casual sketchy lines like Day 1. But there are lots of ideas for how you might want to fill your letters. When you are using them in your Bible journaling, you can fill your letters with doodles that fit the theme of a verse.
Remember, you have the option of color or black and white.
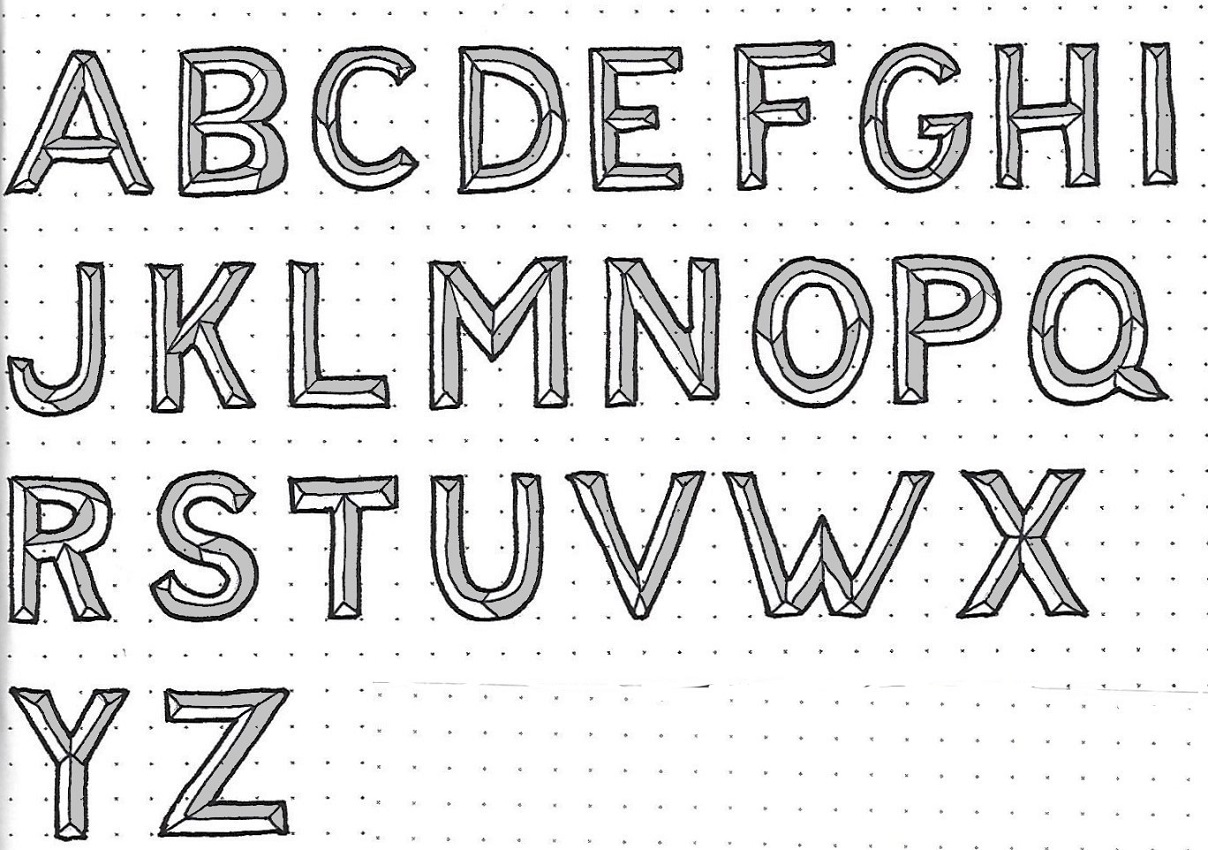
1 & 2 PETER: Day #3a – Carved Letters – Design Lines
There are two sheets for the alphabet today.
For chiseled letters, 1) start by drawing the basic block letter alphabet (caps only). 2) At each end, draw a little triangle 3) on the straight letters, draw a diagonal at the intersections 4) split the elements in half lengthwise, drawing from the points of the triangles 5) connect that center line with any new angles formed 6) add center line to remaining element from the ends of the triangle and the diagonals 7) shade the top and right segments.

Letters with curves get an arrow V along the curve. This is to define where the shading will switch from one side of the element to the other.
Use the steps described to turn your basic block alphabet into chiseled letters. Then go on to page 3b for shading.

1 & 2 PETER: Day #3b – Carved Letter Shading – Alpha
After you have drawn your carved alphabet it is time to work on shading. Since the letters are meant to look like they are indented into stone or concrete, the shading will go on the right and top of all the little bits. The light would come from the top so the top, indented spaces would be in shadow.
It is difficult to remember where the shading goes, so it may take a bit of practice to get it right. For this reason, do your shading in pencil so you can erase if needed.
I keep a copy of the alphabet with and without shading so I can work on structure separately from lighting.
1 & 2 PETER: Day #4 – Fills & Frills – Activity
This piece is to demonstrate that the art fills can be either outside OR inside the letters. And, as a bonus, fills inside the letters can be art objects rather than doodles.
I used the sketchy style of outlining the basic block letters. Then I drew, in pencil, various objects of clothing right across the words. On the first line, I used markers to trace the clothes only outside the letters. On the second line, I used the markers to trace the clothing only inside the letters.
The rest of the text was written out using basic round letters in all-caps, using the same markers. Go have some fun with fills.

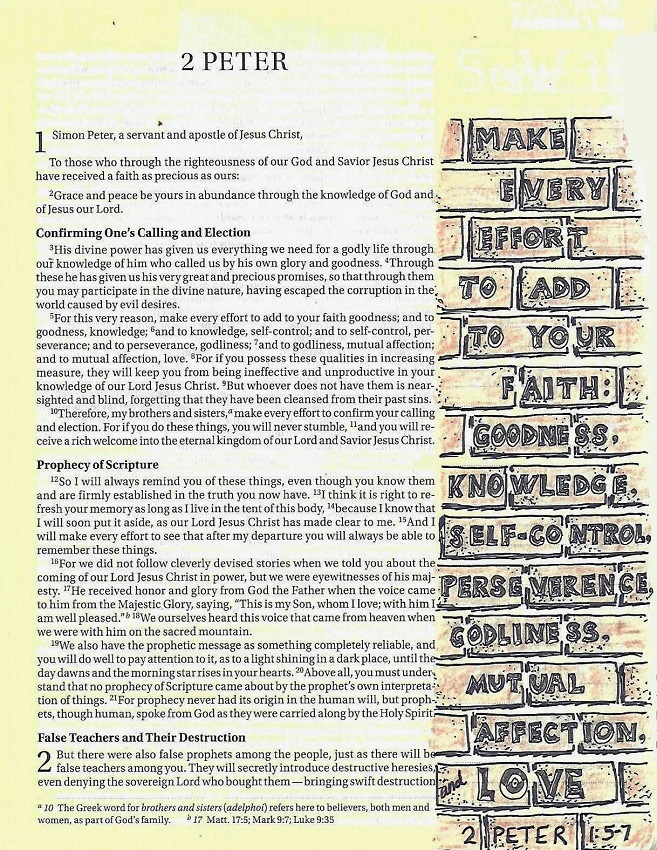
1 & 2 PETER: Day #5 – Using Block Fills – Bible Page
Working with the carved letters on this small scale was quite a challenge. I wanted the words to look like they were carved right into the brick wall (from the Drawing Room this week) So I drew the wall in pencil, then penciled and inked the words, inked the bricks, erased all the pencil and added the shading to the letters and the color to the wall.
Use any one of the styles of filled block letters in your Bible to journal in 1 Peter or 2 Peter.
What fun!
Ddd
