« June 2007 »
S M T W T F S
1 2
3 4 5 6 7 8 9
10 11 12 13 14 15 16
17 18 19 20 21 22 23
24 25 26 27 28 29 30
You are not logged in. Log in
Entries by Topic
All topics  «
3D paperwork
A - Z challenge 5
A - Z challenge 7
A - Z challenge round 4
A to Z challenge round 3
A to Z round 2
A to Z round 6
A-Z round 1
Around the House
Art Challenges
Artist Trading Cards
Backgrounds
Beads
Bible Journaling
Books
Boxes
Collage
Color Challenge
Coloring
cookbook
Die Cuts
Digital Projects
Digital Stamps
Drawing
Dry Embossing
Fabric Stuff
Fantastic Folds
Field Trip
Home Decor
How Does Your Garden Grow?
Hymnal Art
In The Kitchen
In the studio
Jewelry
Lettering
Links
Multi-Technique
Music to Work By
Musings
Nail Art
New Work
Online Class
Other Hobbies
Other Projects
Painting
Paper Embroidery
Paper Piecing
Photo
Pretty Paper
Quilting
Random
reading
Scrap Recovery
scrapbooking
Sewing
Sketch Challenge
Some Backlog
Stamping
Stencils
Stickers
Supplies
Teabag Folding
Techniques
Testing
tips and tricks
Tutorial
Web resources
Welcome to my Blog
Work By My Friends
workflow
Writing
Blog Tools
Edit your Blog
Build a Blog
RSS Feed
View Profile
Group One
In & Out of Studio 3D
Tuesday, 12 June 2007
Interactive Color Wheel
Now Playing: Play with color before even picking up a tool
Topic: Web resources

Are you feeling a bit blue? A few clicks of the mouse will help you find a color to complement it!

There is a great interactive color wheel for you to play with at  http://www.paintquality.com/color/colorwheel.html

There is a tab called Color Combinations that lets you click on various of the primary colors as well as white and black to see what effect they have when combined with other colors.

The Color Schemes tab highlights on the color wheel the patterns for Analogous, Complementaries, Split Complementaries, Tetrads, and Triads.  Within any of these color schemes you can rotate the color wheel to see the results.

Other controls show the wheel as reference colors, with their Shades, Tones, and Tints.

Confused? Click on the Glossary tab for definitions of all the terminology used.

Explore color and get back in the pink!

Ddd studio3d@ccwebster.net


Posted by studio3d@ccgmail.net at 6:27 AM PDT
Monday, 11 June 2007
Sailing Away on the SS Reflections
Now Playing: Terrific e-zine for stampers and scrappers
Topic: Web resources

Hi all -

Let me share with you the best e-zine I have found! SSReflections is an on-line stamping and scrapbooking magazine that runs on the theme of a cruise ship sailing from port to port around the world.

Different decks and lounges feature the variety of techniques and interests in these hobbies and are exceptionally well presented by a variety of 'crew members'. They cover the gamut from traditional to digital scrapping, stamping arts to altered arts with many related topics covered in each monthly issue.

Their own website describes itself this way

SS Reflections Ezine
www.ssreflections.com  

If you are joining us for the very first time, let me explain what S.S. Reflections is. We are a completely FREE online magazine for you with a truly unique concept. SSR is a virtual cruise ship from the Golden Era here to entertain you as we visit a new country/port each month. We have an amazing crew who create designs and share ideas with you each month from various areas of the ship. Our fly-out menu bar, to the left, can take you anywhere on the ship that you would like to be. It will guide you through each deck on this magnificent ship! If you'd like to read each and every feature, at the bottom of each page is a blue arrow and our click to link which will take you to the next page to read as though you were turning a page of a paper magazine! Each page is linked to the next. As mentioned above, we now have a Quick Links feature to help you get to where you want to go to next! We also have an into page for each deck which are listed in the Quick Links section. On these pages are ship's wheels with our crewmember's pictures inside - you can click on the wheel to read a short, fun bio for many of our designers. You can also click on the name of their room on the ship and it will take you directly to their article, or you can email each crewmember directly by clicking on their name! Please write to your favorite designer and be sure to let her know what you love about her and SSR!

They include lots of advertising, product reviews, reader challenges, contests, and more.

Sail away on SSReflections for the trip of a lifetime!

Ddd studio3d@ccwebster.net


Posted by studio3d@ccgmail.net at 3:22 PM PDT
Sunday, 10 June 2007
Source for 3D art projects
Now Playing: Canon 3D Papercraft
Topic: Web resources

Today I'm sharing another great site for printing art projects. Canon has put together Creative Park (http://cp.c-ij.com/english/index.html) with topics and projects grouped under the headings of

Greetings - cards, stationery, envelopes;

Scrapbook - paterened papers, tags, photo frames, borders, fonts;

Calendars - insert your own photos;

Photo gallery - hundreds of beautiful photos to download for use in your projects;

Photo style - teaches you to be a better photographer;

and my personal favorite 3d Paper Craft - dozens of projects to print and construct. In the animal category:

How about a 3D Black Lab 1/2 the size of the real dog, complete with red bandana? Maybe you'd prefer to make emperor penguins? These and others are completely formed 3D models. Others are available in simpler models that just fold over at the top along a 'seam line'.

Under Craftown you can download and print all the parts for a complete city with over 30 parts and pieces.

The general category of 'items' has such projects as a Chinese Dragon, Dharma dolls, Lucky cats, and a Chinese boat.

Having an Italian dinner? Go to the section on architecture and you can whip up a Leaning Tower of Pisa centerpiece! Or just on a whim you can reconstruct the Statue of Liberty, the Sydney Opera House, the Sphynx or dozens of other projects.

The science section features several dinosaurs as well as a globe, star chart, and sundial.

Teddy bears, airplanes, cars and games are featured in the 'toys' category. I think the wedding bears would be a nice centerpiece for a bridal shower.

The origami tab brings up scores of printed origami papers as well as papers printed for specific origami models. You can print a paper and fold as instructed to end up with a rabbit with features already in place!

The Seasons section features many 3D cards, bunches of gift boxes, party goods such as decorations and masks and ornamentations.

You can spend a lot of time at this site followed by a lot of time constructing nifty things followed by a lot of time admiring the results and sharing them with your friends and family.

Go have some 3D fun!

Ddd studio3d@ccwebster.net


Posted by studio3d@ccgmail.net at 7:48 AM PDT
Saturday, 9 June 2007
More from the Parts & Starts bin
Now Playing: I finished the projects started earlier this week
Topic: workflow

Earlier this week I showed the process of working from my Parts & Starts bin to make a variety of cards from old junk mail, calendars, paint chips, and the like. I finished up a total of 6 cards from that session.

As a reminder, here are the scraps of things I started with:

This card was the one I finished that first day, without camera glare this time! It uses a travel brochure picture, large paint chip, strip of scrapbook paper scrap, printed cardstock, wire mesh, brads, seal from a Kahlua bottle, and a clear sticker, all on green textured cardstock. Only the brads and clear sticker are not 'salvage' items.

Card two uses a brochure illustration, a butterfly from a calendar cover, handmade paper, paint chip, blue tissue paper, and two cloth stickers. Although it does not show by looking at the front cover, the interior cardstock is bright orange. I left the paint color of the paint chip showing at the bottom as it was appropriate to the theme. On this card, only the stickers were not salvage.

Next is a card made with a coaster from the Olive Garden restaurant, monoprint leaf paper, paint chips (2), grosgrain ribbon, printed scrapbook paper with text, and a rhinestone brad. The leaf paper was left over from some prints I made myself some years ago so the ribbon and the brad are the only non-salvage items.


Next up is a card that uses a travel brochure illustration, paint chip, handmade paper, copper tissue, vellum, clear sticker, and metal tape. Originally the colors all matched the photo but the whole thing was too bright for my taste. So I ran vellum thru the Xyron and sealed the illustration behind it. Then the edges didn't stick together well enough so I added the metal tape to bind it. The vellum was scrap as was everything else other than the sticker and the metal tape.

Here's a funky little card made with a catalog illustration, scrapbook papers (2), and stickers - two mock-3D and two fabric. I cut the scrapbook papers with a variety of circles and finished off with round punches. Three of the punches go right through the front cover of the card. Only the stickers were not salvage items.

This is my least favorite card. It uses a travel brochure illustration, paint chip, tissue paper, scrapbook paper, brads, clear sticker, and gold metallic marker. The brads and sticker were not salvage items.

So, having finished up 6 cards from that session, all the bits and pieces are sorted back to their scrap bins and the worktable is ready for a new project.

What will it be.....

Ddd

studio3d@ccwebster.net


Posted by studio3d@ccgmail.net at 8:02 AM PDT
Updated: Saturday, 9 June 2007 8:36 AM PDT
Friday, 8 June 2007
Sharing the Best of the Web
Now Playing: Here's a great site for projects to print
Topic: Web resources

I love finding resources on the Web that I can return to over and over, finding new things all the time. One such site is the Print Lab on the Epson website. At the url http://www.epson.com/cgi-bin/Store/PrintLab/pl_home.jsp?BV_UseBVCookie=yes&oid=0 you will find projects, background papers, products, and tips for using your color printer in scrapbooking and other paper crafting.

Click on the categories at the right of the screen and the featured projects in the center change. Right now there are a lot of features on graduation, summer parties, weddings, etc. but if you scroll all the way to the bottom and click on ‘view all projects’ you will get all of the projects in all categories from the beginning. Right now they are displaying projects 1-222 – that’s a lot of projects.

Don’t forget to visit again and again as they add projects all the time.

Later…

Ddd

studio3d@ccwebster.net


Posted by studio3d@ccgmail.net at 9:48 AM PDT
Updated: Friday, 8 June 2007 9:53 AM PDT
Thursday, 7 June 2007
Crafty Mysteries
Now Playing: read a mystery about your favorite crafts
Topic: reading

I like to be surrounded by crafts even in my leisure reading. Here are some authors that write a mystery book series where the protagonist is a crafter of some sort. Many of these books also contain craft tips in the text, in special tip boxes at chapter ends, or at the end of the book.

AUTHOR - CRAFT OR TOPIC

Bright, Elizabeth - Card Making

Bruce, Maggie - Gourd crafts

Cannell, Dorothy - Interior decorating

Childs, Laura - Scrapbooking

Ferris, Monica - Needlework

Fowler, Earlene - Quilting

Hellman, Libby - Photography

Hughes, Mary Ellen - Craft Corner

Ink, India - Bath and Body

Lind, Hailey - Art Lovers

Marberg, Peg - Interior decorating

Myers, Tim - Candlemaking

Myers, Tim - Soap making shop

Sefton, Maggie - Knitting

Smith, Barbara Burnett - Beading

So, pick out a craft related mystery for your reading pleasure.

Ddd


Posted by studio3d@ccgmail.net at 3:02 PM PDT
Wednesday, 6 June 2007
Parts & Starts
Now Playing: Playing with scrap materials
Topic: workflow

In the studio tour I mentioned having a "Parts & Starts" drawer. How many of you caught that??? How many of you understood that??? Well, here I am to explain it!

Whenever I run across something interesting that I think I might want to use in art some fine day I toss it in a bin I call Parts & Starts. These might include calendar illustrations, magazine ads, catalog clippings, travel brochures, neat things torn off of commercial cards, a bit of metal - those kinds of things.

When the drawer gets full or I feel like playing I take out the bin and spread stuff all over my work surface. Today I pulled out these things.

Then I start rearranging things into groups that look good together. Here are 4 groups of things that I matched up: First is a paint strip, a brochure from the credit union, and a butterfly from a calendar cover.

The second group is two different kinds of paint strips and a coaster from dinner at the Olive Garden.

 Group 3 is just a paint strip and an illustration from a travel magazine.

Group 4 is an illustration from a cruise brochure, the seal off the neck of a Kahlua bottle, and another paint strip. (By the way these large single-color paint strips I get from my local hardware store are peel and stick - made so you can apply it right to the wall and see how you like the color without painting).


To each of my groups of things I add coordinating bits from my supply drawers so I have a complete set of things to work from. For group 1 I added some handmade paper, tissue paper in both blue and yellow.


Group 2 picked up printed paper with writing, a leaf-printed handmade paper, and some grosgrain ribbon.

Group 3 got some orange handmade paper and copper tissue.

 Group 4 was the set I ended up working with today. I added some printed scrapbook paper, printed cardstock with a plaster-finish look, and a piece of wire mesh.

These elements were torn, trimmed and rearranged until I found a layout that I liked. Then I adhered them in place.

I then tore the right side of the grouping, trimmed up the other two sides and used green brads to adhere the wire mesh on three sides. This reaffirms the green in the photo and 'frames'  the collage. Finally, I it mounted on a folded green textured cardstock and added rub-on text as a title.

I will go back to my original groupings of supplies and finish them off in similar steps. When I am done, in a typical session, I might have anywhere from 6-12 cards to file for future use.

Start saving junk mail!

Ddd


Posted by studio3d@ccgmail.net at 3:56 PM PDT
Tuesday, 5 June 2007
My Secret Resource
Now Playing: web links sharing
Topic: Supplies

If you are one of those people who must buy ONLY name brand products from BIG name vendors, then today's topic is NOT for you. I buy craft supplies wherever I can get a deal and some of my favorite finds come from Dollar Tree and Big Lots!

I thought I'd share an online resource with you that has some things you would never know you needed if you didn't read their zany catalog entries. American Science and Surplus (www.sciplus.com) is a kick to read and I always find something interesting to buy. Here are some examples from their catalog today:

Sheets of 8 Fairy stickers on which the wings float free - 75 cents

Glass hole-less beads, clear plus a variety of colors available - $1 per 1 oz pkg

Mini-drill - $9.95

Quartz clock movements - $2.50

Microscope slides, box of 100 - $4.95   ! ! ! ! !

Aluminum canisters with clear tops: 1 1/4" = 20 for $5.95; 1 7/8" = 12 for $5.95; 2" (colored) = 12 for $7.95 (the small set comes in an aluminum box too!)

I have also purchased from them a pencil torch, wax carving tools, dental picks, glass vials with screw tops, and a host of other things. Now doesn't this make you want to run right over and buy, buy, buy?

See you tomorrow...

Ddd


Posted by studio3d@ccgmail.net at 3:33 PM PDT
Monday, 4 June 2007
A few Tips
Now Playing: Here are a few little tips for you
Topic: tips and tricks

I read a couple of tips this past month (can't remember which books/magazines) and put them into practice. Handy things...

1) Keep blank 3x5 file cards with you when you're reading your scrapbooking and other craft magazines. When you see a technique you want to try, a product to buy, a website you want to visit - just jot it down - one item per card. File these by topic and use as inspiration when your muse is having an off day.

I started doing this and now have consolidated lots of little torn scraps of paper into a useful file. I also clip out photos of neat card ideas and I tape these to cards for filing as well.

I started a separate file of scrapbook layouts. Many I had saved from the internet, some copied from magazines, some are photocopied, some are hand drawn. All ended up on file cards with a notation of how many photos the spread holds. I filed them with dividers for the number of photos.

2) I read a tip that you should get one of those lucite cubes of 3x3 papers and use them to off-stamp the extra ink left on your rubber stamp after making your chosen impression. What a great idea! It leaves a shadow of the impression and you can use these decorated papers to jot a quick note to include with mailings.

I already had a holder but the paper was all gone. I dug into my fancy scraps and cut small paper pieces down to 3x3 to put in the holder. Now I'm all ready to make some decorated note papers when I am stamping on a project.

3) When preparing to prick out a pattern for paper embroidery I tape two or three papers together. I can prick it out once and stitch up to three times. Usually by the end of three I am tired of the pattern but I rarely do anything exactly the same way twice. I usually prick out a dozen or so different patterns in multiples of each, with varying papers. When I am ready to stitch I can select the paper I want to work with and after completion I rotate to a different pattern.

That's it for today!

Ddd


Posted by studio3d@ccgmail.net at 9:25 PM PDT
Sunday, 3 June 2007
Scrapbooking
Now Playing: A few pages from my scropbooks
Topic: scrapbooking

I READ a lot about scrapbooking, I PLAN a lot about scrapbooking, but I haven't DONE a lot of scrapbooking. In fact, I have only done scrapbooks about our grand vacations (cruising and island trips). I do have a box crammed full of photos, binders, supplies, and ephemera from at least three other trips that I haven't gotten to yet.

 However, I thought I'd share some of the work that I HAVE done.

This page is from a trip to Tahiti. One afternoon a lady set up crafts on the beach. How could I NOT go play. She made available sun-reactive dye, cloth, and plastic templates of island motifs. We soaked the cloth in the dye and staked it out on the beach with protective layers beneath. Then we placed our selected templates over the cloth and went to play elsewhere for an hour. When we returned we rinsed the un-exposed dye out of the cloth and our pattern remained in white on our colored background. I love the color combinations on this page.

This next spread is also from Tahiti. The corners are from a calendar with antique map illustrations. The 'cloth' backgrounds are from a wallpaper sample book. I made the mini shopping bag from a Karen Thomas origami DVD. The photos were all matted with the same color to unify the spread.

Everywhere we went on Tahiti and Moorea there were beautiful tropical blooms. I took lots of photos of them and combined them all on one spread for impact. Each photo is bordered in the color of the flower. They are then arranged to separate the like colors from each other. I trimmed this up with pre-printed diecuts and punchout letters.

Some of my friends have seen the following before, but for those who aren't on any of the Yahoo lists I subscribe to - here is an idea I had to rebind one of my scrapbooks.

This is from our cruise to Alaska. The cruiseline gives out these canvas shopping bags to each cabin and I have collected a number of them. I tried to think of a way to include it IN the scrapbook but ended up cutting open the seams and using the front and the back separately to bind the covers of the scrapbook.

When the book is closed it looks like a scrapbook IN a bag.

But when you open the book the handles each go with their covers and the viewer is always surprised.

Here are views of the corners and of the spine showing how it all came together. I used Crafter's Pick The Ultimate glue. Only these inside edges are glued so the outside remains a giant pocket into which more stuff can be inserted.

Until later.

 Ddd


Posted by studio3d@ccgmail.net at 2:41 PM PDT
Updated: Sunday, 3 June 2007 3:16 PM PDT
Saturday, 2 June 2007
Studio Tour
Now Playing: Let's take a walk around Studio 3D

It's time for a little tour around the studio.

We'll start at the left of the door as you enter. Here is my 'digital' station. A color printer and scanner 'live' here. The laptop travels all over the house (and the world) with me, but comes here to print.

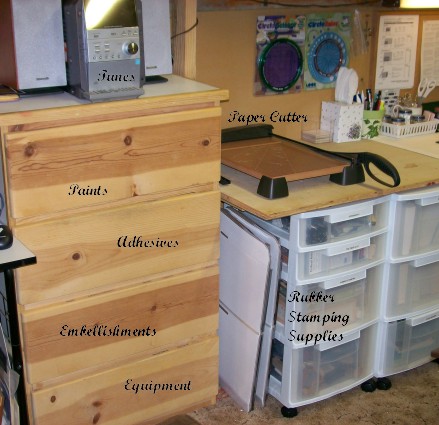
To the right of the digital station is my stereo (gotta have your tunes!) sitting on a dresser with supplies and small equipment. Continuing on to the right begins my seated workstation with the paper cutter. Underneath are Iris carts with rubber stamping inks and supplies, and polymer clay.

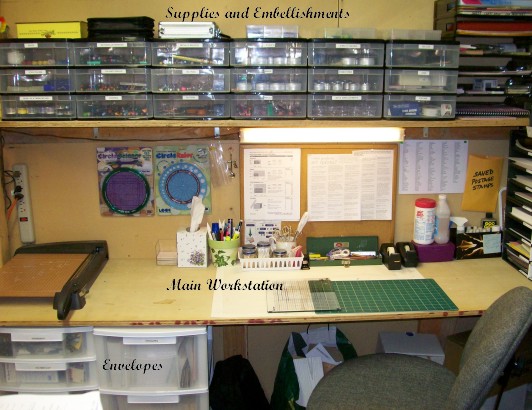
Here you see the rest of the workstation. The lower iris cart here contains envelopes sorted by size. On the back of the tabletop are things I use for nearly every project - scissors, pens, tape, x-acto knives, etc. On the wall, lighted from above, are mounted important references and my circle ruler and circle cutter. On the shelf above that I have mini-drawers with embellishments, pen &, pencils, colorants of all types, tags and die cuts, and postal materials.


This view turns the corner at the end of the room.  You can see that on the end of my seated workstation is a sorter with cardstock separated into color groups. I keep my box of finished cards on top, sorted by occasion, theme, or design. On the right is a metal cupboard with closeable doors. This is where I keep plastic bins of supplies such as punches, buttons, game pieces, rotary tools, stickers, napkins, acrylic paints, beads, etc. There is also a big plastic file box with patterns and instructions filed by topic. On top are some portfolios of artwork and photo clippings sorted by color group. The books on the left are waiting for altering.

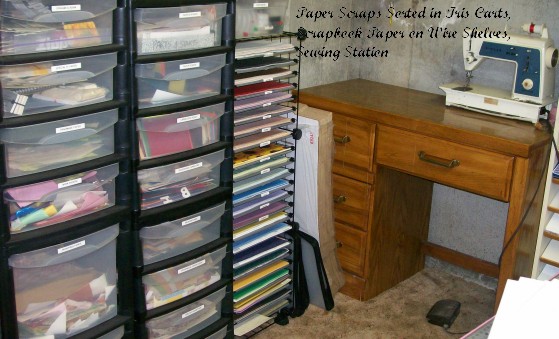
Now on the right of that are lots of iris carts where I have separated papers. I have drawers of asian papers, handmade, wrapping paper, tissue, cardstock scrap, paper scraps, backgrounds, scrapbook paper scraps, specialty papers, and what I call "wow" papers. Then I have a drawer called "parts and starts". To the right of the iris carts I have a wire rack holding 12 x 12 scrapbook papers sorted into color groups. Finally we come to another corner and find the sewing station.

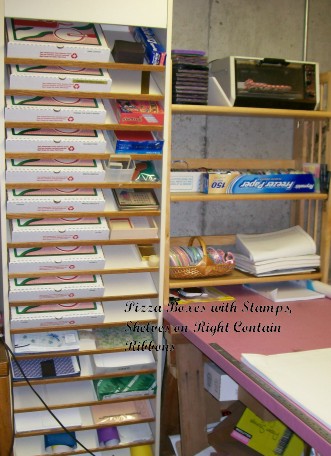
This slant-shelf cabinet is perfect for holding 12" pizza boxes in which I have rubber stamps (sorted by theme, of course). To the right of that is the end of my standing worktable on which I store ribbons and some scrap paper for gluing. There's my polymer clay oven as well.

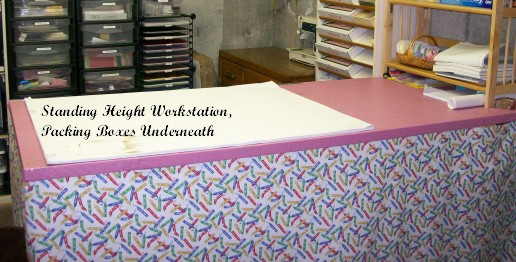
Here is a view of the standing-height worktable from the other side. Underneath I store mailing boxes of all sizes (probably the only thing in the room not 'sorted'! LOL!)

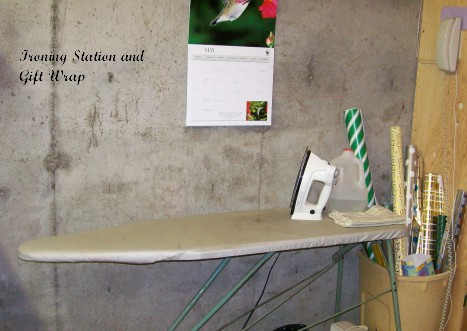
On past the table is the ironing station and wrapping paper storage.

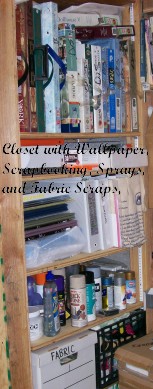
Then you come to the open closet. On the lefthand shelves I store supplies for handmade paper, wallpaper books, teaching materials, scrapbooking stuff, spray stuff like adhesives paints glitter etc, and fabric scraps.

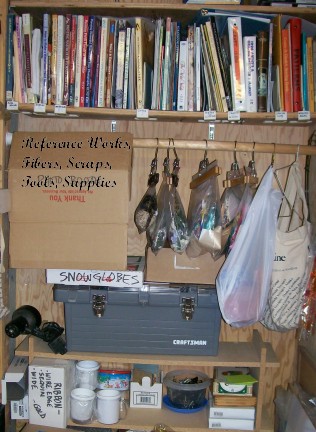
And then on the back of the closet I have my reference books, hanging bags of ribbon scraps, fibers, feathers, etc. Below that is my metalsmithing tool box, some project supplies, and then my 'gift cupboard'.

And after that you're back at the door - which I am not going to show because you've all seen a door before and this one is nothing special!

SO! Now you've had a look around to orient yourself and you'll be able to 'picture it' when I refer to bits and pieces in the future.

More later...

Ddd


Posted by studio3d@ccgmail.net at 8:04 PM PDT
Friday, 1 June 2007
Look who's talking!
Now Playing: A view of the author
Topic: Photo
Today I thought I'd give you a view of who owns the blog. This was shot by my DH at one of the local parks.

My Studio 3D name came about when I was in a jewelery design class at the community college and needed a moniker to sign my work. 3D represents my three initials. I decided as soon as I was married that there was no sense to having all those D's if I didn't make use of them! (Hard to find a monogram kit with enough to go around, though!)

I had, long before, been playing in the field of paper crafts without anything more than Ddd to identify finished products. So I began applying the Studio 3D label to everything I was working on: Paper crafts, Fiber art, Metalsmithing, Fine arts and painting, and Writing. When I took a class on HTML and web design I brought the name with me and designed the first logo. Two iterations later I have settled on this design with the block of 3 D's embedded.


So, there you have it. The story of Studio 3D...

More to come...

Ddd


Posted by studio3d@ccgmail.net at 8:25 AM PDT
Updated: Friday, 1 June 2007 8:41 AM PDT
Thursday, 31 May 2007
The opening salvo
Now Playing: On the first day of blogging...
Topic: Welcome to my Blog

Well I've jumped into the fray, thrown my hat in the ring, got my toes wet, and started a blog. What a lot of ways to get in trouble!

 The intention of this bit of cyberspace is to keep a diary of what's happening in Studio 3D - the part of my basement and the portion of my brain dedicated to creating art, crafts and writing.

 Watch this space for activities, scans of new creations and announcements of updates on my website.

 ...And welcome!

Ddd


Posted by studio3d@ccgmail.net at 9:30 AM PDT

Newer | Latest | Older