« June 2007 »
S M T W T F S
1 2
3 4 5 6 7 8 9
10 11 12 13 14 15 16
17 18 19 20 21 22 23
24 25 26 27 28 29 30
You are not logged in. Log in
Entries by Topic
All topics  «
3D paperwork
A - Z challenge 5
A - Z challenge 7
A - Z challenge round 4
A to Z challenge round 3
A to Z round 2
A to Z round 6
A-Z round 1
Around the House
Art Challenges
Artist Trading Cards
Backgrounds
Beads
Bible Journaling
Books
Boxes
Collage
Color Challenge
Coloring
cookbook
Die Cuts
Digital Projects
Digital Stamps
Drawing
Dry Embossing
Fabric Stuff
Fantastic Folds
Field Trip
Home Decor
How Does Your Garden Grow?
Hymnal Art
In The Kitchen
In the studio
Jewelry
Lettering
Links
Multi-Technique
Music to Work By
Musings
Nail Art
New Work
Online Class
Other Hobbies
Other Projects
Painting
Paper Embroidery
Paper Piecing
Photo
Pretty Paper
Quilting
Random
reading
Scrap Recovery
scrapbooking
Sewing
Sketch Challenge
Some Backlog
Stamping
Stencils
Stickers
Supplies
Teabag Folding
Techniques
Testing
tips and tricks
Tutorial
Web resources
Welcome to my Blog
Work By My Friends
workflow
Writing
Blog Tools
Edit your Blog
Build a Blog
RSS Feed
View Profile
Group One
In & Out of Studio 3D
Monday, 25 June 2007
Yep - I Did That, Too
Now Playing: Ceramic Box Painted in January 2007
Topic: New Work

We've been on a few cruises and lately have been cruising with a line that has 'Ceramics @ Sea'. They wheel out a trolly with blanks of plates, mugs, bowls, coasters, etc. and you choose an item to paint. They supply all the brushes, glazes, and some books that can be used for inspiration.

This is the box with lid that I painted last time out. It has a different aquatic scene on each side.

The crew takes them away for firing and there is a champagne reception on the last day of the cruise for the artists to meet and pick up their finished pieces.

Ddd studio3d@ccwebster.net


Posted by studio3d@ccgmail.net at 1:51 PM PDT
Updated: Monday, 25 June 2007 2:01 PM PDT
Sunday, 24 June 2007
Mindless Moments
Now Playing: Waste Time By Staying Busy
Topic: Web resources

Ever have one of those days when you don't want to do anything but veg out and waste time? Fortunately there are plenty of places on the Internet to assist you with this AND a couple of people ready and willing to help you find them!

One of our local radio stations posts daily (Monday through Friday) a 'work waster' designed to let you look busy at work while you actually waste time. Its a running gag they have, and sometimes their postings are useful, sometimes entertaining, and sometimes truly a waste of time. Check it out for yourself: http://www.1190kex.com/pages/pages/work_waster.php

Ddd studio3d@ccwebster.net  


Posted by studio3d@ccgmail.net at 9:07 AM PDT
Saturday, 23 June 2007
Paper Embroidery
Now Playing: Kokopeili in Stitches
Topic: New Work

Today we took a field trip in the car to have a look around about 50 miles south of us. As we drove the country roads, stopped to buy local strawberries, and did a bit of shopping, I took the time to do some card stitching. I finished these two up when I got home - making a polished stone background to enhance the thread and cardstock colors.

This is a pattern I got from a friend on the Paper Embroidery group.

Ddd studio3d@ccwebster.net  


Posted by studio3d@ccgmail.net at 6:28 PM PDT
Friday, 22 June 2007
Oriental Cards
Now Playing: Results of a challenge
Topic: New Work

One of the Yahoo groups I am on has a challenge this month to make an oriental card. I made two.


Both feature illustrations from a magazine called Taiwan Review. A variety of papers were used as backings and the 'grass cloth' is acutally from a wallpaper sample book.

Ddd studio3d@ccwebster.net  


Posted by studio3d@ccgmail.net at 7:18 AM PDT
Thursday, 21 June 2007
Written Resources
Now Playing: Manly cards
Topic: Books

If you are like the majority of the card making/giving world, and you find it difficult to find fresh ideas for men's cards the new book "Cards for Men and Boys" by Elizabeth Moad will be a refreshing resource for you. [David & Charles, 2006, ISBN 0-7153-2580-9]

The table of contents lists several generic topics followed by sports, indoor leisure, outdoor leisure, and special celebrations (milestones and holidays). Indexing is presented in two separate lists: topics and techniques. This way you can select your man's hobby and look for a card idea or look for instructions on a technique you want to try and be assured that the card presented will be man-suitable.

The book contains over 70 ideas including several templates. Even if you never duplicate any card exactly, you will have plenty of inspiration from which to make your own unique creation.

Ddd studio3d@ccwebster.net  


Posted by studio3d@ccgmail.net at 7:13 AM PDT
Wednesday, 20 June 2007
Handy Tools
Now Playing: Pick up a proportional scale and give it a whirl
Topic: Supplies

Here's a handy tool to have in your craft supplies...a proportional scale. There are three ways to use it:

1-When you have a picture or pattern of a given size and need it to fit in a smaller space. Find the measurement of the original on the inner circle. Rotate this inner circle till the starting measurement lines up with the desired finished measurements on the outer circle. Now, in the little 'window' you read the percentage reduction and this is what you will set on your copier.

2-When you have a set of instructions that are larger than you want to make. Line up as above on one known measurement and you will be able to easily find the matches for each of the subsequent parts of your instructions.

3-When you have a pattern that says to enlarge 125 percent you can tell what the finished size will be. Line up the line above the 'window' with the stated percent enlargement. Now look at the original size on the inner circle and you will see the finished size directly above it on the outside ring.

You can pick up your own proportional scale at photography, craft, and art stores for just a few dollars.

Ddd studio3d@ccwebster.net  


Posted by studio3d@ccgmail.net at 7:04 AM PDT
Tuesday, 19 June 2007
Mini Photo Album
Now Playing: They're all in their places with bright shining faces...
Topic: New Work

People are always asking me if I have pictures of my grandkids. Sure, on the walls...on my desk...on my computer...but NOT in my purse. It's heavy enough as it is!

Well, enough of that! I made this little book out of plastic slide mounts. Each photo has a 'window' of transparency to protect it and the whole is bound with ribbons glued to the spine with The Ultimate glue.


It's a very lightweight album to show off pictures of my 5 beautiful grandchildren.

Ddd studio3d@ccwebster.net  


Posted by studio3d@ccgmail.net at 6:42 AM PDT
Updated: Tuesday, 19 June 2007 3:55 PM PDT
Monday, 18 June 2007
New Summer Card
Now Playing: Run out and play!
Topic: New Work

Here's a card I did yesterday just for fun. I had this great flower-print grosgrain ribbon so I cut out a pair of flip-flops from yellow cardstock, punched three holes, and threaded the ribbon. It is glued to the back with Crafter's Pick The Ultimate glue. I added pink punch-out flowers with floral brad centers to the toe area. The flip-flops are then glued to the front of a 5.5 x 7.5 pink card. I used pink gel pen to 'stitch' around the outline of the shoes and added some summer stickers.

Ddd studio3d@ccwebster.net  


Posted by studio3d@ccgmail.net at 7:15 AM PDT
Updated: Monday, 18 June 2007 1:28 PM PDT
Sunday, 17 June 2007
Classy Trinket Boxes
Now Playing: These little trinket boxes make a great gift
Topic: New Work

I found these 2-inch ceramic boxes at www.orientaltrading.com for $14.95 per dozen (http://www.orientaltrading.com/application?namespace=search&origin=searchMain.jsp&event=button.search&Ntt=56%2F9206&Ntk=all&Ntx=mode%2Bmatchallpartial&N=0).

I used Ranger Industries alcohol inks...

...Alcohol, metallic marker, and a wood peg with velcro to hold a small felt pad.

With these supplies and tools I did the 'polished stone' technique (http://lumpystuff.com/article_ai2.htm) to end up with these finished products.

When the inks are fully dry I spray two coats of clear acrylic sealer to protect the artwork.

Ddd studio3d@ccwebster.net  


Posted by studio3d@ccgmail.net at 8:50 AM PDT
Saturday, 16 June 2007
Three New Cards
Now Playing: Inspiration from Rubberstampmadness
Topic: New Work

The new issue of Rubberstampmadness magazine had a neat topic in the Tips & Techniques column. I had to give it a shot!

The gist is to stamp a scenic or collage stamp with white ink on black cardstock and again with black ink on white cardstock. The white version is colored in and then torn top to bottom leaving a strip featuring the focal point.

The colored version is glued on the black and white version and the whole is trimmed and mounted on a card face. Here are three that I did.

For mine I used Staz-on inks on both versions. The white is glossy cardstock, the black is semi-gloss. I heatset the inks and used Marvy watercolor markers for the coloring.

Neat technique!

Ddd studio3d@ccwebster.net  


Posted by studio3d@ccgmail.net at 8:46 AM PDT
Friday, 15 June 2007
Stamp Out Art !
Now Playing: Design and Print faux postage
Topic: Web resources

Here's a fun little website to play at: http://www.stampitout.wildjelly.com/index.html

Stamp It Out is a simple postage stamp generator (not legal postage) where you upload your own image, select a country (for the correct postal markings), and generate a custom stamp. You can right-click to save the images - of a single stamp or a 'hand-held' group of 4 - or you can print up a full page of your images.

Images come complete with postage stamp edges and are as cute as can be!

By supplying your own image you choose whether you will be making a statement, commemorating an event, sharing your kid's art, or making a custom piece to include in a collage. What you CANNOT do with it is paste it on an envelope in lieu of legally purchased postage!

Here is the handheld view I made from one of my stitching cards.

Go - Play - Have Fun!

Ddd studio3d@ccwebster.net


Posted by studio3d@ccgmail.net at 10:06 AM PDT
Thursday, 14 June 2007
Work from the Studio
Now Playing: Some cards I have made recently
Topic: New Work

Today's entry will share some recent cards I have made.

This is the card DH will get for Father's day. I used wood grained cardstock as the base which is creased on the left face and split on the right face. Pictures of hinges were downloaded from the internet as well as the picture of the latch. I cut a hole in the latch and built a loop of cardstock underneath to slide into the hole. The lock is made of two ephemera stickers that I stuck back to back. I cut the loop at the side so it could be slipped on and off the latch allowing the card to open. Since the challenge was to make a card with brads or eyelets the latch and the hinges are attached with 'plus brads'. They were actually the inspiration for the entire card! The card is lined with the wood grained cardstock as well.

I made this card for a vellum challenge. I used two different colors of vellum in different widths and first punched a border along both edges of each. Then I ran them through the paper crimper. I mounted them on the card with foam tape under each layer and then added satin ribbon, also with foam tape. On the right I used vellum stickers to spell out LOVE and adhered silver peel-off stickers with hearts to link the letters together, Two hearts from the same sheet of peel-offs are added to the ribbon.

For a challenge to make a card with checks, I broke out lots of scrapbook scraps and made this little quilt card. The instructions for this card are on my website at http://mystudio3d.com/QuiltedCard.htm. I attached satin cord to the card and glued miniature closepins to the card as well. The quilt is held in the closepins and also glued to the card. Butterfly stickers were applied and flight-trails drawn in with Sharpie marker. The greeting is a silver peel-off colored with Sharpies to match the butterfly trails.

Finally, this paper embroidery card was made for a challenge to use this particular pattern (the pattern is actually just a single side border.) From the first time I saw the pattern it reminded me of bunting seen at a patriotic event so I broke out the red, white and blue. After pricking the borders on my red and blue cardstocks I glued down a length of white ribbon up the center of each border. Then I stitched over the top of it, blue and white on the red paper - red and white on the blue paper. After stitching I cut the blue to fit inside the borders on the red paper and designed the fireworks center. It is stitched in gold metallic thread and enhanced with gold round and star brads. After mounting on white cardstock I added gold star peel-off borders at the top and the bottom to tame the ends of the ribbons.

I hope you enjoyed the recent work coming out of my studio.

Ddd studio3d@ccwebster.net


Posted by studio3d@ccgmail.net at 6:51 AM PDT
Wednesday, 13 June 2007
Letterboxing
Now Playing: Search your community for hidden stamps!
Topic: Web resources

Here's a way you can combine rubber stamping, treasure hunting, and the family vacation! What fun idea is this? It is called 'letterboxing' - a lot like geocaching but with a rubber stamp as the hidden goal.

From the website for Letterboxing North America http://www.letterboxing.org/index.php comes this explaination:

"Here's the basic idea: Someone hides a waterproof box somewhere (in a beautiful, interesting, or remote location) containing at least a logbook and a carved rubber stamp, and perhaps other goodies. The hider then usually writes directions to the box (called "clues" or "the map"), which can be straightforward, cryptic, or any degree in between. Often the clues involve map coordinates or compass bearings from landmarks, but they don't have to. Selecting a location and writing the clues is one aspect of the art.

"Once the clues are written, hunters in possession of the clues attempt to find the box. In addition to the clue and any maps or tools needed to solve it, the hunter should carry at least a pencil, his personal rubber stamp, an inkpad, and his personal logbook. When the hunter successfully deciphers the clue and finds the box, he stamps the logbook in the box with his personal stamp, and stamps his personal logbook with the box's stamp. The box's logbook keeps a record of all its visitors, and the hunters keep a record of all the boxes they have found, in their personal logbooks."

The Letterboxing North America website has instructions for getting started, a glossary of terms, and a way to locate targets to search for by either text-based searching or by clicking on a US map for the area you want to search in.

I used the map method (look under the 'clues' tab) by clicking on my own state and then the city closest to me. This brought me to a complete list of the letterboxes in my area. A quick scan down the cities for my own, and off I went to read some clues. I did my searching from my armchair and, working my way through the clues, could walk right to any one of the three I read up on. One fine day this summer I plan to create a letterboxing journal, assemble a kit, and start collecting those rubber stamp impressions from my local area.

My children both live in different states than I so I can plan some letterboxing when I go on family visits as well.

Other letterboxing sites include Atlas Quest at http://www.atlasquest.com/, Letterboxing in New Zealand at http://www.psychokiwi.org/letterboxing/nzboxing.htm Many others can be found by searching 'letterboxing' in Google.

Ddd studio3d@ccwebster.net  


Posted by studio3d@ccgmail.net at 7:15 AM PDT
Tuesday, 12 June 2007
Interactive Color Wheel
Now Playing: Play with color before even picking up a tool
Topic: Web resources

Are you feeling a bit blue? A few clicks of the mouse will help you find a color to complement it!

There is a great interactive color wheel for you to play with at  http://www.paintquality.com/color/colorwheel.html

There is a tab called Color Combinations that lets you click on various of the primary colors as well as white and black to see what effect they have when combined with other colors.

The Color Schemes tab highlights on the color wheel the patterns for Analogous, Complementaries, Split Complementaries, Tetrads, and Triads.  Within any of these color schemes you can rotate the color wheel to see the results.

Other controls show the wheel as reference colors, with their Shades, Tones, and Tints.

Confused? Click on the Glossary tab for definitions of all the terminology used.

Explore color and get back in the pink!

Ddd studio3d@ccwebster.net


Posted by studio3d@ccgmail.net at 6:27 AM PDT
Monday, 11 June 2007
Sailing Away on the SS Reflections
Now Playing: Terrific e-zine for stampers and scrappers
Topic: Web resources

Hi all -

Let me share with you the best e-zine I have found! SSReflections is an on-line stamping and scrapbooking magazine that runs on the theme of a cruise ship sailing from port to port around the world.

Different decks and lounges feature the variety of techniques and interests in these hobbies and are exceptionally well presented by a variety of 'crew members'. They cover the gamut from traditional to digital scrapping, stamping arts to altered arts with many related topics covered in each monthly issue.

Their own website describes itself this way

SS Reflections Ezine
www.ssreflections.com  

If you are joining us for the very first time, let me explain what S.S. Reflections is. We are a completely FREE online magazine for you with a truly unique concept. SSR is a virtual cruise ship from the Golden Era here to entertain you as we visit a new country/port each month. We have an amazing crew who create designs and share ideas with you each month from various areas of the ship. Our fly-out menu bar, to the left, can take you anywhere on the ship that you would like to be. It will guide you through each deck on this magnificent ship! If you'd like to read each and every feature, at the bottom of each page is a blue arrow and our click to link which will take you to the next page to read as though you were turning a page of a paper magazine! Each page is linked to the next. As mentioned above, we now have a Quick Links feature to help you get to where you want to go to next! We also have an into page for each deck which are listed in the Quick Links section. On these pages are ship's wheels with our crewmember's pictures inside - you can click on the wheel to read a short, fun bio for many of our designers. You can also click on the name of their room on the ship and it will take you directly to their article, or you can email each crewmember directly by clicking on their name! Please write to your favorite designer and be sure to let her know what you love about her and SSR!

They include lots of advertising, product reviews, reader challenges, contests, and more.

Sail away on SSReflections for the trip of a lifetime!

Ddd studio3d@ccwebster.net


Posted by studio3d@ccgmail.net at 3:22 PM PDT
Sunday, 10 June 2007
Source for 3D art projects
Now Playing: Canon 3D Papercraft
Topic: Web resources

Today I'm sharing another great site for printing art projects. Canon has put together Creative Park (http://cp.c-ij.com/english/index.html) with topics and projects grouped under the headings of

Greetings - cards, stationery, envelopes;

Scrapbook - paterened papers, tags, photo frames, borders, fonts;

Calendars - insert your own photos;

Photo gallery - hundreds of beautiful photos to download for use in your projects;

Photo style - teaches you to be a better photographer;

and my personal favorite 3d Paper Craft - dozens of projects to print and construct. In the animal category:

How about a 3D Black Lab 1/2 the size of the real dog, complete with red bandana? Maybe you'd prefer to make emperor penguins? These and others are completely formed 3D models. Others are available in simpler models that just fold over at the top along a 'seam line'.

Under Craftown you can download and print all the parts for a complete city with over 30 parts and pieces.

The general category of 'items' has such projects as a Chinese Dragon, Dharma dolls, Lucky cats, and a Chinese boat.

Having an Italian dinner? Go to the section on architecture and you can whip up a Leaning Tower of Pisa centerpiece! Or just on a whim you can reconstruct the Statue of Liberty, the Sydney Opera House, the Sphynx or dozens of other projects.

The science section features several dinosaurs as well as a globe, star chart, and sundial.

Teddy bears, airplanes, cars and games are featured in the 'toys' category. I think the wedding bears would be a nice centerpiece for a bridal shower.

The origami tab brings up scores of printed origami papers as well as papers printed for specific origami models. You can print a paper and fold as instructed to end up with a rabbit with features already in place!

The Seasons section features many 3D cards, bunches of gift boxes, party goods such as decorations and masks and ornamentations.

You can spend a lot of time at this site followed by a lot of time constructing nifty things followed by a lot of time admiring the results and sharing them with your friends and family.

Go have some 3D fun!

Ddd studio3d@ccwebster.net


Posted by studio3d@ccgmail.net at 7:48 AM PDT
Saturday, 9 June 2007
More from the Parts & Starts bin
Now Playing: I finished the projects started earlier this week
Topic: workflow

Earlier this week I showed the process of working from my Parts & Starts bin to make a variety of cards from old junk mail, calendars, paint chips, and the like. I finished up a total of 6 cards from that session.

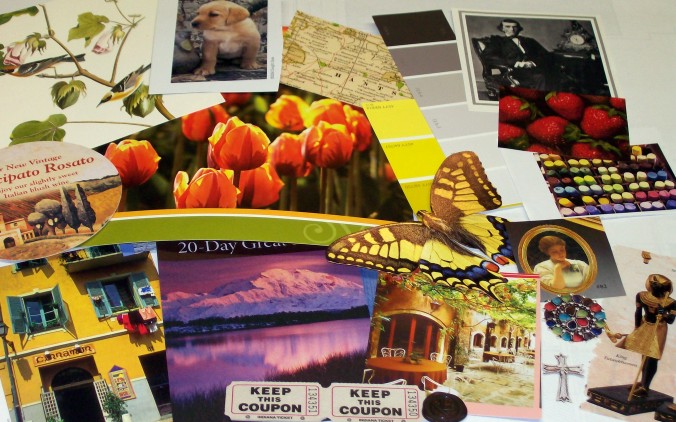
As a reminder, here are the scraps of things I started with:

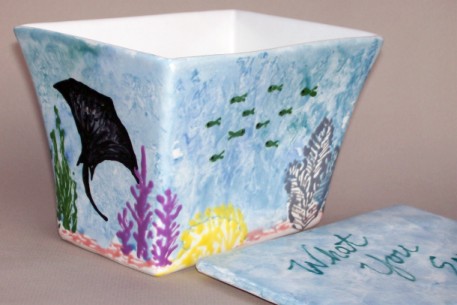
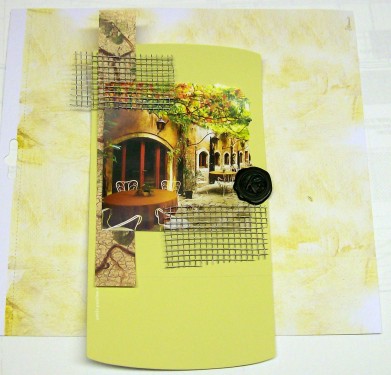
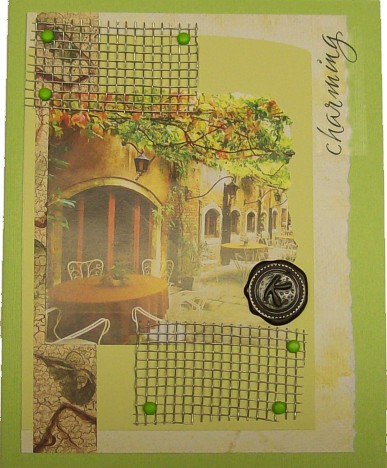
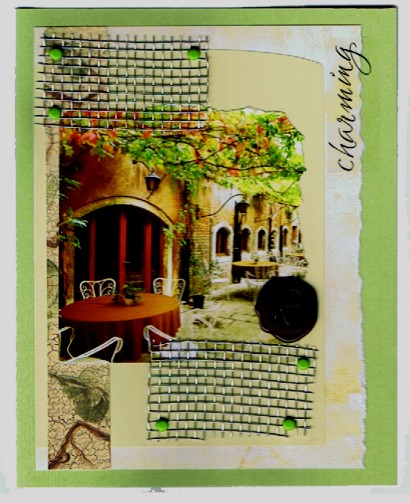
This card was the one I finished that first day, without camera glare this time! It uses a travel brochure picture, large paint chip, strip of scrapbook paper scrap, printed cardstock, wire mesh, brads, seal from a Kahlua bottle, and a clear sticker, all on green textured cardstock. Only the brads and clear sticker are not 'salvage' items.

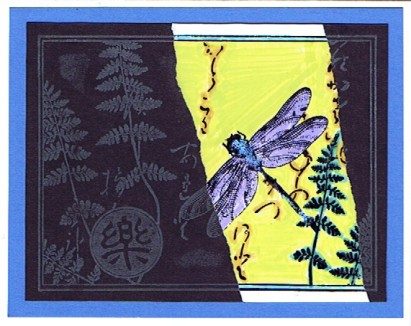
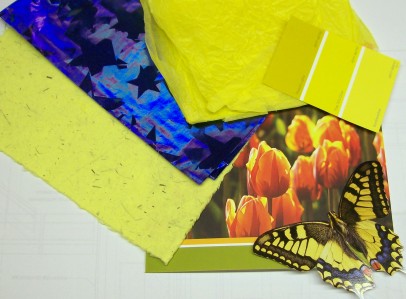
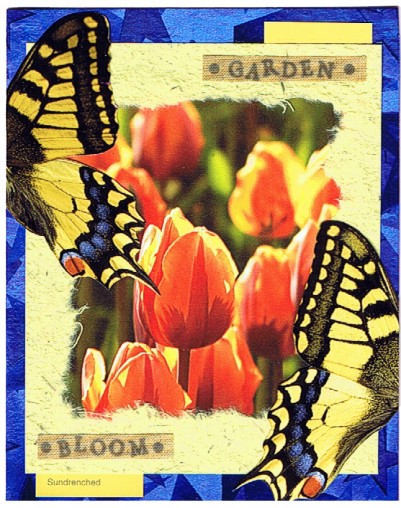
Card two uses a brochure illustration, a butterfly from a calendar cover, handmade paper, paint chip, blue tissue paper, and two cloth stickers. Although it does not show by looking at the front cover, the interior cardstock is bright orange. I left the paint color of the paint chip showing at the bottom as it was appropriate to the theme. On this card, only the stickers were not salvage.

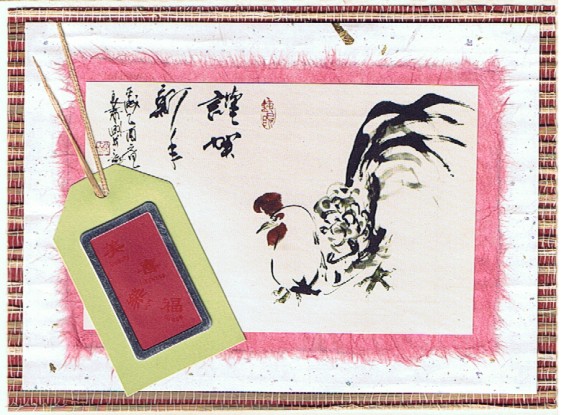
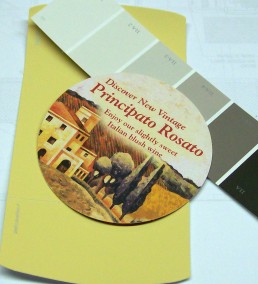
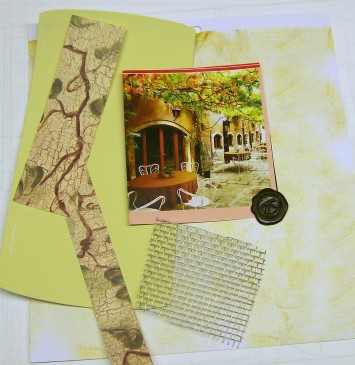
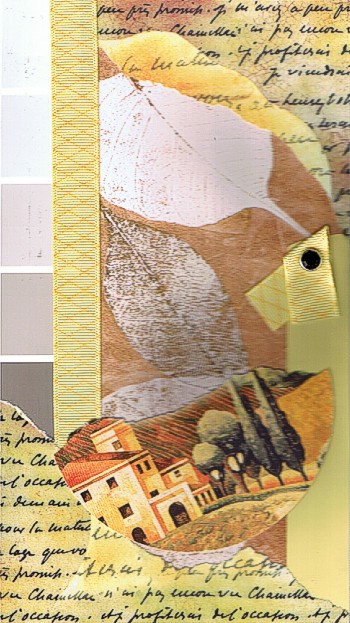
Next is a card made with a coaster from the Olive Garden restaurant, monoprint leaf paper, paint chips (2), grosgrain ribbon, printed scrapbook paper with text, and a rhinestone brad. The leaf paper was left over from some prints I made myself some years ago so the ribbon and the brad are the only non-salvage items.


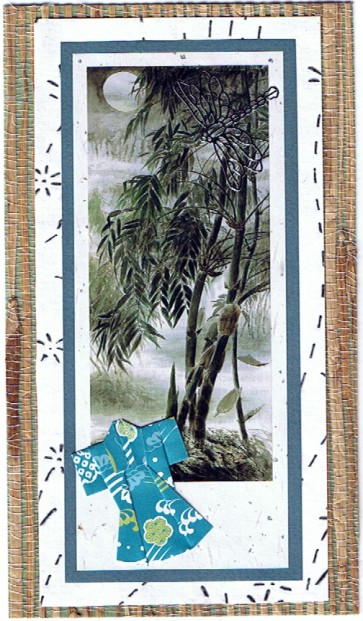
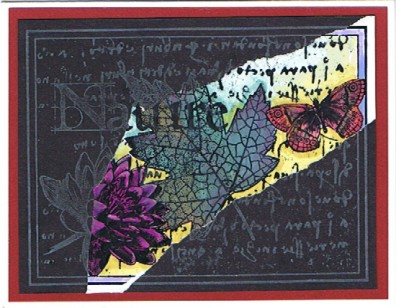
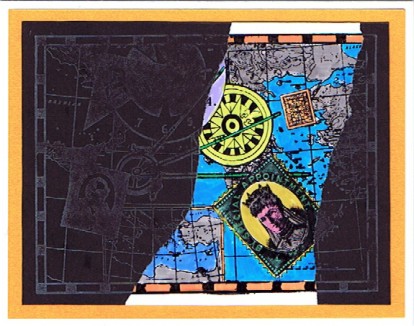
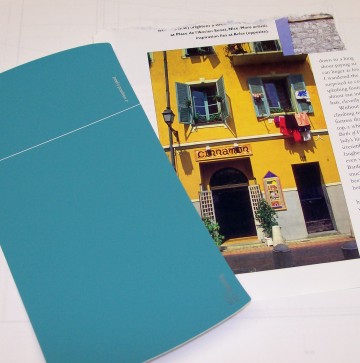
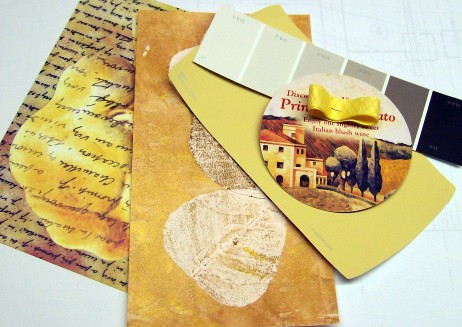
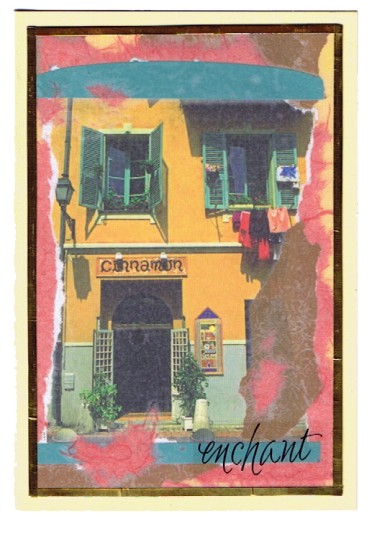
Next up is a card that uses a travel brochure illustration, paint chip, handmade paper, copper tissue, vellum, clear sticker, and metal tape. Originally the colors all matched the photo but the whole thing was too bright for my taste. So I ran vellum thru the Xyron and sealed the illustration behind it. Then the edges didn't stick together well enough so I added the metal tape to bind it. The vellum was scrap as was everything else other than the sticker and the metal tape.

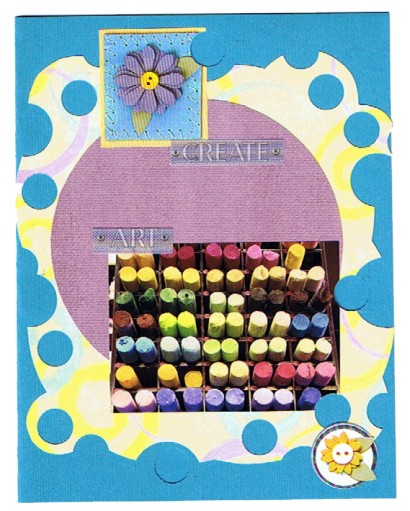
Here's a funky little card made with a catalog illustration, scrapbook papers (2), and stickers - two mock-3D and two fabric. I cut the scrapbook papers with a variety of circles and finished off with round punches. Three of the punches go right through the front cover of the card. Only the stickers were not salvage items.

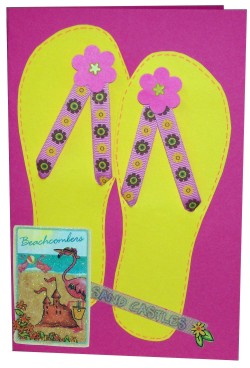
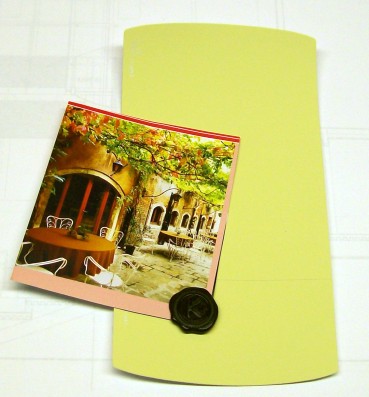
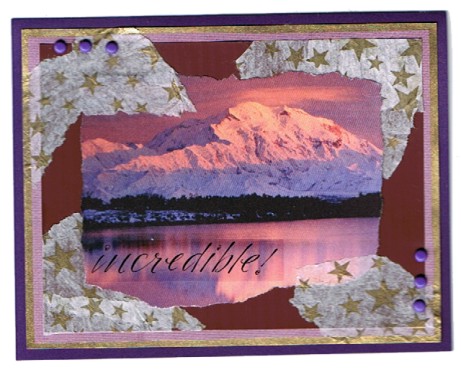
This is my least favorite card. It uses a travel brochure illustration, paint chip, tissue paper, scrapbook paper, brads, clear sticker, and gold metallic marker. The brads and sticker were not salvage items.

So, having finished up 6 cards from that session, all the bits and pieces are sorted back to their scrap bins and the worktable is ready for a new project.

What will it be.....

Ddd

studio3d@ccwebster.net


Posted by studio3d@ccgmail.net at 8:02 AM PDT
Updated: Saturday, 9 June 2007 8:36 AM PDT
Friday, 8 June 2007
Sharing the Best of the Web
Now Playing: Here's a great site for projects to print
Topic: Web resources

I love finding resources on the Web that I can return to over and over, finding new things all the time. One such site is the Print Lab on the Epson website. At the url http://www.epson.com/cgi-bin/Store/PrintLab/pl_home.jsp?BV_UseBVCookie=yes&oid=0 you will find projects, background papers, products, and tips for using your color printer in scrapbooking and other paper crafting.

Click on the categories at the right of the screen and the featured projects in the center change. Right now there are a lot of features on graduation, summer parties, weddings, etc. but if you scroll all the way to the bottom and click on ‘view all projects’ you will get all of the projects in all categories from the beginning. Right now they are displaying projects 1-222 – that’s a lot of projects.

Don’t forget to visit again and again as they add projects all the time.

Later…

Ddd

studio3d@ccwebster.net


Posted by studio3d@ccgmail.net at 9:48 AM PDT
Updated: Friday, 8 June 2007 9:53 AM PDT
Thursday, 7 June 2007
Crafty Mysteries
Now Playing: read a mystery about your favorite crafts
Topic: reading

I like to be surrounded by crafts even in my leisure reading. Here are some authors that write a mystery book series where the protagonist is a crafter of some sort. Many of these books also contain craft tips in the text, in special tip boxes at chapter ends, or at the end of the book.

AUTHOR - CRAFT OR TOPIC

Bright, Elizabeth - Card Making

Bruce, Maggie - Gourd crafts

Cannell, Dorothy - Interior decorating

Childs, Laura - Scrapbooking

Ferris, Monica - Needlework

Fowler, Earlene - Quilting

Hellman, Libby - Photography

Hughes, Mary Ellen - Craft Corner

Ink, India - Bath and Body

Lind, Hailey - Art Lovers

Marberg, Peg - Interior decorating

Myers, Tim - Candlemaking

Myers, Tim - Soap making shop

Sefton, Maggie - Knitting

Smith, Barbara Burnett - Beading

So, pick out a craft related mystery for your reading pleasure.

Ddd


Posted by studio3d@ccgmail.net at 3:02 PM PDT
Wednesday, 6 June 2007
Parts & Starts
Now Playing: Playing with scrap materials
Topic: workflow

In the studio tour I mentioned having a "Parts & Starts" drawer. How many of you caught that??? How many of you understood that??? Well, here I am to explain it!

Whenever I run across something interesting that I think I might want to use in art some fine day I toss it in a bin I call Parts & Starts. These might include calendar illustrations, magazine ads, catalog clippings, travel brochures, neat things torn off of commercial cards, a bit of metal - those kinds of things.

When the drawer gets full or I feel like playing I take out the bin and spread stuff all over my work surface. Today I pulled out these things.

Then I start rearranging things into groups that look good together. Here are 4 groups of things that I matched up: First is a paint strip, a brochure from the credit union, and a butterfly from a calendar cover.

The second group is two different kinds of paint strips and a coaster from dinner at the Olive Garden.

 Group 3 is just a paint strip and an illustration from a travel magazine.

Group 4 is an illustration from a cruise brochure, the seal off the neck of a Kahlua bottle, and another paint strip. (By the way these large single-color paint strips I get from my local hardware store are peel and stick - made so you can apply it right to the wall and see how you like the color without painting).


To each of my groups of things I add coordinating bits from my supply drawers so I have a complete set of things to work from. For group 1 I added some handmade paper, tissue paper in both blue and yellow.


Group 2 picked up printed paper with writing, a leaf-printed handmade paper, and some grosgrain ribbon.

Group 3 got some orange handmade paper and copper tissue.

 Group 4 was the set I ended up working with today. I added some printed scrapbook paper, printed cardstock with a plaster-finish look, and a piece of wire mesh.

These elements were torn, trimmed and rearranged until I found a layout that I liked. Then I adhered them in place.

I then tore the right side of the grouping, trimmed up the other two sides and used green brads to adhere the wire mesh on three sides. This reaffirms the green in the photo and 'frames'  the collage. Finally, I it mounted on a folded green textured cardstock and added rub-on text as a title.

I will go back to my original groupings of supplies and finish them off in similar steps. When I am done, in a typical session, I might have anywhere from 6-12 cards to file for future use.

Start saving junk mail!

Ddd


Posted by studio3d@ccgmail.net at 3:56 PM PDT

Newer | Latest | Older