« April 2008 »
S M T W T F S
1 2 3 4 5
6 7 8 9 10 11 12
13 14 15 16 17 18 19
20 21 22 23 24 25 26
27 28 29 30
You are not logged in. Log in
Entries by Topic
All topics  «
3D paperwork
A - Z challenge 5
A - Z challenge 7
A - Z challenge round 4
A to Z challenge round 3
A to Z round 2
A to Z round 6
A-Z round 1
Around the House
Art Challenges
Artist Trading Cards
Backgrounds
Beads
Bible Journaling
Books
Boxes
Collage
Color Challenge
Coloring
cookbook
Die Cuts
Digital Projects
Digital Stamps
Drawing
Dry Embossing
Fabric Stuff
Fantastic Folds
Field Trip
Home Decor
How Does Your Garden Grow?
Hymnal Art
In The Kitchen
In the studio
Jewelry
Lettering
Links
Multi-Technique
Music to Work By
Musings
Nail Art
New Work
Online Class
Other Hobbies
Other Projects
Painting
Paper Embroidery
Paper Piecing
Photo
Pretty Paper
Quilting
Random
reading
Scrap Recovery
scrapbooking
Sewing
Sketch Challenge
Some Backlog
Stamping
Stencils
Stickers
Supplies
Teabag Folding
Techniques
Testing
tips and tricks
Tutorial
Web resources
Welcome to my Blog
Work By My Friends
workflow
Writing
Blog Tools
Edit your Blog
Build a Blog
RSS Feed
View Profile
Group One
In & Out of Studio 3D
Monday, 21 April 2008
H is for Hand
Topic: A - Z challenge 5

The hands of this ballerina are my theme focus. This is a 3D element where each framed area is another layer. The hands were the most difficult to cut out! 

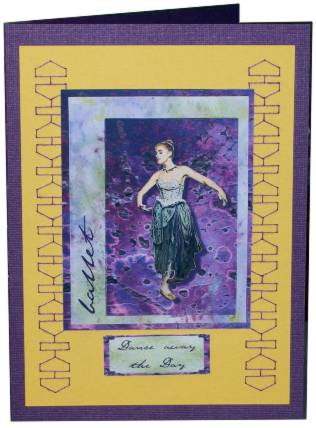
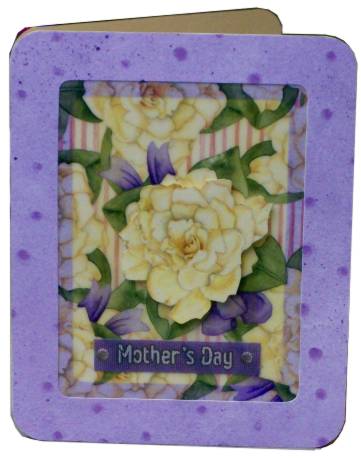
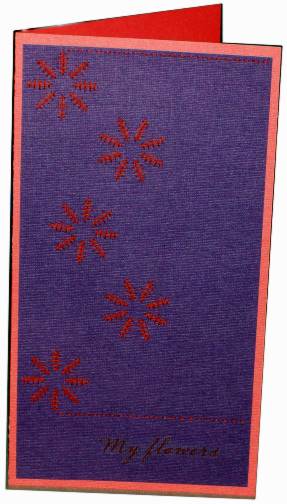
In actuallity, this card was orriginally designed around the stitched border as an assignment for a swap. I designed the border and stitched it in purple on yellow and then went looking for a center piece for it.

Ddd studio3d@ccwebster.net


Posted by studio3d@ccgmail.net at 6:00 AM PDT
Sunday, 20 April 2008
G is for Gold
Topic: A - Z challenge 5

A kit I worked on recently had gold hot glue and rubber stamps to make faux wax seals. I did mine on a craft sheet , melting the glue with a heat gun. When melted I pressed the stamp into the puddle and allowed it to cool. Then I peeled the stamp off and hit the glue quickly with the heat gun to bring up the shine. 

Ddd studio3d@ccwebster.net


Posted by studio3d@ccgmail.net at 6:00 AM PDT
Saturday, 19 April 2008
F is for Foiling
Topic: A - Z challenge 5

I used dryline adhesive around the edges of yellow cardstock and applied foiling to match the foil 3D unit in the center. The flowers are stitched on a pattern created with a Crealies template. I used thread colors to echo the 3D.

Unfortunately, you don't get the full effect of the 3D and the edges being foil in a scan or photo.

Ddd studio3d@ccwebster.net


Posted by studio3d@ccgmail.net at 6:00 AM PDT
Friday, 18 April 2008
E is for Endearing
Topic: A - Z challenge 5

Aren't these the most adorable little baby shoes? The pattern is from Stampington Studio. They go together so easily and are shown here a little larger than life size. 

I used pearl headed brads to hold the straps.

Ddd studio3d@ccwebster.net


Posted by studio3d@ccgmail.net at 6:00 AM PDT
Thursday, 17 April 2008
D is for Dawn
Topic: A - Z challenge 5

This is another all-digital creation. The background photo was taken 'at sea' on our last cruise. The Christ figure was photographed in the courtyard of the cathedral in Mazatlan.

Hills and crosses were digitalized using masks in PhotoPaint. Text was added in CorelDraw.

I used these as Easter cards this year.

Ddd studio3d@ccwebster.net


Posted by studio3d@ccgmail.net at 6:00 AM PDT
Wednesday, 16 April 2008
C is for Caramel
Topic: A - Z challenge 5

Not having a graphic that depicts caramel and not being incline dto cook up a batch as a project I decided to go with 'caramel' as the color theme. I then used Caramel alcohol ink to color some faux leather scraps, drew the boots on with Sharpie marker and cut out. Woodgrain scrapbook paper, a focal paper and some stickers finish this off.

The boots are attached with silicone adhesive.

Ddd studio3d@ccwebster.net


Posted by studio3d@ccgmail.net at 6:00 AM PDT
Tuesday, 15 April 2008
B is for Bow
Topic: A - Z challenge 5

Gingham ribbon was used to tie these bows - three separate bows on a single long strip. A Cuttlebug embossing was sanded to expose the white core. The flower fairy was given three flower brads to hold, each with a rhinestone center.

This was made for a challenge which allowed only yellow and white.

Ddd studio3d@ccwebster.net


Posted by studio3d@ccgmail.net at 6:00 AM PDT
Monday, 14 April 2008
A is for Alcohol Ink
Topic: A - Z challenge 5

I played with alcohol inks in three ways while making projects for Easter. 

The first is using regular hard-boiled eggs. On these I used the polished stone technique. These will be used for hiding and hunting NOT for eating so the alcohol ink is OK.

Next I used glass egg ornaments and coated the inside with alcohol ink. These I turned upside down so the extra could drain out. When Dry I used tweezers to fill them with irridescent ultra-fine Easter grass.


The last set I also used alcohol ink inside but when it was dry I put a coordinating color of Pearl-Ex powder inside and shook to coat it. This makes a really rich coloring of the glass egg.

Ddd studio3d@ccwebster.net


Posted by studio3d@ccgmail.net at 6:00 AM PDT
Sunday, 13 April 2008
Z is for Zig-Zag
Topic: A - Z challenge round 4

The sticky-backed rick-rack trim used on the tree and the border are the title element for this card. The tree was salvaged from an old card as well as the greeting.  The striped background is scrapbook paper.

Ddd studio3d@ccwebster.net


Posted by studio3d@ccgmail.net at 6:00 AM PDT
Saturday, 12 April 2008
Y is for Yarn
Topic: A - Z challenge round 4

This little sweater is made from sticky-back yarn that I got at Big Lots some time back. I placed braids of it side by side and then cut around the sweater shape (separate cutting for the sleeves.)  I used some button brads down the front and then the parts were then pieced together.

The text is rub-on letters that look like stitching. I applied them to green and cut out, then matted with yellow. The yellow cardstock was trimmed out with 'doodle' lines in green.

Ddd studio3d@ccwebster.net


Posted by studio3d@ccgmail.net at 6:00 AM PDT
Friday, 11 April 2008
X is for Xerographic
Topic: A - Z challenge round 4

Photocopies of architectural elements were tinted with distressing inks and a bruch. I used a square punch to make all the squares the same size and mounted on black. This is double-matted on lavender and buff. 

The lavendar text is a clear sticker.

Ddd studio3d@ccwebster.net


Posted by studio3d@ccgmail.net at 6:00 AM PDT
Thursday, 10 April 2008
W is for Wiggle
Topic: A - Z challenge round 4

Google eyes? Wiggle Eyes? I'm not sure of their 'technical name!'

I've had the instructions for this little snowman in my idea file for ages. He is made from craft sticks, painted and trimmed up with elements using silicon glue. 

The carrot is drawn on cardstock and cut out. The hat trim is ribbon and the very cold mouth is letter beads.

Ddd studio3d@ccwebster.net


Posted by studio3d@ccgmail.net at 6:00 AM PDT
Wednesday, 9 April 2008
V is for Vellum
Topic: A - Z challenge round 4

The rose printed vellum is mounted over a purple mat and a second larger mat is placed on top. Rounded corners and a second rose mounted above the central image on foam tape give this an elegant finish. 

The text is a fabric sticker.

Ddd studio3d@ccwebster.net


Posted by studio3d@ccgmail.net at 6:00 AM PDT
Tuesday, 8 April 2008
U is for Used
Topic: A - Z challenge round 4

I sorted through a large collection of used postage stamps and found these 4 with the same theme and coordinating colors. I used a basket-weave wrapping paper for background and layered it over another pastel not in the stamp colors. 

The text block is a sticker.

Ddd studio3d@ccwebster.net


Posted by studio3d@ccgmail.net at 6:00 AM PDT
Monday, 7 April 2008
T is for Tea
Topic: A - Z challenge round 4

When I think of the words "tea" and "crafts" together  I get either 'tea-staining' or 'teabag folding'. You can bet that teabag folding is more up my alley so this is where I let it take me.

This cards layers include: blue print scrapbook paper, white mulberry paper with gold threads, violet mulberry paper, glittered paper, and ribbon - all selected to reflect the colors of the medallion.

A clear text sticker was layered onto more of the white mulberry and mounted at the top for balance.

Ddd studio3d@ccwebster.net


Posted by studio3d@ccgmail.net at 6:00 AM PDT
Sunday, 6 April 2008
S is for Shaving Cream
Topic: A - Z challenge round 4

A simple way to make marbelized backgrounds is to use a tray of shaving cream and drop ink from reinkers onto it. A skewer is used to stir around the inks into swirls and then a piece of glossy cardstock is gently pressed onto the surface, pulled away and wiped clean with paper towels.

Here are a few from my session: 

Here are three cards I made from other sheets in this session:


Ddd studio3d@ccwebster.net


Posted by studio3d@ccgmail.net at 6:00 AM PDT
Saturday, 5 April 2008
R is for Rainbow
Topic: A - Z challenge round 4

Well...not an actual rainbow - but a rainbow of colors! 

I designed this stitching pattern for a card embroidery challenge.

Ddd studio3d@ccwebster.net


Posted by studio3d@ccgmail.net at 6:00 AM PDT
Friday, 4 April 2008
Q is for Quirky
Topic: A - Z challenge round 4

This is a little off-beat! The first decision that sent the card in this direction was to stitch with orange thread on the purple cardstock. Then I decided to try a new stitch on the petals and the card started to look like art I had done in the 70s! 

I added some bands of sinple stitching and then mounted on orange cardstock to match the stitching. The text is a sticker.

Ddd studio3d@ccwebster.net


Posted by studio3d@ccgmail.net at 6:00 AM PDT
Thursday, 3 April 2008
P is for Paste Paper
Topic: A - Z challenge round 4

I made this paste paper background with purple tinted paste over green cardstock. I stamped with a handcarved dragonfly while the paste was still wet. 

For the card, I placed a silver peel-off dragonfly over each impression, mounted on purple card and trimmed the borders with more peel-off. The text is also a sticker.

Ddd studio3d@ccwebster.net


Posted by studio3d@ccgmail.net at 6:00 AM PDT
Wednesday, 2 April 2008
O is for Ornament
Topic: A - Z challenge round 4

These modular origami balls use 6 units made from 3 1/2 inch squares. I made mine of floral scrapbook paper to give them a vintage look. Here you see all three of them on their hangers made of wire.

Here is a close-up of one ornament.

These are sturdy enough that they could have some potpouri placed inside and they could be tucked in a drawer with delicate garments.

Ddd studio3d@ccwebster.net


Posted by studio3d@ccgmail.net at 6:00 AM PDT

Newer | Latest | Older