« August 2009 »
S M T W T F S
1
2 3 4 5 6 7 8
9 10 11 12 13 14 15
16 17 18 19 20 21 22
23 24 25 26 27 28 29
30 31
You are not logged in. Log in
Entries by Topic
All topics  «
3D paperwork
A - Z challenge 5
A - Z challenge 7
A - Z challenge round 4
A to Z challenge round 3
A to Z round 2
A to Z round 6
A-Z round 1
Around the House
Art Challenges
Artist Trading Cards
Backgrounds
Beads
Bible Journaling
Books
Boxes
Collage
Color Challenge
Coloring
cookbook
Die Cuts
Digital Projects
Digital Stamps
Drawing
Dry Embossing
Fabric Stuff
Fantastic Folds
Field Trip
Home Decor
How Does Your Garden Grow?
Hymnal Art
In The Kitchen
In the studio
Jewelry
Lettering
Links
Multi-Technique
Music to Work By
Musings
Nail Art
New Work
Online Class
Other Hobbies
Other Projects
Painting
Paper Embroidery
Paper Piecing
Photo
Pretty Paper
Quilting
Random
reading
Scrap Recovery
scrapbooking
Sewing
Sketch Challenge
Some Backlog
Stamping
Stencils
Stickers
Supplies
Teabag Folding
Techniques
Testing
tips and tricks
Tutorial
Web resources
Welcome to my Blog
Work By My Friends
workflow
Writing
Blog Tools
Edit your Blog
Build a Blog
RSS Feed
View Profile
Group One
In & Out of Studio 3D
Monday, 17 August 2009
Best Wishes Blocks
Topic: Dry Embossing

This is probably my least favorite of all the cards I've made in a long time.

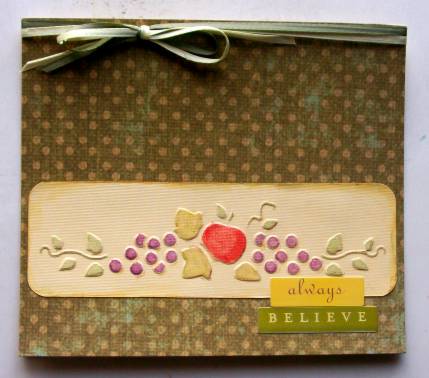
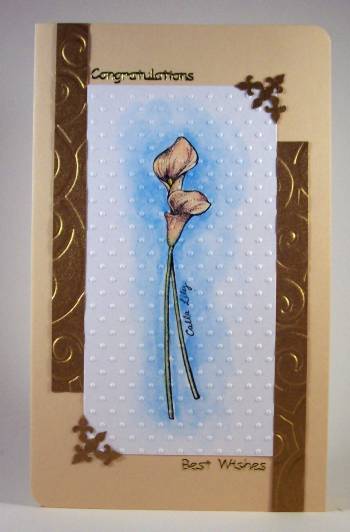
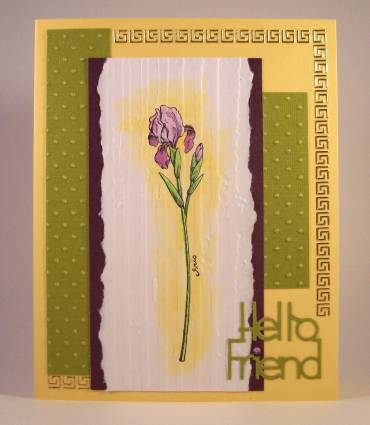
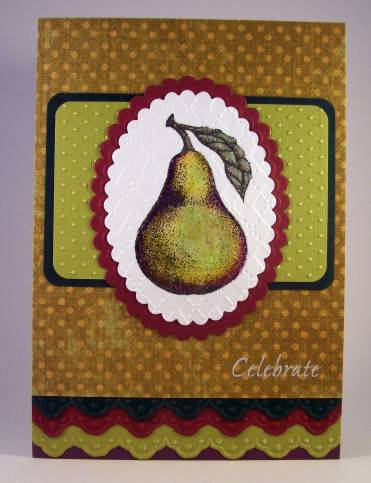
I started with the brass stencil in the Cuttlebug and then tapped an inkpad onto the raised areas. Although I found two papers that carried the color theme, they don't have enough contrase and the pattern of the checked paper is too large.

After wrestling with this for quite a while I finally decided to add the ribbon to give it some boundaries and did some line-work around the spotted papers.

It still wasn't enough so I added gold peel-off corners and a gold greeting. 

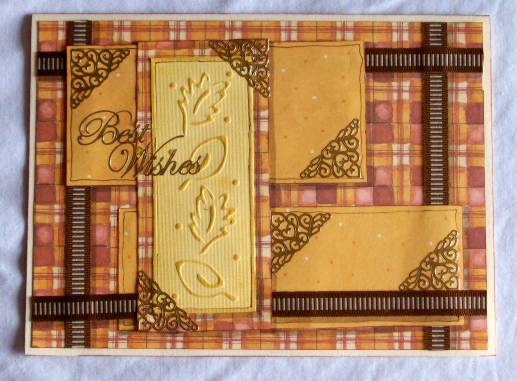
I think I basically wasted a lot of supplies just trying to make the embossed panel work - and it was made from a scrap in the first place!

Whadda ya think? Trash or treasure?

Ddd


Posted by studio3d@ccgmail.net at 6:00 AM PDT
Sunday, 16 August 2009
Purple Happiness
Topic: Dry Embossing

I decided to go with "topics" in the header that were more descriptive of the techniques used instead of the the more general 'new work'. It's basically ALL new work at this point, as I have no more backlog to post.

I used a brass stencil that I cut for myself years ago and used the Cuttlebug to impress it into textured paper with a metallic sheen. I then used a Fiskars corner punch that also embosses. A very pale Sharpie was used to color the raised portions of both. 

White mulberry paper was torn for the backing piece. I also crumpled it before adhering. I made a ribbon slide from more of the purple paper and applied rub-on letters for the text - doesn't that lettering style fit perfectly?

Sheer purple ribbon was laced through the slide and knotted at each end. Everything was mounted to a dark purple cardstock using glue dots.

Ddd


Posted by studio3d@ccgmail.net at 6:00 AM PDT
Saturday, 15 August 2009
Quilting Butterflies
Topic: New Work

I embossed these butterflies onto a metallic finished blue paper with the Cuttlebug and a brass stencil, then trimmed around. The backing paper was emossed into ridges with the Scor-It to create a diamond pattern.

I applied half-pearls at each intersection for a little elegant touch.

The greeting is a white rub-on.

Ddd


Posted by studio3d@ccgmail.net at 6:00 AM PDT
Friday, 14 August 2009
Fruit Stencil
Topic: New Work

I realized that I had several brass stencils in my supplies and that I had read they could be used in the Cuttlebug. So I pulled them out and made several impressions using a variety of papers and cardstock. Some were successful, some not so much. Lighter papers tore :-(

This was done on a light textured cardstock, hand colored with colored pencils and waterbrushed to blend. 

I mounted to cardstock covered with a spotted paper, added two stickers and used two ribbons to tie a bow up top.

Ddd


Posted by studio3d@ccgmail.net at 6:00 AM PDT
Thursday, 13 August 2009
Iris All Tied Up
Topic: New Work

I may be close to winding down this series of stamped and colored card styles. But here is what today brings. The orange cardstock perfectly matched the flower coloring. Before attaching them together, though, I tied three bows around the orange with some green satin ribbon. Each bow then got a 'drop' of orange rhinestone as an accent. 

The focal unit was then attached to a white card base and I added a text sticker in a coordinating green tone.

Ddd


Posted by studio3d@ccgmail.net at 6:00 AM PDT
Wednesday, 12 August 2009
Lily With a Twist
Topic: New Work

This lily went through the Swiss Dots Cuttlebug folder after coloring. The tan cardstock was chosen for the match to the flowers.

I started shuffling scraps from the paper cutter and hit on the fold embossed stripes to apply to each side. They were shorter than the cardstock background which led to their offset placement. Then the other two corners were just left hanging out there so I used a corner punch to make some matching corner trims. 

I added a gold peel-off greeting at the top and at the bottom for balance and then used the corner rounder on two opposing corners of the card base.

Ddd


Posted by studio3d@ccgmail.net at 6:00 AM PDT
Tuesday, 11 August 2009
Rejoice!
Topic: New Work

I started this with just the white folded cardstock and embossed the front. The sticker came next and it was a little too much color in all that sea of white so I chose the colors from the sticker and did light watercolor washes over the raised areas of the image. 

The last step was to add silver peel-off borders along the sides.

Simple, but elegant.

Ddd


Posted by studio3d@ccgmail.net at 6:00 AM PDT
Monday, 10 August 2009
On the Edge
Topic: New Work

I should have taken into consideration the difficulty of photographing whites and pastels before embarking on this long journey of card-making with rubber stamps!

After stamping and watercoloring the image I ran it throught the Distressed Stripes folder for texture. Punching the corners of the green panel allowed me to tuch the corners of the white panel into it. Then I trimmed the right edge with a border made with a Fiskars border punch.

Attached to a folded white card base it left a white block on the left which I filled with a silver peel-off greeting.

The text looked odd just hanging out there so I added some stripes of silver to anchor it.

Ddd


Posted by studio3d@ccgmail.net at 6:00 AM PDT
Sunday, 9 August 2009
Pink on a Field of Hearts
Topic: New Work

I embossed this colored stamping with the Hearts Cuttlebug folder. A simple frame of yellow to bring out the color of the flower and a pink folded card base to bring out the pink on the painting. 

The text is a thick acrylic sticker.

Ddd


Posted by studio3d@ccgmail.net at 6:00 AM PDT
Saturday, 8 August 2009
Hello, Iris!
Topic: New Work

I liked the texturing of the stamped and colored iris from a couple of days ago so I did it again. Different paint job and differeint embossing folder, though. I used Weathered Wood for this one.

In keeping with the distressed look of the stripes, I tore the side edges and then backed with purple card to bring out the flower's color. Two scraps of green card were embossed with the Swiss Dots folder and I used a Cuttlebug die to cut out the greeting. 

The greeting fot a rhinestone to dot the 'i' and I bordered the open areas with some gold peel-off sticker.

Ddd


Posted by studio3d@ccgmail.net at 6:00 AM PDT
White Out
Topic: New Work

No color on this one. Just many layers of white embossed with various Cuttlebug folders and a couple of die cuts. The butterfly is mounted 3D and I went to town with the clear rhinestones for embellishment. 

Ddd


Posted by studio3d@ccgmail.net at 6:00 AM PDT
Texture and Color
Topic: New Work

Yep, more watercolor pencils on rubber stamped images. This one I put through the Cuttlebug script folder and then went nuts creating lots of white layers with different folders. On each I used just a hint of color on the raised portions to create depth and coordinate with the image.

I  cut a couple of butterflies with Spellbinders dies and embossed those, too. Then they are mounted with pop-dots to raise the wings up. I punched the corners of the one colored layer (purple). 

No text is added so it stays simple and clean.

Ddd


Posted by studio3d@ccgmail.net at 6:00 AM PDT
Friday, 7 August 2009
Blue Pear
Topic: New Work

You really can't see very well that I embossed the pear with the Swirls folder. It is raised on pop-dots over the Swiss Dots background. The text is two layers of cutting from a Cuttlebug die. 

I used three rhinestones - obviously to dot the 'i's' and one in the center of the bloom on the pear.

Ddd


Posted by studio3d@ccgmail.net at 6:00 AM PDT
Wednesday, 5 August 2009
Crispy Pear
Topic: New Work

To me there are two things that always make me thing 'crisp': the color white and Swiss Dots. So, white dots surrounding a green pear must be really crisp! 

What I want to know is "where is all the green in this card?" Trust me - this card is NOT brown and gold as it appears here. It is lime green (pear and cardstock rectangle) and moss green (dotted paper)

I placed some snippets of grosgrain ribbon at the right edge of the focal piece and then added lime green floral brads as accent.

After adhering all together I added a green tag with white rubons and placed white round brads as accents.

Ddd


Posted by studio3d@ccgmail.net at 6:00 AM PDT
Monday, 3 August 2009
How About a Round of Tulips?
Topic: New Work

These 'stained glass' stamps look especially nice when you blend the colors. I think it makes them look more radiant.

I wanted to add more 'interest' to this piece so I selected a green corrugated cardstock, a piece of paste paper, and a purple scallop. The scallop is set up on pop-dots to add some dimension.

One long clear sticker was mounted on pink card and cut into three. Then I backed each with more of the purple and attached to the card front with rhinestone dragonflies for 'bullets'.

Ddd


Posted by studio3d@ccgmail.net at 6:00 AM PDT
Updated: Saturday, 18 July 2009 6:47 PM PDT
Sunday, 2 August 2009
Dancing With Iris
Topic: New Work

After stamping and coloring this iris I ran it through the Cuttlebug folder with Script. WOW! I love this!

I pulled out three scrapbook papers that matched the colors of the center piece and used one of my stock of personal sketches for layout. The red was pretty bright so that was used for framing. 

Three rhinestones pull out the pink from the flower and two text stickers were combined for the message.

Ddd


Posted by studio3d@ccgmail.net at 6:00 AM PDT
Saturday, 1 August 2009
Textured Fruit
Topic: New Work

Stamped and colored with pencils, this pear was then cut with scalloped nestabilities and embossed with the Argyle Cuttlebug folder.  I backed this with the larger scalloped oval and then cut a bunch of embossed elements to put together.

The light green rectangle is embossed with Swiss Dots, and three colors of cardstock have a border folder embossed and then cut along the raised edges. 

The dotted backing paper and all the rest of the elements were selected to reflect the colors in the pear. Then I added a white rub-on greeting and finally I used Glossy Accents over the fruit to shine it up.

Ddd


Posted by studio3d@ccgmail.net at 6:00 AM PDT
Friday, 31 July 2009
Noel Nativity
Topic: New Work

I stitched up my pattern with metallic green Sulke thread and added Stickled halos to both mother and child. I cut shimmery red cardstock and punched the corners to tuck the stitching into.

This printed cardstock has ultrafile glitter on the berries and parts of the branches so it fit well with the parts I had already put together. I just folded it, cut to fit, added the art, and then finished with a 3D sticker. 

Ddd


Posted by studio3d@ccgmail.net at 6:00 AM PDT
Thursday, 30 July 2009
Bachelor Buttons
Topic: New Work

This card was planned almost to the last detail before I ever stamped the flowers! That NEVER happens! I usually just 'go with the flow' and I'm as surprised as anyone else how things turn out.

But when I picked up this stamp I visualized it stamped as a bouquet and with buttons for the centers. I 'scribbled' colored pencils loosely following the lines of the stamp and brushed over them with a water brush. The panel was trimmed and mounted on cardstock with a top fold.

I found three buttons of the same style and color but of different sizes. I decided to do the size variation to keep with the casual feel. Then I tied ribbon through the holes and applied them with sticky dots. 

Clear corner stickers echo the colors and the greeting is a clear puffy acrylic sticker.

A 'dream' come true!

Ddd


Posted by studio3d@ccgmail.net at 6:00 AM PDT
Wednesday, 29 July 2009
Row Upon Row Border Punch
Topic: New Work

Well, I really 'went to town' with the frills for this card. The back layer was border punched, then a liner which was inset from the back, then the front which was inset from that. When it is closed it forms three layers of border in contrastinc colors.

Then I layered the focal piece on the same paper as the card liner and rounded the corners. 

I added clear floral corner stickers to frame up the image. There was not enough contrast between the image and its backing paper so I ran a line of colored pencil around it and then wet it to blend.

Here in the closeup you can see that border better as well as how the punched edges line up when the card is closed.

I added the greeting with small gold peel-off stickers.

Ddd


Posted by studio3d@ccgmail.net at 6:00 AM PDT

Newer | Latest | Older