« November 2009 »
S M T W T F S
1 2 3 4 5 6 7
8 9 10 11 12 13 14
15 16 17 18 19 20 21
22 23 24 25 26 27 28
29 30
You are not logged in. Log in
Entries by Topic
All topics  «
3D paperwork
A - Z challenge 5
A - Z challenge 7
A - Z challenge round 4
A to Z challenge round 3
A to Z round 2
A to Z round 6
A-Z round 1
Around the House
Art Challenges
Artist Trading Cards
Backgrounds
Beads
Bible Journaling
Books
Boxes
Collage
Color Challenge
Coloring
cookbook
Die Cuts
Digital Projects
Digital Stamps
Drawing
Dry Embossing
Fabric Stuff
Fantastic Folds
Field Trip
Home Decor
How Does Your Garden Grow?
Hymnal Art
In The Kitchen
In the studio
Jewelry
Lettering
Links
Multi-Technique
Music to Work By
Musings
Nail Art
New Work
Online Class
Other Hobbies
Other Projects
Painting
Paper Embroidery
Paper Piecing
Photo
Pretty Paper
Quilting
Random
reading
Scrap Recovery
scrapbooking
Sewing
Sketch Challenge
Some Backlog
Stamping
Stencils
Stickers
Supplies
Teabag Folding
Techniques
Testing
tips and tricks
Tutorial
Web resources
Welcome to my Blog
Work By My Friends
workflow
Writing
Blog Tools
Edit your Blog
Build a Blog
RSS Feed
View Profile
Group One
In & Out of Studio 3D
Thursday, 12 November 2009
The Inspiration of Memories
Topic: Dry Embossing

After this was embossed with a brass stencil in the Cuttlebug I trimmed it down and used a straw colored distress ink pad to tine the raised portions. These same lines were traced out with a gold-toned Stickles.

The green piece is an alcohol ink test piece from another project. These are layered onto a green textured folded card base. 

I used cardstock text stickers from two different sets to finish it off. The 'button' in the lower corner is a part of the sticker.

Ddd


Posted by studio3d@ccgmail.net at 6:00 AM PST
Wednesday, 11 November 2009
Slice of Life
Topic: In The Kitchen

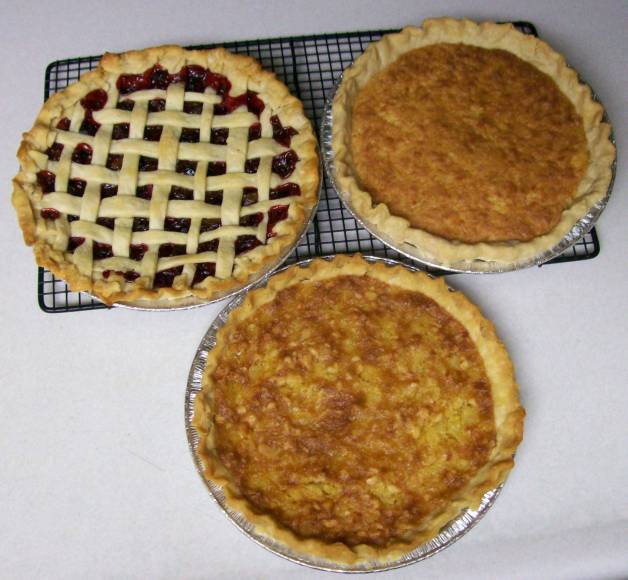
Three pies, hot from the oven, ready for a trip to a pie auction. Together, they sold for $100!

Just in case YOU want a pie worth $30-$35 I'll give you the recipies for them. They are CRANBERRY (upper left), COCONUT MACAROON (upper right), and PINEAPPLE-MACADAMIA (lower).

OIL PASTRY - (thanks, Mom!) makes one crust - do not double

In bowl combine 1 cup all-purpose flour and 1/4 cup vegetable oil. Stir with a fork until blended and crumbly. Sprinkle with 2 tablespoons chilled water. Sitr until it comes together and forms a ball. Wrap in plastic wrap and place in fridge for 10 minutes. When chilled roll out between two pieces of plastic wrap.


CRANBERRY PIE

  • 3 cups fresh cranberries, washed and sorted
  • 1 cup golden raisins
  • 1 cup packed brown sugar 
  • 1/2 cup water
  • 2 tablespons flour
  • 1/4 cup orange juice
  • 1 teaspoon orange peel

Combine in a saucepan and bring to a boil. Lower heat to medium low and boil, stirring often, for 10-15 minutes, till thickened. Remove from heat and stir in 1 teaspoon vanilla extract.

Pour into a 9" unbaked pie shell and dot top with 2 tablespoons of butter or margarine. Add a lattice top as this pie needs lots of venting.

Bake at 450 degrees for 10 minutes. Then turn oven down to 350 degrees and continue baking for another 35 minutes.


COCONUT MACAROON PIE

  • 1 1/2 cup sugar
  • 2 eggs
  • 1/2 teaspoon salt
  • 1/2 cup soft margarine
  • 1/4 cup flour
  • 1/2 cup milk
  • 1 1/2 cup coconut

Mix all ingredients. Pour into a 9" unbaked pie shell. Bake at 325 degrees about 1 hour, till golden brown.


PINEAPPLE-MACADAMIA NUT PIE

  • 1/2 cup butter or margarine
  • 1 cup sugar
  • 3 eggs
  • 1/4 cup dark corn syrup
  • 1/4 cup flour
  • 1/2 teaspoon vanilla extract
  • 1 8-oz can crushed pineapple, drained
  • 1/2 cup macadamia nuts, chopped finely

Cram together the butter and sugar. Add eggs one at a time and continue beating. Add corn syrup, flour, extract, pineapple and nuts. Pour into 9" unbaked pie shell.

Bake at 350 degrees for 40 to 50 minutes, until firm.


Enjoy!

Ddd


Posted by studio3d@ccgmail.net at 12:01 AM PST
Updated: Wednesday, 11 November 2009 5:05 PM PST
Tuesday, 10 November 2009
Single Rose Garden
Topic: Paper Embroidery

Working from one of my own patterns I stitched this rose on red scrapbook paper, trimmed it out and then used chalks to color the background.

The background is a printed cardstock from a pad and I added rub-on borders. 

I found this white sticker in my stash and the text was perfect. I used Sharpies to color it in and then placed all on a folded yellow card base.

Ddd


Posted by studio3d@ccgmail.net at 6:00 AM PST
Monday, 9 November 2009
Happy Harvest
Topic: Stamping

Here's another stamped image but this time I cut it out and mounted it on a Nestabilities label diecut. I used a Cuttlebug diecut for the swirl and brackets. A lime green folded cardstock is the base and I used a Sharpie marker to doodle around the borders. 

The text is hand-lettered with Sharpie

Ddd


Posted by studio3d@ccgmail.net at 6:00 AM PST
Sunday, 8 November 2009
A Little Bit Flaky
Topic: Beads

I made a wire frame and used paper beads to create this snowflake ornament. This was a design I created in my sleep last week! Worked just as I dreamed it. 

Ddd


Posted by studio3d@ccgmail.net at 6:00 AM PST
Saturday, 7 November 2009
Glitter N Pink
Topic: Beads

Another paper bead necklace using silver spacers. The beads are made of gift wrap again. 

Ddd


Posted by studio3d@ccgmail.net at 6:00 AM PST
Friday, 6 November 2009
Precious Metal
Topic: Beads

I used a gold and a silver wrapping paper to make paper beads then strung them with two different glass beads to make a long necklace. I had not used beading wire before so the construction was a new process for me. 

Ddd


Posted by studio3d@ccgmail.net at 6:00 AM PST
Thursday, 5 November 2009
Time Goes By
Topic: Stamping

I framed this stamped image with a background piece made with alcohol inks. The aperture is cut with a die in the Cuttlebug and both the pieces are mounted on a coral cardstock base. 

The charms and the round sticker were covered with Glossy Accents to make them shiny.

Ddd


Posted by studio3d@ccgmail.net at 6:00 AM PST
Wednesday, 4 November 2009
Always Believe
Topic: Stamping

Simple and clean. Very little color was added to this stamp so it has a true watercolor effect. I added Stickles to the wings for glitter effect. All three layers were distressed with purple ink.

The text is a clear sticker. (how MANY times have I said that?!?!?)

Ddd


Posted by studio3d@ccgmail.net at 6:00 AM PST
Tuesday, 3 November 2009
Pale Shell
Topic: Paper Embroidery

The irridescent threads used to stitch this shell don't show up in photos but in real life they look fabulous. The crackle-finish scrapbook paper is mounted over a cream cardstock base and trimmed out with gold peel-off borders and a gold peel-off greeting.

Here is a different angle on the shell that shows the threads better.


Ddd


Posted by studio3d@ccgmail.net at 6:00 AM PST
Monday, 2 November 2009
There You Are
Topic: Stamping

For this stamp I used one of the Nestabilities label dies to cut and emboss its edges. Then I distressed the edges with Broken China distressing ink. Th backing piece is more of my paste paper and it overlays a blue folded card base, also distressed with Broken China ink. 

The circle text is a cardstock sticker.

Ddd


Posted by studio3d@ccgmail.net at 6:00 AM PST
Sunday, 1 November 2009
Friends
Topic: Stamping

Srarting with a stamped image, colored with watercolor pencils, I then cut it to shape and mounted on scrapbook paper over a purple folded cardstock base. 

Bands of rubons frame the sides and provide the text.

Ddd


Posted by studio3d@ccgmail.net at 7:00 AM PDT
Saturday, 31 October 2009
Happiness With You
Topic: Stamping

The framing piece for this stamping, colored with watercolor pencils, is a piece of paste paper I made a long time ago. I punched the corners and cut an aperture with a Nestabilities die. Orange floral brads adorn the corners and an orange folded card serves as the base. 

Two cardstock stickers furnish the text.

Ddd


Posted by studio3d@ccgmail.net at 6:00 AM PDT
Friday, 30 October 2009
Journey
Topic: Paper Embroidery

This stitched shell with verigated threads was cut to shape and placed on a background collaged with a variety of scrapbook papers. All are mounted on a blue folded card base. 

The text is a cardstock sticker.

Ddd


Posted by studio3d@ccgmail.net at 6:00 AM PDT
Thursday, 29 October 2009
Doodles Here, Doodles There
Topic: Stamping

I love junk mail. That's where I got this beautiful purple/blue background cardstock. I used Nestabilities round to cut the hole for the watercolor penciled floral to be mounted behind and then cut both together with the scallop die. I used a smaller scallop die for the text circle. The text is a stamp.

After mounting to white folded cardstock, with foam dots, the card was too plain so I started doodling with a fine-line marker. Dots, dashes, squiggles, and lines brought it all together.

Ddd


Posted by studio3d@ccgmail.net at 6:00 AM PDT
Wednesday, 28 October 2009
Glamorous Iris
Topic: Stamping

Choosing to color the iris stamp pink was the set-up for this card. I had some shiny pink paper that I embossed with a Fiskars texture plate in the Cuttlebug and cut both panels with square scallop Nestabilities dies. 

These are mounted to a pink folded card base along with a glossy text sticker.

Ddd


Posted by studio3d@ccgmail.net at 6:00 AM PDT
Tuesday, 27 October 2009
Pink Partridge
Topic: Stamping

Not your traditional Christmas colors, but pretty, I think. I colored with watercolor pencils and blended with a water brush. Handmade paper was crumpled and torn as a backing with button brads at the corners.

Kraft cardstock is folded as a base and a round thick acrylic sticker was centered over the tree trunk.

Ddd


Posted by studio3d@ccgmail.net at 6:00 AM PDT
Monday, 26 October 2009
A Blessing
Topic: Stamping

I colored this fall stamp with colored pencils and backed it with a plaid scrapbook paper and a green paper with a subtle stripe. 

This is mounted over an orange folded cardstock base.

The text (again) is a clear sticker.

Ddd


Posted by studio3d@ccgmail.net at 6:00 AM PDT
Sunday, 25 October 2009
Peace Arch
Topic: Stamping

I had a great background paper to use with this stamped image and decided to use it as a shape to look like more glass. I drew in some random lines to simulate leading. Then I used yellow distress ink to brush the edges.

I cut the yellow folded card base to an echoing shape. 


The text is a clear sticker.

Ddd


Posted by studio3d@ccgmail.net at 6:00 AM PDT
Saturday, 24 October 2009
Glowing Thanks
Topic: Stamping

This stamp was colored with watercolor pencils and blended with a water brush. A yellow border sets it off from the background made with alcohol ink and metallic marker on glossy cardstock. Another yellow layer borders this over the purple folded card base. 

I used a yellow Sharpie on a glossy sticker and applied that to the finished card.

Ddd


Posted by studio3d@ccgmail.net at 6:00 AM PDT

Newer | Latest | Older