Topic: Photo
What a beautiful view of a portion of the North Santiam River, south of Stayton Oregon.
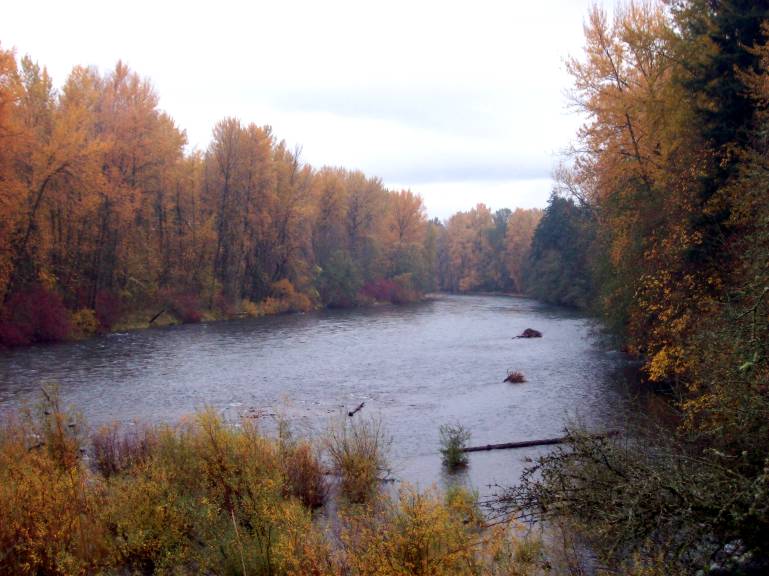
Enjoy the view!
Ddd
Posted by studio3d@ccgmail.net
at 6:00 AM PST
| « | November 2009 | » | ||||
| S | M | T | W | T | F | S |
| 1 | 2 | 3 | 4 | 5 | 6 | 7 |
| 8 | 9 | 10 | 11 | 12 | 13 | 14 |
| 15 | 16 | 17 | 18 | 19 | 20 | 21 |
| 22 | 23 | 24 | 25 | 26 | 27 | 28 |
| 29 | 30 | |||||
What a beautiful view of a portion of the North Santiam River, south of Stayton Oregon.
Enjoy the view!
Ddd
This a stitching from a free pattern that I have not done up before. Quick to stitch, I used Sulky thread in blue and buff on a creamy cardstock. The image was die cut and embossed with a Nestabilities shaped rectangle. A layer of blue cardstock, slightly larger, was corner rounded and then distressed.
I used a Cuttlebug embossing folder on the tan folded cardstock base and mounted the front image on foam tape.
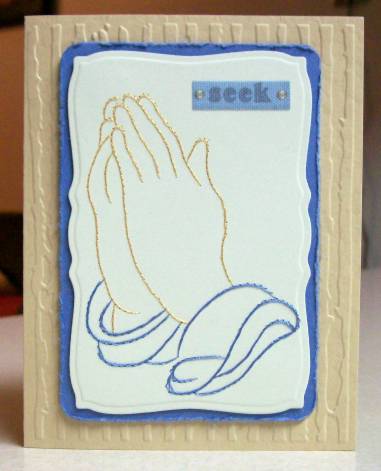
The text is a fabric sticker.
Ddd
The Hat is Back! After so many years of seeing no ink at all, this stamp is sure getting a workout lately. This time it is stamped and colored on white cardstock.
I pulled colors from the hat for the background papers and trims. The purple dotted paper has been stamped with violet borders and the same ink was used to stamp the greeting on a torn piece of torn scrapbook paper.
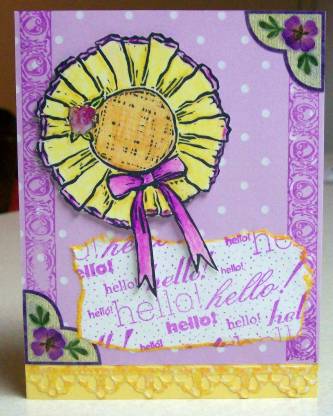
The bottom border is more from the die cut scrapbook paper and I used two stickers for the floral corners. As a finishing touch a rose sticker was adhered over the stamped rose on the hat.
Ddd
Father Christmas, courtesy of a catalog, just gives me a warm feeling about this card. I started with a dusky blue folded card base and used a gold marker to create a thick border. The next layer is a large rub-on. Then comes the feature fellow with his arms full of adorable critters.
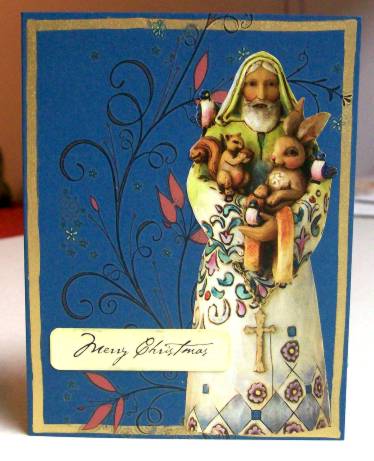
I used the gold marker on the figure's cross.
A thick clear acrylic sticker was layered on a frosted yellow cardstock and trimmed befoe applying on the card front.
Ddd
Mixing a little collage with die cuts and a bit of stamping, as well!
You might even recognize some of these elements as left-overs from other recent projects. LOVE that background paper... and the lacy trim, LOVE the shaped diecut centerpiece and the button brads.
LOVE the way all these elements came together!
Ddd
Another catalog image was clipped out for this card. I started with a white folded card base and added a layer of purple scrapbook paper. Over that a piece of white mulberry paper, cut on three sides and torn at the bottom.
The backdrop to the centerpiece is a Dazzles sticker as are the left and right borders.
Ddd
Way back when I started this blog I was using a lot of junk mail to make collage cards. Well, here we are again - full circle!
This angel with a cat is clipped from a catalog. I pulled matching scraps from my stash and layered torn and die cut pieces. The border on the right side is a rub-on.
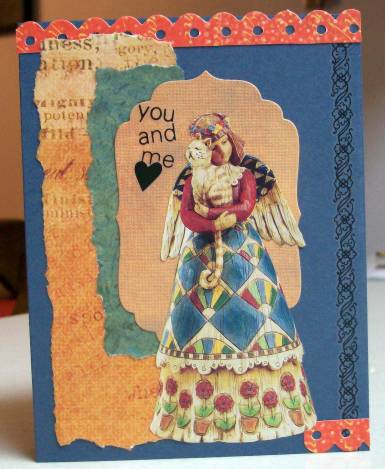
I used a rub-on for the text, separating and applying the words in my own arrangement.
Ddd
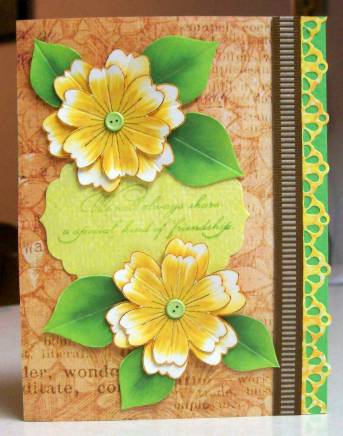
On a little studio clean-up project I found these left-over flowers printed from a sheet by Fred She Said. Layers from the bottom up:
Purple folded cardstock, vellum printed with gold dragonflies tied to cardstock with green ribbon, leaves creased with Scor-Pal, foldy flowers creased and layered with rhinestone brads.
The test is thick clear acrylic sticker.
Ddd
Wow, for somebody that says they 'don't do much stamping' there certainly seems to be a lot on my blog, huh?
After coloring this image with pencils I used a Nestabilities die to cut and emboss the edges, then cut and embossed the next larger size from a pink to match the flowers. Placing on a white card base with foam tape, I then used Cuttlebug dies to cut orange butterflies and a greeting.
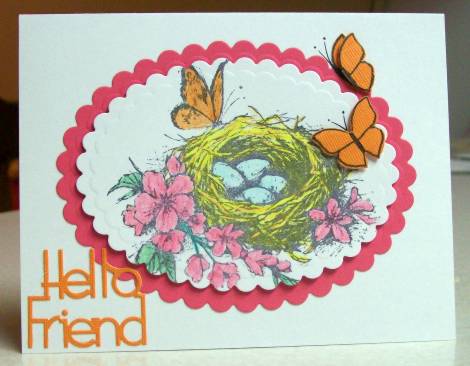
I drew around the butterflies with Sharpie and then cut one of them in half and refersed the wings. Both are mounted with foam and the Sharpie was used to draw in antennae.
Ddd
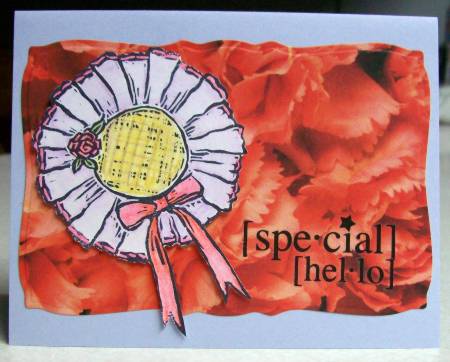
For all the 'light hand' I've applied to this stamp every other time, I really let loose on this one! I colored with bright, saturated colors and layered them heavily. A Nestabilities labels die was used to cut it out and I punched two small holes at the top to thread a ribbon through for a bow. Before tying I threaded a charm on the ribbon.
The coral folded cardstock was embossed with a Cuttlebug folder and the focal piece mounted on it with foam tape.
The text is a thick clear acrylic sticker.
Ddd
I modified the stitched pattern to make it fit on this card and used a crackle patterned scrapbook paper. I had decorative cardstock stickers that suited perfectly.
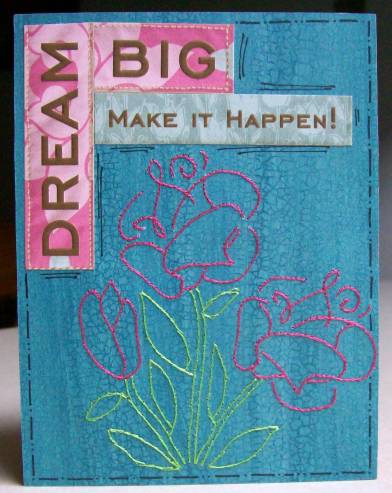
I used a Sharpie marker to add some doodling, as well.
Ddd
A little collage of printed papers sets a backdrop for this stamped image. I used a distress ink pad to bring the tones way down and unify them.
The stamped image is raised on foam dots and the text is a puffy acrylic sticker.
Ddd
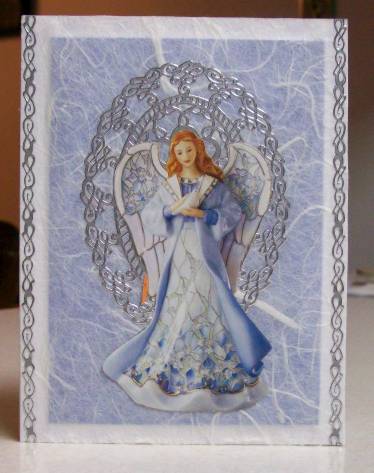
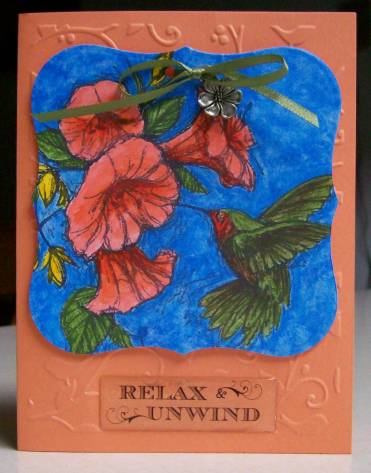
I got some decoratively cut papers in a sale pack and the yellow has this one fabulous border. Cool! So I placed it over lavender folded cardstock and then cut a lavender mottled circle into shapes to frame out the top of the card. Silver borders are echoed in the upper corner swirls and the silver script greeting.

All this is to show off the subtle colors in the stamped floral image. I covered the 'window' with shiny tape to reinforce the feeling of it being made of glass.
Ddd
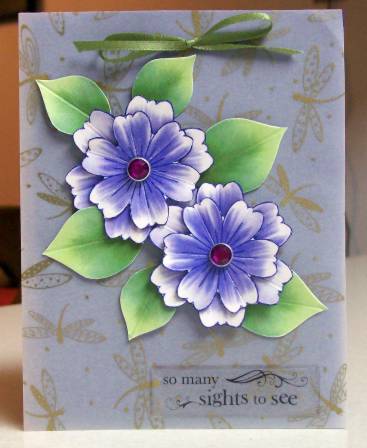
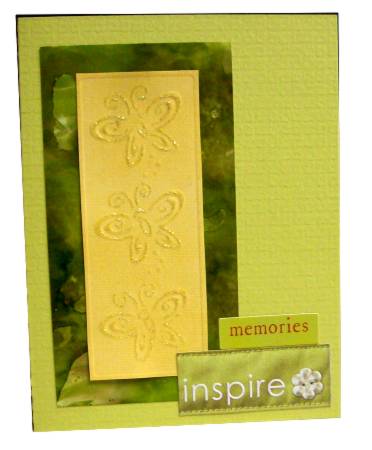
By using second-generation stamping this illustration prints very softly, making it look like a pencil sketsh. I used a very light touch with the colored pencils to maintain that feeling.
The panel is cut and embossed with a Nestabilities labels die and the edges are tinted with 'scattered straw' distress ink. Stickles enhance the centers of the flowers and the edges of the butterfly wings.
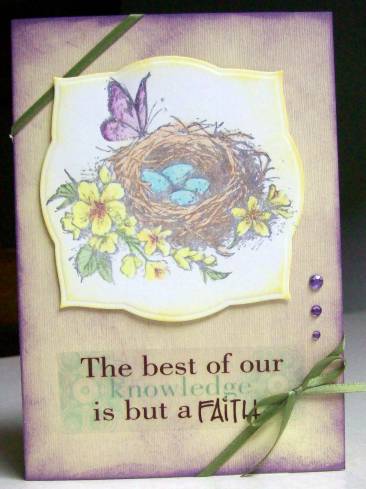
The yellow folded card base is tinted with 'concord grape' and a continuous ribbon is tied around the corners. Three graduated rhinestones add a little bling and point to the text which is a clear sticker.
Ddd
I used a Nestability to cut the background piece from printed scrapbook paper. The stamped image is colored with pencils and mounted with foam tape.
I placed these on a folded lavender cardstock base and combined some rub-ons for the greeting.
Ddd
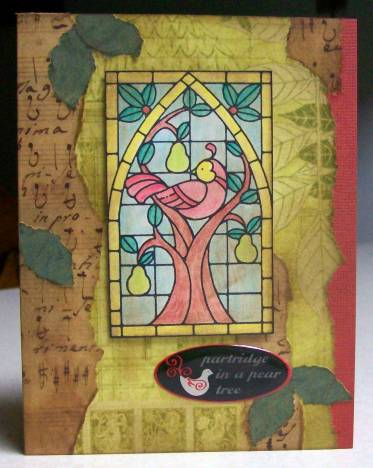
I wish I knew where some of these posts go when I put them out there for delayed appearance and they never do. I suppose one day they will all magically appear and we'll all be surprised!
I used a scrapbook paper as a background for a stamped image that I colored with pencils and blended with a waterbrush. I trimmed this a bit differently than before and used a gold Dazzles sticker to frame it. I took three of the scrap pieces from the sticker and placed them on the fruit to make golden pears.
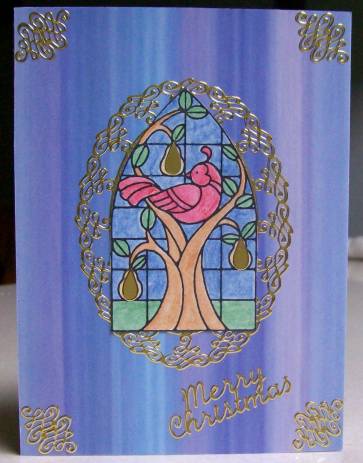
The corner pieces are from the same Dazzles set but the greeting is gold from another brand of sticker sheet.
Ddd
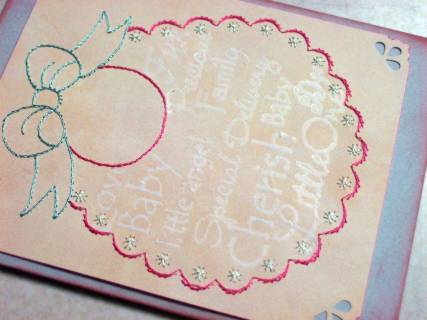
I love this little bib pattern . It is easy to stitch up and looks great, too.
This time I put it on light pink paper, punched the corners and then used a dark pink marker to edge it.
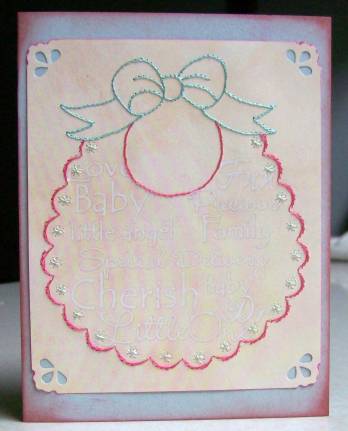
The edges of the blue folded cardstock are toned with 'worn lipstick' distress ink.
In the center of the bib I rubbed on white lettering in an overall pattern. You can see this better below.
Ddd
After this was embossed with a brass stencil in the Cuttlebug I trimmed it down and used a straw colored distress ink pad to tine the raised portions. These same lines were traced out with a gold-toned Stickles.
The green piece is an alcohol ink test piece from another project. These are layered onto a green textured folded card base.
I used cardstock text stickers from two different sets to finish it off. The 'button' in the lower corner is a part of the sticker.
Ddd
Three pies, hot from the oven, ready for a trip to a pie auction. Together, they sold for $100!
Just in case YOU want a pie worth $30-$35 I'll give you the recipies for them. They are CRANBERRY (upper left), COCONUT MACAROON (upper right), and PINEAPPLE-MACADAMIA (lower).
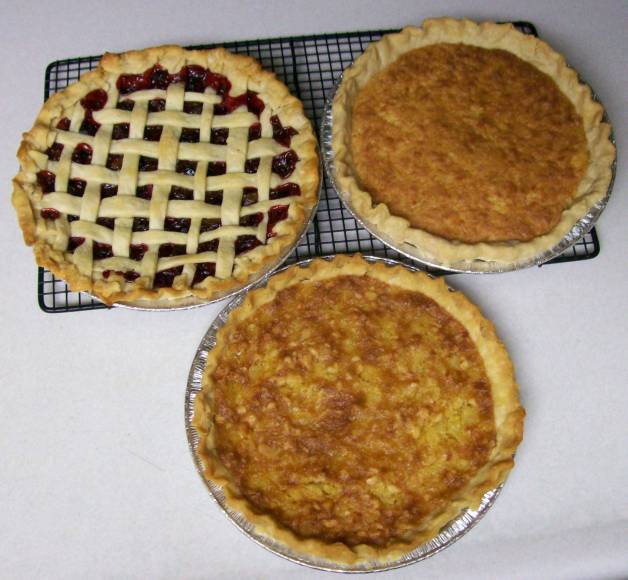
OIL PASTRY - (thanks, Mom!) makes one crust - do not double
In bowl combine 1 cup all-purpose flour and 1/4 cup vegetable oil. Stir with a fork until blended and crumbly. Sprinkle with 2 tablespoons chilled water. Sitr until it comes together and forms a ball. Wrap in plastic wrap and place in fridge for 10 minutes. When chilled roll out between two pieces of plastic wrap.
CRANBERRY PIE
Combine in a saucepan and bring to a boil. Lower heat to medium low and boil, stirring often, for 10-15 minutes, till thickened. Remove from heat and stir in 1 teaspoon vanilla extract.
Pour into a 9" unbaked pie shell and dot top with 2 tablespoons of butter or margarine. Add a lattice top as this pie needs lots of venting.
Bake at 450 degrees for 10 minutes. Then turn oven down to 350 degrees and continue baking for another 35 minutes.
COCONUT MACAROON PIE
Mix all ingredients. Pour into a 9" unbaked pie shell. Bake at 325 degrees about 1 hour, till golden brown.
PINEAPPLE-MACADAMIA NUT PIE
Cram together the butter and sugar. Add eggs one at a time and continue beating. Add corn syrup, flour, extract, pineapple and nuts. Pour into 9" unbaked pie shell.
Bake at 350 degrees for 40 to 50 minutes, until firm.
Enjoy!
Ddd
Working from one of my own patterns I stitched this rose on red scrapbook paper, trimmed it out and then used chalks to color the background.
The background is a printed cardstock from a pad and I added rub-on borders.
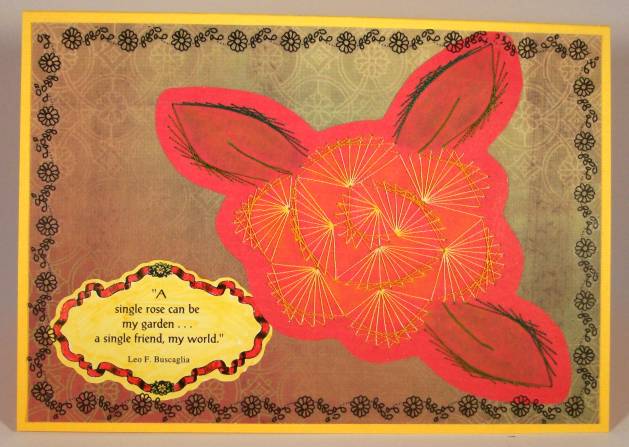
I found this white sticker in my stash and the text was perfect. I used Sharpies to color it in and then placed all on a folded yellow card base.
Ddd
