Topic: Jewelry
If you didn't know these beads were paper you'd be fooled into believing they were make of wood.
I had these real wooden carved disk beads and brown glass balls which paired beautifully for this 30.5-inch necklace.
Ddd
« | December 2009 | » | ||||
S | M | T | W | T | F | S |
1 | 2 | 3 | 4 | 5 | ||
6 | 7 | 8 | 9 | 10 | 11 | 12 |
13 | 14 | 15 | 16 | 17 | 18 | 19 |
20 | 21 | 22 | 23 | 24 | 25 | 26 |
27 | 28 | 29 | 30 | 31 |
If you didn't know these beads were paper you'd be fooled into believing they were make of wood.
I had these real wooden carved disk beads and brown glass balls which paired beautifully for this 30.5-inch necklace.
Ddd
For the rest of my beads - from here on - I embossed them. I put the bead on a toothpick, rolled across a Versamark pad, and dipped into clear embossing powder and heated with a heat gun. This gives the beads a protective coating for longer wear and makes them match up better with the commercial beads.
This set was made with plaid paper. Colors from the paper were pulled out for the accent beads - dark wooden thin disks and green plastic thick disks.
This necklace measures 27 inches.
Ddd
Hah! You probably thought I was done with these. But, wait! There's more!
This plaid turned into a camoflage look and I combined the beads with garnet chips for this earthy 27-inch string.
Ddd
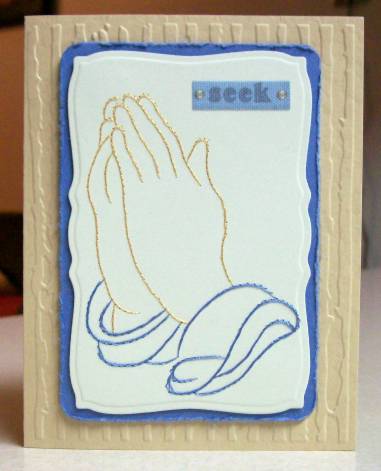
For a recent swap, with the assignment to work in silver and/or gold, I stitched up these praying hands in gold metallic Sulky thread on silver cardstock. I cut it out and embossed with a Nestability die.
I used a silver folded cardstock base and trimmed off the right of the front. Then the front panel has had a gold foil paper overlaid and the stitched panel is mounted onto it.
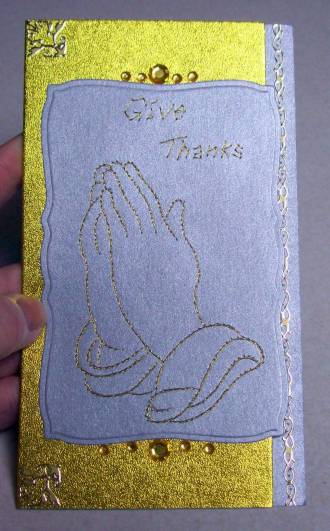
I used gold peel-off stickers on the left corners and as a border on the inside back that shows when the card is closed because of the trimmed front cover.
I added graduated rhinestone accents along the top and bottom of the stitched panel.
Ddd
My Secret Sister gave me a gift and it was wrapped in this beautiful paper. I couldn't toss it out so I turned it into these beads. Since the paper is thinner it makes a more streamlined bead.
I combined it with irridescent glass beads and made up this 24.5-inch beauty.
Ddd
OK, there's not really any tie-dye in this but the twist of colors in the beads really remind me of it anyway.
This necklace measures 29.5 inches.
Ddd
This pink and white necklace, both the paper beads and the glass beads they are combined with reminded me of pappermint candies. This makes a refreshing 28-inch statement.
Ddd
At 31.5 inches, these yellow beads and spacers are paired with trinagle-shaped red plastic beads for a unique and youthful look.
Ddd
This blue and orange number looks like a 28-inch party on your neck. The spacers are glass beads, alternating pink and orange, pulling colors from the scrapbook paper beads.
Ddd
This 23.5-inch necklace uses more of the silver-toned spacers. It is always interesting to roll up the first bead from a piece of paper and see how it looks. This one is from a plaid!
To me it looks a little like cork.
Ddd
This necklace is unique among them all for two reasons: 1) it is the only one I put together with golden accents and 2) it is 34 inches long!
This one really makes a statement!
Ddd
This 24-inch necklace is made of scrapbook paper beads and silver-toned spacers. This is the beginning of a series (get ready to see a LOT of these ofer the next couple of weeks - yes weeks).
I taught a class on making paper beads and then used up all the left-over kits to make a whole wardrobe of necklaces.
Want to make your own beads? Cut scrapbook paper into triangles 8.5 inches long and 1 inch wide at the base. Wind from the wide end on a round toothpick. Glue the last inch to the bead.
Ddd
When fall comes all the little shady places break out in fern fronds. Clean and shiny from the rain, this carpet of green was underfoot last week.
Ddd
What a beautiful view of a portion of the North Santiam River, south of Stayton Oregon.
Enjoy the view!
Ddd
This a stitching from a free pattern that I have not done up before. Quick to stitch, I used Sulky thread in blue and buff on a creamy cardstock. The image was die cut and embossed with a Nestabilities shaped rectangle. A layer of blue cardstock, slightly larger, was corner rounded and then distressed.
I used a Cuttlebug embossing folder on the tan folded cardstock base and mounted the front image on foam tape.
The text is a fabric sticker.
Ddd
The Hat is Back! After so many years of seeing no ink at all, this stamp is sure getting a workout lately. This time it is stamped and colored on white cardstock.
I pulled colors from the hat for the background papers and trims. The purple dotted paper has been stamped with violet borders and the same ink was used to stamp the greeting on a torn piece of torn scrapbook paper.
The bottom border is more from the die cut scrapbook paper and I used two stickers for the floral corners. As a finishing touch a rose sticker was adhered over the stamped rose on the hat.
Ddd
Father Christmas, courtesy of a catalog, just gives me a warm feeling about this card. I started with a dusky blue folded card base and used a gold marker to create a thick border. The next layer is a large rub-on. Then comes the feature fellow with his arms full of adorable critters.
I used the gold marker on the figure's cross.
A thick clear acrylic sticker was layered on a frosted yellow cardstock and trimmed befoe applying on the card front.
Ddd
Mixing a little collage with die cuts and a bit of stamping, as well!
You might even recognize some of these elements as left-overs from other recent projects. LOVE that background paper... and the lacy trim, LOVE the shaped diecut centerpiece and the button brads.
LOVE the way all these elements came together!
Ddd
Another catalog image was clipped out for this card. I started with a white folded card base and added a layer of purple scrapbook paper. Over that a piece of white mulberry paper, cut on three sides and torn at the bottom.
The backdrop to the centerpiece is a Dazzles sticker as are the left and right borders.
Ddd
Way back when I started this blog I was using a lot of junk mail to make collage cards. Well, here we are again - full circle!
This angel with a cat is clipped from a catalog. I pulled matching scraps from my stash and layered torn and die cut pieces. The border on the right side is a rub-on.
I used a rub-on for the text, separating and applying the words in my own arrangement.
Ddd