« March 2010 »
S M T W T F S
1 2 3 4 5 6
7 8 9 10 11 12 13
14 15 16 17 18 19 20
21 22 23 24 25 26 27
28 29 30 31
You are not logged in. Log in
Entries by Topic
All topics  «
3D paperwork
A - Z challenge 5
A - Z challenge 7
A - Z challenge round 4
A to Z challenge round 3
A to Z round 2
A to Z round 6
A-Z round 1
Around the House
Art Challenges
Artist Trading Cards
Backgrounds
Beads
Bible Journaling
Books
Boxes
Collage
Color Challenge
Coloring
cookbook
Die Cuts
Digital Projects
Digital Stamps
Drawing
Dry Embossing
Fabric Stuff
Fantastic Folds
Field Trip
Home Decor
How Does Your Garden Grow?
Hymnal Art
In The Kitchen
In the studio
Jewelry
Lettering
Links
Multi-Technique
Music to Work By
Musings
Nail Art
New Work
Online Class
Other Hobbies
Other Projects
Painting
Paper Embroidery
Paper Piecing
Photo
Pretty Paper
Quilting
Random
reading
Scrap Recovery
scrapbooking
Sewing
Sketch Challenge
Some Backlog
Stamping
Stencils
Stickers
Supplies
Teabag Folding
Techniques
Testing
tips and tricks
Tutorial
Web resources
Welcome to my Blog
Work By My Friends
workflow
Writing
Blog Tools
Edit your Blog
Build a Blog
RSS Feed
View Profile
Group One
In & Out of Studio 3D
Wednesday, 17 March 2010
Accordion Purse
Topic: Fantastic Folds

One group or another is always issuing a challenge - keeps me on my toes and gives me some focus so I don't have to think up projects on my own. 

This time the challenge is for the Scor-Pal Pals group and we were to make an accordion purse. I used the generalized structure but made up my own measurements as I went.


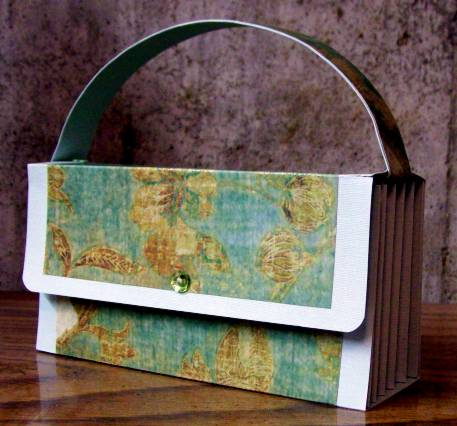
I used two self-stick magnets to hold the front flap closed and placed a large rhinestone on the flap to look like a snap closure. The Handle is held on with brads and a liner placed in the lid to cover the stub ends.


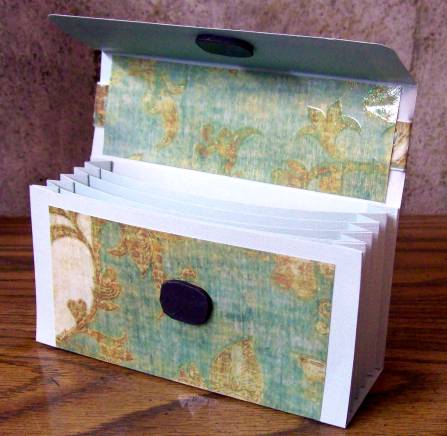
I like the subtle coloring of the scrapbook paper I used to wrap the cardstock.

Ddd


Posted by studio3d@ccgmail.net at 6:00 AM PDT
Tuesday, 16 March 2010
Beaded Bouquet
Topic: Paper Embroidery

Still another swap challenge - to combine iris folding with paper embroidery. I chose to not only embroidery the stitching stickers but added beads to them as well.

The iris folding is done with tissue papers and I drew faux stitching around the elements.

Ddd


Posted by studio3d@ccgmail.net at 6:00 AM PDT
Monday, 15 March 2010

Another Easter card with paper embroidery. I used a different border template and different coloring for the flowers.

This one got rhinestones in the corners, as well.

Ddd


Posted by studio3d@ccgmail.net at 6:00 AM PDT
Sunday, 14 March 2010
Irish Cross Stitch
Topic: Paper Embroidery

Made to answer a challenge to use cross stitch paper embroidery. I found a heart cross stitch online and used it as the basis for making this shamrock. 

I added self-stick rhinestones and gold peel-off stickers.

Ddd


Posted by studio3d@ccgmail.net at 6:00 AM PST
Saturday, 13 March 2010
Easter Card
Topic: Paper Embroidery

For a recent swap I needed a paper embroidery Easter card. I stamped the cross on the blue cardstock and colored it with watercolor pencils. The stitching is based on a portion of a pricking stencil I have.

The corners are punched and I used some glittery orange flowers as accents. The folded yellow cardstock base was selected to match some of the central flowers.

Ddd


Posted by studio3d@ccgmail.net at 6:00 AM PST
Friday, 12 March 2010
Biggest Design Challenge Yet
Topic: Around the House

A dishwasher crisis about 12 weeks ago (at 3:45 am, no less) brought on an unanticipated home renovation. We decided to push past what the insurance provided to put in place what we really wanted.

My hubby gave me all the choices in materials, colors, and plans and this became my biggest design challenge ever. Here are the before/after photos.


First is the basement familyroom which is under the kitchen and got the ceiling, floor (carpet) and two walls ruined.

This is the finished room:

Here's a view from the other end.


2nd room ruined was the dining room. It was mainly the carpet which you see here.

We decided to replace it with hardwood:


And then there was the kitchen (and laundry). We started with the ugliest 1972 kitchen in a double-L layout that was much too small. It had a counter with overhead cabinets extending into the room, separating it from the dining room. It also had plastic green and orange wallpaper and linoleum with asbestos in it!

Here is the 'before'

AND


and the final result with painted walls, tile floors, new maple cabinets, new countertops, and an open floorplan.

AND

Because the laundry is an extension of the kitchen, it got a makeover as well.


So there you have it - 12 weeks of upheval followed by a lifetime of beauty... and I designed it all myself. 


Ddd


Posted by studio3d@ccgmail.net at 6:00 AM PST
Thursday, 11 March 2010
Line by Line
Topic: Paper Embroidery

I've put this house to paper several times before, but never so it resembles a pen and ink drawing.

I used a corner punch to create decorative slots in which to slip the corners.

Ddd


Posted by studio3d@ccgmail.net at 6:00 AM PST
Wednesday, 10 March 2010
Sketch Challenge
Topic: Stamping

One of my groups issued a sketch challenge and this was what I put together. The cross is a new stamp from a set I bought that also includes the text. Foil paper makes up the 4 background blocks and the two lavender panels are cut with Nestabilities dies.

Silk flowers and buttons are attached with glue dots.

Ddd


Posted by studio3d@ccgmail.net at 6:00 AM PST
Tuesday, 9 March 2010
Stuck on You
Topic: Stickers

I arranged floral stickers on cardstock and then shaded around with grey and yellow watercolor pencils. These were smoothed with water on a brush.

The card was trimmed up with gold sticker borders.

Ddd


Posted by studio3d@ccgmail.net at 6:00 AM PST
Monday, 8 March 2010
Bunnykins
Topic: Stickers

When I was young we used to make Easter Bunny cakes using heart shaped cakes cut in half. We would ice them and cover them with colored cocanut.

I wanted to try the same thing with heart stickers and this is the result.

Hubby says it looks like a snail!

Ddd


Posted by studio3d@ccgmail.net at 6:00 AM PST
Sunday, 7 March 2010
Barnyard Fun Sticker Page
Topic: Digital Projects

This is a page I designed for the toddlers to use at library storytime. We had a bunch of farm animal stickers for them and they could place them anywhere they wanted on their farm.


Ddd


Posted by studio3d@ccgmail.net at 6:00 AM PST
Saturday, 6 March 2010
Out of Season
Topic: Digital Projects

Though it is not the season for this graphic, you may save it to use when the time is right! I created it as a full page graphic to be printed on letter-sized paper. The the kids cut 'three sides of a square' to make flaps all over the house. They then glued the page to letter size cardstock and could draw Halloween images or place stickers behind the flaps. We used these to make a countdown to Halloween calendar at the library.


Ddd


Posted by studio3d@ccgmail.net at 6:00 AM PST
Friday, 5 March 2010
Digital Design Owl Project
Topic: Digital Projects

Here's an easy project to create. Try it with kids:

Cut all these pieces:


Arrange as shown:


This will be the result:


Ddd


Posted by studio3d@ccgmail.net at 6:00 AM PST
Thursday, 4 March 2010
More Digital Doo-dah
Topic: Digital Projects

The library where I work had a summer reading theme relating to adventure a few years ago. I created a treasure map to the children's department for tehm to hand out to the kids.

The sections of stacks are very generalized but correct in location to one another.

Ddd


Posted by studio3d@ccgmail.net at 6:00 AM PST
Wednesday, 3 March 2010
Another Graphic Label
Topic: Digital Projects

A while back, at work, I created some custom labels for book spines. One of these was the recently shown 'Food For Thought' graphic. Here are some others:

This is for the children's department for books written in two languages.

This is for a new collection of paperbacks.

And this one is for the graphic novels in the children's department.

They all are in a 3/4" x 1" format.


Ddd


Posted by studio3d@ccgmail.net at 6:00 AM PST
Tuesday, 2 March 2010
Arise, Arise
Topic: Photo

 So glad the days are coming into line with MY sleep schedule. It means I don't have to get up too early to experience THIS!

Is this not truly spectacular?????

The hardest thing for me right now is learning to take photos on my digital camera WITHOUT the benefit of the preview screen. The thing just stopped working right. Instead of a true preview (or postview) there is a very light screen that kinda gives you general shapes. It's very annoying and I take 4-5 pictures hoping one of them will look OK when they are uploaded to the computer. It's more and more like using the old SLR and waiting for the prints to come back. REMEMBER THOSE DAYS??

Anyhoo - have a great day!

Ddd


Posted by studio3d@ccgmail.net at 6:00 AM PST
Monday, 1 March 2010
Inch By Inch
Topic: Collage

Now I do believe this is my new favorite! I needed to make a card with 'inchies' for a swap. These were left over from last spring and I built everything around them.

I started with a beige card and added layers of torn scrapbook paper and printed papers of music and script. I used 'old paper' distress ink to bring the tones all in line and unify it. Then I used an antiwue postcard text stamp with the same ink to stamp over the whole surface.

The green panel was stamped with the postcard script in black and I then used a gold paint pen to border the edges. I mounted a gold dragonfly outline sticker on more of the green and trimmed off the extra. It is adhered with raised wings using folded glue dots.

The inchies are mounted with glue dots for strength of bond.

Ddd


Posted by studio3d@ccgmail.net at 6:00 AM PST
Sunday, 28 February 2010
In the Swing of Things
Topic: Fantastic Folds

Challenge time again. This assignment was to 'make a swing card'. I used the directions on Splitcoaststampers and decorated it with some inchies I made last spring. 


I stamped the inside with one of my favorite text stamps.


The side borders were trimmed up with gold peel-off borders and I added gold peel-off flowers to the stamped panel.

Ddd


Posted by studio3d@ccgmail.net at 6:00 AM PST
Saturday, 27 February 2010
Verigated Dragonfly
Topic: Paper Embroidery

Verigated threads used to stitch up the dragonfly pattern really change the look of it. I cut a scalloped circle into quarters and embossed with the Cuttlebug to create some corner elements. Gold trim and text finish it off.

Ddd


Posted by studio3d@ccgmail.net at 6:00 AM PST
Friday, 26 February 2010
Peony 3D
Topic: 3D paperwork

Oh my, it's another 3D - FREE of course. When I print these on white cardstock and cut them out I end up with white edges. I carefully color those edges with matching watercolor marker.

On this one I put the gold trim directly on the image, right over the printed border. A text sticker finishes it.

Ddd


Posted by studio3d@ccgmail.net at 6:00 AM PST

Newer | Latest | Older