« May 2010 »
S M T W T F S
1
2 3 4 5 6 7 8
9 10 11 12 13 14 15
16 17 18 19 20 21 22
23 24 25 26 27 28 29
30 31
You are not logged in. Log in
Entries by Topic
All topics  «
3D paperwork
A - Z challenge 5
A - Z challenge 7
A - Z challenge round 4
A to Z challenge round 3
A to Z round 2
A to Z round 6
A-Z round 1
Around the House
Art Challenges
Artist Trading Cards
Backgrounds
Beads
Bible Journaling
Books
Boxes
Collage
Color Challenge
Coloring
cookbook
Die Cuts
Digital Projects
Digital Stamps
Drawing
Dry Embossing
Fabric Stuff
Fantastic Folds
Field Trip
Home Decor
How Does Your Garden Grow?
Hymnal Art
In The Kitchen
In the studio
Jewelry
Lettering
Links
Multi-Technique
Music to Work By
Musings
Nail Art
New Work
Online Class
Other Hobbies
Other Projects
Painting
Paper Embroidery
Paper Piecing
Photo
Pretty Paper
Quilting
Random
reading
Scrap Recovery
scrapbooking
Sewing
Sketch Challenge
Some Backlog
Stamping
Stencils
Stickers
Supplies
Teabag Folding
Techniques
Testing
tips and tricks
Tutorial
Web resources
Welcome to my Blog
Work By My Friends
workflow
Writing
Blog Tools
Edit your Blog
Build a Blog
RSS Feed
View Profile
Group One
In & Out of Studio 3D
Saturday, 29 May 2010
A Real Treat
Topic: Fantastic Folds

This card was made for a challenge to do this particular structure. I starts as a single 8 1/2 x 11 piece of cardstock. Folds and a cutout make the basic model.

I went on to add a pop-up in the frame to add interest.

The front is decorated with the piece from the inside cutout (showing its reverse side). I stamped on it with a text stamp and a bird then trimmed it up with gold peel-offs.

The inside features silk flowers, glitter domes and more gold peel-offs.

Ddd


Posted by studio3d@ccgmail.net at 6:00 AM PDT
Friday, 28 May 2010
Birds on a Ladder
Topic: Fantastic Folds

Used the other half of the cardstock from yesterday to make the same card structure - just different decorative content.

I cut these two birds from a calendar illustration, along with their branches. The tag is leftover from a kit and I mounted it with foam dots and tied on a ribbon. Three stickers finish it off: The round text, the bottom border text and the 'remember' block.

I do love this structure.

Ddd


Posted by studio3d@ccgmail.net at 6:00 AM PDT
Thursday, 27 May 2010
Step It Up
Topic: Fantastic Folds

I saw a similar card on Andrea Walford's blog and had to have a go at it. I changed up the measurements and made mine from double-sided cardstock. This requires a 12 x 6 piece and is scored 6 times and cut once. VERY simple to do.

I decorated each step with stickers and then placed paper on the back of the overhang and trimmed it out. The text block is a rub-on and there are gold peel-offs finishing it off.

For a final step I rounded the lower corners.

Ddd


Posted by studio3d@ccgmail.net at 6:00 AM PDT
Wednesday, 26 May 2010
A Horse, Of Course
Topic: Other Projects

I spent a couple of days at the church helping to paint pieces of scenery for VBS. The first day I painted a grouping of potted plants and two HUGE birds that will sit on the tops of walls over the platform.

This week I painted a 10-foot horse:

Yes, the back legs are shorter! The horse is walking down an incline in the scene. This is painted on taped-together butcher paper and will be mounted on sheets of styrofoam.

The whole platform will be covered with scenery that represents the inside of an Egyptian museum.

I'm going to be helping with crafts that week, as well.

Ddd


Posted by studio3d@ccgmail.net at 6:00 AM PDT
Tuesday, 25 May 2010
Titling
Topic: Other Projects

This giant vinyl banner came with the color, the artwork and the first caption printed on it. My assignment was to put on the event particulars. I chose a font called Papyrus and worked in full size in CorelDraw. Then I moved the whole text one section at a time onto the 'page' in the program and printed it out. The printed pages had to be all taped together and them I taped it to the BACK of the banner, hung it lengthwise on the patio door and traced it all out with Magic Marker.

I made two of them and delivered them to the church for posting.

Ddd


Posted by studio3d@ccgmail.net at 6:00 AM PDT
Monday, 24 May 2010
Back to the Land
Topic: Other Hobbies

Another year, another garden.

A couple of new things this year: I put in both sweet onions and white onions in addition to the green spring onions. And for the tomato selections I went to a high yield cherry tomato, a roma, and an heirloom mix. I am going to try growing the larger tomatoes in the hanging planters I've seen on TV. For the time being I have them in starter trays and will move them once they are established plants.

As I was weeding the barrels in preparation for planting I was fascinated by the way each barrel has it's own little specialty in the weed department. One barrel is heavy on the thistles, another has these weird weeds that 'pop' and spray seeds when you touch them. Then there are some kind of vines that have purple flowers and a real sticky stem, and in yet another barrel there are milkweed. I've found grass in some, too, but the most FUN is finding the walnuts from across the road that the squirrels have buried in the soil. A few of them sprout but most are just hanging out. This year I found three of them.

Ddd


Posted by studio3d@ccgmail.net at 6:00 AM PDT
Sunday, 23 May 2010
Ruffles and Ridges
Topic: Photo

These fungi were encroaching on another of my oak vegetable barrels. They had to go but I loved their decorative look and photographed them first.

This view from the top really shows off the stripes on their 'petals'. They almost look like they are made of wood.


Ddd


Posted by studio3d@ccgmail.net at 6:00 AM PDT
Saturday, 22 May 2010
Squatters
Topic: Photo

I started cleaning the weeds out of mygarden barrels in preparation for planting vegetables. In one barrel I found these two little squatters. I have no idea their identity and they weren't talking. So I booted them out.


Love the weathered wood in the background.

Ddd


Posted by studio3d@ccgmail.net at 6:00 AM PDT
Friday, 21 May 2010
Come Along For the Ride
Topic: Paper Embroidery

New challenge: combine paper embroidery with spirelli. Now, spirelli is NOT one of my favorite techniques so I usually try to turn the wound bit into something else. I had this pattern in a Joke De Vette book and shrunk it to fit the scalloped circles I had cut with my Cuttlebug.


I actually liked it more than I expected! I used a Nestabilities die to cut out the stitched piece and ran my folded cardstock base through an embossing folder. The trim is made of desktop scraps... and there you go.

Ddd


Posted by studio3d@ccgmail.net at 6:00 AM PDT
Thursday, 20 May 2010
Mandala
Topic: Paper Embroidery

This card is made with a stitching sticker and gold thread. I put some table-scraps to use for both the sticker backing and the folded cardstock.

The border behind the mandala is gold foil paper and I added three peel-off greetings.

This is SO glittery that it is hard to get a good photo. Here's a closeup of the stitching part.

Ddd


Posted by studio3d@ccgmail.net at 6:00 AM PDT
Wednesday, 19 May 2010
Stitch and Cut
Topic: Paper Embroidery

Assignment: Create a card that combines cutwork with stitching.

Result:

I had this printed cardstock laying on the desktop leftover from another project. I simply pricked out along part of the design and stitched with metallic purple thread. Then I used a Cuttlebug die to cut the corner designs. These cutouts have sticky-back paper inserted behind and then glitter was rubbed into the stickum to fill up the designs.

I mounted on plum cardstock.

Ddd


Posted by studio3d@ccgmail.net at 6:00 AM PDT
Tuesday, 18 May 2010
Dots and Dashes
Topic: 3D paperwork

I needed a card for a sketch challenge and started by making the 3D center element. In matching colors for the backing I pulled out this pierced paper and then kept adding other parts of the same sheet - large scalloped edge became the half-circle elements and small scalloped edge became red-backed trims.

The 3D cuting has a built-in banner so I added a peel-off greeting there and trimmed up with border peel-offs on the banner and the pail. More gold border around the card and on the scalloped trim pieces.

Here you can see a better view of the layers on the 3D.

I really like how this card came together.

Ddd


Posted by studio3d@ccgmail.net at 6:00 AM PDT
Monday, 17 May 2010
Man-cation
Topic: Fantastic Folds

For a challenge to create a 'manly card' with fantastic folds I created another squash-fold booklet from 12 x 12 cardstock. This time the cardstock was double-sided so there was coordinating back and front.

I used 'outdoors', 'travel', and 'Alaska' stickers from different sets to decorate this one and used the checks of the paper as guidelines to add hand-lettered text with brown Sharpie marker.


Because I thought bows at top and bottom would take away from the manliness of this card, I left a long enough tail on the top portion to wrap it over the back and tie it once at the bottom.

Ddd


Posted by studio3d@ccgmail.net at 6:00 AM PDT
Sunday, 16 May 2010
Three Petal Card - Stitched
Topic: Paper Embroidery

This card was made from the other half of the 12 x 12 cardstock I started with for the tri-book card the other day. I even used some of the same decor on it. However, since this was for a paper embroidery swap I traded out the rub-on stitching in the center panel for actual stitching.

I added all the text in white rub-ons since this was for a purple and white theme swap. Also, to cover the back of the stitching, I glued the backs of the center panels together. This makes it more 'book like' rather than an accordion fold.


Ddd


Posted by studio3d@ccgmail.net at 6:00 AM PDT
Saturday, 15 May 2010
Squash (no, not a vegetable or a sport)
Topic: Fantastic Folds

I was recently reminded of the squash book structure which generally uses three squares of card scored and overlapped. I decided to try to create it using a single sheet of 12 x 12 inch cardstock.

To do this I scored at 3", 6" and 9" in both directions. Then I trimmed away three blocks in an L on opposite corners. Finally, each remaing block of four is scored on the diagnonal. I also used scraps from the cut-away sections to cover the front and the back cover, trapping a length of ribbon between to tie the book closed.

I printed and trimmed photos from our recent cruise to fill this book.

This may be a record for me, using cruise photos within a week of returning (this is a delayed posting - project was completed on 5/3/10)

Ddd


Posted by studio3d@ccgmail.net at 6:00 AM PDT
Friday, 14 May 2010
Graduated
Topic: Fantastic Folds

Challenge - Make a 'tri-fold' card. 

Answer - OK!

This started out as a 12 x 12 piece of cardstock. From this I got two 6 x 12 strips. For each I accordion folded at 2", 5", and 8"and then trimmed the first panel down 2" and the next two panels down 1".

For this one I used vellum stickers of pansies and rub-on stitching to decorate the panels.

Then added text in clear stickers and peel-offs which you can see in this view slowing the card opened.


The other version will be shown in a few days - not quite done with it yet.

Ddd


Posted by studio3d@ccgmail.net at 6:00 AM PDT
Thursday, 13 May 2010
Purple and White
Topic: Dry Embossing

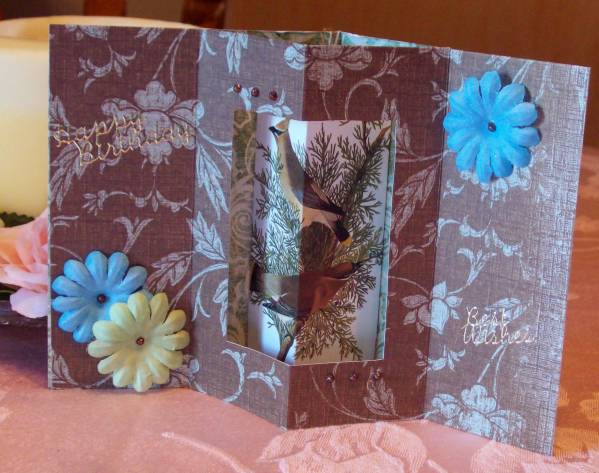
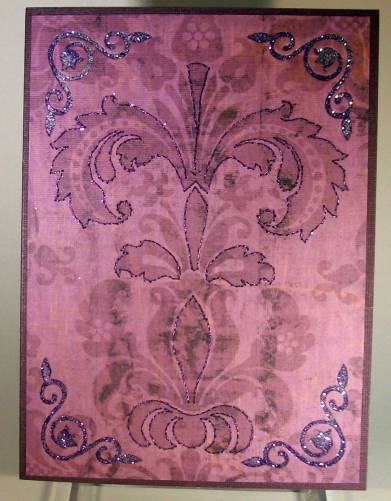
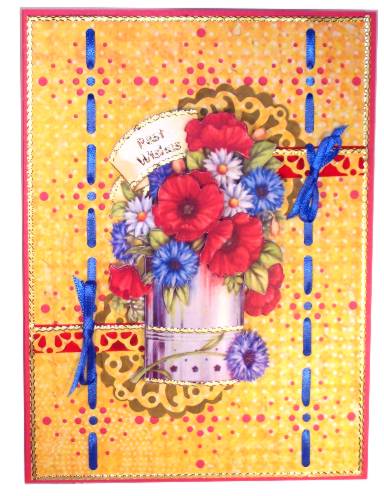
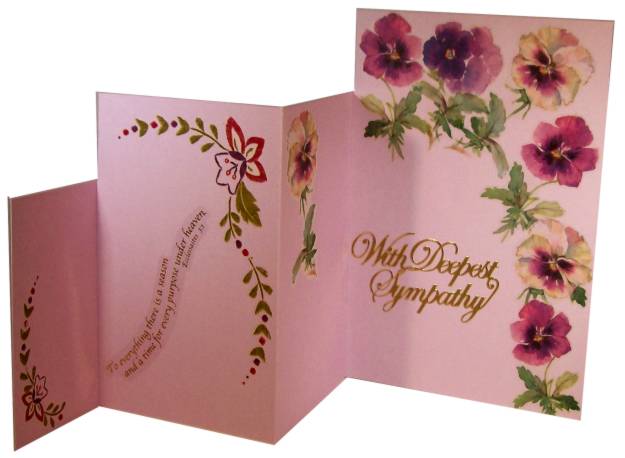
OK, I signed up to do a Purple and White swap on one of my lists and then sat down and created this card. I used purple printed cardstock for the background and ran it through the Cuttlebug folder to add the script. Then I sanded it to expose the white core. Next are two torn pieces of white mulberry paper with white paper behind to intensify the contrast.

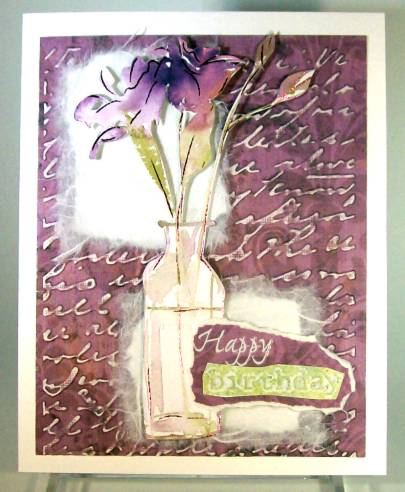
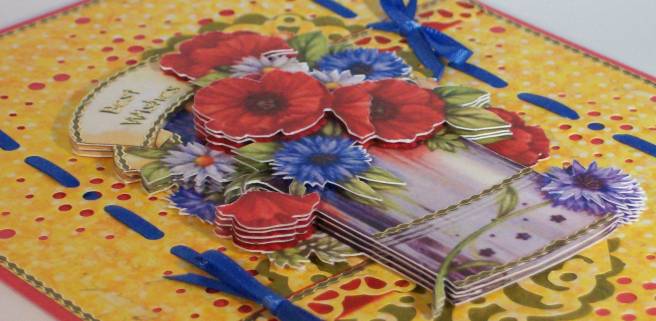
The flower was cut off of a commercial card and mounted with 3D glue dots. Then I made the text block with torn purple card, white rub-ons, and a Cuttlebugged green paper, sanded. This is mounted 3D also.

I looked up who I was supposed to send it to for the swap and discovered my BIG mistake - it was for the wrong group! The Purple and White swap was for a Paper Embroidery group and my card has no embroidery on it. RATS!

Oh well, it works for another groups' swap that was due - one that requires some kind of embossing. Since I used dry embossing for the background I'm all set.

Ddd


Posted by studio3d@ccgmail.net at 6:00 AM PDT
Wednesday, 12 May 2010
Friends and Neighbors
Topic: Paper Embroidery

Birdhouses once again. This time I pricked it out on a shimmery blue card and did all the stitching in a single color - copper brown. I mounted on brown cardstock and added a thick acrylic text sticker. The leggs have been cut off the brads and they are glued in place.

I like this simple look.

Ddd


Posted by studio3d@ccgmail.net at 6:00 AM PDT
Tuesday, 11 May 2010
Love Thy Neighbor
Topic: Paper Embroidery

This time, after stitching my birdhouse pattern, I chose not to color the houses. I used the same backing paper and the same house colors but added a clear sticker for the scripture text.

Doesn't this text just fit perfectly?

Ddd


Posted by studio3d@ccgmail.net at 6:00 AM PDT
Monday, 10 May 2010
Time to Make a Bookmark
Topic: Paper Embroidery

I've been busy mounting the stitching that I did while on vacation. This one is bronze thread on tan cardstock. I used two pieces of paste paper back to back as a base so it would look good on the back, too. 

It is inserted in a plastic bookmark sleeve and topped off with a ribbon.

Ddd


Posted by studio3d@ccgmail.net at 6:00 AM PDT

Newer | Latest | Older