« June 2010 »
S M T W T F S
1 2 3 4 5
6 7 8 9 10 11 12
13 14 15 16 17 18 19
20 21 22 23 24 25 26
27 28 29 30
You are not logged in. Log in
Entries by Topic
All topics  «
3D paperwork
A - Z challenge 5
A - Z challenge 7
A - Z challenge round 4
A to Z challenge round 3
A to Z round 2
A to Z round 6
A-Z round 1
Around the House
Art Challenges
Artist Trading Cards
Backgrounds
Beads
Bible Journaling
Books
Boxes
Collage
Color Challenge
Coloring
cookbook
Die Cuts
Digital Projects
Digital Stamps
Drawing
Dry Embossing
Fabric Stuff
Fantastic Folds
Field Trip
Home Decor
How Does Your Garden Grow?
Hymnal Art
In The Kitchen
In the studio
Jewelry
Lettering
Links
Multi-Technique
Music to Work By
Musings
Nail Art
New Work
Online Class
Other Hobbies
Other Projects
Painting
Paper Embroidery
Paper Piecing
Photo
Pretty Paper
Quilting
Random
reading
Scrap Recovery
scrapbooking
Sewing
Sketch Challenge
Some Backlog
Stamping
Stencils
Stickers
Supplies
Teabag Folding
Techniques
Testing
tips and tricks
Tutorial
Web resources
Welcome to my Blog
Work By My Friends
workflow
Writing
Blog Tools
Edit your Blog
Build a Blog
RSS Feed
View Profile
Group One
In & Out of Studio 3D
Wednesday, 9 June 2010
Mail Train
Topic: Some Backlog

Now THIS is really backlog! I made this train mailbox about 25 years ago as a gift for my parents. They no longer have a place to use it so I've got it back - decorating my front porch.

I designed this around an actual mailbox and added the coupula and cow catcher using sheet metal (a friend with a riveter helped with assembly). The funnel is actually a funnel from the hardware store and is screwed on. The bracket for the bell is a curtain rod bracket and it is supposed to have a little bell tied on that is the kind you buy for your birdcage (for the bird to play with). It also used to have a little convex mirror on the handle to represent the headlight.

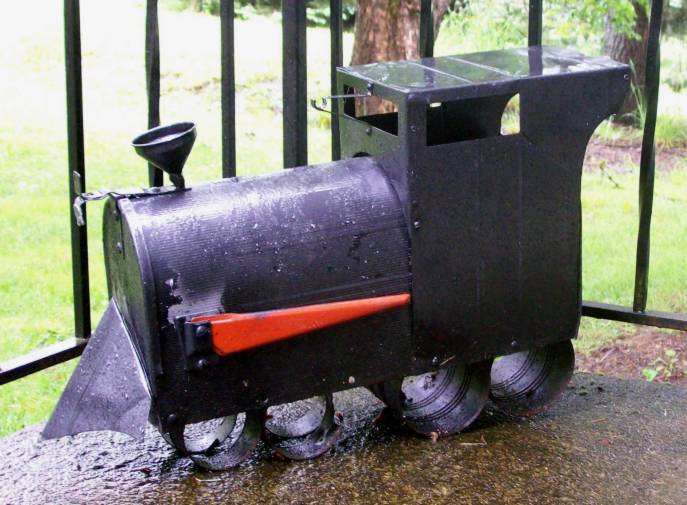
I used large spaghetti sauce cans for the back wheels and tuna cans for the front. Then I masked off the flag and spray painted it with glossy black paint.

She's all pretty tired looking now after many years in the weather, but I kinda like that look with the wrought iron railings of the porch.

Ddd


Posted by studio3d@ccgmail.net at 6:00 AM PDT
Tuesday, 8 June 2010
Purple Haze
Topic: Backgrounds

Practising the brayer techniques I learned last month, I chose pinks and purples from my set of Whispers die ink pads. This uses some brayering, some sponging and a little bit of stamping (the tree and distant brush. I drew in the birds with Sharpie marker and the water lines with white gel pen.

The sentiment is white rub-ons.

Ddd


Posted by studio3d@ccgmail.net at 6:00 AM PDT
Monday, 7 June 2010
Take to the Air
Topic: Stamping

 More of the same from yesterday! The reverse of my sample brayer cardstock was green and there was enough left over from yesterday's project to mount a different butterfly. I used the same techniques - including the same Stickles. The green backfround picks up more of the gold tones of the glitter, though.

The cardstock for this one is a green metallic textured stock. It looks SO nice with the glittery butterfly! I used the same faux text stamp but changed out the greeting for the bottom.

Ddd


Posted by studio3d@ccgmail.net at 6:00 AM PDT
Sunday, 6 June 2010
If I Could Fly
Topic: Stamping

Where it all started... I had a sample card that I practiced brayering techniques on. I laid on the gold outline butterfly and then trimmed around. Then I colored the body black. I applied 'diamond' Stickles to all the open areas and clear Glossy Accents to the body.

So, what to do with it???

I saw this structure on Gina K's blog StampTV ( http://stamptv.ning.com/video/reverse-nestabilities ). And knew the butterfly would look great this way. The area behind the large cutout is stamped with a faux script and a greeting stamp was placed behind the smaller coutout. Both of the cutouts are done with the Nextabilities Labels 11 dies.

The 'frame' is mounted with foam dots to provide dimension and the same is done with the butterfly. The wings of the butterfly turned up on their own as the Stickles dried. Cool!

Ddd


Posted by studio3d@ccgmail.net at 6:00 AM PDT
Saturday, 5 June 2010
Here Is My Handle, Here Is My Spout
Topic: Fantastic Folds

A reprise of the teapot adventure. I couldn't resist making another one and this time I did it without the directions! They each take about an hour to make.

The cardstock I chose for this one has a sheen to it that makes it look more like porcelain.

Ddd


Posted by studio3d@ccgmail.net at 6:00 AM PDT
Friday, 4 June 2010
I'm a Little Teapot...
Topic: Fantastic Folds

Back when I was in school we always had these tests with multiple choice questions. One of my favorite was when they would show an object and you had to choose the flat pattern that would make it or, conversly, a pattern was shown and you had to choose which of four objects would be created when it was folded. I was always very good at that.

So, when I decided I wanted to create a paper teapot, I designed it all on the computer in a flat pattern first. To do this I had to 'assemble' it in my head as I went and then design the next fold or measurement to fit with what I already had. When I used the directions I had written to make the actual object I had to change only ONE thing (the order of assembly of the bottom which would be attached later to the base.

So, are you ready to see it? This is the side view:

Of course you can't actually USE it for tea, the bags are just laying there for scale. This is the top view:

You can see that the handle and the spout are not 3-dimensional, but you can't have everything! Here is a view showing the lid removed:

You could actually use it to store teabags if you wanted to! It is ov a size that would make a good centerpiece, too.

This project uses three pieces of printed cardstock 12 x 6 inches and a large decorative brad.

Ddd


Posted by studio3d@ccgmail.net at 6:00 AM PDT
Thursday, 3 June 2010
Sunset on the Lake
Topic: Stamping

This was the last card done at Michelle's brayer workshop.

We masked the sun, brayered multiple shades at the top and bottom, masked the horizon line and brayered again. Masked the lower left and stamped the tree and bushes. Then we sponged in both islands and the green in the foliage.  Highlights on the foliage and the lines in the water are done with gel pen. Finally, the sun was sponged and the little cloud added.

The layering with background cards is color echoed in the corner brackets with brads.

Ddd


Posted by studio3d@ccgmail.net at 6:00 AM PDT
Wednesday, 2 June 2010
Cry at the Moon
Topic: Stamping

This was the second card we made at the brayer workshop.

We used a mask for the moon, stamped trees, sponged layers, stamped a wolf, and added highlights with white gel pen.

Layering with two colors and added two feature straps with brads.

Ddd


Posted by studio3d@ccgmail.net at 6:00 AM PDT
Tuesday, 1 June 2010
Hey, Teacher?
Topic: Stamping

The other day I had the opportunity to attand a 'brayer workshop' taught by Michelle Zindorf, a Stampin' Up demonstrator, who's blog I read daily. I love her style of work and tried to emulate it a few times on my own with limited success. This workshop was just what I needed.

This is the first card we made using brayering, sponging and stamping. We learned how to blend multiple shades of color to get the graduated effect, how to make masks and sponge around them, create cast shadows, and paint with an aquabrush and ink from the stamp pads. We used white gel pen to create highlights.

Lots of layering and some brads finish this off.

Ddd


Posted by studio3d@ccgmail.net at 6:00 AM PDT
Monday, 31 May 2010
Three Years Old Today!
Topic: 3D paperwork

Happy Blogiversary to Me! This blog is three years old today, that's 1096 posts.

So, how do you like it so far? Nobody ever leaves comments, so its hard to tell, from here. I KNOW you're out there because the statistics count your visits. I just don't know if you like what you see.

Anyhoo, here is today's creation. The roses on this card are from wall stickers. I mounted them on plain paper and cut more from each layer to create my own 3D illustration. Then I tore around the base paper for the largest piece and inked the edges to blend with the background.

The text is a cardstock sticker.

I started with a double-sided cardstock which I tri-folded so the inside was decorated as well. I added a quote sticker.

Ddd


Posted by studio3d@ccgmail.net at 6:00 AM PDT
Sunday, 30 May 2010
Vacation in a Box Car(d)
Topic: Fantastic Folds

I picked up this structure on someone's blog - it's called a box card. It folds flat to 5 1/2 x 4 1/4 and then pops out to a box that stands up on its own. The punched hole provides a view to the inside that displays a greeting or more decoration.

I used some 'travel' cardstock, stickers, punchouts, and rub-ons to decorate this bon voyage card.

Here you can see from the bottom how it pops out.

Ddd


Posted by studio3d@ccgmail.net at 6:00 AM PDT
Saturday, 29 May 2010
A Real Treat
Topic: Fantastic Folds

This card was made for a challenge to do this particular structure. I starts as a single 8 1/2 x 11 piece of cardstock. Folds and a cutout make the basic model.

I went on to add a pop-up in the frame to add interest.

The front is decorated with the piece from the inside cutout (showing its reverse side). I stamped on it with a text stamp and a bird then trimmed it up with gold peel-offs.

The inside features silk flowers, glitter domes and more gold peel-offs.

Ddd


Posted by studio3d@ccgmail.net at 6:00 AM PDT
Friday, 28 May 2010
Birds on a Ladder
Topic: Fantastic Folds

Used the other half of the cardstock from yesterday to make the same card structure - just different decorative content.

I cut these two birds from a calendar illustration, along with their branches. The tag is leftover from a kit and I mounted it with foam dots and tied on a ribbon. Three stickers finish it off: The round text, the bottom border text and the 'remember' block.

I do love this structure.

Ddd


Posted by studio3d@ccgmail.net at 6:00 AM PDT
Thursday, 27 May 2010
Step It Up
Topic: Fantastic Folds

I saw a similar card on Andrea Walford's blog and had to have a go at it. I changed up the measurements and made mine from double-sided cardstock. This requires a 12 x 6 piece and is scored 6 times and cut once. VERY simple to do.

I decorated each step with stickers and then placed paper on the back of the overhang and trimmed it out. The text block is a rub-on and there are gold peel-offs finishing it off.

For a final step I rounded the lower corners.

Ddd


Posted by studio3d@ccgmail.net at 6:00 AM PDT
Wednesday, 26 May 2010
A Horse, Of Course
Topic: Other Projects

I spent a couple of days at the church helping to paint pieces of scenery for VBS. The first day I painted a grouping of potted plants and two HUGE birds that will sit on the tops of walls over the platform.

This week I painted a 10-foot horse:

Yes, the back legs are shorter! The horse is walking down an incline in the scene. This is painted on taped-together butcher paper and will be mounted on sheets of styrofoam.

The whole platform will be covered with scenery that represents the inside of an Egyptian museum.

I'm going to be helping with crafts that week, as well.

Ddd


Posted by studio3d@ccgmail.net at 6:00 AM PDT
Tuesday, 25 May 2010
Titling
Topic: Other Projects

This giant vinyl banner came with the color, the artwork and the first caption printed on it. My assignment was to put on the event particulars. I chose a font called Papyrus and worked in full size in CorelDraw. Then I moved the whole text one section at a time onto the 'page' in the program and printed it out. The printed pages had to be all taped together and them I taped it to the BACK of the banner, hung it lengthwise on the patio door and traced it all out with Magic Marker.

I made two of them and delivered them to the church for posting.

Ddd


Posted by studio3d@ccgmail.net at 6:00 AM PDT
Monday, 24 May 2010
Back to the Land
Topic: Other Hobbies

Another year, another garden.

A couple of new things this year: I put in both sweet onions and white onions in addition to the green spring onions. And for the tomato selections I went to a high yield cherry tomato, a roma, and an heirloom mix. I am going to try growing the larger tomatoes in the hanging planters I've seen on TV. For the time being I have them in starter trays and will move them once they are established plants.

As I was weeding the barrels in preparation for planting I was fascinated by the way each barrel has it's own little specialty in the weed department. One barrel is heavy on the thistles, another has these weird weeds that 'pop' and spray seeds when you touch them. Then there are some kind of vines that have purple flowers and a real sticky stem, and in yet another barrel there are milkweed. I've found grass in some, too, but the most FUN is finding the walnuts from across the road that the squirrels have buried in the soil. A few of them sprout but most are just hanging out. This year I found three of them.

Ddd


Posted by studio3d@ccgmail.net at 6:00 AM PDT
Sunday, 23 May 2010
Ruffles and Ridges
Topic: Photo

These fungi were encroaching on another of my oak vegetable barrels. They had to go but I loved their decorative look and photographed them first.

This view from the top really shows off the stripes on their 'petals'. They almost look like they are made of wood.


Ddd


Posted by studio3d@ccgmail.net at 6:00 AM PDT
Saturday, 22 May 2010
Squatters
Topic: Photo

I started cleaning the weeds out of mygarden barrels in preparation for planting vegetables. In one barrel I found these two little squatters. I have no idea their identity and they weren't talking. So I booted them out.


Love the weathered wood in the background.

Ddd


Posted by studio3d@ccgmail.net at 6:00 AM PDT
Friday, 21 May 2010
Come Along For the Ride
Topic: Paper Embroidery

New challenge: combine paper embroidery with spirelli. Now, spirelli is NOT one of my favorite techniques so I usually try to turn the wound bit into something else. I had this pattern in a Joke De Vette book and shrunk it to fit the scalloped circles I had cut with my Cuttlebug.


I actually liked it more than I expected! I used a Nestabilities die to cut out the stitched piece and ran my folded cardstock base through an embossing folder. The trim is made of desktop scraps... and there you go.

Ddd


Posted by studio3d@ccgmail.net at 6:00 AM PDT

Newer | Latest | Older