« July 2010 »
S M T W T F S
1 2 3
4 5 6 7 8 9 10
11 12 13 14 15 16 17
18 19 20 21 22 23 24
25 26 27 28 29 30 31
You are not logged in. Log in
Entries by Topic
All topics  «
3D paperwork
A - Z challenge 5
A - Z challenge 7
A - Z challenge round 4
A to Z challenge round 3
A to Z round 2
A to Z round 6
A-Z round 1
Around the House
Art Challenges
Artist Trading Cards
Backgrounds
Beads
Bible Journaling
Books
Boxes
Collage
Color Challenge
Coloring
cookbook
Die Cuts
Digital Projects
Digital Stamps
Drawing
Dry Embossing
Fabric Stuff
Fantastic Folds
Field Trip
Home Decor
How Does Your Garden Grow?
Hymnal Art
In The Kitchen
In the studio
Jewelry
Lettering
Links
Multi-Technique
Music to Work By
Musings
Nail Art
New Work
Online Class
Other Hobbies
Other Projects
Painting
Paper Embroidery
Paper Piecing
Photo
Pretty Paper
Quilting
Random
reading
Scrap Recovery
scrapbooking
Sewing
Sketch Challenge
Some Backlog
Stamping
Stencils
Stickers
Supplies
Teabag Folding
Techniques
Testing
tips and tricks
Tutorial
Web resources
Welcome to my Blog
Work By My Friends
workflow
Writing
Blog Tools
Edit your Blog
Build a Blog
RSS Feed
View Profile
Group One
In & Out of Studio 3D
Saturday, 3 July 2010
Multiplying
Topic: Photo

While I was photographing the deer yesterday, there were bunnies grazing nearby. I took lots of photos, testing out the camera zoom. Even tho there are lots of shots, there are really just two of these rabbits.


I think these are just adorable.

I am really pleased with this camera. It is amazing that you can actually see individual hairs on these rabbits at such a distance. I think the lens was set to 40x zoom!

Ddd


Posted by studio3d@ccgmail.net at 6:00 AM PDT
Friday, 2 July 2010
Deer (Without Headlights)
Topic: Photo

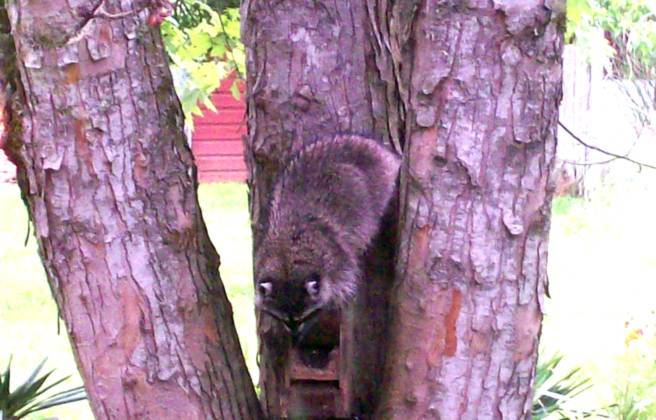
When a visitor made herself at home in the back yard I decided it was an opportunity to test the zoom feature on my new camera.

This was  taken from the back deck and the doe is at the edge of the creek drop-off. If you want to know 'how far' that is you'll have to consult someone else. I don't do math!

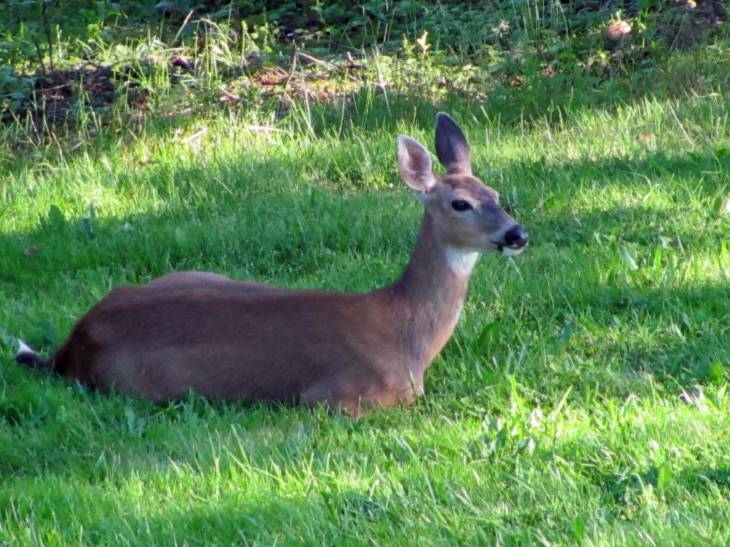
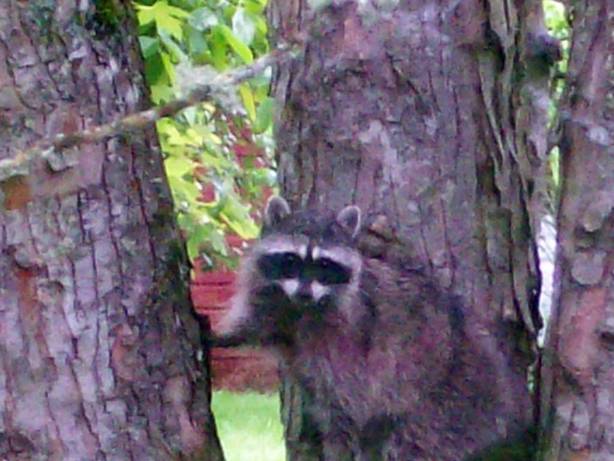
I zoomed in even more and got this shot.

She got tired of my moving around and left shortly but, when I was on the lower deck watering the garden, she ambled back out and grazed for a bit.

A few days ago we watched two does tuck their newborn fawns in the tall grass and go off to graze. We've since seen one doe and one fawn wandering around and have seen single does several times, but never the two fawns together.

Then we also watched for about 15 minutes as two does played tag all over the neighborhood the other day. They took turns chasing and hiding behind trees to jump out at each other. We had to go back and forth from the front yard to the back to keep them in sight. They played over about 3 acres. Round and round.

We have two bucks here as well. One has small horns only about 4 inches long but the other has spikes. They hang out by themselves.

Ddd


Posted by studio3d@ccgmail.net at 6:00 AM PDT
Thursday, 1 July 2010
Butterfly Ring
Topic: Paper Embroidery

This pattern is one I have had on my computer for a long time but never remembered to print out to use until just recently. I LOVE how it works up, though I changed a few things so the straight lines were done point-to-point instead of on lines of holes like designed.

I used four colors of thread to make a gradation from red to yellow, which looks really excellent on the bright blue cardstock.

All the trim, text, and centerpiece are gold peel-off stickers. Then I layered with red and yellow cardstock.

Ddd


Posted by studio3d@ccgmail.net at 6:00 AM PDT
Wednesday, 30 June 2010
Potted Plants
Topic: Other Projects

This was the first project I painted for the Vacation Bible School and the LAST to be set up so I could photograph it! I did these four potted plants on paper which were then mounted on styrofoam so they would stand up.

That upper left plant seems to have a couple of the leaves turned backward on the stems. Hmm - I'd better fix those!

Ddd


Posted by studio3d@ccgmail.net at 6:00 AM PDT
Tuesday, 29 June 2010
Another Big Bird
Topic: Other Projects

Here's the other half to the 'pair' of birds I painted. This one didn't get legs since he sits on a rock!

Not much else to say about it, huh?

Ddd


Posted by studio3d@ccgmail.net at 6:00 AM PDT
Monday, 28 June 2010
Tah Dah!
Topic: Other Projects

As promised - the anniversary cake...

I made a double layer round and a double layer hexagon stacked on a footed clear glass plate. Then I used clear pillars and separator plates to elevate the cake topper.

I covered it and decorated it with buttercream icing (made with sour cream instead of milk) and did all the decoration with piping.

It has been a LOT of years since I did this last but I think it turned out well (the lower left was a transportation faux pas).

And the taste was fantastic, too. The cake is Betty Crocker Golden Vanilla. Yummy!

Ddd


Posted by studio3d@ccgmail.net at 6:00 AM PDT
Sunday, 27 June 2010
Altered Cake Topper
Topic: Other Projects

I went looking for a cake topper for a 60th aniversary cake. No such thing! My solution was to buy a 25th cake topper and edit it so much that it is not recognizable anymore!

Here is a photo of the 'before' cake topper from the catalog (except this is the 50th version with gold trim. The one I used was the 25th version with silver trim.


Here is the 'after'.

The only things original are the clear plastic base, the ruffle, and the couple. However, I used a Krylon paint pen to change their hair from blonde and black to silver/grey.

They had a really twinky 'poof' of netting stuck in behind them so I tore it off and glued on the triptych mirror. Then I tore off the clump of clay from the front edge that said '25' and glued on white paper flowers at their feet.

All of the flowers got self-stick clear rhinestone centers since the 60th is the 'diamond' anniversary. I added flowers to the back of the mirror base as well.


I had chipboard sticker numbers but they were: 1) brown 2) western style. I stuck them to my craft sheet and cut off the pointy edges so they were no longer 'western'. Then I used the Krylon metallic paint marker to make them silver and when that was dry I covered them with 'ice' Stickles.

And tomorrow....

      ... the CAKE!

Ddd


Posted by studio3d@ccgmail.net at 6:00 AM PDT
Updated: Thursday, 24 June 2010 8:52 PM PDT
Saturday, 26 June 2010
Temple Toss
Topic: Other Projects

You never know what you're going to find here, do you? Today it's a game I made for our Vacation Bible School round-up/pre-registration day. It sat at one end of a long table and the kids had to roll golf-balls UP the table and try to get it inside the 'temple' between the pillars.

I made it from a cardgoard box and the tube from gift wrap. I covered it all with three types of metallic tissue: an Egyption print, solid gold, and a black/gold swirl. I trimmed up the temple top and the pillar bottoms with ribbon.

Ddd


Posted by studio3d@ccgmail.net at 6:00 AM PDT
Friday, 25 June 2010
Who's Your Mummy?
Topic: Other Projects

Another project painted for Vacation Bible School: A 10-foot King Tutankhamen sarcophagus. This one is painted on canvas using tempera paints.

I was given an outline and then got a color photograph of the real thing to work from. I had a helper who did the face for me and helped to paint some of the gold lines in the head-piece.  I painted the rest of it and even painted the whole black background.

Here you can see a close-up of the head:

And this close-up of the body shows how the detail was done. I used a template of zig-zags to draw on the gold background with magic marker to make the black lines. Then a foam brush was pressed in between these lines. From a distance it mimics the design on the original.

Just a couple more projects to show and then on to other things.

Ddd


Posted by studio3d@ccgmail.net at 6:00 AM PDT
Thursday, 24 June 2010
Big Bird
Topic: Other Projects

 More painting stuff for Vacation Bible School. I designed and painted this 'buzzard' and then it was mounted on foam. The legs are made of shiny 3/4 inch ribbon and I hung the feet (brown paper mounted on cardboard) from the ribbon.

The body is about 3 feet across, for scale.

Ddd


Posted by studio3d@ccgmail.net at 6:00 AM PDT
Wednesday, 23 June 2010
You Be the Judge
Topic: Photo

LOOKIE!

I mentioned (complained) a while back that the preview screen on my digital camera had burned out, making photography somewhat hit and miss. I finally had enough and went looking for a replacement (and an upgrade, while I was at it).

Old camera: Kodak EasyShare C633 with 6.1 mega pixels and a 3X optical zoom.

New camera: Canon PowerShot SX120 IS with 10.0 mega pixels and a 10X optical zoom.

For comparison, I took the same photo across the valley of this barn. It is about 1/6 mile (300 yards) away.

With the old camera:


With the new camera:


Just a LITTLE difference, huh!?! Including the ability to preview the shot and center the subject. Oh, YEAH!

I am hoping my card and project photos also show this much improvement in quality...time will tell. Actually, TOMORROW will tell, as that is the first project that will be photographed with the new equipment.

Stay tuned...


Ddd


Posted by studio3d@ccgmail.net at 6:00 AM PDT
Tuesday, 22 June 2010
'Til the Cows Come Home
Topic: Photo

We have no animals on our farm, yet, but I woke up this morning and found this neighbor trying to peek in the windows of the camper! I'm calling him Tom, now.

There are actually a pair of these beefers who ALWAYS are together so you'd think they were conjoined! They are SO curious and follow us around the fence line watching to make sure we know what we're doing.

They won't be petted but if you are patient they will come and touch their noses to your hand briefly. THEY have to be the one doing the touching.

Here's another shot of Tom, peeping at me. Love the colors created by the backlighting of the sunrise.

Ddd


Posted by studio3d@ccgmail.net at 6:00 AM PDT
Monday, 21 June 2010
Busted!
Topic: Around the House

A glance out the front window the other day and I spied this bandit raiding the squirrel feeder. THAT'S not a squirrel!

When one shot caused the flash on the camera to go off she suddenly realized she was BUSTED!

Uh-oh! She watched me for a few minutes and then quietly walked down the back of the tree and waddled off around to the back of the house where she lives.

We'll se her again - as soon as somebody steps out on the deck and hollers, "Racoon buddies, I've got marshmallows!" Then she'll come running up to the bottom of the deck stairs to beg for treats.

Ddd


Posted by studio3d@ccgmail.net at 6:00 AM PDT
Sunday, 20 June 2010
Shell Sparkle
Topic: Stamping

Another new stamp (they were having a 40% off sale). This is one of the style I especially like that looks like it is sketched. I stamp these once on scrap paper then on the panel to look more like pencil drawing. I colored with watercolor pencils and blended with aquabrush. 

I used a Cuttlebug frame folder to impress right over the stamped image and then traced over all the raised portions with Stickles. Sticky-back pearls are added at the frame corners.

I rounded the corners of the embossed panel, the designer paper and the folded base card before adhering all together.

Ddd


Posted by studio3d@ccgmail.net at 6:00 AM PDT
Saturday, 19 June 2010
This Is My Country
Topic: Dry Embossing

Assignment: Create a card for swap that tells about your country. So I created this little history lesson!

The stars are a Cuttlebug folded on which I applied Adriondack 'denim' directly on the folder before impressing. The same is true of the stripes using Adriondack 'cranberry' ink. I tore both and glued together.

I used a Marvy marker to hand write in the patriotic phrases and used the denim ink to stamp the image at the lower right.

After mounting on white then cranberry cardstock I added a gold star to the stamped image and a border of gold stars to represent the flagpole.

Ddd


Posted by studio3d@ccgmail.net at 6:00 AM PDT
Friday, 18 June 2010
Oh Happy Day
Topic: Stamping

This is another of the stamps from the new set I got. See how the words are all embedded in the flowers? This is the commonality in them. The text at the bottom of the card, though, is a rub-on but I thought the style really fit.

I added Stickles to all the 'daisies' including the one at the bottom. The ribbon is tied around the front panel which has been rounded at the upper left and lower right.

Ddd


Posted by studio3d@ccgmail.net at 6:00 AM PDT
Thursday, 17 June 2010
Destination
Topic: Stamping

Sometimes I get a ways into a card, don't like the way it is going, but just keep adding stuff trying to 'rescue' it. Can't seem to just let it go.

This is just such a card...

The lower image is stamped. The rest is designer papers and stickers.

So there you go. It is what it is and it is done!

Ddd


Posted by studio3d@ccgmail.net at 6:00 AM PDT
Wednesday, 16 June 2010
Wheel On In
Topic: Stamping

What a cheery card! Maybe it will finally usher in some sunshine at my house!

I used the Cuttlebug to cie-cut the wheelbarrow image and the designer paper behind it. Then prepared the yellow backing card with Cuttlebug embossing. The swirls at the corner were scraps I had from way back and I added sticky-back pearls around the image.

The image panel and the silk flower are mounted 3D. I used Sharpie marker to color the center of the flower to match the stamped image and also colored it's leaves.

Ddd


Posted by studio3d@ccgmail.net at 6:00 AM PDT
Tuesday, 15 June 2010
A Little Swagger
Topic: Paper Embroidery

More combining stamping with stitching... This stamp is from a new set for me. After coloring, I pricked out the pattern at the bottom and used colors to match the focal image. I added a Cuttlebug embossed border at the top and then added sticky-back pearls to all the flower centers throughout.

I backed with pink and green to match the flowers, leaves and swags.

Ddd


Posted by studio3d@ccgmail.net at 6:00 AM PDT
Monday, 14 June 2010
Pink and Blue
Topic: Stamping

Same stamped image as yesterday with a little twist on the colors. I went more pastel with this card. I used an embossing folder on the pinc card front and Nestabilities dies to cut the image and a blue backing. The two panels are mounted 3D.

I added Stickles to all the flowers and a text sticker.

Ddd


Posted by studio3d@ccgmail.net at 6:00 AM PDT

Newer | Latest | Older