« July 2010 »
S M T W T F S
1 2 3
4 5 6 7 8 9 10
11 12 13 14 15 16 17
18 19 20 21 22 23 24
25 26 27 28 29 30 31
You are not logged in. Log in
Entries by Topic
All topics  «
3D paperwork
A - Z challenge 5
A - Z challenge 7
A - Z challenge round 4
A to Z challenge round 3
A to Z round 2
A to Z round 6
A-Z round 1
Around the House
Art Challenges
Artist Trading Cards
Backgrounds
Beads
Bible Journaling
Books
Boxes
Collage
Color Challenge
Coloring
cookbook
Die Cuts
Digital Projects
Digital Stamps
Drawing
Dry Embossing
Fabric Stuff
Fantastic Folds
Field Trip
Home Decor
How Does Your Garden Grow?
Hymnal Art
In The Kitchen
In the studio
Jewelry
Lettering
Links
Multi-Technique
Music to Work By
Musings
Nail Art
New Work
Online Class
Other Hobbies
Other Projects
Painting
Paper Embroidery
Paper Piecing
Photo
Pretty Paper
Quilting
Random
reading
Scrap Recovery
scrapbooking
Sewing
Sketch Challenge
Some Backlog
Stamping
Stencils
Stickers
Supplies
Teabag Folding
Techniques
Testing
tips and tricks
Tutorial
Web resources
Welcome to my Blog
Work By My Friends
workflow
Writing
Blog Tools
Edit your Blog
Build a Blog
RSS Feed
View Profile
Group One
In & Out of Studio 3D
Friday, 16 July 2010
Birdhouse on a Branch
Topic: Stamping

When I bought this stamp set of birdhouse images I expected it to be really neat to work with. But I soon realized that stamping the birdhouse on white and mounting it on color makes it look goofy. One would normally see through the bars to the background.

So for this one I used colored pencils to mimic the background color in the image and trimmed close around the birdhouse and chain. The backing piece was cut out with Nestabilities label 11 and embossed with a Cuttlebug folder, using only a portion of it for the top and another part for the bottom.

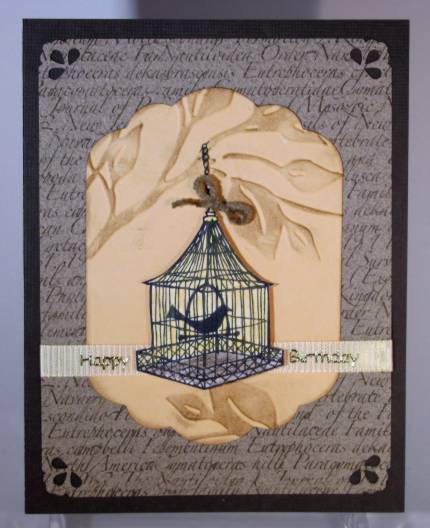
The piece was then brushed lightly with distress ink to bring up the texture more. I added a piece of calligraphy behind it and corner punched to mimic the edges of the centerpiece. A ribbon was added as a carrier for the gold peel-off greeting stickers.

I stacked chololate cardstock base, calligraphy, leafy piece and them popped up the birdhouse on foam dots. As a final touch I tied a bow in some soft cord to make it look like the birdhouse is tied to the chain.

Ddd


Posted by studio3d@ccgmail.net at 6:00 AM PDT
Thursday, 15 July 2010
You Make Me Smile
Topic: Stamping

Back to stamping today...

It's been a while since I used this Anna Griffin stamp. Love it! I colored it with watercolor pencils and blended with an aqua-brush. I picked up a new Nestability die that is not a small of scallops as my usual one. I like this for a more elegant feel.

The background paper is from an old 'scrapbook page-a-day' calendar. I tied on a ribbon and then added a clear sticker that is placed on the same cardstock as the base card and trimmed around.

Both the stamped image and the text sticker are on foam tape for dimension.

Ddd


Posted by studio3d@ccgmail.net at 6:00 AM PDT
Wednesday, 14 July 2010
Yellow Bib
Topic: Paper Embroidery

The stitching on this bib looks better in real life as the photo does not give the full impace of the yellow on yellow. I trimmed around the outline and added a sticker to the bib.

I found some great printed paper for the background and added a vellum text sticker. That sticker had a pink heart on the right which did not reflect the color scheme at all so I popped on the yellow flower and tucked in a fold of checkered blue ribbon to 'give it a reason for being there'.

This turns a 'frilly' bib into something a baby boy might wear.

Ddd


Posted by studio3d@ccgmail.net at 6:00 AM PDT
Tuesday, 13 July 2010
Light the Candle
Topic: Stamping

Back to the studio today. I did some more stamping and colored with watercolor pencils and aqua-brush. Then I used two different Stickles to color the image and added sticky pearls to the lily centers.

Layers of card are either cut with Nestabilities or given punched/embossed corners and then mounted directly or raised on foam dots for variety.

As a last touch I colored some paper flowers and layered them at the bottom of the image. These got sticky pearls in their centers like the stamped ones.

Ddd


Posted by studio3d@ccgmail.net at 6:00 AM PDT
Monday, 12 July 2010
High on a Hill
Topic: Collage

A few days ago I got a travel brochure with a great illustration I had to use. There was postal smudges and advertising text in the sky portion so I cut the whole sky away. Then I inserted a great atmospheric sky that I had saved from an old calendar.

I backed this with olive green cardstock and placed brads at the four corners and added the stack to a folded brown card base.

I used scraps of the same colors to stamp the greeting with ColorBok chalk ink and added a single row of piercing. The two ends of the piercing got brads of their own and the panel was placed on the card with foam dots for 3D effect.

I love it when supplies come 'free' in the mail.

Ddd


Posted by studio3d@ccgmail.net at 6:00 AM PDT
Sunday, 11 July 2010
Wild About You
Topic: Photo

Wild roses grow along the roadside too.

So, between my neighbors and God, we've got a pretty nice garden around here. And nothing for ME to weed or prune.

Ddd


Posted by studio3d@ccgmail.net at 6:00 AM PDT
Saturday, 10 July 2010
Social Climber
Topic: Photo

I think this is a clemantis. If I am wrong, keep it to yourself!

The color on this shot is not a true as the other florals. This is really quite a dark purple bloom. I think the direct sunlight washed it out.

Winding its way around the fence behind a neighborhood mailbox.

Ddd


Posted by studio3d@ccgmail.net at 6:00 AM PDT
Updated: Thursday, 24 June 2010 8:40 PM PDT
Friday, 9 July 2010
No Wine From This
Topic: Photo

Oregon Grape, despite the name, is totally unsuited for making wine, juice, jelly or any other edible concoction.

I didn't realize the leaves turned red in the summer - thought that was an autumn 'thing'.

Growing in the ditch...

Ddd


Posted by studio3d@ccgmail.net at 6:00 AM PDT
Thursday, 8 July 2010
Loves Me, Loves Me Not
Topic: Photo

I know this isn't really a daisy. In fact, it is a weed. But you could still play the game!

Only one single bloom on the whole forest floor.

Ddd


Posted by studio3d@ccgmail.net at 6:00 AM PDT
Wednesday, 7 July 2010
Any Other Name?
Topic: Photo

Such a wet spring has left few beautiful blooms on local roses. Fortunately, a few have survived but the leaves seem a little 'rusty' in places.


These are miniature roses - about twice life size in the pictures.

Ddd


Posted by studio3d@ccgmail.net at 6:00 AM PDT
Tuesday, 6 July 2010
Lily Liver
Topic: Photo

Really? Nah, it's just plain Lily.

These beauties are WAY down the road. I pass by them every day as I drive in and out so I wanted to get a close-up look at them. Worth the trip!


All these shots were taken about 6 pm. That explains the angle of the light.

Ddd


Posted by studio3d@ccgmail.net at 6:00 AM PDT
Monday, 5 July 2010
Down the Garden Path
Topic: Photo

Actually, more photos from down the road. My next stop was the gorgeous poppies across the road. These look like paintings instead of photos and I especially like the backlit ones for the intensity and variety of colors.


Thanks to my neighbors who grow all the flowers so I don't have to!

Ddd


Posted by studio3d@ccgmail.net at 6:00 AM PDT
Sunday, 4 July 2010
Waiting For the Fruit
Topic: Photo

I took my new camera for a walk... up the road to photograph flowers! The first thing I ran across was LOTS of blackberry vines. They are blooming at the tops and off the road so I used the zoom to take these shots from about 12 feet.


Amazing detail. Hand-held camera, auto-focus, great zoom!

Ddd


Posted by studio3d@ccgmail.net at 6:00 AM PDT
Saturday, 3 July 2010
Multiplying
Topic: Photo

While I was photographing the deer yesterday, there were bunnies grazing nearby. I took lots of photos, testing out the camera zoom. Even tho there are lots of shots, there are really just two of these rabbits.


I think these are just adorable.

I am really pleased with this camera. It is amazing that you can actually see individual hairs on these rabbits at such a distance. I think the lens was set to 40x zoom!

Ddd


Posted by studio3d@ccgmail.net at 6:00 AM PDT
Friday, 2 July 2010
Deer (Without Headlights)
Topic: Photo

When a visitor made herself at home in the back yard I decided it was an opportunity to test the zoom feature on my new camera.

This was  taken from the back deck and the doe is at the edge of the creek drop-off. If you want to know 'how far' that is you'll have to consult someone else. I don't do math!

I zoomed in even more and got this shot.

She got tired of my moving around and left shortly but, when I was on the lower deck watering the garden, she ambled back out and grazed for a bit.

A few days ago we watched two does tuck their newborn fawns in the tall grass and go off to graze. We've since seen one doe and one fawn wandering around and have seen single does several times, but never the two fawns together.

Then we also watched for about 15 minutes as two does played tag all over the neighborhood the other day. They took turns chasing and hiding behind trees to jump out at each other. We had to go back and forth from the front yard to the back to keep them in sight. They played over about 3 acres. Round and round.

We have two bucks here as well. One has small horns only about 4 inches long but the other has spikes. They hang out by themselves.

Ddd


Posted by studio3d@ccgmail.net at 6:00 AM PDT
Thursday, 1 July 2010
Butterfly Ring
Topic: Paper Embroidery

This pattern is one I have had on my computer for a long time but never remembered to print out to use until just recently. I LOVE how it works up, though I changed a few things so the straight lines were done point-to-point instead of on lines of holes like designed.

I used four colors of thread to make a gradation from red to yellow, which looks really excellent on the bright blue cardstock.

All the trim, text, and centerpiece are gold peel-off stickers. Then I layered with red and yellow cardstock.

Ddd


Posted by studio3d@ccgmail.net at 6:00 AM PDT
Wednesday, 30 June 2010
Potted Plants
Topic: Other Projects

This was the first project I painted for the Vacation Bible School and the LAST to be set up so I could photograph it! I did these four potted plants on paper which were then mounted on styrofoam so they would stand up.

That upper left plant seems to have a couple of the leaves turned backward on the stems. Hmm - I'd better fix those!

Ddd


Posted by studio3d@ccgmail.net at 6:00 AM PDT
Tuesday, 29 June 2010
Another Big Bird
Topic: Other Projects

Here's the other half to the 'pair' of birds I painted. This one didn't get legs since he sits on a rock!

Not much else to say about it, huh?

Ddd


Posted by studio3d@ccgmail.net at 6:00 AM PDT
Monday, 28 June 2010
Tah Dah!
Topic: Other Projects

As promised - the anniversary cake...

I made a double layer round and a double layer hexagon stacked on a footed clear glass plate. Then I used clear pillars and separator plates to elevate the cake topper.

I covered it and decorated it with buttercream icing (made with sour cream instead of milk) and did all the decoration with piping.

It has been a LOT of years since I did this last but I think it turned out well (the lower left was a transportation faux pas).

And the taste was fantastic, too. The cake is Betty Crocker Golden Vanilla. Yummy!

Ddd


Posted by studio3d@ccgmail.net at 6:00 AM PDT
Sunday, 27 June 2010
Altered Cake Topper
Topic: Other Projects

I went looking for a cake topper for a 60th aniversary cake. No such thing! My solution was to buy a 25th cake topper and edit it so much that it is not recognizable anymore!

Here is a photo of the 'before' cake topper from the catalog (except this is the 50th version with gold trim. The one I used was the 25th version with silver trim.


Here is the 'after'.

The only things original are the clear plastic base, the ruffle, and the couple. However, I used a Krylon paint pen to change their hair from blonde and black to silver/grey.

They had a really twinky 'poof' of netting stuck in behind them so I tore it off and glued on the triptych mirror. Then I tore off the clump of clay from the front edge that said '25' and glued on white paper flowers at their feet.

All of the flowers got self-stick clear rhinestone centers since the 60th is the 'diamond' anniversary. I added flowers to the back of the mirror base as well.


I had chipboard sticker numbers but they were: 1) brown 2) western style. I stuck them to my craft sheet and cut off the pointy edges so they were no longer 'western'. Then I used the Krylon metallic paint marker to make them silver and when that was dry I covered them with 'ice' Stickles.

And tomorrow....

      ... the CAKE!

Ddd


Posted by studio3d@ccgmail.net at 6:00 AM PDT
Updated: Thursday, 24 June 2010 8:52 PM PDT

Newer | Latest | Older