« November 2010 »
S M T W T F S
1 2 3 4 5 6
7 8 9 10 11 12 13
14 15 16 17 18 19 20
21 22 23 24 25 26 27
28 29 30
You are not logged in. Log in
Entries by Topic
All topics  «
3D paperwork
A - Z challenge 5
A - Z challenge 7
A - Z challenge round 4
A to Z challenge round 3
A to Z round 2
A to Z round 6
A-Z round 1
Around the House
Art Challenges
Artist Trading Cards
Backgrounds
Beads
Bible Journaling
Books
Boxes
Collage
Color Challenge
Coloring
cookbook
Die Cuts
Digital Projects
Digital Stamps
Drawing
Dry Embossing
Fabric Stuff
Fantastic Folds
Field Trip
Home Decor
How Does Your Garden Grow?
Hymnal Art
In The Kitchen
In the studio
Jewelry
Lettering
Links
Multi-Technique
Music to Work By
Musings
Nail Art
New Work
Online Class
Other Hobbies
Other Projects
Painting
Paper Embroidery
Paper Piecing
Photo
Pretty Paper
Quilting
Random
reading
Scrap Recovery
scrapbooking
Sewing
Sketch Challenge
Some Backlog
Stamping
Stencils
Stickers
Supplies
Teabag Folding
Techniques
Testing
tips and tricks
Tutorial
Web resources
Welcome to my Blog
Work By My Friends
workflow
Writing
Blog Tools
Edit your Blog
Build a Blog
RSS Feed
View Profile
Group One
In & Out of Studio 3D
Sunday, 21 November 2010
Warm Frosty
Topic: Scrap Recovery

This cute little snowman had a little scarf which I traded out using some lumpy yarn. I actually cut slits in the card and tucked the yarn ends in them. He doesn't look nearly so chilly now.

The text is a thick acrylic sticker.

Ddd


Posted by studio3d@ccgmail.net at 6:00 AM PST
Saturday, 20 November 2010
Blue Birds and Berries
Topic: Scrap Recovery

Cut from a recycled card with Nestabilities, these blue birds are mounted over a glitter and striped border cut from another card.

I chose a blue folded cardstock base to match the color of the birds and added red rhinestones to most of the berries - using three sizes for variety.

Ddd


Posted by studio3d@ccgmail.net at 6:00 AM PST
Friday, 19 November 2010
Gold and Green
Topic: Scrap Recovery

I cut this ornament from a catalog. With such beautiful scrollwork on it I simply traced it with diamond Stickles, including the cap and string. It is mounted on a die cut which floats over gold on gold scraps with foam dots underneath.

This is a top-fold card.

Ddd


Posted by studio3d@ccgmail.net at 6:00 AM PST
Thursday, 18 November 2010
Three Wishes
Topic: Scrap Recovery

These three snowmen were cut and embossed from a single card with a circle Nestability. Gold paper was cut and hole-punched to mount behind them to turn them into ornaments. A gold thread of the same paper is used to 'hang' them from the top fold of the card.

In my quest to put Stickles on everything I touch, I used it on the snowy parts of these three guys.

The text greeting is stamped.

Ddd


Posted by studio3d@ccgmail.net at 6:00 AM PST
Wednesday, 17 November 2010
In the Manger
Topic: Scrap Recovery

What it's all about - this little babe in the manger. I used concentric Nestability dies to cut the illustration and two backing cards. The top two are flat mounted and raised upon foam dots over the third.

I stamped the corners and used a black pen to complete the 'frame'

Ddd


Posted by studio3d@ccgmail.net at 6:00 AM PST
Tuesday, 16 November 2010
Another Two-fer
Topic: Scrap Recovery

I somehow came up with these Santas in holly wreaths and used a Nestability circle die to cut them out. Scrapbook paper makes up the background, mounted on red cardstock. On the background I used diamond Stickles to trace out the yellow lines.

I also added star dust Stickles to Santa's beard.

Ddd


Posted by studio3d@ccgmail.net at 6:00 AM PST
Monday, 15 November 2010
Berry Basket
Topic: Die Cuts

More of the victorian illustrations, this time framed out in green. Otherwise the process was the same as yesterday's cards.

I also used the same peel-off greetings.

Ddd


Posted by studio3d@ccgmail.net at 6:00 AM PST
Sunday, 14 November 2010
Ding Dong Bells
Topic: Die Cuts

A few years back someone sent to me a big stack of 'victorian' illustrations that are framed in either green or red and cut out save for little bridge pieces that connect the picture to the frame.

For these I used a nestability die to create an aperture for it in a bronze toned cardstock, rounded the corners, and raised it up on foam dots over cream cardstock. This background lets the bridges blend in.

The text is gold peel-off stickers.

Ddd


Posted by studio3d@ccgmail.net at 6:00 AM PST
Saturday, 13 November 2010
Flashy Poinsettia
Topic: Collage

This image is one of the prints out of the catalog I picked up at Goodwill. I colored with Copic markers and added diamond Stickles to the evergreens and to the center of the blossom.

The background paper is some gold on gold text cardstock that I picked up on sale last year. It came in 12 x 12 sheets so I can get quite a few cards out of each one.

What I can't  do is make metallics like this look good in a photograph.

Ddd


Posted by studio3d@ccgmail.net at 6:00 AM PST
Friday, 12 November 2010
Forest For The Trees
Topic: Scrap Recovery

Yep, I'm still making Christmas cards out of last year's received cards. This one had such a nice illustration on it so I didn't adorn it too much.

The gold tree is a sticker on which the rhinestones were already included. I did add diamond Stickles to the gold balls on the sticker tree and stamped a portion of a stamp for the text.

Ddd


Posted by studio3d@ccgmail.net at 6:00 AM PST
Thursday, 11 November 2010
Sparkle Santa
Topic: Stamping

Colored up with Copic markers and cut with nestability dies, this Santa also features Star Dust Stickles on all of the fur trim. It's a jolly little fellow and I raised him up on foam dots over forest green folded cardstock as a base.


Ddd

Posted by studio3d@ccgmail.net at 6:00 AM PST
Wednesday, 10 November 2010
The Great Wall
Topic: Around the House

Another household project completed... I did NONE of this, though. Hubby has worked on this wall for about three years, a block here and a block there. It all went uphill and had to be leveled at the ground level. This summer, as he got to the final upper curve he had a pro come in to lay the last 20 base blocks. Then he hauled and set the rest of the blocks, hauled and filled all of the dirt, and last week our neighbors told us they were changing their landscaping and asked if we wanted the 5 shrubs.

It's a very shady spot and we're hoping these shrubs will survive there. Next spring we'll do some fill in with ground cover or flowering plants that are shade-loving.

Ddd


Posted by studio3d@ccgmail.net at 6:00 AM PST
Tuesday, 9 November 2010
Purple Ladder Card
Topic: Fantastic Folds

Are these forget-me-nots or violets? Maybe they are neither? Maybe some are one and some another? So, we'll call them little purple flowers.

The main image on the left is a 3D foil element. The rest of the flowers are rub-ons (mostly) I had three little pieces of the 3D I left off and scattered them around. Can you find them?

A stamped text and a silver peel-off text sticker finish this off.

Ddd


Posted by studio3d@ccgmail.net at 6:00 AM PST
Monday, 8 November 2010
Yellow Rose Ladder Card
Topic: Fantastic Folds

I liked the scalloped die cuts so much that I did it again for this card. However, I did add more of the gold peel-offs in the form of borders and an outline rose to counterbalance the main element.

Sorry that so much metallic and foil is a hard read for the camera. These look awesome in person.

Ddd


Posted by studio3d@ccgmail.net at 6:00 AM PST
Sunday, 7 November 2010
Pansy Ladder Card
Topic: Fantastic Folds

Hey! It's a flower I know the name of!

The flowers and borders for this card are from a foil 3D sheet. I used scalloped nestability die cuts to create some framing and added stamping and a silver peel-off sticker for text.

All of the 3D sheets I've been showing on these cards are from some new realeases over at Paper Wishes. They do NOT require hours of tedious citting as they are all die cut and just punch out! Awesome!

Ddd


Posted by studio3d@ccgmail.net at 7:00 AM PDT
Saturday, 6 November 2010
Lady Slipper Ladder Card
Topic: Fantastic Folds

Another unidentified flower that I'm calling Lady Slippers - even if they are not!

This is another 3D element that I took the extra parts to create a separate arrangement with. I've had these checkered borders in my sticker stash forever and this seemed like the right place for them. The butterflies were on this same sticker sheet and I mounted them like yesterday's - stuck in the center, raised wings. Then I outlined the butterflies and decorated the flowers with gold Stickles.

The same stamp and gold peel-off were used for the text.

Ddd


Posted by studio3d@ccgmail.net at 6:00 AM PDT
Friday, 5 November 2010
Bluebell Ladder Card
Topic: Fantastic Folds

I have no idea if these are really bluebells but I'm calling them by that name anyway.

For the construction of this card I skewed the ladder to one side as I liked the balance better. Also, instead of making up the 3D as designed I took all the parts and constructed a second flower grouping for the background. Stickles used liberally on the flowers, again.

The three butterflies were on the 3D sheet but I overlaid each with a silver peel-off butterfly and mounted all of them with the body stuck down and the wings raised.

I added black card on the first step to make the peel-off easier to see and added an organza tie. The text on the front panel is stamped.

Ddd


Posted by studio3d@ccgmail.net at 6:00 AM PDT
Thursday, 4 November 2010
Daisy Thank You
Topic: Fantastic Folds

One of my groups had a challenge to create a 'step ladder card' - so I created 6. I needed some appreciation cards for a pastor appreciation Sunday and these seemed to be special enough to suit.

The first is made with some new 3D sheets I just got. This sheet had three sizes of the daisy bouquet - the smallest one is cut out but not 3D. I chose cardstock that matched the main flowers and ribbon that matched the background flowers.

The daisies all have gold Stickles in the centers and the purple flowers are covered in silvery Stickles. The text in the scalloped nestability die cut is stamped. The 'thank you' text is a gold peel-off sticker.

Ddd


Posted by studio3d@ccgmail.net at 6:00 AM PDT
Wednesday, 3 November 2010
Let's Ride
Topic: Multi-Technique

I had to add a new Topic category for cards like this one. It uses dry embossing in 2 areas, 3D elements, a constructed piece with die-cut parts, and stickers.

I started with the 3D element from a sheet given me years ago. Then I had a sketch challenge on one of my groups and set about trying to put them together. The circle was a part of the sketch and I had an inspiration to use a nestabilities die set and some spirelli with silver cord to make a motorcycle tire. Cool, huh?

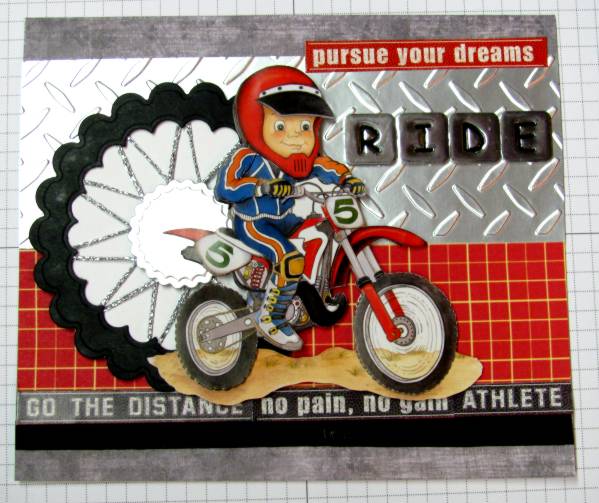
I next recalled that I had the Cuttlebug folder for diamond plate and used that on some silver cardstock. The red checked paper fit the colors in the illustration. I pulled out a sheet of cardstock stickers with a sports theme to make the top and bottom borders and added a Cuttlebug border of 'wheels' along the bottom.

The base cardstock is a gray distressed surface and the final touch was the thick silver metal stickers 'RIDE'.

This is going to a friend who will soon be setting out on a 2 month motorcycle ride.

Ddd


Posted by studio3d@ccgmail.net at 6:00 AM PDT
Tuesday, 2 November 2010
Wishing Santa
Topic: Scrap Recovery

Simple.

Die-cut image - glued to patterend cardstock - glued to folded card base - stamped with greeting.

Done.

Ddd


Posted by studio3d@ccgmail.net at 6:00 AM PDT

Newer | Latest | Older