« March 2011 »
S M T W T F S
1 2 3 4 5
6 7 8 9 10 11 12
13 14 15 16 17 18 19
20 21 22 23 24 25 26
27 28 29 30 31
You are not logged in. Log in
Entries by Topic
All topics  «
3D paperwork
A - Z challenge 5
A - Z challenge 7
A - Z challenge round 4
A to Z challenge round 3
A to Z round 2
A to Z round 6
A-Z round 1
Around the House
Art Challenges
Artist Trading Cards
Backgrounds
Beads
Bible Journaling
Books
Boxes
Collage
Color Challenge
Coloring
cookbook
Die Cuts
Digital Projects
Digital Stamps
Drawing
Dry Embossing
Fabric Stuff
Fantastic Folds
Field Trip
Home Decor
How Does Your Garden Grow?
Hymnal Art
In The Kitchen
In the studio
Jewelry
Lettering
Links
Multi-Technique
Music to Work By
Musings
Nail Art
New Work
Online Class
Other Hobbies
Other Projects
Painting
Paper Embroidery
Paper Piecing
Photo
Pretty Paper
Quilting
Random
reading
Scrap Recovery
scrapbooking
Sewing
Sketch Challenge
Some Backlog
Stamping
Stencils
Stickers
Supplies
Teabag Folding
Techniques
Testing
tips and tricks
Tutorial
Web resources
Welcome to my Blog
Work By My Friends
workflow
Writing
Blog Tools
Edit your Blog
Build a Blog
RSS Feed
View Profile
Group One
In & Out of Studio 3D
Wednesday, 23 March 2011
Red on Red
Topic: 3D paperwork

This 3D image is one I printed some time ago off the internet on a free site. I like how the image escapes its frame - and I trimmed off the outer border of the frame to make it fit the card better.

I added a rich red printed paper over the green card base to further enhance the card.

The text is gold peel-off

Ddd


Posted by studio3d@ccgmail.net at 6:00 AM PDT
Tuesday, 22 March 2011
Love Those Pansies
Topic: 3D paperwork

 I think these may be the last of the foil 3D sheets I bought last fall. Love them! Especially since they are punch out instead of cut out.

This one comes with the oval backing which helps with design. I tore a piece of printed paper for the left edge and added the image along with two extra flowers that were part of the page.

Purple folded cardstock and a silver peel-off greeting were the only other touches needed.

Ddd


Posted by studio3d@ccgmail.net at 6:00 AM PDT
Monday, 21 March 2011
Recipe For Love
Topic: 3D paperwork

I created another countertop scene for this card but left it in portrait format because of the size of the 3D element. This is the 2nd half of yesterday's illustration.

I had the text sticker with some kitchen stickers and decided they fit this card.

Ddd


Posted by studio3d@ccgmail.net at 6:00 AM PDT
Sunday, 20 March 2011
Blueberry Kitchen
Topic: 3D paperwork

I've had this 3D illustration printed off for literally years and just got around to cutting it out! When I did, I thought that 6 layers was really too much so I divided the step-outs into every other one and made two arrangements. One will be featured tomorrow.

For this one I turned the card to landscape and used patterned paper on the upper part to look like wallpaper. This allowed me to 'set' my pie on the countertop. I used a sticker to add a picture to the 'wall' to make this really feel like a kitchen.

The wooden spoon and fork are also stickers. I didn't add a sentiment to this one.

Ddd


Posted by studio3d@ccgmail.net at 6:00 AM PDT
Saturday, 19 March 2011
Early Easter
Topic: Scrap Recovery

These tulips are from the surplus stamp catalog, colored with watercolor markers and trimmed with a craft knife.

The background is from a pad of printed cardstock I recently picked up and I stamped the text.

Folded green cardstock forms the base and I went with an asymetrical arrangement - even running elements off the edge for an edgy effect.

Ddd


Posted by studio3d@ccgmail.net at 6:00 AM PDT
Friday, 18 March 2011
Flower Cart Birthday
Topic: Scrap Recovery

More green cardstock, more striped paper, more rub-on greeting, more colored image. Different sentiment and image - same techniques.

Certainly made for a speedy card since all the elements were already there.

Ddd


Posted by studio3d@ccgmail.net at 6:00 AM PDT
Thursday, 17 March 2011
Thanks for the Iris
Topic: Scrap Recovery

Back to using images from the surplus stamp catalog I bought at Goodwill. I used watercolor markers on this and trimmed it out with a craft knife. The striped paper with a built in border really sets off the image.

I added it all to a green folded card base and used a rub-on for the greeting.

Ddd


Posted by studio3d@ccgmail.net at 6:00 AM PDT
Wednesday, 16 March 2011
Quilt Card
Topic: Paper Embroidery

An online friend designed some quilt blocks in paper embroidery. I think they work up nicely and I decided to feature this one on more of the yellow rose printed cardstock.

The corners of the stitched panel are rounded and I added gold peel-off corners to the rose cardstock. The text is done win letter stickers and I attached it all to a orange folded card base.

Ddd


Posted by studio3d@ccgmail.net at 6:00 AM PDT
Tuesday, 15 March 2011
Golden Roses
Topic: 3D paperwork

From one of the sheets of foiled 3D images I chose this yellow rose. Printed cardstock with a yellow rose fabric print made the perfect backdrop. I backed the 3D with black for a sharp contrase and added it to a dark green folded card base.

A gold peel-off made the perfect text finish.

Ddd


Posted by studio3d@ccgmail.net at 6:00 AM PDT
Monday, 14 March 2011
Missing Ewe
Topic: Die Cuts

This is one of those ideas I sketched out on my church bulletin (bad girl) and it turned out exactly like I wanted!

I used scalloped circle nextabilities in every other size and then ran them through the d'vine swirls Cuttlebug folder. I used oval nestabilities for the faces and the ears (cut in half). Then the parts are layered with foam dots and the faces are drawn on with white pen.

The 'missing' is a portion of a Cuttlebug diecut and the 'ewe' is letter stickers. I added a ribbon bow to the girl sheep.

These make me laugh.

Ddd


Posted by studio3d@ccgmail.net at 6:00 AM PDT
Sunday, 13 March 2011
Branching Out with Pearls
Topic: Teabag Folding

ASSIGNMENT: create a care combining stitching and teabag folding

After stitching I added stick-back pearls to the centers of the flowers. I had this teabag fold already done and used two layers of pink cardstocks to bring out the color of the flowers.

Been a L-O-N-G time since I did teabag folding.

Ddd


Posted by studio3d@ccgmail.net at 6:00 AM PST
Saturday, 12 March 2011
I Love Oregon
Topic: Stamping

ASSIGNMENT: Make a stamped card celebrating the Birthday of Oregon (February 14) - must use hearts

I used 4 stamps for this: 1) the wallpaper is a 1 1/2 inch cube stamped repeatedly 2) the window is one of my hand-carved stamps 3) the tree on either side of the scene is a SU stamp 4) the background is an unknown unmounted stamp.

The scene was stamped using liberal masking and is all watercolored using colored pencils and an aquabrush.

I mounted this on a lime green paisley pattern over a white folded card base. Three different stickers make up the text.

Ddd


Posted by studio3d@ccgmail.net at 6:00 AM PST
Friday, 11 March 2011
Dandelion Script
Topic: Dry Embossing

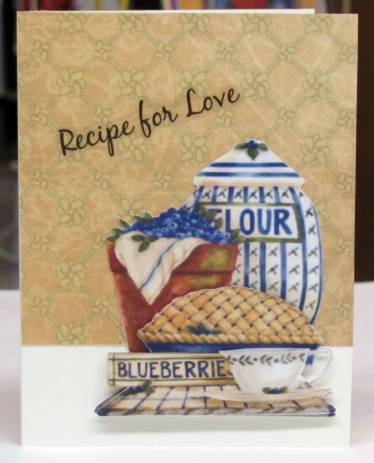
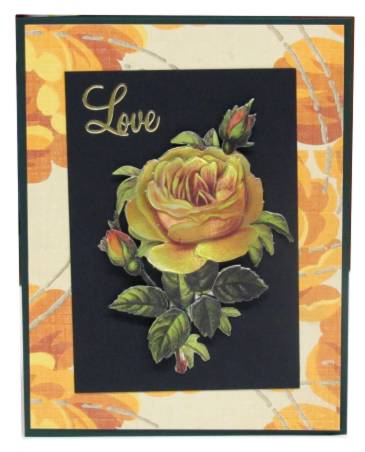
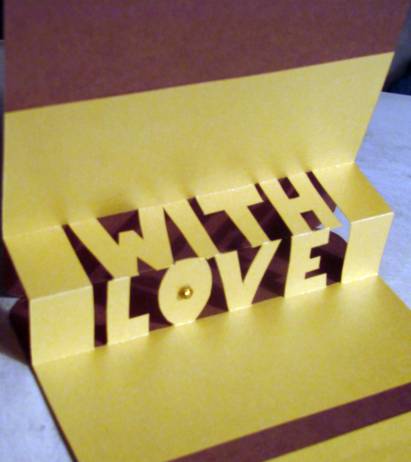
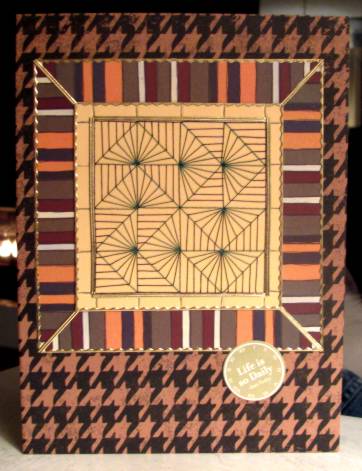
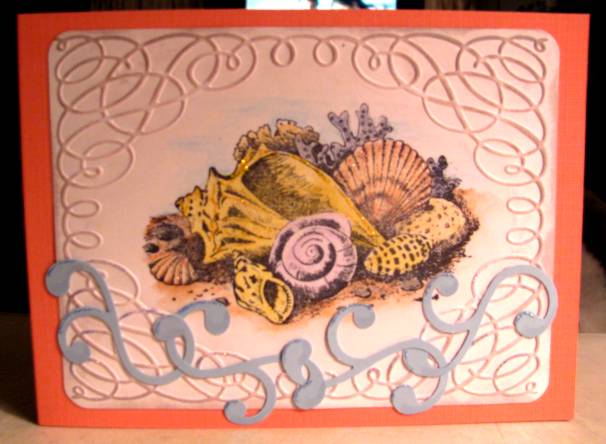
I made this card to try out a technique demonstrated by Tim Holtz in his "12 Tags of Christmas" series. He stamped on the inside of an embossing folder and then impressed it onto cardstock. It makes the result look like it is stamped behind the embossing. Way Cool!

The problem is that I do not havebackground stamps and really wanted to use a script. These will come out with the writing in reverse. Fortunately, this 'script' stamp is illegible anyway, so I forged on ahead.

The script is stamped in 'Old Paper' distess ink on the 'Forever Friends' Cuttlebug folder. Then I impressed it on light yellow cardstock. I used a blender tool and 'Tea Dye' distress ink to color the edges and the raised parts of the impression. The greeting is stamped with 'Old Paper' ink and I mounted the card on dark brown folded cardstock for a base.

Tim Holtz has a new stamp set coming out that has text in reverse specifically to use with this technique so the text will be readable in the resulting card. I think they are being released at CHA (February) so I will have to watch for them. I like this technique and it would be good to have his stamps to use for it. I might have to pick up some background stamps as well.

Ddd


Posted by studio3d@ccgmail.net at 6:00 AM PST
Thursday, 10 March 2011
Circle of Roses
Topic: Multi-Technique

I started this card by stitching the pink circle. However, the 3D foil roses looked too plain in the center so I picked up a lacy medallion. Then I picke dup another one. Then I cut green backing for both of them. Then I distressed them with pink ink.

Layer...layer...layer. Glue...glue...glue. Foam tape...foam tape...foam tape. DONE...DONE...DONE!

Ddd


Posted by studio3d@ccgmail.net at 6:00 AM PST
Wednesday, 9 March 2011
Pop Up Words
Topic: Multi-Technique

ASSIGNMENT: make a card with a word pop-up inside

Never done that before! Let's try it!

First you have to look at the outside. Pretty simple really, 3D sunflowers mounted on a houndstooth printed cardstock. I added gold peel-off text to one of the leaves. Then I added some peel-off 'mesh' to the rounded corners.

Now for the intended feature. I sketched the words out on paper until they were arranged so that there would be no 'dangling' parts at the center fold. The letters were then cut and a crease added at the top, bottom and center of the words.

The top and bottom panels are glued inside the card and a panel was added for writing a greeting. I also added a golden orb to the center of the 'O'.

Ddd


Posted by studio3d@ccgmail.net at 6:00 AM PST
Tuesday, 8 March 2011
C is for Cupcake
Topic: Paper Embroidery

Have you figured out yet that I'm working my way through the alphabet in paper embroidery? Not in order, though!

For this image I stitched it in and then colored with pencils. I used a round stamp to fill in the background, masking where needed. Then I used a grey marker to shade around the cupcake.

I had a printed cardstock panel with built in swirls. I razored around the swirls and then tucked the cupcake panel behind them.

All that was left was to round the corners and mount to pink cardstock.

Ddd


Posted by studio3d@ccgmail.net at 6:00 AM PST
Monday, 7 March 2011
Q is for Quilt
Topic: Paper Embroidery

An online friend designed three 'quilt' patterns for paper embroidery. I stitched this one up with dark blue and dark green.

Mounting is really simple - striped scrapbook paper with mitered corners, trimming with gold peel-off borders, a printed cardstock background and one round text circle "Life is so Daily".

Ddd


Posted by studio3d@ccgmail.net at 6:00 AM PST
Sunday, 6 March 2011
F is for Fish
Topic: Paper Embroidery

I chose to stitch my goldfish pattern on an asian background. After stitching in two tones of golden thread I used Copic markers to shade the fish.

I used rubons to make some 'moving water' behind the fins and tails then attached some blue water droplets stickers to them. Glittery gold orbs were added for the eyes.

I rounded the corners of the panel and attached to a printed folded cardstock base.

Ddd


Posted by studio3d@ccgmail.net at 6:00 AM PST
Saturday, 5 March 2011
Tah-Dah!
Topic: Fantastic Folds

ASSIGNMENT: Make a surprise pop-up card (we were given directions)

I had never done this structure before but it went together nicely. I started with a stamped image that I had colored with markers and glittered. This was cut out with a Nestabilities labels die and used as the focal peice.

The card is constructed of a back panel, a sliding insert, and a split/folded front panel. The bottom of the open part of the front panel is attached to the sliding insert so pulling up on the ribbon collapses the front to reveal a stamped greeting inside.

An additional greeting is revealed on the panel top that is pulled up.

Ddd


Posted by studio3d@ccgmail.net at 6:00 AM PST
Friday, 4 March 2011
Oregon Ocean
Topic: Stamping

For a swap I needed to create a card with stamping on the theme 'Oregon Ocean'.

I stamped my sketch stamp of seashells and colored using watercolor pencils and an aqua brush.

I used a Cuttlebug frame empossing folder around the image and applied distress ink to enhance the lines. Punched swirls in blue are glued on to emulate waves. I rounded the corners and mounted on coral base.

Finally, I applied Stickles in appropriate colors to the wave caps, some of the frame and three of the shells.

Ddd


Posted by studio3d@ccgmail.net at 6:00 AM PST

Newer | Latest | Older