« June 2011 »
S M T W T F S
1 2 3 4
5 6 7 8 9 10 11
12 13 14 15 16 17 18
19 20 21 22 23 24 25
26 27 28 29 30
You are not logged in. Log in
Entries by Topic
All topics  «
3D paperwork
A - Z challenge 5
A - Z challenge 7
A - Z challenge round 4
A to Z challenge round 3
A to Z round 2
A to Z round 6
A-Z round 1
Around the House
Art Challenges
Artist Trading Cards
Backgrounds
Beads
Bible Journaling
Books
Boxes
Collage
Color Challenge
Coloring
cookbook
Die Cuts
Digital Projects
Digital Stamps
Drawing
Dry Embossing
Fabric Stuff
Fantastic Folds
Field Trip
Home Decor
How Does Your Garden Grow?
Hymnal Art
In The Kitchen
In the studio
Jewelry
Lettering
Links
Multi-Technique
Music to Work By
Musings
Nail Art
New Work
Online Class
Other Hobbies
Other Projects
Painting
Paper Embroidery
Paper Piecing
Photo
Pretty Paper
Quilting
Random
reading
Scrap Recovery
scrapbooking
Sewing
Sketch Challenge
Some Backlog
Stamping
Stencils
Stickers
Supplies
Teabag Folding
Techniques
Testing
tips and tricks
Tutorial
Web resources
Welcome to my Blog
Work By My Friends
workflow
Writing
Blog Tools
Edit your Blog
Build a Blog
RSS Feed
View Profile
Group One
In & Out of Studio 3D
Sunday, 26 June 2011
Window View
Topic: Quilting

Completed another quilt for a grandchild. I designed this using the Attic Windows setting and chose fields of running horses for the panes, dark and light for the window sills and a barn wood print for the sashing. The 10-year-old horse fanatic is going to LOVE this birthday gift.

I quilted this 'in the ditch' around all the sashing and then free-motioned horse heads in each of the window panes, alternating the direction the horses face.

HAPPY BIRTHDAY!

Ddd


Posted by studio3d@ccgmail.net at 6:00 AM PDT
Updated: Monday, 15 April 2013 11:45 AM PDT
Saturday, 25 June 2011
Origami Rainbow
Topic: Quilting

Although this is the THIRD quilt created for my grandkids I am posting it second since the birthday of the other one I've done won't be until tomorrow. This one went out in May for my grandson.

I designed a landscape using log cabin blocks and stitched it in 4 fabrics for each of the 5 color bands plus white for the clouds and snow. Once it was pieced, quilted and bound I made all the origami pieces of 9-inch cuts of fabric. Raw edges are sealed with Steam-a-Seam 2. These are appliqued to the surface with invisible thread (machine zig-zag).

My grandson who is crazy for origami will really like this full-size quilt.

The origami steps and layout were crafted using instructions from Miranda Van Beek and were inspired by m.c.escher.

Ddd


Posted by studio3d@ccgmail.net at 6:00 AM PDT
Updated: Monday, 15 April 2013 11:45 AM PDT
Friday, 24 June 2011
Sing to the Lord
Topic: Stamping

Have you been keeping count? If so, you know that today is the last (8th) of these floral cards with the chunky stamp.

The background paper pulls out more of the dark center from the stamped flower and adds some flowers of its own. I chose to mount the stamped image in the upper left and balanced it out with an organza ribbon with a bow at the lower right.

Ddd


Posted by studio3d@ccgmail.net at 6:00 AM PDT
Thursday, 23 June 2011
Three White Bows
Topic: Stamping

When someone sent me these white bows with pearl centers I couldn't image what I might use them for. Now I know!

I think the oriental printed cardstock background sets a different 'tone' for this card. I used an apricot folded card base to echo the flower color so the bows are used to echo the white of the stamped panel.


Ddd


Posted by studio3d@ccgmail.net at 6:00 AM PDT
Wednesday, 22 June 2011
Choosing Favorites
Topic: Stamping

This is my favorite of the layouts and color combinations, but not my favorite of the flowers. This was a 1st generation impression and also the first I traced around. I think the inking on the line is too bold.

The background is the reverse of the pink branch cardstock and the scalloped edge is die-cut in the 6 x 6 pad. It looks black but is really a rich chocolate brown.

A piece of matching ribbon is tied in a simple knot and mounted with a glue dot.

Ddd


Posted by studio3d@ccgmail.net at 6:00 AM PDT
Tuesday, 21 June 2011
Ribon Rose
Topic: Stamping

On a whim I tried building a ribbon rose directly on a large clue dot. Worked beautifully! I added two ribbon tails and then adhered it to spruce up this card.

The Background paper is more busy on this card than the rest so I kept everything else really simple.

Still working with table scraps so you gotta use what is at hand.

Ddd


Posted by studio3d@ccgmail.net at 6:00 AM PDT
Monday, 20 June 2011
Green Green Green
Topic: Stamping

I pulled out a variety of green cardstock and added panel upon panel to make this simple card. I used an apricot ribbon around the front panel to echo the flower color.

You can tell this is an earlier generation stamping because the image is much darker.

Ddd


Posted by studio3d@ccgmail.net at 6:00 AM PDT
Sunday, 19 June 2011
Thankful Hearts
Topic: Stamping

The branch paper makes a reappearance today along with a diecut edge cardstock. I went a little crazy with the paper cutter and this panel ended up the wrong size. Oh well, change of plans!

EDITED TO INCLUDE THE PHOTO I FORGOT!


I used an oval to cut the focal image and added black peel-off stickers and rhinestones along the right edge of the folded green card base.

Ddd


Posted by studio3d@ccgmail.net at 6:00 AM PDT
Updated: Sunday, 19 June 2011 1:34 PM PDT
Saturday, 18 June 2011
More Chunky Stamp
Topic: Stamping

As promised (threatened?) I'm offering a view of the rest of the cards I made with the coloring sticks. These feature different scriptures, different panel shapes, and different intensities of impressions (depending on the generation). So I pulled out the table scraps and made the cards original as well.

Today's card features a swirly Cuttlebug background paper, a sheer ribbon, and a 'branch' printed cardstock panel. There are stickles on the stamen of the bloosom.

Ddd


Posted by studio3d@ccgmail.net at 6:00 AM PDT
Friday, 17 June 2011
Spotlight on Lily
Topic: Scrap Recovery

When I was stamping the lilies for yesterday's card I made a couple of extras in case I messed up the coloring. I didn't, so had two left over. I colored up a full one and then colored up the focal area and punched it out with the large square punch.

A thin border of green showcases the spotlight bloom and it is popped up on foam. I used a Nestabilities die to cut out the main image and used the next larger size to cut a green panel to frame it out.

A maroon folded card base supports a speckled panel of scrapbook paper. I added a scripture stamp before mounting the pictorial elements to the front.

Ddd


Posted by studio3d@ccgmail.net at 6:00 AM PDT
Thursday, 16 June 2011
1 - 2 - 3 Stamp
Topic: Stamping

I admired a card made with three squares with oversized florals offset in them so decided to make my own. I started with a stamp of lilies and made three impressions. These were colored with Copic markers, punched out with a large square punch, corners rounded, and the edges distressed with 'old paper' distress ink.

The rust printed cardstock had the fancy edge die-cut so I mounted it over folded green card and stamped a scripture onto it. The edge looked a bit unfinished until I added pen 'stitching' around it.

Ddd


Posted by studio3d@ccgmail.net at 6:00 AM PDT
Wednesday, 15 June 2011
Blue Delft Tiles
Topic: Stamping

Here's another technique that I had on my list of things to try. I first scored my white cardstock at 3/4 inch in both directions. Then I stamped a blue image 4 times to create a background. It is important to NOT press too hard because you don't want the stamp to go down into the score lines. Then I used a different blue to distress all over, taking care to not go down into the score lines. Finally, I used three blue watercolor pencils to color in the butterflies and went over them with an aquabrush.

If you do accidently go down into the cracks here and there you can use a white gel pen to trace in the grout to cover up the blue.

I added a Shapeabilities butterfly in two layers. The dark blue is mounted flat to the card and the lighter blue is embossed in the Cuttlebug and has the wings bent up and is traced around with  blue Stickles.

I stamped a scripture on another piece of the lighter blue and cut with a Nestabilities die. Everything is mounted on a blue folded card base.

I liked this so much I made another one almost like it:

Ddd

Posted by studio3d@ccgmail.net at 6:00 AM PDT
Tuesday, 14 June 2011
Blocky Stamp Coloring
Topic: Supplies

I have had a set of 'coloring things' in my supplies for several years but never really had any idea how to use them properly until now. They are marked 'Silky' and they come in a tube like a glue stick. Very strong pigment in a stick that is water soluble. Hmmm.

Well, I saw Donna Downey playing with something similar on her blog the other day and it set me to thinking about how I might make use of these 'coloring things' (not sure what to call them).

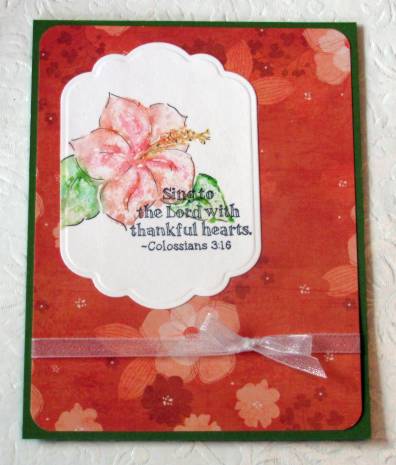
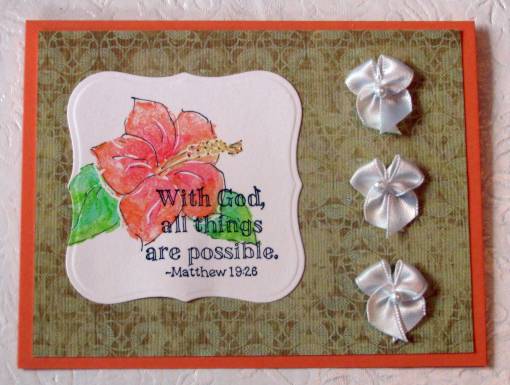
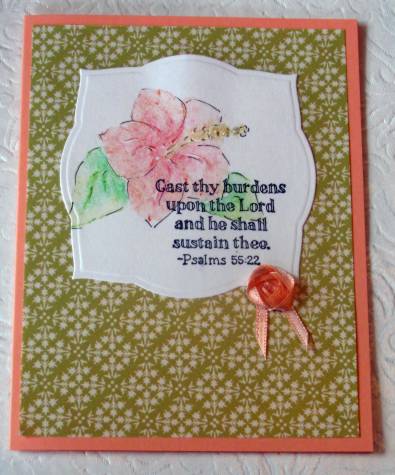
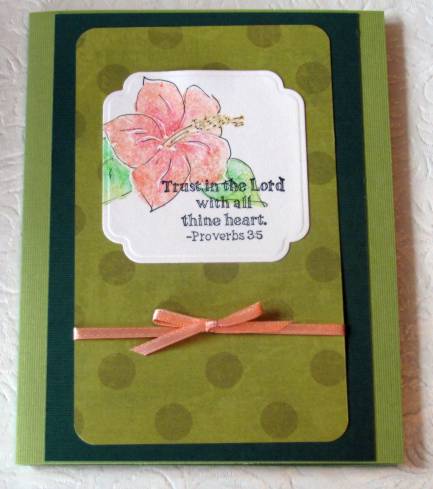
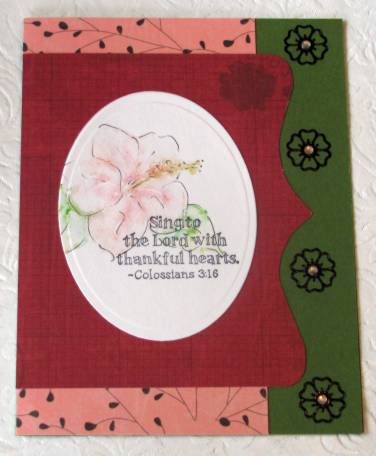
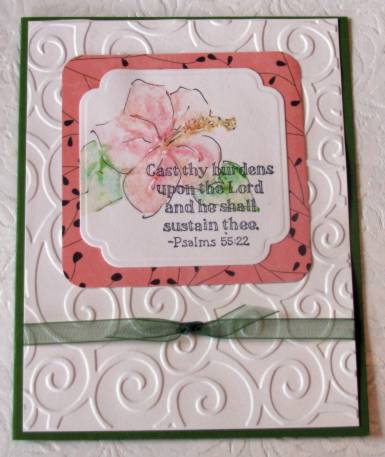
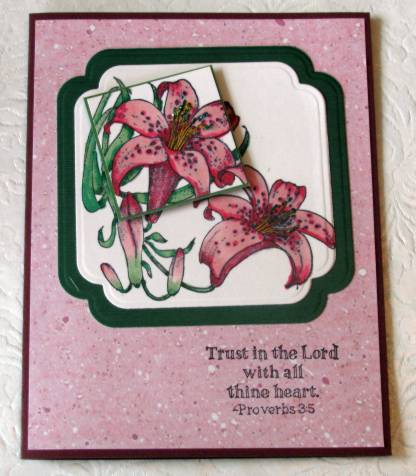
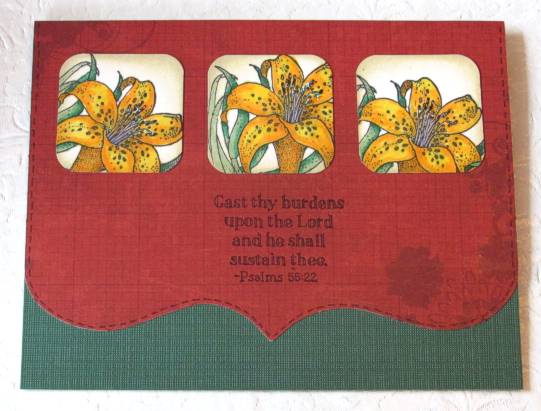
What I did was take out a solid stamp and misted it with water. Then I used two tones of pink, two of green, and one of yellow-gold and colored right on the stamp. Another mist of water and then I stamped on plain white cardstock. I was able to mist again and again, getting 4 impressions before I had to color the stamp again.

This image is one of the 4th generations. When I had all of these stamped out I dired with the heat gun and then sketched around the image with a Pigma pen.

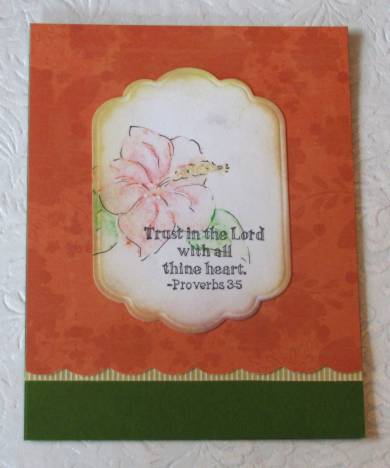
I used the set of Stampin Up scriptures that I got at Goodwill and placed text over the image. Then it was cut with a Nestabilities die. In this case I also distressed the edges before mounting on a scalloped cardstock.

I added a bit of yellow striped ribbon under the scallops and then glued to a green folded card base.

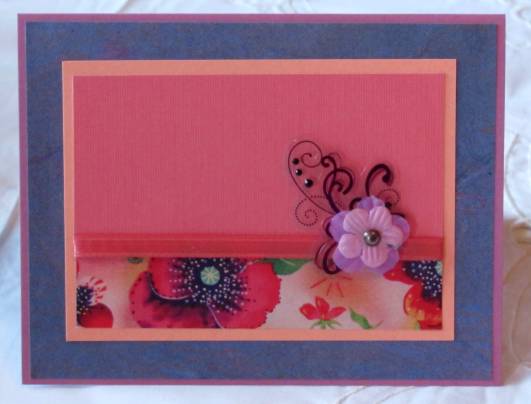
While I was experimenting with these supplies I made a total of 8 flower panels ( 2 sets of 4 generations ). This means that you'll be seeing several similar cards coming up. I do have plans to share some other techniques first, though.

Ddd


Posted by studio3d@ccgmail.net at 6:00 AM PDT
Monday, 13 June 2011
Time For Tea
Topic: Fantastic Folds

I was assigned a Secret Sister who:

1-collects teapots

2-likes roses

3-says her favorite color is purple...

So for a revealing gift (I had to squelch my crafty urges for three months so she would not guess who I was) I made her one of my teapots and then used the other 1/2 sheet of cardstock to make a matching teacup - designing it as I went along.

I made the set from purple printed vintage-look cardstock:

On a closer look at the teapot you can see that I used a rose-shaped button for the knob on top. It was frosted white so I made it match the purple by coloring on the bottom of it with Sharpie marker. This way the color is muted when it is viewed through the button.

Here is a closer view of the cup. If I were making it again I would make the straight sides shorter. This is more the height of a coffee cup rather than a tea cup.

You can see that on the cup I folded over the upermost edge to make the cup lined rather than showing the inside of the cardstock. This only goes as far as the folds where the cup begins to curve in at the bottom. I also used a plain circle of the cardstock to make a foot for the cup as I was very short of supplies at this point.

Ddd


Posted by studio3d@ccgmail.net at 6:00 AM PDT
Sunday, 12 June 2011
Spring Flowers
Topic: Paper Embroidery

Hey, the butterfly ring is back! This time I stitched it up a bit differently in the center. This creates a design feature without the big antennas that are common to this pattern.

I used a 3D illustration and added a printed tag with one end on a pop dot for dimension. It says 'designed by the day'.

Ddd


Posted by studio3d@ccgmail.net at 6:00 AM PDT
Saturday, 11 June 2011
Color of Love
Topic: Sketch Challenge

We're done! (after today's card).

I used the other half of the floral band for the bottom and set it off with a green woodgrain. I found I had some awesome picot-edge trim that matched well. Rhinestones in the centers of the flowers bring the bling.

The crackle finish background paper eases the formality and matches the light pink in the chipboard text tag.

(HEY, SOMETHING DIFFERENT TOMORROW!)

Ddd


Posted by studio3d@ccgmail.net at 6:00 AM PDT
Friday, 10 June 2011
Leaves and Vines
Topic: Sketch Challenge

The larger block of paper and the ribbon both feature leaves and vines so I stayed with that theme by adding a leaf chipboard at the side. A couple of additional green papers add some texture while the tan border breaks it up.

I added three green rhinestones down the left set of leaves for a bit of balance.

Ddd


Posted by studio3d@ccgmail.net at 6:00 AM PDT
Thursday, 9 June 2011
Devotion
Topic: Sketch Challenge

Sixteen. That's the answer to 'how many of this sketch did you do?' Still a few more left to post.

Table scraps, scrapbook paper from the scrap bin, a satin ribbon and a chipboard text block.

I fell in love with this color combination. The teal and rose work very well together and I added a folded card base in the teal as well.

Ddd


Posted by studio3d@ccgmail.net at 6:00 AM PDT
Wednesday, 8 June 2011
Color Splash
Topic: Sketch Challenge

Many, many color blocks - layering one of each as found in the floral paper. Those flowers are part of a magazine photo of fabric.

I added a double-layered acrylic swirl and topped it with a fabric flower.

Ddd


Posted by studio3d@ccgmail.net at 6:00 AM PDT
Tuesday, 7 June 2011
With Friends
Topic: Sketch Challenge

The way this background paper read it was a phrase that included the words 'without friends'. We, in this situation it was inappropriate so I covered part of it with a red heart! The little hugging bears were so cute in illustrating this so I pulled the green and pink colors from them for the color blocks.

I added a sheer pink ribbon and then placed green rhinestones at the flower centers.

Ddd


Posted by studio3d@ccgmail.net at 6:00 AM PDT

Newer | Latest | Older