« October 2011 »
S M T W T F S
1
2 3 4 5 6 7 8
9 10 11 12 13 14 15
16 17 18 19 20 21 22
23 24 25 26 27 28 29
30 31
You are not logged in. Log in
Entries by Topic
All topics  «
3D paperwork
A - Z challenge 5
A - Z challenge 7
A - Z challenge round 4
A to Z challenge round 3
A to Z round 2
A to Z round 6
A-Z round 1
Around the House
Art Challenges
Artist Trading Cards
Backgrounds
Beads
Bible Journaling
Books
Boxes
Collage
Color Challenge
Coloring
cookbook
Die Cuts
Digital Projects
Digital Stamps
Drawing
Dry Embossing
Fabric Stuff
Fantastic Folds
Field Trip
Home Decor
How Does Your Garden Grow?
Hymnal Art
In The Kitchen
In the studio
Jewelry
Lettering
Links
Multi-Technique
Music to Work By
Musings
Nail Art
New Work
Online Class
Other Hobbies
Other Projects
Painting
Paper Embroidery
Paper Piecing
Photo
Pretty Paper
Quilting
Random
reading
Scrap Recovery
scrapbooking
Sewing
Sketch Challenge
Some Backlog
Stamping
Stencils
Stickers
Supplies
Teabag Folding
Techniques
Testing
tips and tricks
Tutorial
Web resources
Welcome to my Blog
Work By My Friends
workflow
Writing
Blog Tools
Edit your Blog
Build a Blog
RSS Feed
View Profile
Group One
In & Out of Studio 3D
Wednesday, 19 October 2011
Line Up
Topic: Scrap Recovery

I just grabbed an assortment of table scraps and a couple of border punches and built up a block of interesting stripes. I added these to a block of finely dotted red cardstock and a tan folded card base. I used the trim-off to create a tag in the upper left and then echoed this with a tag to stamp the greeting.

Paper flowers were layered with copper brads and attached with glue dots.

This is the kind of card I would like to create on purpose instead of by accident!

Ddd


Posted by studio3d@ccgmail.net at 6:00 AM PDT
Tuesday, 18 October 2011
I Was Framed
Topic: Die Cuts

Left over from the 'dog days' project I had two of the beaded oval frames left over. Here are the two projects I made with these:

The first uses the same red splotchy cardstock as the base and the white frame placed the same as the dog cards. However, I had a clear scripture sticker which I added to the center. I found an awesome glittered foam bracket for the bottom and then added two tones of green rhinestones to the frame. A couple of irridescent green dragonfly stickers finish it off.


This one has the white frame added to white cardstock so you just get a subtle look. I used a clear scripture sticker for the center again and added some sunflower stickers at the corners.


So hard to photograph white on white - looks much better in person.

Ddd


Posted by studio3d@ccgmail.net at 6:00 AM PDT
Monday, 17 October 2011
Painter's Greens
Topic: Scrap Recovery

When selecting some paints for the house I picked up some paint sample folders that had great illustrations on the covers. Three of them were in awesome shades of green.

The first was this tasty pear which I framed with a couple of pieces of brown paper and a red background with textured graphics. This was added to a folded toast-colored card base. I stamped the text onto bright green glossy paper with Staz-on and trimmed to create a label.


This leaf was cut down to emphasize the veins and framed out with a light green paper. Yellow was placed underneath and then it was all added to a bright green card base. I used a weed stamp to add foliage around the edges and added a Thinking Of You tag.


The reamining leaf has a more woodsy look so I chose browns as the accents. The tag is from that little booklet of then from the other day but the 'ribbons' in it are actually cardstock. The celery card base supports the tag, the illustration backed by a colorblock of green and brown and a stamped text popped up on foam tape.

Ddd

Posted by studio3d@ccgmail.net at 6:00 AM PDT
Sunday, 16 October 2011
Color Me Labels
Topic: Supplies

I have showed the sheets from the sampler pack of Color Me papers I bought but have never showed anything using the page of labels . I cut them up into individual units before coloring them with Distress Inks, Shimmer Sprays, or Chalk Inks. Today I have a couple of cards I made using these labels.

This first one I colored with Distress Ink and trimmed close around. I colored a piece of the Color Me full sheet with some Shimmer Spray and mounted it on a Pink folded card base. The corners were rounded with a punch and I added a peice of clipart from a book. Then I stamped the text.


This one I colored with chalk ink and added to a piece of gray cardstock then stamped the text. For the bottom piece I wasdoing some experimenting with a border punch and a 1/8-inch punch. I threaded narrow pink ribbon through the holes and placed it on the card. I added two silver peel-off dragonflies.


I colored up the whole page of labels but these were the only ones I pulled out to use right away.

Ddd


Posted by studio3d@ccgmail.net at 6:00 AM PDT
Updated: Sunday, 16 October 2011 2:55 PM PDT
Saturday, 15 October 2011
Dog Days
Topic: Die Cuts

Challenge: Make cards on the theme 'dogs'

I started out wanting to stamp something but only have two dog stamps and they are both kind of 'cartoon-y'. Instead I decided to do a silhouette and went back to making my 'thumb puppies' to get them (that's where you trace around your crooked thumb and add your choice of ears to create a dog head)

I cut the dog heads from black cardstock, used two nestabilities dies to make white  frames and attached them to a red 'splotched' card base.


I had a stamp of 4 paw prints and used this to make corner elements using Staz-On ink.

Ddd


Posted by studio3d@ccgmail.net at 6:00 AM PDT
Friday, 14 October 2011
Many Thanks
Topic: Fantastic Folds

As the last project for the ladies' retreat I made 'thank you' cards for the speaker and worship team. These are made with the Shutter Card format that I got from the Scor-Pal website.

I started with a green printed cardstock as the base and did all the measuring, cutting and folding on that. I then added several papers in apple green and chocolate brown (theme colors). To the speaker's card I added tissue tape with text imprinted. The musicians got tissue tape with music imprinted.


I added pulled out a brown and a green silk flower, brown buttons and green 1/8-inch ribbon (to tie through the button holes). These were layered and attached with glue dots on the front cover and the back page. Large gold stars, gold peel-off stars, punched star holes, stamped star outlines and stamped starbursts are scattered throughout. I added green rhinestones to the upper right of the center section so they show when the card is closed.


I had a stamp with 'thank you' repeatedly on it so I stamped it twice on the inside panel and filled in around with the starburst stamp.  This leaves the last green panel for a personal note and signature.

Here is another one:


Ddd


Posted by studio3d@ccgmail.net at 6:00 AM PDT
Thursday, 13 October 2011
Stick-Ups
Topic: Other Projects

This was my last big project for the Ladies' Retreat.

I made 60 refrigerator magnets with the colors and theme of the retreat: "Shining Like a Star".

They were first printed on cardstock with my inkjet printer, then a star punched out in place of the letter A. I backed the cutout with glittery gold paper and ran the cardstock through the Xyron with laminate on both sides.

These were then cut out with the Nestabilities Labels 18 die.

A piece of sheet magnet was cut with a smaller Labels 18 die and affixed to the back.

Ddd


Posted by studio3d@ccgmail.net at 6:00 AM PDT
Wednesday, 12 October 2011
A Little Twist
Topic: Boxes

I have always liked the boxes creates by Amazing Paper Grace (blog) called the Twist Top Box. I made one a couple of years ago when she first posted the directions.

For the speaker and musicians at our retreat I created custom ones to go in their gift baskets. I did three in chocolate cardstock with apple green accents and one in apple green with chocolate accents.


I used my star punch to create the side cutouts and lined the sides with pieces of transparency. They have tissue paper tucked into them so the candies will be contained.


The ribbon loops on top are just taped inside the twist. They are decorative and not meant to carry the weight of a filled box.

Ddd


Posted by studio3d@ccgmail.net at 6:00 AM PDT
Tuesday, 11 October 2011
Kitt'n
Topic: Other Projects

Worked on more projects for our Ladies' Retreat. I made 60 kits for them to make their own bookmarks. These include the illustrated instructions, a charm, three colored beads, two silver beads, and a yard of ribbon.


This is a mock-up of what they look like when they are done with some differences: the ribbon will be wider, the color lighter, the charm smaller and clear, the silver beads fancier (the one above is one of 4 special kits for the speaker and uses a different charm entirely).

These bookmarks are so simple to make and take about 3 minutes.

Ddd


Posted by studio3d@ccgmail.net at 6:00 AM PDT
Monday, 10 October 2011
Stamping It Out
Topic: Stamping

Some stamped by me - some stamped and sent by friends - some from the stamp catalog. All colored by me though!

I trimmed this one close to create an intimate scene and rounded the corners to make it casual. This corner rounding follows through most of the layers and they are offset to keep that casual feel going. I used Glossy Accents on the bottle and glassware to make them shine and then added the yellow panel which also is glossy finish. The rest is just color-blocking to enhance the image and to provide a resting place for the stamped greeting.


Sweet little lamb has a furry coat created by coloring just curls with a grey marker. The colors of the table scrap panels are used to accent rather than match the stamp coloring. I added a stamped greeting to the top.

The patchwork heart got a fall coloring so I added plaids and stripes to the background using the same color scheme to make it look homey. The vertical stamped greeting was a perfect fit for the space as well as the sentiment.


The coloring on this fella was pretty bright so I kept the layering bright as well. rounded corners lighten the mood, too. I added the greeting to a punched tag and placed a flower brad in it. The tag is mounted on foam tape.


Not a lot of coloring to do on a black and white cow so I added shading with gray markers. I carried the shading over on the pink areas as well. A couple of table scraps create the pasture grass and the swirling sky. The greeting is hand-lettered - because I think it's funny. I used thesoft yellow card base because the stamp name is 'buttercup'. Just a little inside joke for ME.


This one is a visual pun.I had these awesome butterflies made of painted feathers and the colors were perfect so... there you go. Glue dots were the perfect colution for holding feathers to cardstock, by the way. I added table scraps for backing and stamped the greeting on one of them.


Another cute pig! He just got lots of table scrap layering, including the scalloped circle, popped up on foam tape. I also punched a couple of holes in the scallop and knotted a ribbon through them. I had the punched out script on hand from a swap with a friend.


This heart wreath got a more elegant setting with the script and swirls paper scrap. I left a border of the backing card showing at the top and used this space for stamping the greeting, using blue chalk ink to match the printed paper.


Another set with similar techniques and a wide variety of styles.

Ddd


Posted by studio3d@ccgmail.net at 6:00 AM PDT
Sunday, 9 October 2011
Sticker Shock
Topic: Stickers

Yes, SHOCKED because I found more of these awesome stickers in my stash. Every time I think I've run out of them I find a few more I tucked away somewhere. I hope I stashed some LOTS of places, because I really like finding more of them to use.

I mounted this sticker on a texture-print cardstock and did a fine doodle-line close around it. After mounting on the violet card base I added some faux-stitching lines around the backing. Two strips of wood-grain table scraps were backed with green and crossed at the corner. Then I stamped the greeting on the larger strip.


Little chipboard bird makes another apprearance with this large sticker on a floral print. Simple layering to color tone and a stamped greeting finish it up. I recently picked up a large set of clear-stamp words that can be mixed and matched as desired for greeting phrases. Just mount all together on the block and stamp like they are one unit. NEAT!


No greeting for this little glittery bird. I combined the large sticker with table scrap strips including a Cuttlebug embossed piece with birds. I like the way the swirling branches echo the curls on the sticker and I reinforced one to act as a perch for the bird - extending the end of it onto the sticker for continuity.


Here's to finding lost supplies (please, oh please).

Ddd 


Posted by studio3d@ccgmail.net at 6:00 AM PDT
Saturday, 8 October 2011
Photo Opportunity
Topic: Scrap Recovery

Old calendars can provide some awesome backgrounds for use on cards. Combined with great table scraps, embellishments, stickers, and stamps, I created several cards to share today.

First up is a scene down a brightly lit wooded path. Not very many wooded paths area a yellow brick road, but I love this one. I added a golden strip of card for the greeting stamp and for the chipboard bird. The color of the bird is repeated in the rose card base.


Another portion of the same calendar page yielded this photo. I added the bird directly over the photo and used the bottom of one of those tags (featured yesterday) to stamp the greeting and mount at the top. This bird is one that came glittered so I wanted the feel of the card to be 'lighter'. A green panel and a pink card base keep it casual.

Love this casual garden seating group - especially with the flowers dropped on the table. I rounded the corners to lower the formality and added a strip of tissue tape (Tim Holtz) that I just got on sale. The little yellow chipboard bird and the apricot card base pick up colors from the garden. There is no greeting on this card.


I kept the focus on the roses in this calendar photo by using color echoing in the layering. I reinforced the two lower blooms by layering roses in gold peel-off stickers over them. This gold is echoed in the upper left corner element and the single heart inside the greeting. The greeting is a clear sticker. Love how it fits inside that one bloom.


I was knocked out by the colors in this garden chair! Nothing to do but trim it close, layer on a purple card base and add a clear acrylic greeting sticker. I backed the greeting withcard matching the card base. Simple - beautiful - simply beautiful!

A field of poppies is eye-popping! I used a bright-colored glossy print to back it and separated the two with a fine gold border sticker. The poppy corner sticker at the lower right offsets the gold sticker greeting on the upper left. I used a bright yellow card base in keeping with the overall color pallette.


Lesson: save your calendars!

Ddd


Posted by studio3d@ccgmail.net at 6:00 AM PDT
Friday, 7 October 2011
Tag, You're It
Topic: Supplies

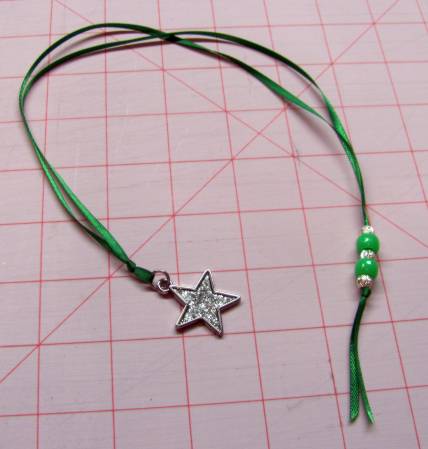
Ooooh, goodie! Shopping in the $1 bin at JoAnn Fabrics I found these really cute notebooks of 26 printed tags (I think there were 6 styles in all). Each style has two of each tag. I bought 2 of each style so I could play with half and send half in goodie bags for swaps.

So I set about using some of these tags to make cards:

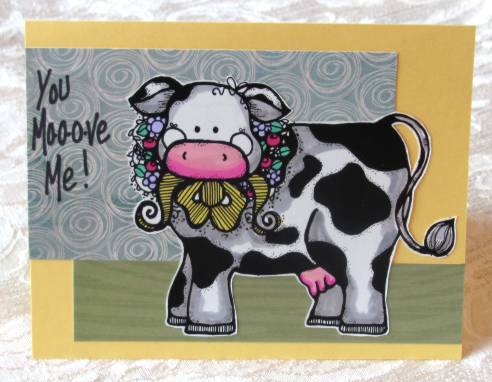
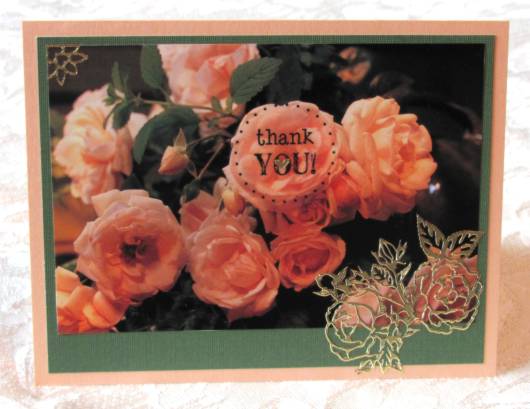
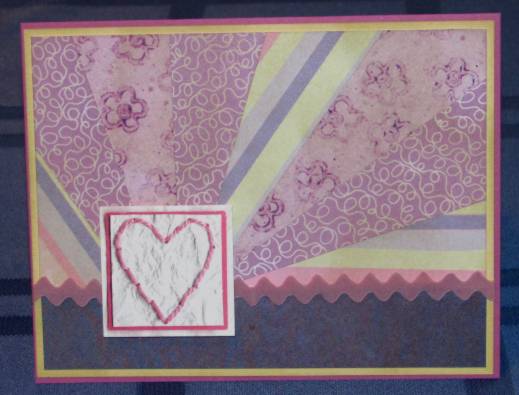
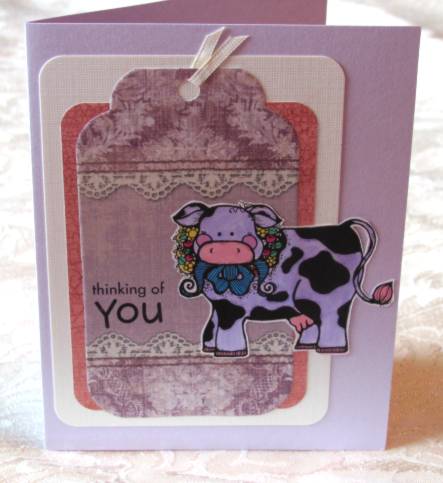
This vintage-look tag, imprinted with lace and fabrics was layered with a crackle-print paper and a cream panel of cardstock, both with rounded corners. I chose a lavender card base to go with the stamped, watercolored cow I wanted to use (remember the old poem, "I never saw a purple cow..."?). I added a fold of ribbon through the hole in the tag to finish it off. The greeting is stamped.


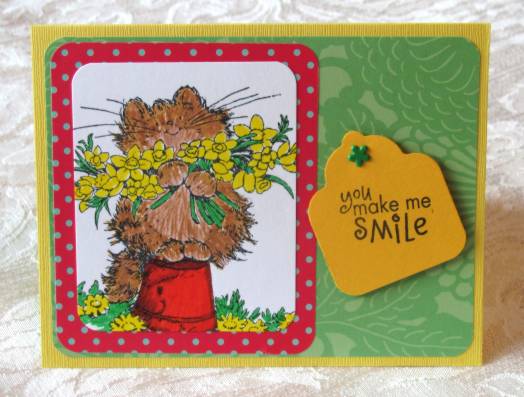
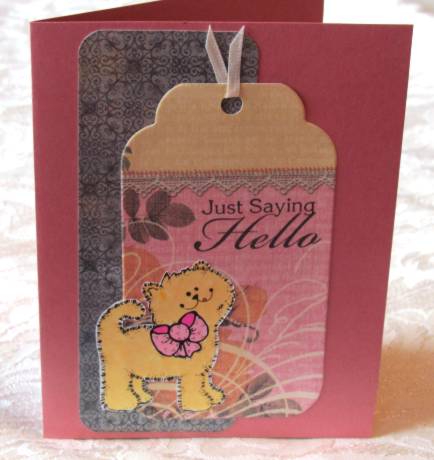
This tag was purrrr-fect for the little kitty I stamped, colored and cut out. Apanel of printed cardstock from the table scraps and a dusty rose card base rounded out the supplies. I stamped the greeting and added the snippet of ribbon to the tag.


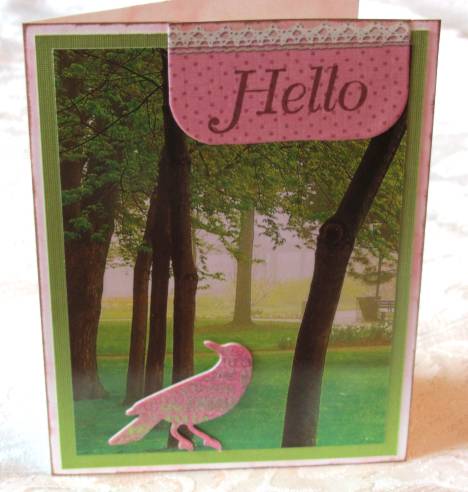
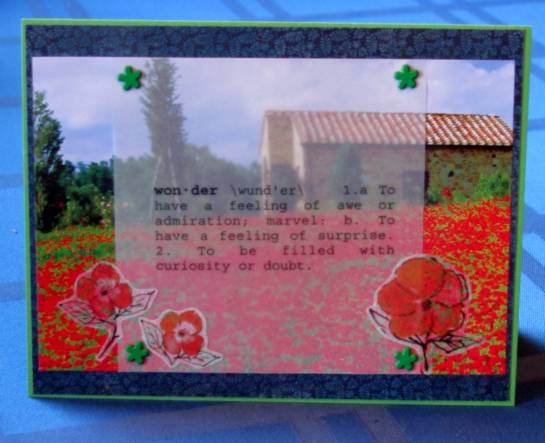
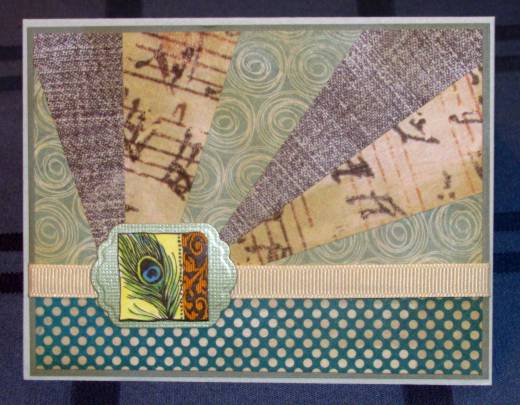
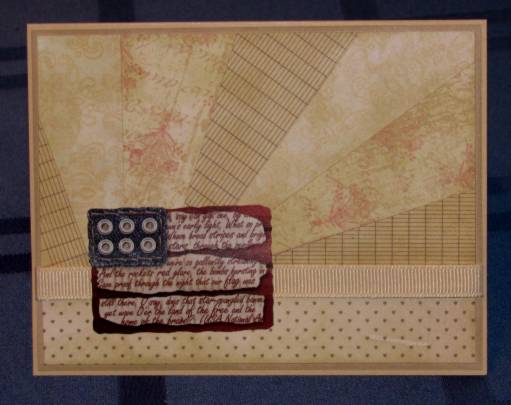
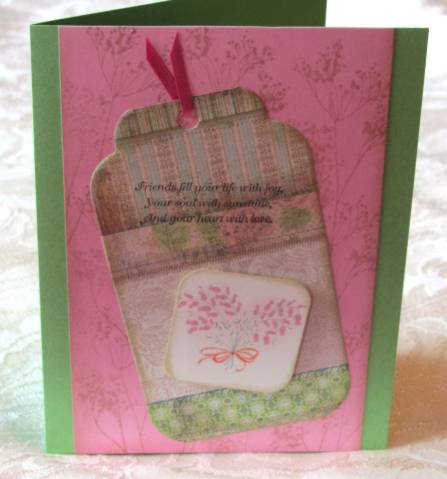
I stamped a background for this tag to rest upon using the 'weeds' (Tim Holtz) and distress ink in Old Paper. I used the distress ink to tone the edges of the pink panel, the tag and the little square, punched from an old greeting card and punched with a corner rounder. A green card base was selected, as well as the ribbon snippet and a stamped greeting.


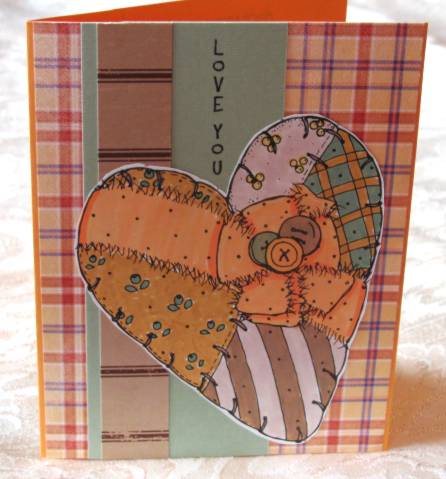
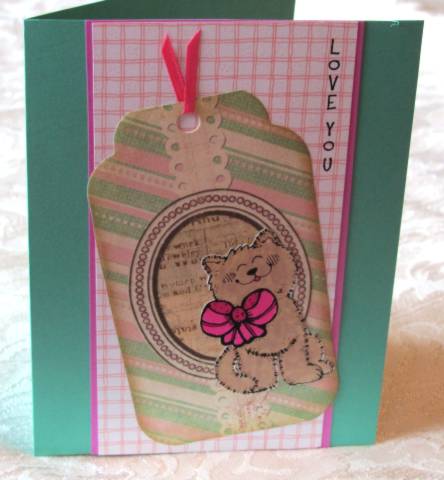
This tag, with it's diagonal stripes and oval frame made the perfect setting for a playful kitty stamp. The cat was stamped separately, colored and cut out. I had a scrap of checked print and reinforced the cat's bow with the ribbon snippet and the borders on each side of the checked paper. The soft green card base matches the green in the tag. Again, the text is stamped.


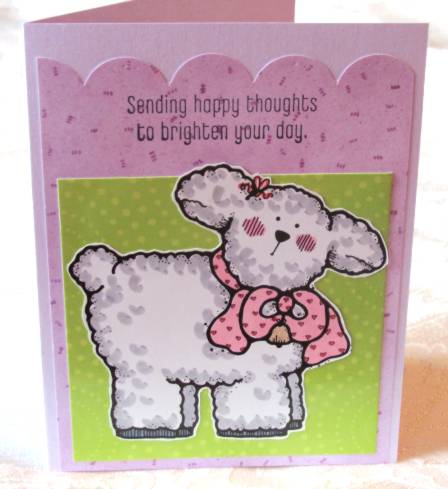
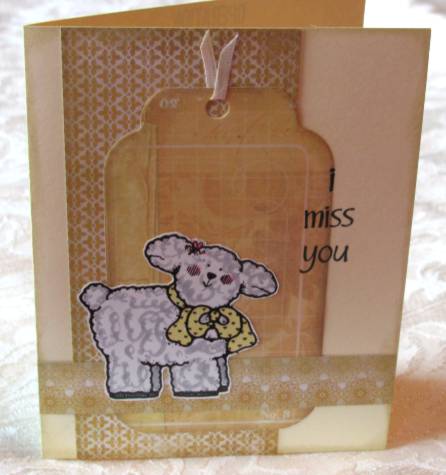
This little tag looks like ledger paper and I chose other table scraps with the same golden hues. Each piece was distressed edges using Old Paper distress ink, as does the card base. I colored and cut out the little lamb and added a ribbon snippet and stamped the card greeting.


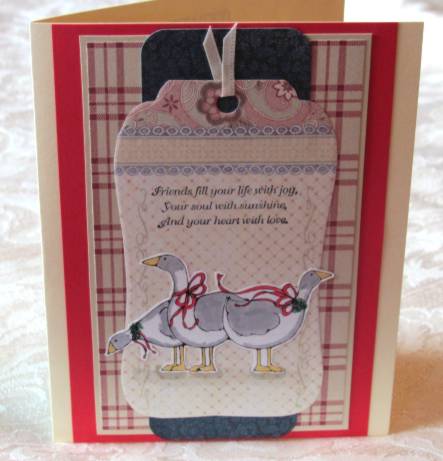
These geese were time consuming to cut out! I added shadows under their feet with copic markers and let them stretch their necks outside the edges of their tag. The stamped greeting seemed especially to fir the scene of the three geese. I added mulpiple panels of table scraps and a cream card base.


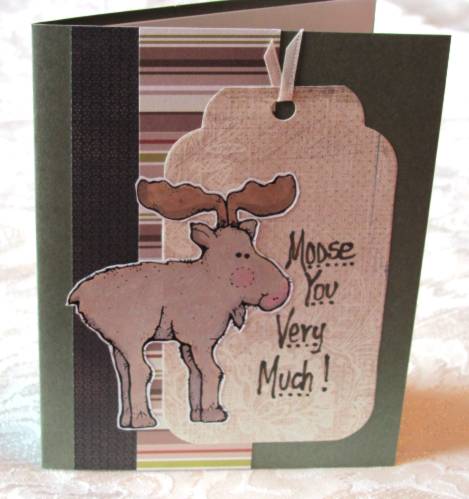
I love a good pun so "Moose You Very Much" seemed right for this fella, stamped, colored and cut out for mounting (yes, I mounted a WHOLE moose - not just his head). The tag was quite plain so I hand-lettered the greeting directly onto it in a casual style. More table scraps make up the layers and the card base has a little bit of texturized look to it.


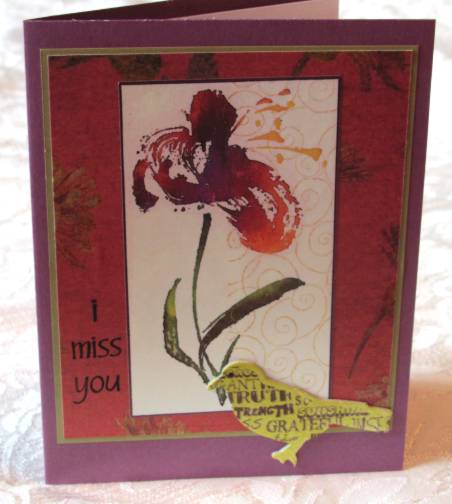
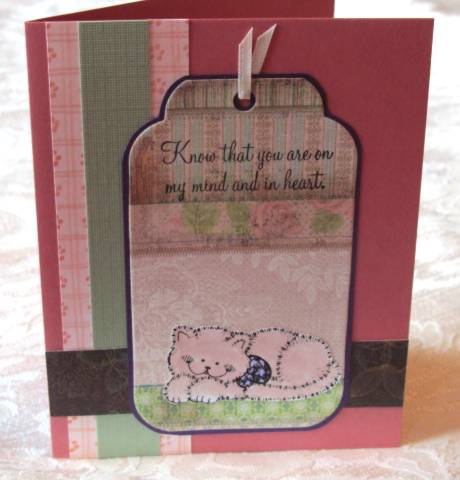
This tag had a natural line that I used to serve as a 'carpet' for this kitty. The upper line provided a natural panel for stamping the greeting. The table scraps in the background left little definition for the edges of the tag so I backed it with a purple border to pick up the purple in the cat's bow. A dusty rose card base keeps the cozy  feeling going.


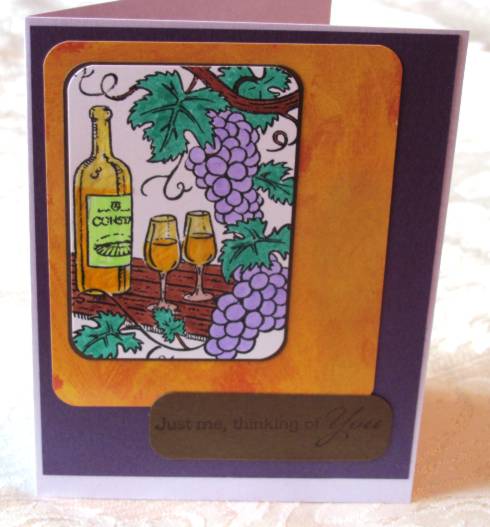
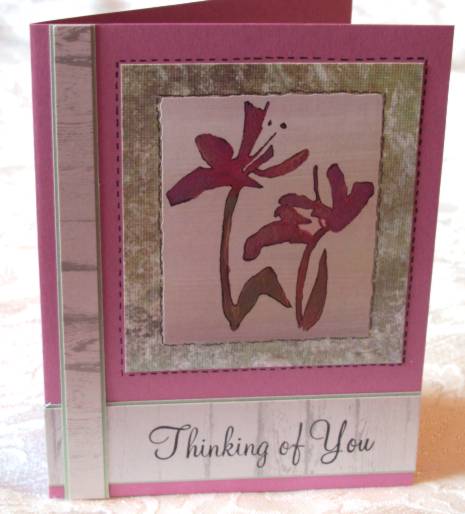
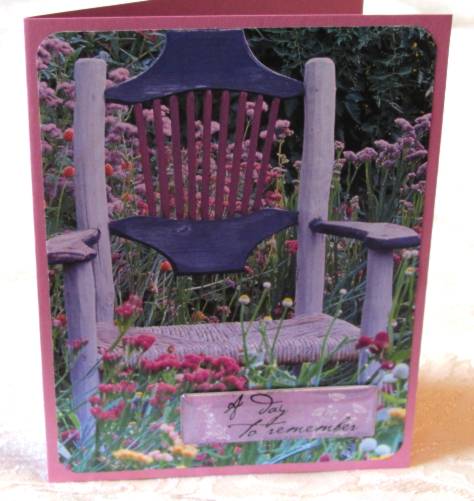
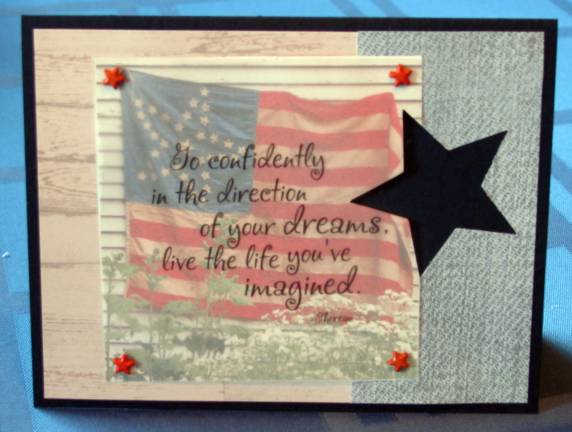
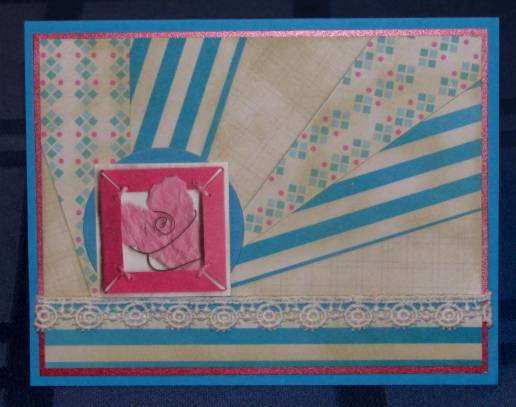
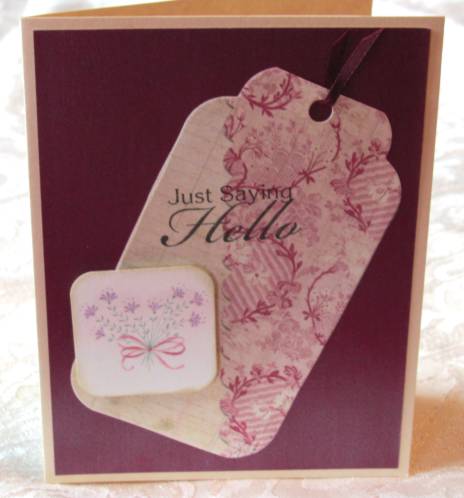
I like the vintage look to this tag and the diagonal line needed accenting. So used the diagonal line to create the centerline for the card and kept the backing simple - just a single piece of simmery plum paper. I punched the square from an old greeting card, rounded the corners and color-distressed the edges. It is popped up on foam tape. The greeting is stamped and I added that snippet of ribbon to the tag.


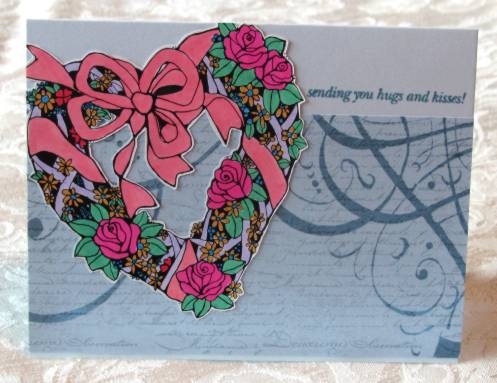
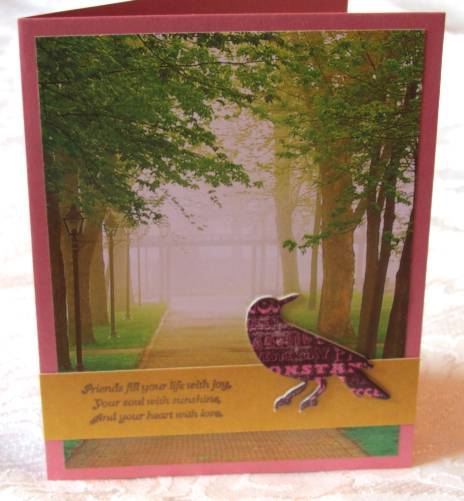
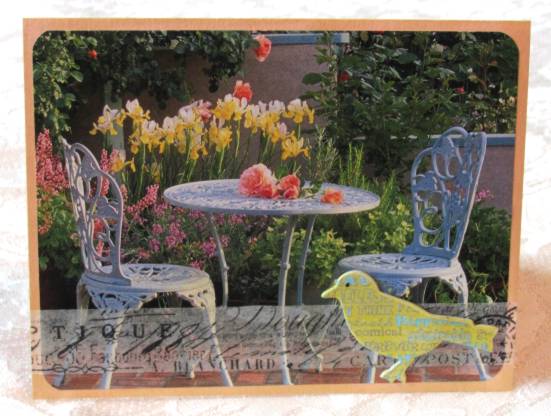
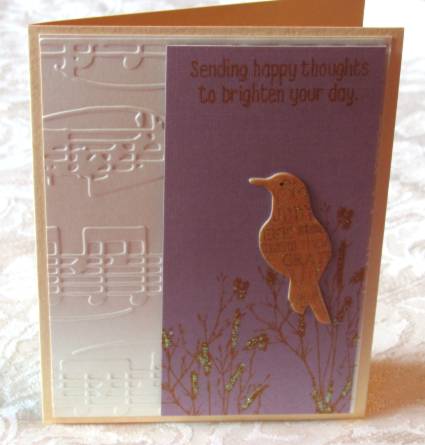
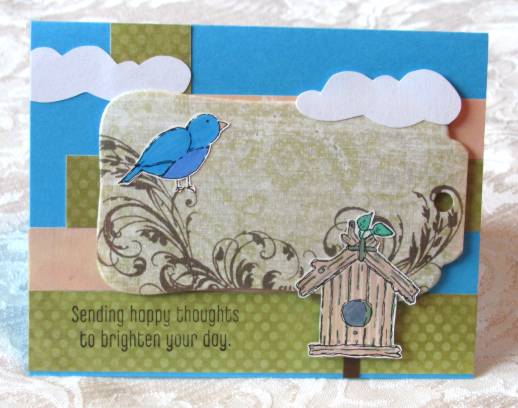
I used the tag on this card to create a landscape, using the swirls as tree branches. It is mounted on foam tape over a background of table scraps and a blue folded card base. I cut the clouds freehand from white cardstock and mounted the right one on foam tape. The bird and house were stamped, colored and cut for mounting. The bird is directly on the tag while the house extends over the edge and it's bottom is mounted on foam tape. The pole for the birdhouse is glued to the card base level for dimension. I did not add ribbon to this tag as it serves as a scene rather than a tag on this card. I stamped the greeting.


As you can see, there is a lot of variety in these sets of paper tags - and I've only scratched the surface. There are many more tags left to play with.

Ddd


Posted by studio3d@ccgmail.net at 6:00 AM PDT
Thursday, 6 October 2011
Made with NEW stuff
Topic: Stamping

I don't ALWAYS use leftovers to make cards - not ALWAYS!

For instance, for today's card I used TWO new stamp sets and another bird from the new set of chipboard diecuts mentioned yesterday. One of the new stamp sets is the greeting at the top of the plum panel and the other is the weedy branches at the bottom (one of Tim Holtz's sets). I stamped both in More Mustard Distress Ink and added Stickles to the weeds to match the bird which already had glitter. The plum panel WAS from the scrap bin, I must admit. But the embossed music panel was sent by a friend. I mounted the plum panel with foam tape and used a golden card base to match the bird and stamping.


Yes, only one card to share today as I don't have that many cards made with only NEW materials. LOL!

Ddd


Posted by studio3d@ccgmail.net at 6:00 AM PDT
Wednesday, 5 October 2011
Scrappy Goodness
Topic: Scrap Recovery

I save old greeting cards.

No surprise there, eh?

Well, today will show you WHY!

This first card is made from an embossed 'thank you' note card (center panel) and an anniversary card (two embossed hearts). The hearts had the gold foiling already on them and matched the panel exactly. I just trimmed close around the hearts leaving a tiny bit of cream border. Then I mounted one flat on the background and popped one up on foam tape. I cut a piece of shiny metallic gold cardstock to back the panel and actually had a folded card base with the same irovy tone. It looked a little too matchy-matchy so I added tinted acrylic domed heart stickers to the corners and the hearts. AWESOME!


Not quite as impressive is this one made using the front of an old greeting card. I cut it down and rounded the corners to fit on a dusty rose folded card base. I had just bought a package of these diecut chipboard birds (Studio 112 - $1 bin at JoAnn Fabrics) and popped one onto the branch. The text is cardstock stickers.


And that, my friends, is why I save old greeting cards.

Ddd


Posted by studio3d@ccgmail.net at 12:01 AM PDT
Updated: Thursday, 14 July 2011 9:42 AM PDT
Tuesday, 4 October 2011
N is for Narcissus
Topic: Paper Embroidery

Yeah, we're up to 'N' in paper embroidery through the alphabet. I found a pattern for a narcissus in the one book I own on paper embroidery and decided this was 'the one' to do.

I selected a purple cardstock (Yes, it is purple - pay no attention to the blue in the photo) and stitched it up in orange, yellow and green. I followed instructions from a blog I follow on how to use a standard border punch to punch out a frame. Then I cut the stitched panel to fit inside and layered them together.

I mounted these over green folded card base and added an orange cardstock sticker. (the sticker says 'reflect')

Ddd


Posted by studio3d@ccgmail.net at 6:00 AM PDT
Monday, 3 October 2011
From the Mail Bag
Topic: Scrap Recovery

Another place I like to get illustrations for using on cards is from my junk mail.

This is a portion of a full-page photo that I cut down. I layered a vellum dictionary entry over it with green flower brads and added vellum flower stickers. This is layered on a blue cardstock and a green card base:


This illustration is from a magazine and I added a string of wooden charms down the right side. I rounded the left corners of both the illustration and the card base. I punched a small hole at the upper left and threaded the string of a printed tag through it. The tag was then glued along the left edge of the photo:


This illustration is also from a magazine and I cut it to the same size as the vellum panel andlocked them together with red star brads. I made a background of wood panel print and denim print, layered the velum panel over and punched through all the layers with a star punch. The dark blue from the folded card base shows through:


From a magazine I got a large illustration of tree branches and got two panels from it. For this first one I added a square vellum panel with brass brads, layered it over a brown panel and orange folded card base. The green text is a sticker:


The other half of the picture I used a horizontal band of vellum and just turned it to the back to adhere it. I mounted over a green patterned cardstock and a yellow folded card base:


Ddd

Posted by studio3d@ccgmail.net at 6:00 AM PDT
Sunday, 2 October 2011
Off The Calendar
Topic: Scrap Recovery

I gathered up a bunch of illustrations from an old calendar to make cards for today.

I used the OWH sketch #74 for this first one. I used table scraps for the background strips and cut the illustration with a nestabilities die. The text is a clear sticker:


Most of the illustrations in this calendar are of birds. However, I did have one of squirrels that I thought was pretty cute. I cut it top and bottom with a new border punch and layered with some table scraps that had fancy cut edges. The text is a cardstock sticker:


I used a printed vellum panel over this illustration and attached it with brads right through the patterned background. The yellow text block is a cardstock sticker:


I treated this one with a velum panel as well - this one with a dictionary entry for 'happiness'. Patterned background cardstock and a cardstock text sticker finish it off:


It's a good thing I get a new calendar every year, as I really like the pictures they present.

Ddd


Posted by studio3d@ccgmail.net at 6:00 AM PDT
Saturday, 1 October 2011
Back to School
Topic: Stickers

Assignment: Make back to school cards

(Yes this is a belated posting)

I had some sets of stickers that fit the 'school' theme so that's what I started with.  This first one got a stamped background using my hand-carved crayon image. I placed two stickers on yellow cardstock and trimmed to leave a tiny border. These are popped up on foam dots. I added the word 'school' in rubon letters and cut out the word 'spirit' from a scrapbook paper. The pencil is a sticker and I turned it into an exclaimation point with the addition of a rhinestone. The yellow border all around is the folded card base:


I moved on to a set of stickers that depicts school notebooks. I framed each out in yellow cardstock. For the background I started with a navy blue card, layered a denim print paper, then ablue with script and swirls, then a strip of dictionary print card. Each of these was distressed with 'ole paper' ink before layering. I found someletter stickers with the notebook image and used these to write 'student' at the bottom. Round stickers spell out 'star' at the top and I added a star paperclip as well. This panel was mounted to a yellow card base and the three tags were popped up on foam dots:


Finally, I used OWH Sketch #75 to create this card on a blue card base with a light green panel over it. Strips of text and script papers run horizontally and a red accent strip makes the vertical. Three framed tags overlay the red strip with only the bottom one popped up on foam. The text at the upper left is from a sticker sheet:


These were sent to OWH.

Ddd


Posted by studio3d@ccgmail.net at 6:00 AM PDT
Friday, 30 September 2011
Sunburst of Scraps
Topic: Scrap Recovery

A tutorial on the OWH Stars and Stamps blog showed the layout for these sunburst cards. I made 18 of them using just table scraps, ribbons (mostly scraps) and some leftover elements from previous projects.

I first cut all the burst pieces and then divided them up into sets of papers that went together. These were glued down and then a bottom strip was selected and cut. These were glued to a base cardstock that matched or contrasted, ribbon was selected and attached with glue dots. Embellishments were added before the panel was attached to a folded card base.

The first three use silk flowers and brads over dircut circles for the embellishments:


Two use diecut 'love' over diecut circles:


Four of them use stamped hearts on foam dots:


And then there are a bunch of miscellaneous embellishments like stamped and colored images, stickers, printed images, die cuts, etc.:


And there you have it.

Ddd


Posted by studio3d@ccgmail.net at 6:00 AM PDT

Newer | Latest | Older