« January 2012 »
S M T W T F S
1 2 3 4 5 6 7
8 9 10 11 12 13 14
15 16 17 18 19 20 21
22 23 24 25 26 27 28
29 30 31
You are not logged in. Log in
Entries by Topic
All topics  «
3D paperwork
A - Z challenge 5
A - Z challenge 7
A - Z challenge round 4
A to Z challenge round 3
A to Z round 2
A to Z round 6
A-Z round 1
Around the House
Art Challenges
Artist Trading Cards
Backgrounds
Beads
Bible Journaling
Books
Boxes
Collage
Color Challenge
Coloring
cookbook
Die Cuts
Digital Projects
Digital Stamps
Drawing
Dry Embossing
Fabric Stuff
Fantastic Folds
Field Trip
Home Decor
How Does Your Garden Grow?
Hymnal Art
In The Kitchen
In the studio
Jewelry
Lettering
Links
Multi-Technique
Music to Work By
Musings
Nail Art
New Work
Online Class
Other Hobbies
Other Projects
Painting
Paper Embroidery
Paper Piecing
Photo
Pretty Paper
Quilting
Random
reading
Scrap Recovery
scrapbooking
Sewing
Sketch Challenge
Some Backlog
Stamping
Stencils
Stickers
Supplies
Teabag Folding
Techniques
Testing
tips and tricks
Tutorial
Web resources
Welcome to my Blog
Work By My Friends
workflow
Writing
Blog Tools
Edit your Blog
Build a Blog
RSS Feed
View Profile
Group One
In & Out of Studio 3D
Sunday, 29 January 2012
Tree Huggers
Topic: Stamping

This image was stamped and sent to me in a swap. I used Copic markers to color it and there was a LOT of coloring in itty-bitty spaces. I wanted to play up the bright and cheery colors so I added multiplelayers of framing (black and white diamond, pink solid, red and white polkadot). I added these to a dark red card base to keep the Valentine theme.

The heart carving on the tree says 'you and me'.

Ddd


Posted by studio3d@ccgmail.net at 12:01 AM PST
Saturday, 28 January 2012
Love Letters
Topic: Stamping

We've moved on to Valentines! Actually, I made these for Operation Write Home and left off any sentiments to they can be used by the troops for generic 'love' cards if they wich, rather than Valentines specifically.

I made two of them with a collage stamp image that is NOT one of my favorites. I find that the only logical thing to color on this stamp is the spray of flowers so I think it looks a little drab when it is 'finished'. I used a very light gray marker to color in some shadows behind the flowers, though. I chose different color card bases, different background paper (though both are of lined notebook print) and cut the stamped panels with different margins.  I did use black ink on the edges of each panel to define them and used the same layout.


Ignore the white margins as I cropped out the distracting surface they were laying on when I took the photos.

Ddd


Posted by studio3d@ccgmail.net at 12:01 AM PST
Friday, 27 January 2012
Bead Bands
Topic: Beads

I put together another set of stretchy bands for medical ID bracelets. You can see on the right how they clip onto the metal information plate by using the lobster claw clasps on each end. This one as well as the blue ovals are polished stones that I bought for this project. The rest are put together from a mix of beads in my stash.


These are so easy to put together that you can have a whole wardrobe in no time at all. In fact, the most time-consuming part is deciding what beads to use!

Ddd


Posted by studio3d@ccgmail.net at 12:01 AM PST
Thursday, 26 January 2012
Two Brown Birds
Topic: Scrap Recovery

I had a couple of birds left over from a 2010 calendar that I decided to make use of. I cut both of them into simple rectangles and rounded the corners with a punch. I also selected the same brown cardstock for the base and decided to use embossing folders as the background for both.

For this first one I embossed a simple frame and mounted the bird panel centered inside. I added a printed nature tag to the upper right corner.


For this one I used two embossing folders. I embossed tree bark on the left 1/3 and leafy branches on the right 2/3. With the bird panel in the upper right I added layered punch flowers and dropped a gold 'nail head' sticky dot into each center. I placed a printed tag with a leaf on the lower left.


You'll notice these also hinge on the left side which is an unusual orientation but I was working with table scraps and they were already folded this way.

Ddd


Posted by studio3d@ccgmail.net at 12:01 AM PST
Wednesday, 25 January 2012
Mouse Lips
Topic: Stamping

Just a fun little image (stamped by a friend) that I love to color. I always add red lips to the girl mouse like she is trying out the lipstick. I colored this up with Copics and cut with a scalloped oval die. I then inked the edges with distress in and layered with foam dots over a floral patterned cardstock, green patterned cardstock and a teal folded card base.


Ddd


Posted by studio3d@ccgmail.net at 12:01 AM PST
Tuesday, 24 January 2012
Sing, Choirs of Angels
Topic: Other Projects

I made 150 of these angels. Can you tell what they are made from?

1) a paper napkin 2) a metallic pipe cleaner 3) pleated paper butterfly. That's it!

It's one of those projects that just 'came' to me. Discussion of decorations for a Christmas dessert... Question: "what shall we do with the napkins?" WHAM! This just popped into my head full-blown. I just had to enlarge the template for the pleated paper butterfly, cut out 150 of the wings from fractal gold paper gift bags (from the dollar store), and assemble them. 


The pipe cleaner is folded in half and a loop created. Twist together 1 1/2 inches. Fold down top corner of napkin then fold in sides to create a 'cone'. Gather a 'neck' and wrap pipe cleaner ends from back to front, cross over and around to back. Wrap pipe cleaner around center of wings. Bring ends of pipe cleaner to front between top and bottom wings. Fold into 'arms'.

Tah Dah!

So glad when my brainstorms work as planned.

Ddd


Posted by studio3d@ccgmail.net at 12:01 AM PST
Monday, 23 January 2012
Precious Metals
Topic: Paper Embroidery

Assignment: create a paper embroidery card for Christmas using silver and gold

Well, these colors do NOT photograph well at all and are, in fact, difficult to work with in real life. I started with a mirror-finish gold cardstock and embossed with a snowflake Cuttlebug folder. Then I pricked out and stitched a large snowflake in silver thread. It did not show up until I had stitched over it in 4 thicknesses of thread! Then I stitched on silver beads. After mounting on brushed silver card base I still wasn't impressed with the contrast so I went over all the stitching with 'diamond' Stickles.

Here's a closer look at the stitched snowflake:

I think it looks like it is made of ice.

Ddd


Posted by studio3d@ccgmail.net at 12:01 AM PST
Sunday, 22 January 2012
Fairy Ring
Topic: Paper Embroidery

Assignment: Make a Paper Embroidery card with mythological creatures.

I really have no patterns for anything mythological so went to my sticker collection to see if something would fit. These fairies were the closest thing I could find. They are two layers of clear sticker. The bottom layer sticks to the card and the body only of the printed layer sticks to that so the wings can be folded up. I had a whole sheet of them so chose two that were similar in colors and stitched a fairly simple border for them to fly in.


Backgrounds and accent papers are all scraps on a coral card base. I added rhinestone flight trails and a clear thick acrylic text sticker.

Ddd


Posted by studio3d@ccgmail.net at 12:01 AM PST
Saturday, 21 January 2012
WAY Belated Halloween Pictures
Topic: Sewing

I left my camera away from me and did not have it to post Halloween costume pictures on time. Then I forgot to do it when I got the camera back so we are really running late on these - 2 1/2 months!

I made my hubby's costume from a disposable construction jumpsuit. I slit the legs to the knee and the sleeves to the elbow and sewed in red satin triangle inserts. Then I blinged up the front with red and clear rhinestones, made him a red satin scarf and a white belt. The belt 'buckle' is spray painted on and we purchased the wig.


For my costume I took a look at the 'actual' dress online and just started cutting and stitching to create mine. I built in some extra 'padding', bought a wig and spray painted some sandals with gold. The rest is makeup.


Ooooh la la!

Ddd


Posted by studio3d@ccgmail.net at 12:01 AM PST
Friday, 20 January 2012
Bordering on Insanity
Topic: Scrap Recovery

I pulled out a bit of leftover border to use and then just kept adding more and more bits of scraps as borders, punching some, cutting some thick and some thin, added a bit of tissue tape as a border and backed it all with a coral folded card base.

Hard to know when you're 'done' when you go at it like this:

I used a white rub-on for the greeting and added coral Liquid Pearls to the lacy border that started the whole thing off.

Ddd


Posted by studio3d@ccgmail.net at 12:01 AM PST
Thursday, 19 January 2012
Can't See the Forest
Topic: Paper Embroidery

Assignment: Make paper embroidery cards with the theme 'trees'

I have LOTS of tree patterns for embroidery so it was hard to choose one. However, I had only done up this one as a beaded Christmas tree so I thought I'd try to make it look more like it was in a natural setting.

I stitched both trees on brown cardstock using green thread (different ones on each tree) and stamped ground underneath using markers and a 'grass' stamp. I also added and colored a little bird on the ground then cut out the tree and ground. Beingd each I placed a printed blue cardstock to serve as the sky then backed with a green textured dot cardstock and a brown folded card base.

On this one I decorated the tree with golden Liquid Pearls:

This one got green rhinestones:

I didn't add any greetings as these can be stamped in the sky area before sending.

Ddd


Posted by studio3d@ccgmail.net at 12:01 AM PST
Wednesday, 18 January 2012
OWH Inspiration
Topic: Stamping

Some months ago Operation Write Home challenged us to create cards using this shirt as an inspiration:

Since I wasn't going to have my computer in the studio to refer to I simply made notes to myself: "Swirls in red/teal/green/blue/orange, birds, scroll with text, angel wings, hearts."

Working with those notes I created a card starting with a light blue cardstock with a subtle swirl background on it (from a Tim Holtz paper pad). I used multiple colors of distress inks to tint the background and then sprayed liberally with a silver shimmer mist. I dried with a heat gun then stamped matching swirls at the top and bottom along with some dotted flowers and two different bird silhouettes. I attached silver peel-off borders as well as a large scrolly heart and two hearts with wings. The text across the center is a clear sticker. 

I used a coral colored folded cardstock base and placed dots of silver Liquid Pearls in the centers of the dotted flowers.

Ddd


Posted by studio3d@ccgmail.net at 12:01 AM PST
Tuesday, 17 January 2012
Dots and Scallops and Pearls, Oh My!
Topic: Multi-Technique

I picked up some bits and bobs from the scraps pile and started layering and combining based on color palettes. I pulled out multiple colors of my favorite cardstock with raised dots to back them and created two cards.

First up is this square card. I had gotten the punched flower from a friend when she sent a card to me. The heart image was clip art from a book and I trimmed with a craft knife leaving a narrow border. The leaves of the flower were glued flush to the heart while the bloom has foam tape behine. This was all layered onto increasingly large blocks of the dotted cardstock in colors to match the images. As a final step I used Liquid Pearls in yellow on the stamens of the flower and the lacy scallops of the heart.

For the second card I started with a blue dotted cardstock and created a tall card base. I had on hand the peachy circles, snowflake dots, and the lacy strip of Color Me border. I cut a couple of additional borders with a scallop punch and layered all of these together. The two circle layers are held together with blue brads. I added Liquid Pearls to the Color Me border and Stickles to the snowflakes. As a final step I punched a large scallop border on the right edge of the card base and backed it with a white strip.


No greetings oneither of these leaves them open to being sent on any occasion.

Ddd


Posted by studio3d@ccgmail.net at 12:01 AM PST
Monday, 16 January 2012
Ruffles and Posies
Topic: Quilting

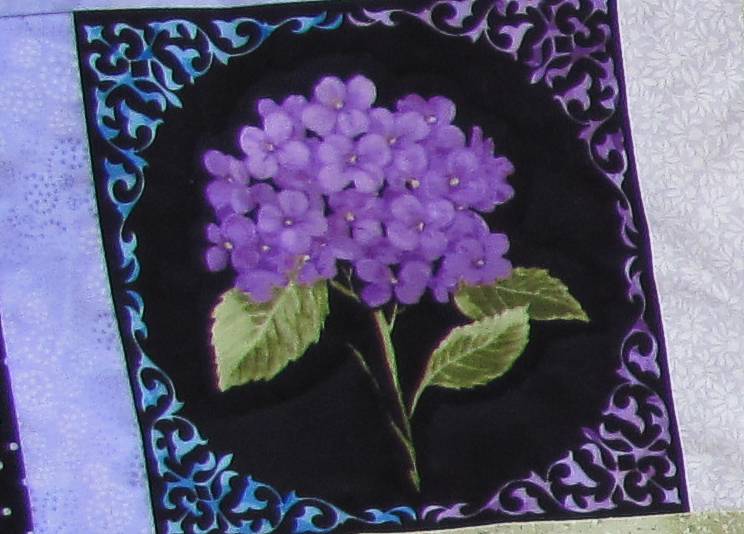
I found some awesome floral fabric on clearance that I couldn't resist and then found a complementary floral backing fabric as well, also on sale. Colors went so well with strips I already had cut left over from the origami quilt. I designed a layout based on the 'courthouse steps' block and created this lap quilt for my niece:


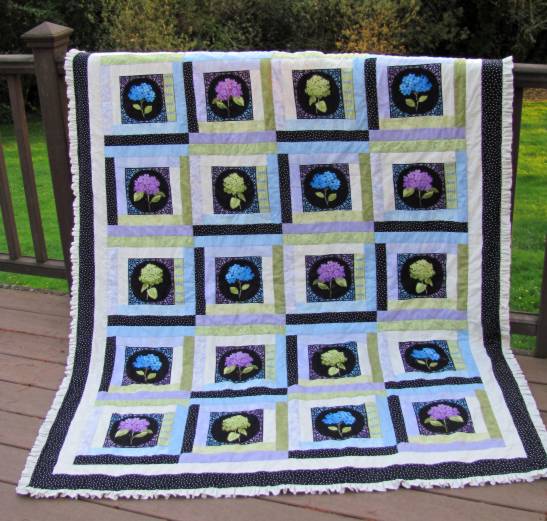
I dis have to purchase the black polka dot as well because I didn't have enough of either of the two black solids I had on hand to make all the strips. I'm glad of that because I think this fabric really makes the quilt.

I made myself a new challenge to incorporate a ruffle in the binding and you can see that a little better here - as well as a view of the backing fabric:


I quilted the whole thing in the ditch of the large blocks and then did free-motion shadow quilting around the blossoms on the front. Here you can see an example of that:


This completes 5 full-size quilts, one lap quilt, and two wall hangings in 13 months. Can you guess that I like this new hobby?

Ddd


Posted by studio3d@ccgmail.net at 12:01 AM PST
Sunday, 15 January 2012
Go Big Red - Go For The Gold
Topic: Color Challenge

Color Challenge: Make a card using only Red and Gold!

This is harder than one might imagine - using only two colors. I also found that it was hard to find supplies in my stash that matched in the red category. In the end I was successful, I think - you be the judge.

I started with a scrapbook paper printed with a photo of red roses. This was layered onto gold cardstock and these over a red folded card base. Then I used more of the gold and a Spellbinders Shapeabilities die to cut and emboss a rose frame and two separate roses. The frame was cut around the edges and the two additional roses glued over top along the left edge. The one in the center left is popped up on foam dots. Then I used a Cuttlebug die to cut the sentiment from the same gold cardstock and glued it inside the frame.

I does not photograph as well as it looks in person.

Ddd


Posted by studio3d@ccgmail.net at 12:01 AM PST
Saturday, 14 January 2012
Three Flowers on Layers
Topic: Sketch Challenge

For a sketch challenge I created 4 cards, using flowers for the round element in each case. Most of them use paper flowers that I colored with mist sprays - layering some flowers, layering some colors. I attached all of these with brads and /or glue dots. In one case I had some silk flowers and used those.

I pulled out a set of black/white papers my grandson gave me for my birthday that I hadn't used yet. Then I pulled out a set of papers from a Tim Holtz distress pad. Pulling together various embellishments such as ribbon, accent strip papers, stamps, tags, etc. these are the four cards I produced.


I was very pleased with how all these came together.

Ddd


Posted by studio3d@ccgmail.net at 12:01 AM PST
Friday, 13 January 2012
So Sweet
Topic: Stamping

Another dollar bin stamp set, cupcake! I love cupcake stamps and own several but hardly ever use them, for some reason. I used masking to stamp this one three times and colored with Copic and Bic markers. I used two tones for the cupcake tops and red for all the heart toppers.

I colored up one like this:

And then liked the second one so much I colored up the third just like it.


All were mounted on red cardstock to match the hearts. The hearts were treated with glossy accents for shine and the stars all got stickles. A stamped greeting from the same set finishes them.

Ddd


Posted by studio3d@ccgmail.net at 12:01 AM PST
Thursday, 12 January 2012
Sketchy Flowers
Topic: Stamping

Here's a set of clear stamps that I've had for a while but not used. Each flower is separate so I attached 5 of them to a block and stamped all together. The stems I drew in by hand then I used Copic and Bic markers to color them.

For the first three I went with three tones ofa single color family, banded the image with black card and attached to a matching folded card base. I also added text stamping and applied stickles to parts of the flowers.


On the last one I really went wild with the markers, using purples and golds on the flowers and then colored with oranges and blues in the background. I added a few doodle dots along the stems, stamped a text greeting and mounted on purple cardstock.


I placed purple rhinestoneson the flowers before decorating them with Stickles.

I really like the effect of this card but it is SO time consuming and I hate to think how much of the ink it used up in my markers!

Ddd


Posted by studio3d@ccgmail.net at 12:01 AM PST
Wednesday, 11 January 2012
Lonely Tree
Topic: Stamping

I needed more masculine cards for Operation Write Home and used the opportunity to use this stamp from the one-dollar bin. I stamped it on glossy cardstock and used Copic and Bic markers to color it. I colored four of them, trimmed them out and used a mix of papers, cardstocks and ribbons to complete them.


I used different bits of trim to stamp the text for each card.

Ddd


Posted by studio3d@ccgmail.net at 12:01 AM PST
Tuesday, 10 January 2012
Feathered Friends
Topic: Stamping

I picked up a new stamp on sale and wanted to ink it up. I had an assignment to make masculine cards and this was perfect for it. I stamped on glossy cardstock and colored up all 5 images with Copic and Bic Alcohol Markers in exactly the same way. I used a variety of Nestabilities dies to cut them out and then combined with different papers, cardstock and ribbons to make 5 cards.

Here they are:


I used stamping on some of the to add text.

Ddd


Posted by studio3d@ccgmail.net at 12:01 AM PST

Newer | Latest | Older