« February 2012 »
S M T W T F S
1 2 3 4
5 6 7 8 9 10 11
12 13 14 15 16 17 18
19 20 21 22 23 24 25
26 27 28 29
You are not logged in. Log in
Entries by Topic
All topics  «
3D paperwork
A - Z challenge 5
A - Z challenge 7
A - Z challenge round 4
A to Z challenge round 3
A to Z round 2
A to Z round 6
A-Z round 1
Around the House
Art Challenges
Artist Trading Cards
Backgrounds
Beads
Bible Journaling
Books
Boxes
Collage
Color Challenge
Coloring
cookbook
Die Cuts
Digital Projects
Digital Stamps
Drawing
Dry Embossing
Fabric Stuff
Fantastic Folds
Field Trip
Home Decor
How Does Your Garden Grow?
Hymnal Art
In The Kitchen
In the studio
Jewelry
Lettering
Links
Multi-Technique
Music to Work By
Musings
Nail Art
New Work
Online Class
Other Hobbies
Other Projects
Painting
Paper Embroidery
Paper Piecing
Photo
Pretty Paper
Quilting
Random
reading
Scrap Recovery
scrapbooking
Sewing
Sketch Challenge
Some Backlog
Stamping
Stencils
Stickers
Supplies
Teabag Folding
Techniques
Testing
tips and tricks
Tutorial
Web resources
Welcome to my Blog
Work By My Friends
workflow
Writing
Blog Tools
Edit your Blog
Build a Blog
RSS Feed
View Profile
Group One
In & Out of Studio 3D
Sunday, 5 February 2012
T'was the Banner Before Christmas
Topic: Quilting

I finished this quilted banner 4 days before Christmas, hung it up and forgot to post for you all to admire see.

I made it entirely from scraps from three of the grandchild quilts and a quick look at a quilt in a shop I saw in October. I sketched out the block on my computer when I got home and did some adjustments to make the bow look more 'realistic'. Then I had to figure out how to construct the parts so the angle would be right and all the fabrics would remain on grain. I pieced the background from three similar fabrics to create a mosaic look.


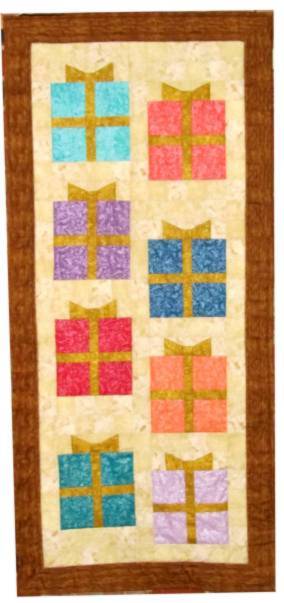
This was hung on the end of the fireplace where the falling leaves banner had been previously. I like the idea of having banners there and may continue to make them for the various seasons/holidays.

Ddd


Posted by studio3d@ccgmail.net at 12:01 AM PST
Saturday, 4 February 2012
From the High Seas - 2
Topic: Field Trip

As promised, today I'm showing the second card made on the cruise.

Here is the sample sheet:


Not much you could do when the houndstooth was already printed on the cardstock, the aperture already cut out and the embellishments were sized to fit. However, I did cut their strip apart so it would fit lenthwise and did not insert the filigree panel in the aperture. Instead, I used their white rubon to put the greeting on the black interior of the card so it could be read through the hole. I added rhinestones above and below.

Here is my card:


Ddd


Posted by studio3d@ccgmail.net at 12:01 AM PST
Updated: Tuesday, 27 December 2011 10:29 AM PST
Friday, 3 February 2012
From the High Seas - 1
Topic: Field Trip

On a recent cruise one day's creative project was to make cards from kits that were provided to us. There were supplies for two cards in the kit - each with a couple of pictures of sample ideas.

This is the sample picture for the first card:


The scrolly thing was a frame to be mounted inside so a photo could be inserted. Not on MY card though! I cut it into four strips an layered them on the card front with the upper-most one up on foam dots. I used their doily diecut but not any of the pink plastic stickers they provided. Instead, I cut apart several of their rubons to create my own text boxes.

Here is my card:


The other card is for tomorrow...

Ddd


Posted by studio3d@ccgmail.net at 12:01 AM PST
Updated: Tuesday, 27 December 2011 10:28 AM PST
Thursday, 2 February 2012
All My Free Stitching Patterns
Topic: Paper Embroidery

Today I finally collected all of the patterns I have created in the last 3 years and added them to my website. You can see them all at http://mystudio3d.com/StitcheryDoDodd.htm

The new ones are at the bottom and include the Mardi Gras Mask, a Poinsettia,  three Dragons, a Maple Leaf, a Bookmark, Birdhouses, and more.

Grab whatever you want. THEY'RE FREE!

Ddd


Posted by studio3d@ccgmail.net at 1:05 PM PST
Updated: Thursday, 2 February 2012 3:08 PM PST
Vintage Rose
Topic: Scrap Recovery

This rose was 'clip art to use' from another salvage book. Again, I used Copic markers (and when I say 'copic' please understand that I use a combination of Bic and Copic selected by their range of colors. They are both alcohol markers and work perfectly well together.)


More table scraps were used for backing this, including the snippet of scroll diecut. Some black ink was used to define the edge of the feature panel, as well.

Ddd


Posted by studio3d@ccgmail.net at 12:01 AM PST
Wednesday, 1 February 2012
Rose Bearer
Topic: Stamping

This is another image from a swap. I used Copic markers to color her, using lots of shading for dimension.

Layers of backing were selected from the table scraps based on the colors in the focal image. I love the dot textured purple cardstock. You will probably recognize the black scrap from recent days and the red rose paper was featured not too long ago, as well.

The card base is a red layer as well.

Ddd


Posted by studio3d@ccgmail.net at 12:01 AM PST
Tuesday, 31 January 2012
Love Birds
Topic: Scrap Recovery

Another image from the stamp catalog (did I get my money's worth from this $5 purchase, or what?). This was quite a small image that I colored with Copic markers, so I did some creative framing.


The card base is a blue marbled card topped with a pink layer then a blue layer of ColorMe paper. I used a square of pink, pierced around the edge and turned on point as a backing for the focal image.

Ddd


Posted by studio3d@ccgmail.net at 12:01 AM PST
Monday, 30 January 2012
My Heart Thinks of You
Topic: Scrap Recovery

This lovely, lacy heart is an image from that stamp catalog I scrapped out. I colored with Copic markers and stamped the sentiment in the center. Then I used Liquid Pearls to embellish the tiny teardrop marks around the edge.


I cut around with a craft knife and layered on black 'quilted' paper over a peach card base.

Ddd


Posted by studio3d@ccgmail.net at 12:01 AM PST
Sunday, 29 January 2012
Tree Huggers
Topic: Stamping

This image was stamped and sent to me in a swap. I used Copic markers to color it and there was a LOT of coloring in itty-bitty spaces. I wanted to play up the bright and cheery colors so I added multiplelayers of framing (black and white diamond, pink solid, red and white polkadot). I added these to a dark red card base to keep the Valentine theme.

The heart carving on the tree says 'you and me'.

Ddd


Posted by studio3d@ccgmail.net at 12:01 AM PST
Saturday, 28 January 2012
Love Letters
Topic: Stamping

We've moved on to Valentines! Actually, I made these for Operation Write Home and left off any sentiments to they can be used by the troops for generic 'love' cards if they wich, rather than Valentines specifically.

I made two of them with a collage stamp image that is NOT one of my favorites. I find that the only logical thing to color on this stamp is the spray of flowers so I think it looks a little drab when it is 'finished'. I used a very light gray marker to color in some shadows behind the flowers, though. I chose different color card bases, different background paper (though both are of lined notebook print) and cut the stamped panels with different margins.  I did use black ink on the edges of each panel to define them and used the same layout.


Ignore the white margins as I cropped out the distracting surface they were laying on when I took the photos.

Ddd


Posted by studio3d@ccgmail.net at 12:01 AM PST
Friday, 27 January 2012
Bead Bands
Topic: Beads

I put together another set of stretchy bands for medical ID bracelets. You can see on the right how they clip onto the metal information plate by using the lobster claw clasps on each end. This one as well as the blue ovals are polished stones that I bought for this project. The rest are put together from a mix of beads in my stash.


These are so easy to put together that you can have a whole wardrobe in no time at all. In fact, the most time-consuming part is deciding what beads to use!

Ddd


Posted by studio3d@ccgmail.net at 12:01 AM PST
Thursday, 26 January 2012
Two Brown Birds
Topic: Scrap Recovery

I had a couple of birds left over from a 2010 calendar that I decided to make use of. I cut both of them into simple rectangles and rounded the corners with a punch. I also selected the same brown cardstock for the base and decided to use embossing folders as the background for both.

For this first one I embossed a simple frame and mounted the bird panel centered inside. I added a printed nature tag to the upper right corner.


For this one I used two embossing folders. I embossed tree bark on the left 1/3 and leafy branches on the right 2/3. With the bird panel in the upper right I added layered punch flowers and dropped a gold 'nail head' sticky dot into each center. I placed a printed tag with a leaf on the lower left.


You'll notice these also hinge on the left side which is an unusual orientation but I was working with table scraps and they were already folded this way.

Ddd


Posted by studio3d@ccgmail.net at 12:01 AM PST
Wednesday, 25 January 2012
Mouse Lips
Topic: Stamping

Just a fun little image (stamped by a friend) that I love to color. I always add red lips to the girl mouse like she is trying out the lipstick. I colored this up with Copics and cut with a scalloped oval die. I then inked the edges with distress in and layered with foam dots over a floral patterned cardstock, green patterned cardstock and a teal folded card base.


Ddd


Posted by studio3d@ccgmail.net at 12:01 AM PST
Tuesday, 24 January 2012
Sing, Choirs of Angels
Topic: Other Projects

I made 150 of these angels. Can you tell what they are made from?

1) a paper napkin 2) a metallic pipe cleaner 3) pleated paper butterfly. That's it!

It's one of those projects that just 'came' to me. Discussion of decorations for a Christmas dessert... Question: "what shall we do with the napkins?" WHAM! This just popped into my head full-blown. I just had to enlarge the template for the pleated paper butterfly, cut out 150 of the wings from fractal gold paper gift bags (from the dollar store), and assemble them. 


The pipe cleaner is folded in half and a loop created. Twist together 1 1/2 inches. Fold down top corner of napkin then fold in sides to create a 'cone'. Gather a 'neck' and wrap pipe cleaner ends from back to front, cross over and around to back. Wrap pipe cleaner around center of wings. Bring ends of pipe cleaner to front between top and bottom wings. Fold into 'arms'.

Tah Dah!

So glad when my brainstorms work as planned.

Ddd


Posted by studio3d@ccgmail.net at 12:01 AM PST
Monday, 23 January 2012
Precious Metals
Topic: Paper Embroidery

Assignment: create a paper embroidery card for Christmas using silver and gold

Well, these colors do NOT photograph well at all and are, in fact, difficult to work with in real life. I started with a mirror-finish gold cardstock and embossed with a snowflake Cuttlebug folder. Then I pricked out and stitched a large snowflake in silver thread. It did not show up until I had stitched over it in 4 thicknesses of thread! Then I stitched on silver beads. After mounting on brushed silver card base I still wasn't impressed with the contrast so I went over all the stitching with 'diamond' Stickles.

Here's a closer look at the stitched snowflake:

I think it looks like it is made of ice.

Ddd


Posted by studio3d@ccgmail.net at 12:01 AM PST
Sunday, 22 January 2012
Fairy Ring
Topic: Paper Embroidery

Assignment: Make a Paper Embroidery card with mythological creatures.

I really have no patterns for anything mythological so went to my sticker collection to see if something would fit. These fairies were the closest thing I could find. They are two layers of clear sticker. The bottom layer sticks to the card and the body only of the printed layer sticks to that so the wings can be folded up. I had a whole sheet of them so chose two that were similar in colors and stitched a fairly simple border for them to fly in.


Backgrounds and accent papers are all scraps on a coral card base. I added rhinestone flight trails and a clear thick acrylic text sticker.

Ddd


Posted by studio3d@ccgmail.net at 12:01 AM PST
Saturday, 21 January 2012
WAY Belated Halloween Pictures
Topic: Sewing

I left my camera away from me and did not have it to post Halloween costume pictures on time. Then I forgot to do it when I got the camera back so we are really running late on these - 2 1/2 months!

I made my hubby's costume from a disposable construction jumpsuit. I slit the legs to the knee and the sleeves to the elbow and sewed in red satin triangle inserts. Then I blinged up the front with red and clear rhinestones, made him a red satin scarf and a white belt. The belt 'buckle' is spray painted on and we purchased the wig.


For my costume I took a look at the 'actual' dress online and just started cutting and stitching to create mine. I built in some extra 'padding', bought a wig and spray painted some sandals with gold. The rest is makeup.


Ooooh la la!

Ddd


Posted by studio3d@ccgmail.net at 12:01 AM PST
Friday, 20 January 2012
Bordering on Insanity
Topic: Scrap Recovery

I pulled out a bit of leftover border to use and then just kept adding more and more bits of scraps as borders, punching some, cutting some thick and some thin, added a bit of tissue tape as a border and backed it all with a coral folded card base.

Hard to know when you're 'done' when you go at it like this:

I used a white rub-on for the greeting and added coral Liquid Pearls to the lacy border that started the whole thing off.

Ddd


Posted by studio3d@ccgmail.net at 12:01 AM PST
Thursday, 19 January 2012
Can't See the Forest
Topic: Paper Embroidery

Assignment: Make paper embroidery cards with the theme 'trees'

I have LOTS of tree patterns for embroidery so it was hard to choose one. However, I had only done up this one as a beaded Christmas tree so I thought I'd try to make it look more like it was in a natural setting.

I stitched both trees on brown cardstock using green thread (different ones on each tree) and stamped ground underneath using markers and a 'grass' stamp. I also added and colored a little bird on the ground then cut out the tree and ground. Beingd each I placed a printed blue cardstock to serve as the sky then backed with a green textured dot cardstock and a brown folded card base.

On this one I decorated the tree with golden Liquid Pearls:

This one got green rhinestones:

I didn't add any greetings as these can be stamped in the sky area before sending.

Ddd


Posted by studio3d@ccgmail.net at 12:01 AM PST
Wednesday, 18 January 2012
OWH Inspiration
Topic: Stamping

Some months ago Operation Write Home challenged us to create cards using this shirt as an inspiration:

Since I wasn't going to have my computer in the studio to refer to I simply made notes to myself: "Swirls in red/teal/green/blue/orange, birds, scroll with text, angel wings, hearts."

Working with those notes I created a card starting with a light blue cardstock with a subtle swirl background on it (from a Tim Holtz paper pad). I used multiple colors of distress inks to tint the background and then sprayed liberally with a silver shimmer mist. I dried with a heat gun then stamped matching swirls at the top and bottom along with some dotted flowers and two different bird silhouettes. I attached silver peel-off borders as well as a large scrolly heart and two hearts with wings. The text across the center is a clear sticker. 

I used a coral colored folded cardstock base and placed dots of silver Liquid Pearls in the centers of the dotted flowers.

Ddd


Posted by studio3d@ccgmail.net at 12:01 AM PST

Newer | Latest | Older