« March 2012 »
S M T W T F S
1 2 3
4 5 6 7 8 9 10
11 12 13 14 15 16 17
18 19 20 21 22 23 24
25 26 27 28 29 30 31
You are not logged in. Log in
Entries by Topic
All topics  «
3D paperwork
A - Z challenge 5
A - Z challenge 7
A - Z challenge round 4
A to Z challenge round 3
A to Z round 2
A to Z round 6
A-Z round 1
Around the House
Art Challenges
Artist Trading Cards
Backgrounds
Beads
Bible Journaling
Books
Boxes
Collage
Color Challenge
Coloring
cookbook
Die Cuts
Digital Projects
Digital Stamps
Drawing
Dry Embossing
Fabric Stuff
Fantastic Folds
Field Trip
Home Decor
How Does Your Garden Grow?
Hymnal Art
In The Kitchen
In the studio
Jewelry
Lettering
Links
Multi-Technique
Music to Work By
Musings
Nail Art
New Work
Online Class
Other Hobbies
Other Projects
Painting
Paper Embroidery
Paper Piecing
Photo
Pretty Paper
Quilting
Random
reading
Scrap Recovery
scrapbooking
Sewing
Sketch Challenge
Some Backlog
Stamping
Stencils
Stickers
Supplies
Teabag Folding
Techniques
Testing
tips and tricks
Tutorial
Web resources
Welcome to my Blog
Work By My Friends
workflow
Writing
Blog Tools
Edit your Blog
Build a Blog
RSS Feed
View Profile
Group One
In & Out of Studio 3D
Friday, 16 March 2012
Yummy Ribbons
Topic: Supplies

For Christmas I received three of the punches from We R Memory Keepers that allow you to punch anywhere on a page and weave ribbon through. They come with a 3-pack of ribbon that you can use to do the weaving. I did three cards with one of the punches, used thrie ribbon for two of them and a ribbon I had on hand for the third card.

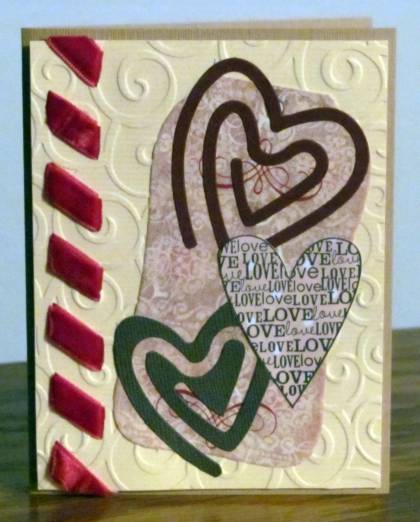
This one uses their velvet ribbon. I felt it was too thick to do the second step of the ribbon weaving so just tucked the ends to the back. I mounted the front piece onto a folded card base using foam tape so the ribbon would not make it bulge up from the back. I used a Sizzix die to cut 'primative hearts' to layer with a printed tag and a text heart stamped on decorative paper.


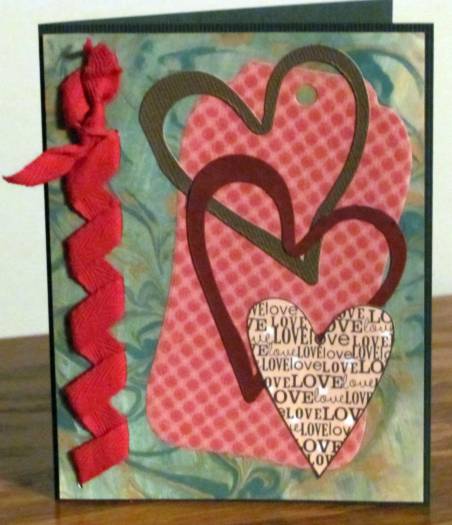
The second card uses their twill ribbon which I wove in the prescribed manner. I also added a bit of knotted ribbon at the top end. This background is one made with the 'shaving cream' technique. I mounted it to the base card with foam tape again and continued with the primative heart die cuts, tag and stamped heart.


For this third card I used ribbon I had on hand. More of the shaving cream background, tag, diecut hearts and stamped text heart. I added a snippet of the ribbon to the top of the tag on this one.


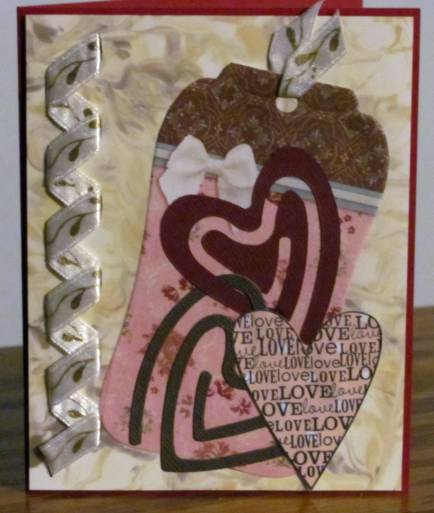
I think this is my favorite of the three.

I have two more of these punches to try out along with more ribbons that came with them and more of them on hand. If I get bored with these, there are actually three more punches that I don't own. Oh the possibilities!

Ddd


Posted by studio3d@ccgmail.net at 12:01 AM PDT
Thursday, 15 March 2012
Eagle in Stitches
Topic: Paper Embroidery

I've been working on a new pattern for paper embroidery. I hope to have it available soon. In the meantime, here is the stitching I worked up from the draft version.


I wanted to do something patriotic and chose the bald eagle with a banner. I think I might do several text phrases that can be stitched into the banner as desired.

Ddd


Posted by studio3d@ccgmail.net at 12:01 AM PDT
Wednesday, 14 March 2012
Hot Tropics
Topic: Die Cuts

This challenge was to use hot troical versions of pink, green and yellow. I found an old card front image that had the right colors in it and used that for my background.

I diecut varying sizes of frames in multiple colors and shapes and layered until I had an arrangement I liked. This was glued to the card front and then the center oval was cut out of all the layers together.

The base card is neon yellow and I attached a butterfly sticker to the center. The constructed piece is mounted with foam tape around the opening and with glue (flat to the card) around the outside edges.


I stamped and diecut the text label out of neon orange and mounted with foam tape on the middle and glue on the ends. Three sticker hearts decorate the front and I added rhinestones to the flower centers on the butterfly.

Ddd


Posted by studio3d@ccgmail.net at 12:01 AM PDT
Tuesday, 13 March 2012
Birch Trees 2.0
Topic: Techniques

Back with another version of the birch trees card. This time I used distress inks to paint the background areas.

Here are the EASY steps:
  • Open a folded white card to lie flat (mine was 5.5 x 4.25 when folded)
  • Use sticky notes to mask off the folded edge on the back of the card so no ink will get on the back
  • Use two sticky notes to mask on the front, leaving a space between them (width of one desired tree trunk)
  • With the very edge of a light brown stamp pad stroke lightly from one sticky note edge toward the center of the open space. Turn card around and do from other sticky note edge. Do NOT aim for complete coverage. Spotty coverage is much better for the effect.
  • Move sticky notes over to expose another trunk area and repeat (vary the width of the trees and change the angles slightly). Repeat to make 5 wide tree trunks.
  • Move back to one edge and mask off a very skinny tree trunk. Mask off a space at the bottom so the tree will sit further back in the scene (wider trees will be closer so need less space masked off at the bottom). Swipe with ink pad. These trees will get a bit more coverage just because they are smaller to work with.
  • Repeat, moving the sticky notes to make several of these smaller trees.
  • Remove all sticky notes except for the one masking the card back.
  • Use fine-line black pen to sketch lines down the sides of the larger trees and make a few side-to-side marks in the trunks.
  • Draw in some defining curves at the bottoms of the smaller trees and draw in some upper branches on them (make sure the branches stay 'behind' your larger foreground trees)
  • Sketch in some hills and distant trees.
  • Paint the snowy foreground, purple in the mountains and green in the distant trees.For coloring the background, here is what I do. I use Distress Inks and press the pad onto an acrylic block. Then I use an aqua-brush to pick up the ink and paint it on like watercolors. The colors I used: Brushed Corduroy for the birch trees, Frayed Burlap for the snow then layered Tumbled Glass over it, Milled Lavender for the mountain, Bundled Sage for the background trees, Tumbled Glass for the sky
  • Attach a greeting.

Here is the newer verion of the card:


Ddd


Posted by studio3d@ccgmail.net at 12:01 AM PDT
Monday, 12 March 2012
Birdhouse Row
Topic: Paper Embroidery

This was for a challenge to stitch up a card on friendship. I thought this 'neighborhood' of birdhouses would fir the topic nicely.


I stitched on a printed cardstock, layered on another printed cardstock and a plain green card base. Then I added two cardstock stickers for text. Love the little bird that came on the lower one.

Ddd


Posted by studio3d@ccgmail.net at 12:01 AM PST
Sunday, 11 March 2012
Version 2.0
Topic: Paper Embroidery

A couple of months ago I was looking at blogs or catalogs or something and saw a poinsettia I thought would make a great stitching pattern. I even took notes and made a sketch in a notebook. When I was at my computer a few weeks later I made a pattern off the top of my head and stitched it up.

My initial impression was "I'm not impressed." It wasn't nearly as neat as I had envisioned it.

Fast forward a few more weeks and I opened the sketch notebook for something and ran across the original notes. No wonder I wasn't impressed - it wasn't what I had sketched!

So I went back to the computer and reworked the pattern to match the sketch and - WOW - what a difference.


Now THIS was exactly what I had in mind. I would like to use burgundy for the lines in the petals but did not have any thread that color on hand. Maybe in version 3.0.

Ddd


Posted by studio3d@ccgmail.net at 12:01 AM PST
Updated: Sunday, 11 March 2012 8:15 AM PST
Saturday, 10 March 2012
Tall Tree
Topic: Paper Embroidery

Here is another card for the Christmas stash. I've made this pattern up before but never as a Christmas tree. LOVE the bumpy dot paper background.

I stitched with red, green and dark yellow threads and added 'nail head' dots to the tops of the sections. A star rhinestone went on the top of the tree and sheer ribbon was tied around the base of the panel.


A folded card base and a thick acrylic clear sticker finish it off.

Colors are WAY off on this photo. Card base is really burgundy, background and ribbon are moss green.

Ddd


Posted by studio3d@ccgmail.net at 12:01 AM PST
Friday, 9 March 2012
Heart and Hands
Topic: Paper Embroidery

Assignment: Make a paper embroidery valentine

Isn't this the perfect pattern for the assignment? I thought the swirly background looked romantic so started there. For the hands, I stitched one in red and the other in dark pink.


Many layers for framing were added plus a clear text sticker.

Ddd


Posted by studio3d@ccgmail.net at 12:01 AM PST
Thursday, 8 March 2012
Dove Grey
Topic: Paper Embroidery

Challenge: Make a paper embroidery card with the theme 'birds'

I chose to stitch this dove in grey so it would not be stark white. This made it a bood match for the silver peel-off greeting.


Layering with black-banded color blocks, I used an off-center alignment and rounded corners for interest.

Ddd


Posted by studio3d@ccgmail.net at 12:01 AM PST
Wednesday, 7 March 2012
Hanging Out
Topic: Paper Embroidery

Shimmery gold paper was the starting place for this card. I used a red/green/gold verigated thread for the ornament and afterward slipped in the round center design. Left and right borders were added from a striped Christmas paper.


I gathered tree, branch and leaf punchouts in a variety of greens and layered them to create a pine bough for the ornament to hang from.

The text is a thick acrylic sticker.

Ddd


Posted by studio3d@ccgmail.net at 12:01 AM PST
Tuesday, 6 March 2012
Santa Paws
Topic: Paper Embroidery

This is the latest project for the '2 Christmas cards a month' challenge

I fell in love with this little puppy pattern when I saw it. Unfortunately, the original did not have the back feet and he looked a little like a seal. So I added the back feet when stitching with verigated brown thread. After all the stitching I used watercolor pencils and an aqua-brush to color in the image. The fur trim on the hat and pom were added with Flower Soft. This is the first time I have used it.


The text and the greenery were added with stickers.

Ddd


Posted by studio3d@ccgmail.net at 12:01 AM PST
Monday, 5 March 2012
Snow and Ice
Topic: Dry Embossing

Assignment: Make a card about snow and ice

I pulled blue cardstock and used a border embossing folder and a snowflake one together. I used blue and white Liquid Pearls to enhance the embossing. I cut a label with a Spellbinders die and trimmed it out with the Liquid Pearls as well.


After mounting the background on a white folded card base I used foam tape to mount the label. The text is silver peel-off stickers.

Ddd


Posted by studio3d@ccgmail.net at 12:01 AM PST
Updated: Monday, 23 January 2012 10:15 PM PST
Sunday, 4 March 2012
Birch Trees
Topic: Techniques

Another brilliant plan comes together!

The idea was to mask off strips on white cardstock and drag the edge of an ink pad over them from both edges toward the middle. This was to create birch trees. I had some table scraps that were a close match to the ink and I cut thin strips and glued them on in the open spaces.

I used thin black marker to add some details to the tree edges for shading (both the ink ones and the paper ones) and then started drawing in a landscape, branches, and snow drifts around the trees. I colored the landscape with markers.

ISN'T THIS AWESOME?


As a last step I added a clear thick acrylic sticker to the center.

Ddd


Posted by studio3d@ccgmail.net at 12:01 AM PST
Saturday, 3 March 2012
Love Couple
Topic: Paper Embroidery

Assignment: Make a stitched card with the theme 'romance'.

This pattern was the first one I thought of with the announcement of the theme. Isn't it perfect?


After stitching the couple on pink cardstock with golden and brown threads I selected paper layers with those colors as well. I then added the circle graphic/text sticker and then found these awesome puffy heart stickers in my stash. They came in the perfect combination of colors!

Ddd


Posted by studio3d@ccgmail.net at 12:01 AM PST
Friday, 2 March 2012
Country Angel
Topic: Stamping

Here's another image from the stamp catalog, colored with Copics. I really like the shading I accomplished on this one. More layering with the table scraps and a black background for the image.


I added some silver peel-off stickers for the text.

Ddd


Posted by studio3d@ccgmail.net at 12:01 AM PST
Thursday, 1 March 2012
Dancing Diva
Topic: Stamping

This little girl is having SO much fun! Lots of layers of table scraps frame her up perfectly.


The text was stamped on some of my favorite 'dot' cardstock and the top corners rounded to go with the illustration. By making it flush with the bottom of the card it grounds the card.

Ddd


Posted by studio3d@ccgmail.net at 12:01 AM PST
Wednesday, 29 February 2012
Windy Girl
Topic: Stamping

This stamped image was a gift to me adn I colored it with Copic markers. Multiple layers to pick up colors from the image, banded in black to create definition.


I added those little banners to reinforce the impression of the wind blowing.

Ddd


Posted by studio3d@ccgmail.net at 12:01 AM PST
Tuesday, 28 February 2012
Diamond Girl
Topic: Stamping

More table scraps, another stamp catalog image, no text.

I like the graphical layout of this card. When combined with the linear papers it creates quite an impact.


Colors are actually brighter in real life.

Ddd


Posted by studio3d@ccgmail.net at 12:01 AM PST
Monday, 27 February 2012
Today Tomorrow Forever
Topic: Stamping

Another image from the stamp catalog colored with Copics. I love the shading I achieved on this one, don't you?

It is layered up with table scraps and black borders. By mounting it off center it allowed room for the 'beanstalk' clear sticker.


I used more of the cardstock stickers to create the phrase.

Ddd


Posted by studio3d@ccgmail.net at 12:01 AM PST
Sunday, 26 February 2012
Lucky Bear
Topic: Stamping

Lots of table scraps form a striped background for this bear from the stamp catalog. I colored him with Copics and cut with a narrow border.


The text is a combination of a cardstock sticker and some peel-offs.

Ddd


Posted by studio3d@ccgmail.net at 12:01 AM PST

Newer | Latest | Older