« September 2012 »
S M T W T F S
1
2 3 4 5 6 7 8
9 10 11 12 13 14 15
16 17 18 19 20 21 22
23 24 25 26 27 28 29
30
You are not logged in. Log in
Entries by Topic
All topics  «
3D paperwork
A - Z challenge 5
A - Z challenge 7
A - Z challenge round 4
A to Z challenge round 3
A to Z round 2
A to Z round 6
A-Z round 1
Around the House
Art Challenges
Artist Trading Cards
Backgrounds
Beads
Bible Journaling
Books
Boxes
Collage
Color Challenge
Coloring
cookbook
Die Cuts
Digital Projects
Digital Stamps
Drawing
Dry Embossing
Fabric Stuff
Fantastic Folds
Field Trip
Home Decor
How Does Your Garden Grow?
Hymnal Art
In The Kitchen
In the studio
Jewelry
Lettering
Links
Multi-Technique
Music to Work By
Musings
Nail Art
New Work
Online Class
Other Hobbies
Other Projects
Painting
Paper Embroidery
Paper Piecing
Photo
Pretty Paper
Quilting
Random
reading
Scrap Recovery
scrapbooking
Sewing
Sketch Challenge
Some Backlog
Stamping
Stencils
Stickers
Supplies
Teabag Folding
Techniques
Testing
tips and tricks
Tutorial
Web resources
Welcome to my Blog
Work By My Friends
workflow
Writing
Blog Tools
Edit your Blog
Build a Blog
RSS Feed
View Profile
Group One
In & Out of Studio 3D
Thursday, 6 September 2012
Two for Christmas
Topic: Paper Embroidery

Another two paper embroidery cards for Christmas!

This time I used some metallic threads to stitch up a new-to-me tree pattern. I left off the outer border and trimmed fairly close to the stitching. This gave me extra room around the edge to add some gold sticker trim. Then I added a gold and green metallic text sticker.


My second card is snowflake redux. This is my own pattern that I have done a zillion times. I stitched it with metallic purple thread over a light teal paper and backed it with a lavender card base. The different treatment this time is using rhinestone stickers for decoration.


Anybody keeping track of how many Christmas cards I have done already? Me neither!

Ddd


Posted by studio3d@ccgmail.net at 12:01 AM PDT
Wednesday, 5 September 2012
Scrappy Flags
Topic: Scrap Recovery

In the kits I made up some time ago I had two that had patriotic cardstock stickers; the last leftovers from a large sheet. One of them had a blue card base and one a red card base - both in muted tones. I had also dropped in these kits lots of red, glue and neutral scraps.

So I treated both in a similar manner by making scrappy flags. For the first I used a single block of blue checked paper for the upper left corner. I used a heart punch on it so the card base shows through. Then I l alternated printed paper strips in reds and neutrals. Then i placed the cardstock sticker under the blue field.

For the second I used slightly brighter colors. I started with a block of three blue patterned papers. Then I used cream and yellow strips on the field while letting the red background show between them. I placed two diecut swirls on top and then placed the cardstock sticker in the center.


I like how these came out - scrappy but still recognizable.

Ddd


Posted by studio3d@ccgmail.net at 12:01 AM PDT
Tuesday, 4 September 2012
Shiny Wafers
Topic: Supplies

A quick stop by the craft store the other day had me scanning the shelves for things marked for clearance. I happened upon a package of round and oval stickers that are acrylic domes but still very low profile. These are perfect for cards.

I grabbed up some of the kits I had made up and took out the old 'feature items' and replaced with these new disks. First up is one using some crushed tissue paper over cardstock (the background purple strip) and a 'sample' of cardstock off the cover of a pad (the netting and lace circle page) as well as a gold metallic diecut (the shaped item) and a clear greeting sticker.


Next I used three pieces of printed cardstock (left, center, right) and a clear plastic greeting bar. It had to be mounted over white cardstock and trimmed out as the colors showing through made the text unreadable.


This one is simply a strip of striped paper and a cardstock text block. The bird, label and scrollwork are all printed on the striped paper. I just had to place the circle sticker carefully to cover up the printed sentiment.


This has a green card base, pink colored panel and a floral stripe panel with rounded corners. The flowers on the striped panel are glittered. I added a clear scripture at the top.

A blue patterned paper, a tag backed with green and a diecut circle backed with green. A clear scripture sticker covers the circle. Three losenge-shaped gemstones are pn the right.

I used a couple of table scraps for background and added dotted stripes to each side. Then I placed a block cut from a printed tag at the left side. The text is a large clear sticker. 

Three strips of patterned paper, a bordered tag with scrappers floss knot and a clear sticker. 


For this one the printed papers included this with the butterflies printed down it. I gave each butterfly a color-coordinating word sticker. Then I mounted some textured shiny paper with two rounded colors to be the backpiece for the focal wafer.


Sorry about the quality of the photos. I got a new computer and that meant new photo-editing software. Still learning!

Ddd


Posted by studio3d@ccgmail.net at 12:01 AM PDT
Monday, 3 September 2012
Hummingbird House
Topic: Scrap Recovery

I grabbed one of the kits I had created a while back and whipped up this card. The birdhouse is from the page-a-day scrapbooking calendar. I combined it with one green paper, one red dotted paper and a brown paper. The stand is a diecut bracket that someone sent me in a swap.


I finished it off with a pre-stamped sentiment with rounded corners and two peel-off gold hummingbird stickers.

Ddd


Posted by studio3d@ccgmail.net at 12:01 AM PDT
Sunday, 2 September 2012
Zucchini Marathon
Topic: In The Kitchen

Sometimes the neighbors are overly generous with their zucchini (OK, they ALWAYS are). This year I was given some real whoppers so I had a marathon baking session. I would like to share some of my favorite recipes and methods here.

First up is a new-to-me recipe for a pie - yep, a zucchini pie! It is mock-apple and it truly delicious. There is NO telling this is zucchini, either.

MOCK APPLE PIE WITH ZUCHINI

6 cups zucchini

1 ¼ cups sugar

1 ½ Tbsp flour

1 ½ tsp cream of tartar

1 ½ tsp cinnamon

dash of salt

dash of nutmeg

pastry for double crust 9 inch pan

Peel very large zucchini, slice lengthwise, remove and discard seeds. Slice like apple. Add to ¼ cup lemon juice and ¼ cup water in a saucepan and bring to a boil. Simmer 10 minutes until just tender. Drain and cool. Add remaining ingredients and place in unbaked pie crust in a 9-inch pan. Cover with second crust and flute and seal the edges. Cut slits for steam. Bake at 350 degrees for 50 to 60 minutes until top is browned.

-------------------------

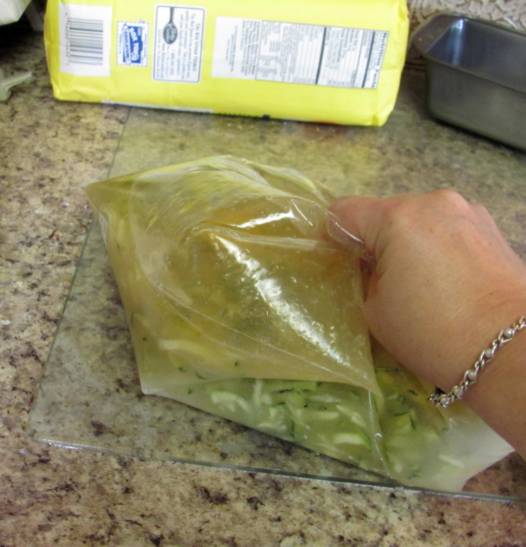
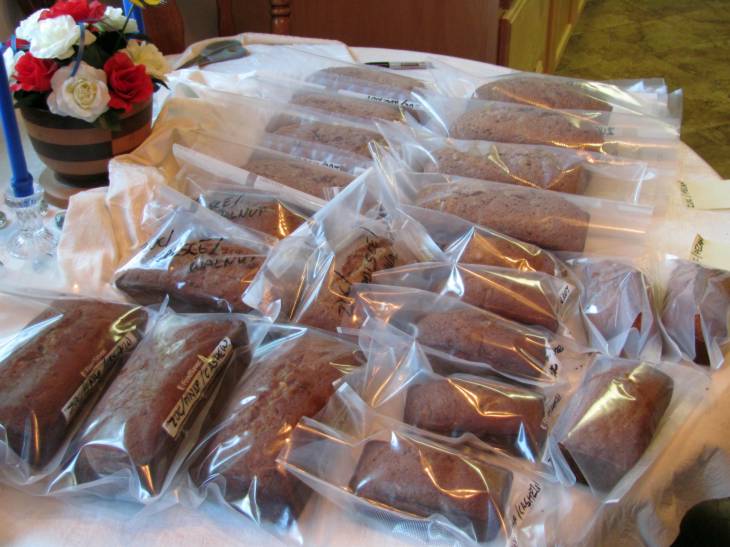
Then I made up 22 full-size and 8 mini loaves of zucchini bread. I have three recipes that I use so that we have some variety and I always double the recipes.  For a marathon session I get out some gallon ziplock bags. For each recipe I place all the wet ingredients, including the sugar and zucchini in one big bag. I measure out all of the bags at once (for this session I ended up with 6 bags of double recipes. The number of bags I have is entirely dependent on how much zucchini there is. I measure that into each bag FIRST and build the rest of the recipe around it. I label the bags with a marker as to which recipe they are.


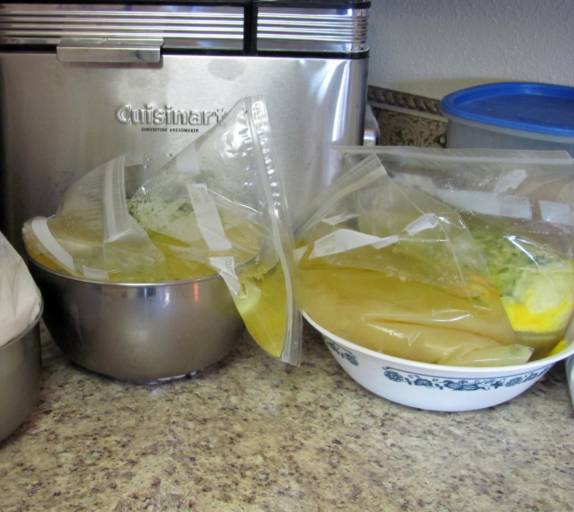
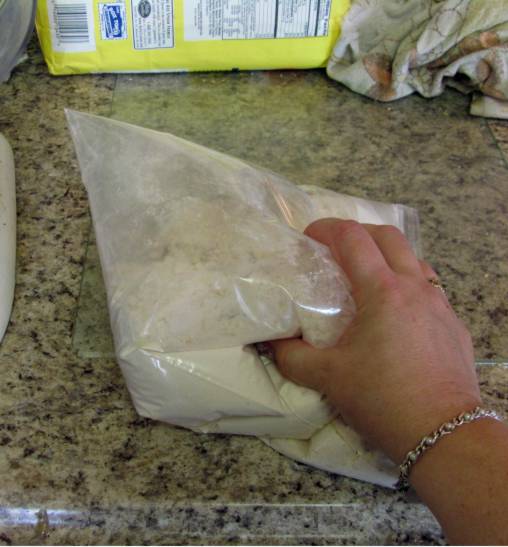
Then I take another set of bags and measure out all the dry ingredients, including the nuts. These also get marked with the recipe name.

Now I just match up bags of wet and dry by recipe and set them aside.


Now I'm ready to mix up some zucchini bread. I massage a bag of wet ingredients to get them unstuck from the sides of the bag.


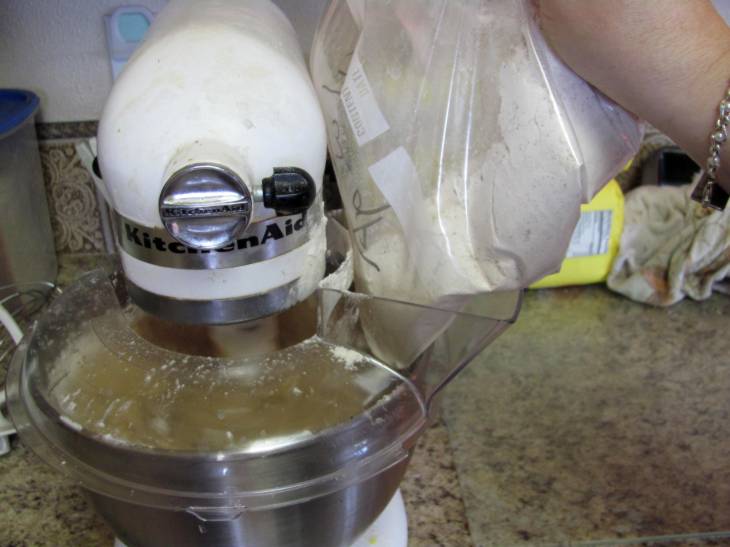
Pour that into the mixer bowl and start it up on low speed. Then I massage and roll around a bag of dry (in place of sifting).


With the mixer running I feed the dry ingredients into the bowl gradually.


I leave the mixer running while I spray the pans with non-stick spray. I read a great idea on another blog the other day and tried it out... place the pans on the door of your dishwasher. All the overspray goes on the door and is cleaned up when the dishwasher is run.


While the loaves are in the oven I wash the mixer bowl, paddle and spatula. That way I'm ready for the next batch to be mixed up. When the loaves come out of the oven I turn them out to cool on a wire rack. They stay here until the next batch comes out of the oven.


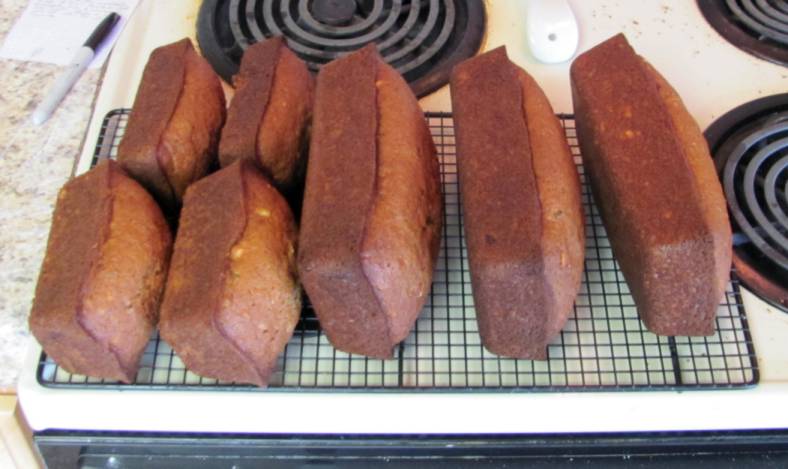
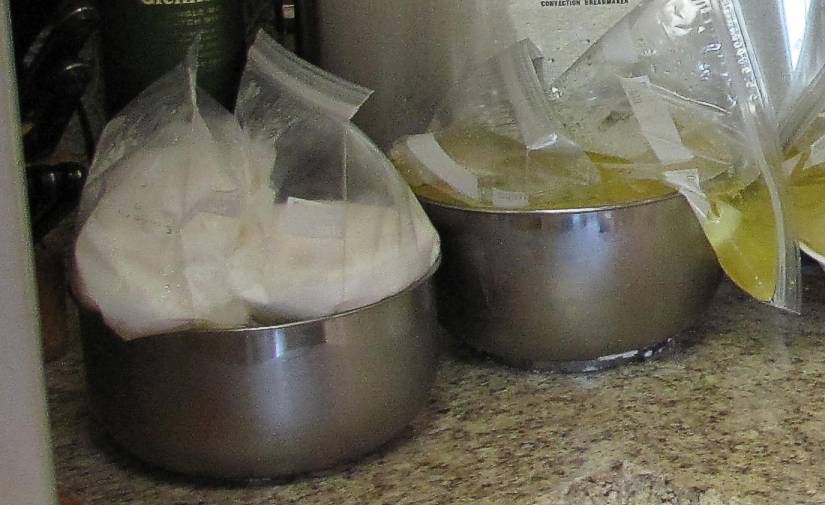
When the loaves are cooled to this point I slip them into vacuum seal bags but leave the ends open. I use a marker to write the product name on the bag. When they are completely cooled I will seal them with the vacuum sealer. Here is the layout partway through the marathon. At this point there are 4 more loaves in the oven and 4 still to mix up.


Here are the recipes I used today:

ZUCCHINI APPLESAUCE LOAF

2 eggs

1 cup vegetable oil

2 cups white sugar

2 cups grated zucchini

1 cup applesauce

2 teaspoon vanilla extract

3 cups all-purpose flour

1 1/2 teaspoon baking soda

1/2 teaspoon baking powder

1 teaspoon salt

2 teaspoons ground cinnamon

1 1/2 teaspoon ground nutmeg

1 cup chopped nuts (walnut or pecan)

Beat eggs, oil, and sugar in a large bowl. Stir in zucchini, pineapple, and vanilla.

In another bowl, measure and combine flour, soda, baking powder, salt, cinnamon, nutmeg, and nuts. Pour all at once into batter. Stir to moisten. Pour into greased loaf pans.

Bake in 350 degree oven for 45 minutes to 1 hour until bread tests done. Cool for 10 minutes before turning loaf out to cool on rack.


ZUCCHINI PINEAPPLE LOAF

2 eggs

1 cup vegetable oil

2 cups white sugar

2 cups grated zucchini

1 cup crushed pineapple with juice

2 teaspoon vanilla extract

3 cups all-purpose flour

1 1/2 teaspoon baking soda

1/2 teaspoon baking powder

1 teaspoon salt

2 teaspoons ground cinnamon

1 1/2 teaspoon ground nutmeg

1 cup chopped nuts (walnut, pecan, unsalted       

               cashew, or macadamia)

Beat eggs, oil, and sugar in a large bowl. Stir in zucchini, pineapple, and vanilla.

In another bowl, measure and combine flour, soda, baking powder, salt, cinnamon, nutmeg, and nuts. Pour all at once into batter. Stir to moisten. Pour into greased loaf pans.

Bake in 350 degree oven for 45 minutes to 1 hour until bread tests done. Cool for 10 minutes before turning loaf out to cool on rack.


ZUCCHINI BREAD    our old standby

Mix together:

3 eggs

1 c. oil

2 c. sugar

2 c. grated zucchini

3 t. vanilla

Sift together and stir in:

3 c. flour

1 t. salt

¼ t. baking powder

1 t. soda

¾ t. nutmeg

3 T cinnamon

Add 1 c. chopped nuts (walnuts or pecans)

Bake at 325o for 1 hour in 2 greased and floured loaf pans (makes 4 mini-loaves)

 -----------------------

I freeze up my loaves and we eat on them all year as well as passing them on to friends, taking them to dinners, and using them as thank-you gifts. I will do some Green Tomato bread to add to this stock when I get some off my vines. Here is that recipe:

GREEN TOMATO BREAD

1 ½ cups ground green tomatoes

½ cup grated tart apple

2 cups sugar

1 cup vegetable oil

3 beaten eggs

1 teaspoon vanilla

3 cups flour

1 teaspoon baking powder

1 teaspoon baking soda

1 teaspoon salt

2 ½ teaspoons cinnamon

¼ teaspoon ground cloves

¼ teaspoon grated nutmeg

¾ cup chopped nuts

½ cup raisins (optional)

            In a large bowl, combine green tomatoes, apple, sugar, oil, eggs and vanilla. Into separate bowl, sift dry ingredients. Stir dry ingredients into wet ingredients.

            Add nuts and raisins (if using) and stir to combine. Divide mixture between two greased 9x5 inch loaf pans. Bake at 325 degrees for 1 hour, or until a tester comes out dry.

            NOTE: The green tomatoes can be ground and measured out for freezer storage until you are ready to make bread, if you wish.


Hope you enjoy this!

Ddd


Posted by studio3d@ccgmail.net at 12:01 AM PDT
Saturday, 1 September 2012
Going, Going, Gone
Topic: Quilting

I got some donated scraps that someone had started combining into 9-patch blocks. There were more 5-inch squares cut and come extra fabric so I cut and whacked and stitched until I had 12 blocks. They were real scrappy and no way to lay them out in any kind of 'pattern' so I remembered a technique I had read about on a blog called 'Disappearing 9-Patch'. What you do is cut the 9-patch in half top to bottom, swap the right with the left and combine with another block. Then you do the same by cutting side to side and moving the bottoms to the tops and mixing with other blocks.

The result is 4 whole blocks in the center surrounded with half-blocks all around the sides and quarter blocks in the corners. Looks complicated with little work.

I pieced these together with 2 1/2 inch strips and quilted with a burnt-orange backing. I gave it a dark green binding. 

The result is roughly 4 x 5.5 feet.

This quilt will be donated to our local hospital for their Passages program. The chaplain's office gives them to patients who are not expected to survive their stay. The family keeps the quilt afterwards.

Ddd


Posted by studio3d@ccgmail.net at 12:01 AM PDT
Friday, 31 August 2012
Challenging Hearts
Topic: Paper Embroidery

One of the groups sent us a pattern challenge. It had several elements and we got to choose which parts we wanted to use. I chose one of the borders and one of the hearts. The original heart has three swirls in it so I used one swirl in each of three versions. All these elements were stitched with verigated thread on a light teal cardstock.

I selected some coordinating cardstock from a new 6 x 6 paper pad and combined them to make a decorative edge with rounded corners.


I used some dragonflies punched from paint strips for the left border and added gold peel-off sticker greetings.

Ddd


Posted by studio3d@ccgmail.net at 12:01 AM PDT
Thursday, 30 August 2012
Challenging Embroidery
Topic: Paper Embroidery

One of my groups gave us a challenge to make an anniversary card. Another set up a swap of cards using yellow and pink. Both had to be paper embroidery so I combined the two into one card.

The stitched heart is a free pattern from Ann's Paper Arts which I stitched using golden yellow and a veregated pink on a dusty pink dotted cardstock. I added a foil rose bouquet in 3D and set this on a dark pink shimmer cardstock with rounded corners.


I used white peel-off lace trim at the top and bottom. Then I used Copic marker to add yellow coloring to silver script stickers and silver border trim before adding them to the card. One single yellow rhinestone was placed in the embroidery.

Ddd 


Posted by studio3d@ccgmail.net at 12:01 AM PDT
Wednesday, 29 August 2012
Down By The Riverside
Topic: Field Trip

We went down to the river along a large rock bar the other day. The bar is covered with brush so you cannot see the shoreline of the bar from the embankment where we came in. Imagine our surprise when we walked to the far side and found about 25 little stacks of rocks that someone built over there. As access is difficult here and it is about 4 miles downstream from the local town, we assume a boater or rafter came ashore to do this.


Some were more elaborate than others.


They were interesting to look at and we had to look up online to see if they are meant to represent something or what other purpose they have. They are apparently just built for the satisfaction of having done it and for the entertainment of people who discover them.


Actually, we WERE entertained by them. I added a couple of small rocks to one as we were leaving.

Then, it started to rain a bit so we headed back. I found more beauty in the flowers that were struggling to survive on this rocky ground.


"Thanks on the great job on the outdoor decorations", to God and whoever the other guy was.

Ddd 


Posted by studio3d@ccgmail.net at 12:01 AM PDT
Tuesday, 28 August 2012
Stripes and Dots
Topic: Scrap Recovery

More pieces from the table scraps bin.

The floral was white and black so I tinted it to make the flowers tan. Then I cut this as well as the black dotted paper into stripes and alternated them on a tan card base. I had the scalloped diecut left over from another project and layered that with a reverse dotted banner. On top of that is a stamping of my phoenix bird that I cut out with a round punch.

I ditressed the edges with a tool and distress ink then mounted it on foam tape.


Ddd


Posted by studio3d@ccgmail.net at 12:01 AM PDT
Monday, 27 August 2012
Dancin' On Dots
Topic: Scrap Recovery

I grabbed a whole bunch of little pieces from the table scraps bin using colors from the butterfly panel on the right. I cut them into bands and used a loose arrangement to allow the background cardstock to show through. The trimmings are a simple stamped greeting, pieces of white peel-off sticker lace at the top and bottom and a butterfly diecut with my Cuttlebug and a Spellbinders die. I used Old Paper distress ink to bring the butterfly color closer to the other blues. Then I gave it gold nailhead dots for a body and drew in some antennae.


Ddd


Posted by studio3d@ccgmail.net at 12:01 AM PDT
Sunday, 26 August 2012
Let It Snow - Later
Topic: Stamping

So how do you make it snow in August? With stamping!

I started with a white cardstock and masked off the bottom. I stamped the weeds with Versamark and then with black right below that. I embossed with clear powder. Then I tore a paper for the back hill and sponged blue distress ink onto the sky. I removed that mask and added another for the lower hill and sponged it from the bottom up. That mask was removed and the foreground was sponged from the bottom mask which was then removed. The sentiment was stamped last.

I trimmed the panel, bordered with black and placed on a white card base.

I made two of these - using different blues:


What a neat effect and so easy to do.

Ddd


Posted by studio3d@ccgmail.net at 12:01 AM PDT
Saturday, 25 August 2012
One, Two, Three - Let's Color Trees
Topic: Stamping

I saw some Spring trees created this way and thought I'd use the same method to make Fall trees.

I used a circle punch to create a round mask. Then I held it over tan cardstock and sponged three orange circles using different inks from Whispers. Over these I stamped a tree image with black ink. For one of them I used a tree with leaves but I prefered the leafless version so I used that on the other 5 cards.

I cut down the panel and tied a piece of scrappers floss around the panel. This was glued onto a orang-y brown folded card base and I stamped a sentiment on the bottom band of color.

Here is a full view of one:


And here is a look at the whole set of 6 cards:


That was so easy I may make some for the other seasons.

Ddd


Posted by studio3d@ccgmail.net at 12:01 AM PDT
Friday, 24 August 2012
A Band of Orange
Topic: Stamping

This may be as close to a one-layer card as I can make myself do! I decided to do some seasonal cards and started with fall. I started with a white cardstock and masked off the top and bottom. Then I used four different orange distress inks to blend a band of color. I stamped three leaf stamps a couple of times using a light brown distress ink and then removed the masks. I stamped the leaves again in black across the whole surface of the card. I stamped in some filler branches as well. I trimmed the panel, banded it in a golden brown and added three brads along the color line and a stamped sentiment. Then the panel was placed on a white folded card base.

I made two of these:


Ddd


Posted by studio3d@ccgmail.net at 12:01 AM PDT
Thursday, 23 August 2012
Rose Window Stained Glass Quilt
Topic: Quilting

I tried a new (to me) technique in quiltmaking to create a stained glass quilt. Each of the pieces is cut out, laid on a backing block and tacked in place with Steam-a-Seam2. Then the leading lines were added with single-fold bias tape and 1/2 inch wide Steam-a-Seam2. I did a mini-zigzag along both edges of the leading and then pieced all these blocks together. After I sandwiched the batting and backing with it I laid in the leading across all the seams joining the blocks and zigzaged along those for the quilting. This was for the patterned part. Then I added all the wide borders along with their batting and backing. The quilting for the wide borders is large roses at each corner and the centers of the sides. These are connected by leaves and vines. The whole quilt is bound in black.

Here is the queen-sized quilt:


Here is a closeup of the border quilting:


Ddd


Posted by studio3d@ccgmail.net at 12:01 AM PDT
Wednesday, 22 August 2012
A Takeover
Topic: In the studio

As quilting has taken over more and more of my time it has also taken up more and more of my studio space. It also started spreading to other parts of the house so I was doing cutting in the studio, pressing at the ironing board in the family room, piecing at a desk in the studio, sandwiching the quilt on a bed in a guest room, and quilting on the dining room table with all the leaves in it. Now that's just silly!

So we decided to cut back to having only one guest bedroom and use the other as a new quilt studio. We got rid of the bedroom set and I moved into the room with the sewing cabinet, ironing board, and fabric stash. I purchased four bookcases, a sheet of plywood (cut to 4 x 7 feet) and a piece of flannel-backed tablecloth plastic. From this I built a large table that is of a height for cutting fabric, sandwiching quilts and also quilting where the whole quilt has a place to rest without dragging.

Here's a view as you come in the door:


At the far side you can see the desk where the sewing machine sits most of the time and where I will do piecing. If you turn to the left wall there is a desk (which will eventually go elsewhere) with a bulletin board (that will stay) and the ironing board for pressing fabric.


From the pressing area, looking to the right you see the corner of the sewing table and you can see the open area in the table that allows for sitting here for sewing - just move the sewing machine over. Over on the far right you see the closet which has nothing quilt related at all. I bought a tension rod and some fabric to make curtains for this opening. The window will also get a matching valance.


The bookcases supporting the table will be used for my few quilting books as well as supplies. There is an open bay area for stacking bins with my fabric stash. I also installed a floor lamp for better lighting on the table.

Here's a view of the first quilt being finished off in the new quilt studio. Notice that I also installed a holder for my rulers under the window.


Now when the topic tag says 'in the studio' I might have to be more specific!

Ddd


Posted by studio3d@ccgmail.net at 12:01 AM PDT
Tuesday, 21 August 2012
Over Spray
Topic: Stencils

The stencil I used the other day with birds in the branches is actually a 6 x 6 piece that also includes some birdcages hanging from the branches. For those cards I blocked out all the birdcages. Today, however, I left one of the cages exposed. I also used three color sprays instead of the sponging like before and I used watercolor paper to control the bleeding and buckling of the paper.

I used a bit of a red, a blue and a green - trying to control where the color sprayed to give it a painterly look. I then pierced at the top and bottom of the hanging chain and threaded scrappers floss through to tape on the back. I added a bow of the same at the top of the cage.


I made a color blocked background to represent the sky and the ground and cut a pre-stamped sentiment. The center of the strip is popped up on foam but the ends are flat to the paper.

I added a clear sticker to the bottom edge.

Ddd


Posted by studio3d@ccgmail.net at 12:01 AM PDT
Updated: Thursday, 9 August 2012 9:56 AM PDT
Monday, 20 August 2012
Buzzin' In the Cattails
Topic: Paper Embroidery

I've always been fond of cattails so when one group allowed us to do our 'pattern of choice' for a swap I selected this from the book I own.

I stitched the heads in a brownish green and the stalks and leaves in a mossy green. Little moths from a sticker sheet seemed to fit right in with them.


The color is horrible in the photo. The pattern is actually stitched onkraft cardstock and the base card is really a deep forest green! However, the corners really are rounded just like the photo indicates.

Ddd


Posted by studio3d@ccgmail.net at 12:01 AM PDT
Sunday, 19 August 2012
Out On a Limb
Topic: Stencils

NEW CATEGORY! A while back I bought a couple of stencils to use on cards and just got around to trying one out. This is one of the mini stencils from The Crafters Store called Birds of a Feather.

I gathered a bunch of wide printed paper strips from the table scraps bin and selected Distress Inks to coordinate with each one. Then, using washi tape, I blocked off a portion of the stencil (hanging birdhouses) that I did not want to transfer to the paper. I used foam daubers to pick up ink from the pad and sponged it through the stencil onto the patterned paper.

When these were done I selected more table scraps for each one and then chose a card base. Each one then got a sentiment from the pre-stamped bin plus some paper flowers with either pearl or rhinestone centers. In some cases, where the contrast was not high between  a couple of papers, I used a colored or black fine line marker to draw in some faux stitching.

I made 7 of these cards with three being vertical and four on the horizontal.


Many more techniques to try using the stencil (including using the birdhouses portion of them). So, expect to see this again.


Ddd


Posted by studio3d@ccgmail.net at 12:01 AM PDT

Newer | Latest | Older