« December 2012 »
S M T W T F S
1
2 3 4 5 6 7 8
9 10 11 12 13 14 15
16 17 18 19 20 21 22
23 24 25 26 27 28 29
30 31
You are not logged in. Log in
Entries by Topic
All topics  «
3D paperwork
A - Z challenge 5
A - Z challenge 7
A - Z challenge round 4
A to Z challenge round 3
A to Z round 2
A to Z round 6
A-Z round 1
Around the House
Art Challenges
Artist Trading Cards
Backgrounds
Beads
Bible Journaling
Books
Boxes
Collage
Color Challenge
Coloring
cookbook
Die Cuts
Digital Projects
Digital Stamps
Drawing
Dry Embossing
Fabric Stuff
Fantastic Folds
Field Trip
Home Decor
How Does Your Garden Grow?
Hymnal Art
In The Kitchen
In the studio
Jewelry
Lettering
Links
Multi-Technique
Music to Work By
Musings
Nail Art
New Work
Online Class
Other Hobbies
Other Projects
Painting
Paper Embroidery
Paper Piecing
Photo
Pretty Paper
Quilting
Random
reading
Scrap Recovery
scrapbooking
Sewing
Sketch Challenge
Some Backlog
Stamping
Stencils
Stickers
Supplies
Teabag Folding
Techniques
Testing
tips and tricks
Tutorial
Web resources
Welcome to my Blog
Work By My Friends
workflow
Writing
Blog Tools
Edit your Blog
Build a Blog
RSS Feed
View Profile
Group One
In & Out of Studio 3D
Sunday, 2 December 2012
Heartfelt Felt Heart
Topic: Scrap Recovery

This sticky-back felt heart was left over when I cut a long felt border for another project a long time ago. I had backed it with the green marbled background and then put it in the 'someday' bin. When I created 'kits' to work from some time ago I included it along with the red dot, cream dot and scalloped oval and chose a folded red card base.

So, when I got ready to make this card I added the green paper and the white hearts left over from an acetate project. I used 'black soot' distress ink to distress all the papers to give them more continuity. I simply layered them on the card base and stamped the text on the oval.


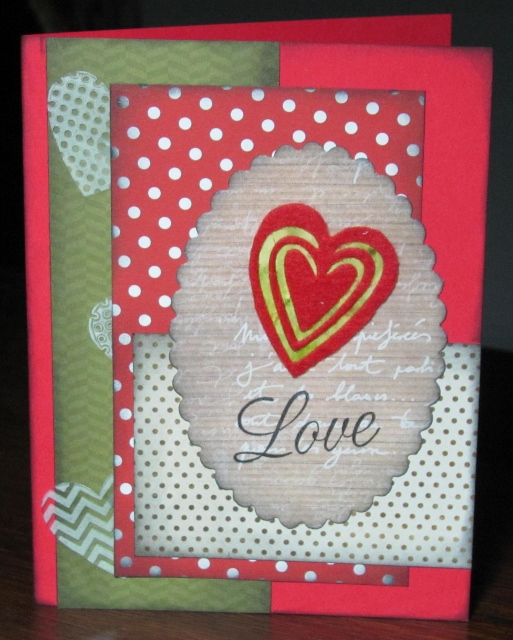
That cleaned a lot of leftovers off the table!

Ddd


Posted by studio3d@ccgmail.net at 12:01 AM PST
Saturday, 1 December 2012
Blocks and Bars
Topic: Quilting

With the donation of some starry fabrics I designed a 48" square quilt for the hospital chaplain's Passages program. This was a quick project - completed in just two days.

The blocks are 6x6, the large bars are 9x3 and the small bars are 6x3. I used two blues, two reds and two beige in the quilt blocks and added a third blue for the border and a fourth blue for the binding. On the back is a burgundy with tiny white dots and it has side sashes of dark blue with white stars. Since I also used leftover batting from another project the only cost I had for this project was for a spool of thread for the quilting.


For that one spool of thread I selected a verigated red that goes from burgundy down to pink with a short color change. I used this in the bobbin as well as the needle and did free-motion stippling over the whole surface.


This is the first large stippling project I have done and I really like the result.

Ddd


Posted by studio3d@ccgmail.net at 12:01 AM PST
Friday, 30 November 2012
Lamplighter
Topic: Paper Embroidery

Even though I did not need any more Christmas cards I already had this one pricked out so decided to stitch it up anyway. Then I got a request to make one for someone and 'voila' I am ready!

This pattern is from the one book I have on the topic of paper embroidery (by Joke de Vette) and the holes are VERY close together. It is a challenge to stitch without tearing any holes.

I used very dark versions of all the colors: black, brown, green, red, and yellow.


I mounted on a dark brown dotted paper over a dark green folded card base and then added a rub-on script greeting.

Ddd


Posted by studio3d@ccgmail.net at 12:01 AM PST
Thursday, 29 November 2012
You Can Count On Me
Topic: Other Projects

I had another run at the countdown blocks. I used the same style wooden blocks, the same papers and stamps and methods of distressing. Two things different with these: The number layouts are now 0, 1, 2, 4, 6, 8 and 0, 1, 2, 3, 5, 7. Why? Just felt like it! This will ensure a shuffling of the backgrounds as the 0, 1 and 2 will have to be switched back and forth from one block to the other every day.

The other thing that is different, and more significant, is the product used for the numbers. I used diecut digits from sheets of 'grungeboard'. First I used a black Sharpie to color the edges and then a Krylon gold paint marker to color the top surface. They got two coats.


The numbers are adhered using Glossy Accents.

Ddd


Posted by studio3d@ccgmail.net at 12:01 AM PST
Wednesday, 28 November 2012
Three-Two-One
Topic: Other Projects

A couple of YEARS ago I bought two-inch wooden blocks to make coundown blocks. And I finally got around to making them.

I used Scor-Tape to attach a variety of papers. Then I used sandpaper to distress all the seams and toned down the exposed white cores of the paper edges with Old Paper Distress ink. I used number stamps, one repeatedly on each side, with Gray Staz-On ink.

The diecut numbers, in 4 colors, were affixed to the sides with Xyron adhesive and I used a fine black marker to add faux stitching around each numeral. One block has 0, 1, 2, 3, 4, 5 and the other block has 0, 1, 2, 6, 7, 8. The 6 can be turned upside down to become 9. The blocks can then be arranged to count down from 31 to 01 or count upwards as a calendar.

I made these with winter papers to use as a countown to Christmas, but with more generic papers they could be used year-round.

Ddd


Posted by studio3d@ccgmail.net at 12:01 AM PST
Updated: Tuesday, 27 November 2012 8:12 AM PST
Tuesday, 27 November 2012
On the Fence
Topic: Quilting

I had cut many more color blocks than I needed for yesterday's quilt so I picked up some black with mixed size and color dots to used as the side bars and did the same layout. (This is really a modified Rail Fence block - thus the title of the quilt and today's blog entry.)

I used the same black for the backing so didn't have the butterfly tie-in for quilting. I kept the graphic image of the colors as the focus and did the quilting down the center of each black bar, creating an X at each intersection where they jogged left and right.


I used a bright pink for the binding to reinforce the modern, graphic feel.

Ddd


Posted by studio3d@ccgmail.net at 12:01 AM PST
Monday, 26 November 2012
Field Guide to Butterflies
Topic: Quilting

The title of today's entry is actually the name I gave this quilt! I started designing with some very bright prints and selected 4 aqua, 4 orange, 4 green, 4 pink and 1 yellow. I made 6-inch blocks with 4 inches of color bordered by 1 inch of white on each side. Then I laid them out in a twist and turn format to make it look woven.

When I went looking for an appropriate backing I found an awesome butterfly print with sketched black lines:

This inspired me to doodle butterflies as the quilting, which I did inside each color block, doubling the stitching of each one and carrying over to the next block with a single line. This is all stitched in columns with black thread.

Here is a close-up of the quilting:

I bound this lap quilt with some of the green stripe.

Here's a look at the finished product:


A bit of Spring in the middle of Autumn!

Ddd


Posted by studio3d@ccgmail.net at 12:01 AM PST
Sunday, 25 November 2012
Right Day, Wrong Month
Topic: Paper Embroidery

It may be the 25th, but it is NOT December. But I still had to make a Christmas Card for a paper embroidery swap.

I used some of the dot textured cardstock and stitched with a verigated metallic thread. It has a very short turn on the colors (about 1.5 inches) and goes from green to gold to red. The colors look dark on the spool but come off more pastel when stitched. This gives the card a delicate look that I like. I rounded the corners and mounted to a top-fold pink card.

I decorated the tree with 'nail head' dots.

Ddd


Posted by studio3d@ccgmail.net at 12:01 AM PST
Saturday, 24 November 2012
Buttercup Yellow
Topic: Paper Embroidery

There's been a lot of color challenges this year! This time the assignment for the swap was to use only yellow and white.

I chose a pattern that was designed for a bookmark and placed it on the edge of a white shimmery cardstock. I stitched with two tones of yellow to enhance the effect. After mounting to a shimmery yellow card base I added yellow clear sticker butterflies and a silver peel-off text.

The butterflies have a very fine silver outline that matches the sentiment.

Ddd


Posted by studio3d@ccgmail.net at 12:01 AM PST
Friday, 23 November 2012
White on White
Topic: Paper Embroidery

This card was made for a challenge to do paper embroidery with white on white.

I used cardstock with a shimmer to it and stitched with plain white thread. I used an embossing folder to make the frame in my Cuttlebug and then cut out the aperture with a craft knife and added to the front of the stitching. Then I put a tiny bit of Stickles glitter glue to the top of the stitching.

I diecut the lettering and glued it on before coating the top of the sentiment with 'opal' Liquid Pearls. Rounded corners echo the oval aperture.

Ddd


Posted by studio3d@ccgmail.net at 12:01 AM PST
Thursday, 22 November 2012
Playing It Straight
Topic: Sketch Challenge

Although this is an older sketch http://mojomonday.blogspot.nl/2012/04/mojo-monday-236.html it was issued as a challenge on one of the groups I am on. So I gave it a run - making it into another Love/Valentine card for OWH. Here is the original sketch for your reference:


For my card I used a striped paper as a base and used three border embossing folders as the three horizontal stripes. I added tiny borders to the top and bottom of this white panel and bordered all this in red. I created a white scalloped  circle and cut a black and white floral paper circle for the center of it. Diecut red words were glued in the center and I used a fine-line red pen to create dashed lines around it. I popped up this element on foam tape. I had some white seam binding and I dyed it with red pepper alcohol ink. While it was still damp I scrunched it and then dryed it with the heat gun. This was tied around the main panel and knotted.

There was still sommething missing so I added a black and white stripe around all the edges as a finish.

Me like!

Ddd


Posted by studio3d@ccgmail.net at 12:01 AM PST
Wednesday, 21 November 2012
Not Your Gramma's Chalkboard
Topic: Dry Embossing

A challenge to use chalks on a card led to making these two cards. For both of them I started by dry embossing a background on white cardstock. I used a q-tip to apply chalks to the raised portions and then sprayed with a sealing spray to set the chalk. Trimming and bordering with a pastel. I also used the same treatment for a sentiment strip.

The first was using a corner treatment folder with greens and yellows.


The second uses an all-over floral with a variety of colors.

Yes, I really have started making Valentine cards already... by request of OWH.

Ddd


Posted by studio3d@ccgmail.net at 12:01 AM PST
Updated: Tuesday, 6 November 2012 7:48 PM PST
Tuesday, 20 November 2012
So Close
Topic: Stamping

I wanted to create a stamped card with a fall theme and relating to Oregon in some way. I pulled out a couple of my hand-carved stamps to make this little scene.

Why is this Oregon? Well, we have plenty of these little bandits in our back yard. We call them out of the brush and when they come we toss marshmallows to them (also the heels of bread and bowls of table scraps). Our favorite thing is when the Mommas bring their kits out to play on the lawn.

Anyway... I stamped the raccoon with black and then colored over it with a tan distress marker and cut it out. I stamped the fish on grey and colored it with three distress markers before cutting it out. For assembly I stamped the trees on a blue scrapbook paper. I tore a hill along the top of a grass print scrapbook paper and tore a lower arc as well. The lower arc was filled with a water print paper. These were all layered and the raccoon and fish added in their places.

I used distress markers to blotch fall colors in the trees, sketched ripples on the water and banded the two sides with dotted papers.

Ddd


Posted by studio3d@ccgmail.net at 12:01 AM PST
Monday, 19 November 2012
Sparkle and Shine
Topic: Paper Embroidery

The assignment for this swap was to make a paper embroidery card with sparkle and shine. I call this one 'night on the town' because of the dark background. Whacko that I am, I again tried stitching on dark paper and, to make it even more difficult for myself, the back of the paper has a busy pattern on it. Sigh...

All of the stitching is done with metallics and irridescent threads. I trimmed the stitched panel down, rounded the corners and mounted on a white folded card base.

As you can see, this is another 'difficult to photograph' card that does liik better in real life.

Ddd


Posted by studio3d@ccgmail.net at 12:01 AM PST
Sunday, 18 November 2012
Swirls of Best Wishes
Topic: Paper Embroidery

I had a challenge on one list to make a paper embroidery 'get well' card and on another list had a swap assignment to make a card in red and green. So I combined the two to come up with this card.

The background is some ColorMe paper sprayed with silver mist. I pricked out a pattern I've had for a long time but never liked the way the blossoms were designed. So I edited the bottom holes to a different configuration and stitched them up to make them into fuschia.


I used two reds for the blooms and two greens for the leaves and stems to give a little dimension. I cut the panel down and rounded the corners before adhering to a red card base. I added a silver peel-off sentiment as a last step.

Ddd


Posted by studio3d@ccgmail.net at 12:01 AM PST
Saturday, 17 November 2012
Clock-a-Block
Topic: Backgrounds

The last of the clock-printed background was carved up into 4 individual clock faces. All were treated the same with some variety in the color combinations to coordinate with the clocks.

I impressed all the backgrounds with the clocks and gears Cuttlebug folder and used Distress Ink to enhance the texture. The clock blocks  got rounded corners, borders, stamped hands, and a center brad.


The all also got bordered sentiments with rounded corners, popped up on foam tape.


Can't wait to see what's next? Me too!

Ddd


Posted by studio3d@ccgmail.net at 12:01 AM PST
Friday, 16 November 2012
Clocks Collage
Topic: Collage

One of the 12 x 12 papers I wanted to use was covered with rows and rows of clock faces. I took a 12 x 6 area and cut into 1 inch strips then rearranged them, mixing together the clock faces but keeping their alignment. After this mix I cut the other direction into 1 inch strips and mixed these up as well. The result was a 12 x 6 piece with a 1 x 1 grid of clock faces. LOVE THIS!

The one on the left I ran through the Cuttlebug with a clocks and gears folder. I enhanced the embossing by using Old Paper Distress Ink and popped up a bordered sentiment.

On the right I did not emboss. I added a bordered sentiment with a flag end and used a copper brad to anchor it. 

Here, on the left, I added two arrows as clock hands under a bordered sentiment popped up on foam tape. For the one on the right I left the clock background whole and just added a stamped sentiment with slots through which I threaded a twill ribbon.

As you can see...miss you all the time.

Ddd


Posted by studio3d@ccgmail.net at 12:01 AM PST
Thursday, 15 November 2012
Pansies and Posies
Topic: Backgrounds

Here is another large botanical with a glittery-shiny finish. It took up so much space on the card fron that I cut along the blossom edges so I could tuck the sentiment underneath.

The sentiments both got rounded corners. They are popped up on foam on the upper-right corner only and then the top blue bloom is also popped up.


I used different colors of sentiments to pick out differing colors from the background.

Ddd


Posted by studio3d@ccgmail.net at 12:01 AM PST
Wednesday, 14 November 2012
Botanical Blocks
Topic: Backgrounds

A few days back I made a stack of cards using the botanical tiles. They're back! I found three more of the medium size.

The one at the left and bottom are the same yellow print. I bordered them in yellow with a green under that. The sentiments were both printed on yellow and bordered in the same green. I used a green diamond lattice as the background.


The one on the right got 'photo corners' on opposing corners. I added a sentiment cut like a tag and tied with scrappers floss. this one got a pink diamond-lattice background.

This one looks very Victorian.

Ddd


Posted by studio3d@ccgmail.net at 12:01 AM PST
Tuesday, 13 November 2012
Lady Slippers
Topic: Backgrounds

Today's cards use a botanical print that is covered with a shiny glittery finish. I'm not sure they ARE lady slippers but I'm calling them that anyway!

I treated these both the same by adding the green borders on each side and mounting a rosy sentiment over yellow and popping them up on foam tape. On the left I mounted the sentiment higher than the one on the right.


Simple but effective.

Ddd


Posted by studio3d@ccgmail.net at 12:01 AM PST

Newer | Latest | Older