« December 2012 »
S M T W T F S
1
2 3 4 5 6 7 8
9 10 11 12 13 14 15
16 17 18 19 20 21 22
23 24 25 26 27 28 29
30 31
You are not logged in. Log in
Entries by Topic
All topics  «
3D paperwork
A - Z challenge 5
A - Z challenge 7
A - Z challenge round 4
A to Z challenge round 3
A to Z round 2
A to Z round 6
A-Z round 1
Around the House
Art Challenges
Artist Trading Cards
Backgrounds
Beads
Bible Journaling
Books
Boxes
Collage
Color Challenge
Coloring
cookbook
Die Cuts
Digital Projects
Digital Stamps
Drawing
Dry Embossing
Fabric Stuff
Fantastic Folds
Field Trip
Home Decor
How Does Your Garden Grow?
Hymnal Art
In The Kitchen
In the studio
Jewelry
Lettering
Links
Multi-Technique
Music to Work By
Musings
Nail Art
New Work
Online Class
Other Hobbies
Other Projects
Painting
Paper Embroidery
Paper Piecing
Photo
Pretty Paper
Quilting
Random
reading
Scrap Recovery
scrapbooking
Sewing
Sketch Challenge
Some Backlog
Stamping
Stencils
Stickers
Supplies
Teabag Folding
Techniques
Testing
tips and tricks
Tutorial
Web resources
Welcome to my Blog
Work By My Friends
workflow
Writing
Blog Tools
Edit your Blog
Build a Blog
RSS Feed
View Profile
Group One
In & Out of Studio 3D
Tuesday, 11 December 2012
When All Is Said And Done
Topic: How Does Your Garden Grow?

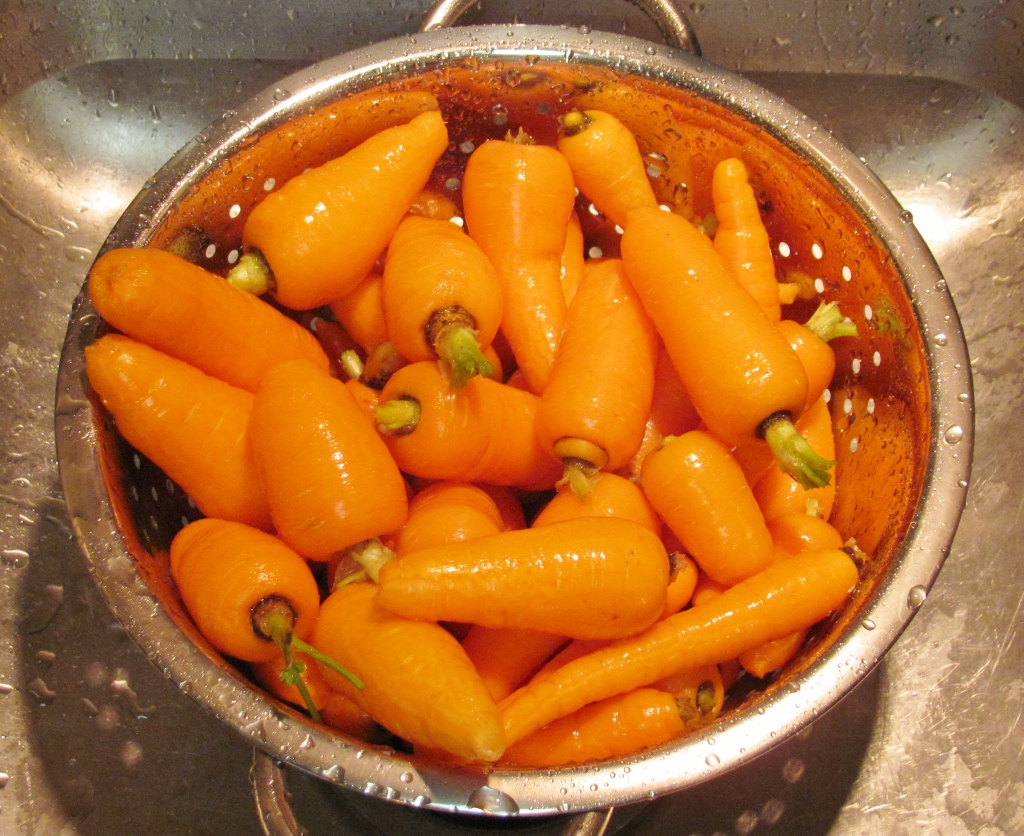
I pulled up the last of the garden produce today - the carrots. This is the best crop of them I have ever had, though most of them were stubby they made up for it in girth.

This batch is about 1/4 of the total I got from the single barrel I planted.


I dug the last of the Yukon Gold potatoes last week and transfered them to cold storage. I got tired of throwing out every 5th one because the squirrels ate chunks out of them. Why don't they eat the purple potatoes? We didn't like them much anyway! So I left the rest of the purples in the ground and the squirrels can eat on them all they want this winter. I'll dig up and discard the remains in the spring and plant only the kinds WE like - and then try to figure out a way to keep our squirrel friends out of them.

Ddd


Posted by studio3d@ccgmail.net at 12:01 AM PST
Monday, 10 December 2012
Angels On the Table
Topic: Other Projects

For the Ladies' Christmas Dinner at church I was asked to 'host' a table. Each host decorated their own table on the theme "Glory to God". I used some things from my own Christmas decor plus items I picked up at Dollar Tree.

I started with two $1 table runners in sage green and crossed them over the center of the round table. Red $1 pottery plates were laid out at each place setting. On these are $1 packages of instant flavored coffee as a hostess gift. Angel napkins (leftover from last year) were placed on top of the coffee.


In the center of the table I placed a footed cake plate with three angels from my collection. In the center is a $1 vase filled with $1 red potpourri and a sprig of each green and red $1 berry sprays. I scattered some of the potpourri around the angels and under the cake plate. I added pieces of miniature sheet music that usually goes on my Christmas tree around the base of the cake plate and strung a $1 gold bell garland up and down around the plate. This is all circled with eight $1 angel ceramics alternating in sage green and cream robes.


Our table will be using flatware that is provided at the food service. The other tables were elegantly beautiful.

Ddd


Posted by studio3d@ccgmail.net at 12:01 AM PST
Sunday, 9 December 2012
Beds of a Feather
Topic: Quilting

So... I ran across this free quilt pattern that just made me swoon and had to have a go at it. It is from Anna Marie Horner and it is called Feather Bed (http://www.annamariahorner.com/make.html). What an awesome title for a pattern!

I used scraps I had on hand from all my previous projects to create a little over a yard of striped fabric to cut the feathers from. I used some fabric from the donation stash for my background (which, to me, looks like pajama fabric) instead of the plain white in the sample. The feathers are HUGE, at about 18 inches from tip to tail.


I was loving the red I used for the quill portion so used more of that on the border. Still loving it so I quilted by doing a decorative stitch in red around every feather.


It is bound by wrapping the backing to the front and top stitching with the same red decorative stitch.

This lap quilt for Passages is about 56-58 inches square.

Ddd


Posted by studio3d@ccgmail.net at 12:01 AM PST
Saturday, 8 December 2012
Early Spring
Topic: Paper Embroidery

Since everyone needed a break from Christmas projects on one of the lists we were challenged to make a Spring card in December. I'm one to jump on board with a butterfly any time of the year so that is what I chose to stitch.

I pricked out two butterflies with the pattern onto shimmery white cardstock and stitched with verigated thread (orange, green, red, blue). I rounded two corners and added some simple borders in colors to match the thread.


I found the perfect sentiment in a package of clear stickers.

Ddd


Posted by studio3d@ccgmail.net at 12:01 AM PST
Friday, 7 December 2012
Quilty Reading
Topic: reading

Way back in 2007 I listed a bunch of authors I like to read because they include crafts in their fiction. Since they write in series there is always something new coming from them.

Since I started this new hobby of quilting I have discovered another list of crafty authors that delve into the topic as they solve their mysteries or tell their story. YAY! So, I now share these authors with you.

FOR YOUR READING PLEASURE:

Thayer, Terri

Zane, Carolyn

Chiaverini, Jennifer

Bostwick, Marie

Sachitano, Arlene

O'Donohue, Clare

Fowler, Earlene

There are many others that have written a single book that combines quilting and fiction. I've just included the series writers.

Ddd


Posted by studio3d@ccgmail.net at 12:01 AM PST
Thursday, 6 December 2012
Golden Throat
Topic: Backgrounds

Though this bird is not nearly as large as the one used yesterday, I still had to trim it pretty close to make it fit the card well. I liked the method of making the background recede that I used on the blue birds so I used the 'pumice stone' distress marker on the backgrounds of these again. I did not do anything to the bird, itself, though.

For the first one I picked up the blue in the wings with a robin's egg blue frame, the green to pick up the leaf color and a yellow card base to pick up the color of the belly. I added the doodle lines around various parts and added a sentiment with a gold peel-off sticker.


With the same coloring and layout I used coral tones to bring out the color of the cherries and the speck of color around the eye. I changed up the faux stitching style and the script greeting.

Still not done with all these backgrounds so you'll see more pop up from time to time.

Ddd


Posted by studio3d@ccgmail.net at 12:01 AM PST
Wednesday, 5 December 2012
Blue Birds of Happiness
Topic: Backgrounds

If you saw this in the original paper you would probably not recognize it now! The birds on this paper were very large for a card so I cut them down to use only the front half of the birds. I rounded the corners and then stared at them for quite a while... (insert 'Jeopardy' theme music). I decided the problem was that the whole thing was too much the same tone. So I used a 'pumice stone' distress marker over the whole background and then went over the whole bird with a 'picket fence' distress marker. This made the bird pop off a subdued background. I used 'old paper' distress ink with a blending tool over the bird to bring back a little color.

For the first card I backed the illustration with a lemon yellow with rounded corners. Behind this I layered a yellow/blue dot and a grey folded card base. I did some faux stitching with a fine line pen and added a diecut white script.


I added a few fine lines to the illustration on this next one but did the rest of the coloring the same. I bordered it with a robin's egg blue and a burgundy strip over a pink folded card base.

The text on this one is proveded with a gold peel-off sticker.

Ddd


Posted by studio3d@ccgmail.net at 12:01 AM PST
Tuesday, 4 December 2012
Gilded Cage
Topic: Backgrounds

The background that included birds in a cage was just not working as a whole piece so I cut out the cage and traced out all the bars and framing with peel-off gold stickers.

For the first I used a tone on tone orange background paper and repeatedly stamped the sentiment on it. I toned the edges with 'black soot' distress ink and added a gold peel-off scroll at the top. More peel-off trim creates a chain and I popped up the cage on foam tape over it.


You can see that these birds and the cage has that shiny glittery surface. For the next one I used the same exact treatment but over green paper with a pre-printed corner bracket. The hanging bracket I added is different on this one, too.

Now those are love birds.

Ddd


Posted by studio3d@ccgmail.net at 12:01 AM PST
Monday, 3 December 2012
It's In the Script
Topic: Backgrounds

From those 12 x 12 sheets I cut up some time back, I'm still coming up with parts to use as backgrounds. I had two that had script in a framed area with some floral accents.

First I used 'aged mahogany' distress ink to tone the edges (darker on the corners) of the panel and a peach dotted paper. These were layered together and I placed two vellum script stickers which are printed in gold. That left some open space so I placed a gold peel-off scroll in the middle and then filled a heart opening with a pink heart brad.


You'dhardly know this was the same illustration! I did toning with 'old paper' distress ink only in the script area and then overstamped it with more script using 'espresso' Adriondack ink. I used parts of silk flowers to build on top of the printed ones and added a 'ColorMe' papers tag with a stamped sentiment. The tag fot a burgundy border and a bow tied with scrappers floss. I bordered the illustration with burgundy and placed it on a cream and black striped paper.

The open flower got a little heart brad for the center.

Ddd


Posted by studio3d@ccgmail.net at 12:01 AM PST
Sunday, 2 December 2012
Heartfelt Felt Heart
Topic: Scrap Recovery

This sticky-back felt heart was left over when I cut a long felt border for another project a long time ago. I had backed it with the green marbled background and then put it in the 'someday' bin. When I created 'kits' to work from some time ago I included it along with the red dot, cream dot and scalloped oval and chose a folded red card base.

So, when I got ready to make this card I added the green paper and the white hearts left over from an acetate project. I used 'black soot' distress ink to distress all the papers to give them more continuity. I simply layered them on the card base and stamped the text on the oval.


That cleaned a lot of leftovers off the table!

Ddd


Posted by studio3d@ccgmail.net at 12:01 AM PST
Saturday, 1 December 2012
Blocks and Bars
Topic: Quilting

With the donation of some starry fabrics I designed a 48" square quilt for the hospital chaplain's Passages program. This was a quick project - completed in just two days.

The blocks are 6x6, the large bars are 9x3 and the small bars are 6x3. I used two blues, two reds and two beige in the quilt blocks and added a third blue for the border and a fourth blue for the binding. On the back is a burgundy with tiny white dots and it has side sashes of dark blue with white stars. Since I also used leftover batting from another project the only cost I had for this project was for a spool of thread for the quilting.


For that one spool of thread I selected a verigated red that goes from burgundy down to pink with a short color change. I used this in the bobbin as well as the needle and did free-motion stippling over the whole surface.


This is the first large stippling project I have done and I really like the result.

Ddd


Posted by studio3d@ccgmail.net at 12:01 AM PST
Friday, 30 November 2012
Lamplighter
Topic: Paper Embroidery

Even though I did not need any more Christmas cards I already had this one pricked out so decided to stitch it up anyway. Then I got a request to make one for someone and 'voila' I am ready!

This pattern is from the one book I have on the topic of paper embroidery (by Joke de Vette) and the holes are VERY close together. It is a challenge to stitch without tearing any holes.

I used very dark versions of all the colors: black, brown, green, red, and yellow.


I mounted on a dark brown dotted paper over a dark green folded card base and then added a rub-on script greeting.

Ddd


Posted by studio3d@ccgmail.net at 12:01 AM PST
Thursday, 29 November 2012
You Can Count On Me
Topic: Other Projects

I had another run at the countdown blocks. I used the same style wooden blocks, the same papers and stamps and methods of distressing. Two things different with these: The number layouts are now 0, 1, 2, 4, 6, 8 and 0, 1, 2, 3, 5, 7. Why? Just felt like it! This will ensure a shuffling of the backgrounds as the 0, 1 and 2 will have to be switched back and forth from one block to the other every day.

The other thing that is different, and more significant, is the product used for the numbers. I used diecut digits from sheets of 'grungeboard'. First I used a black Sharpie to color the edges and then a Krylon gold paint marker to color the top surface. They got two coats.


The numbers are adhered using Glossy Accents.

Ddd


Posted by studio3d@ccgmail.net at 12:01 AM PST
Wednesday, 28 November 2012
Three-Two-One
Topic: Other Projects

A couple of YEARS ago I bought two-inch wooden blocks to make coundown blocks. And I finally got around to making them.

I used Scor-Tape to attach a variety of papers. Then I used sandpaper to distress all the seams and toned down the exposed white cores of the paper edges with Old Paper Distress ink. I used number stamps, one repeatedly on each side, with Gray Staz-On ink.

The diecut numbers, in 4 colors, were affixed to the sides with Xyron adhesive and I used a fine black marker to add faux stitching around each numeral. One block has 0, 1, 2, 3, 4, 5 and the other block has 0, 1, 2, 6, 7, 8. The 6 can be turned upside down to become 9. The blocks can then be arranged to count down from 31 to 01 or count upwards as a calendar.

I made these with winter papers to use as a countown to Christmas, but with more generic papers they could be used year-round.

Ddd


Posted by studio3d@ccgmail.net at 12:01 AM PST
Updated: Tuesday, 27 November 2012 8:12 AM PST
Tuesday, 27 November 2012
On the Fence
Topic: Quilting

I had cut many more color blocks than I needed for yesterday's quilt so I picked up some black with mixed size and color dots to used as the side bars and did the same layout. (This is really a modified Rail Fence block - thus the title of the quilt and today's blog entry.)

I used the same black for the backing so didn't have the butterfly tie-in for quilting. I kept the graphic image of the colors as the focus and did the quilting down the center of each black bar, creating an X at each intersection where they jogged left and right.


I used a bright pink for the binding to reinforce the modern, graphic feel.

Ddd


Posted by studio3d@ccgmail.net at 12:01 AM PST
Monday, 26 November 2012
Field Guide to Butterflies
Topic: Quilting

The title of today's entry is actually the name I gave this quilt! I started designing with some very bright prints and selected 4 aqua, 4 orange, 4 green, 4 pink and 1 yellow. I made 6-inch blocks with 4 inches of color bordered by 1 inch of white on each side. Then I laid them out in a twist and turn format to make it look woven.

When I went looking for an appropriate backing I found an awesome butterfly print with sketched black lines:

This inspired me to doodle butterflies as the quilting, which I did inside each color block, doubling the stitching of each one and carrying over to the next block with a single line. This is all stitched in columns with black thread.

Here is a close-up of the quilting:

I bound this lap quilt with some of the green stripe.

Here's a look at the finished product:


A bit of Spring in the middle of Autumn!

Ddd


Posted by studio3d@ccgmail.net at 12:01 AM PST
Sunday, 25 November 2012
Right Day, Wrong Month
Topic: Paper Embroidery

It may be the 25th, but it is NOT December. But I still had to make a Christmas Card for a paper embroidery swap.

I used some of the dot textured cardstock and stitched with a verigated metallic thread. It has a very short turn on the colors (about 1.5 inches) and goes from green to gold to red. The colors look dark on the spool but come off more pastel when stitched. This gives the card a delicate look that I like. I rounded the corners and mounted to a top-fold pink card.

I decorated the tree with 'nail head' dots.

Ddd


Posted by studio3d@ccgmail.net at 12:01 AM PST
Saturday, 24 November 2012
Buttercup Yellow
Topic: Paper Embroidery

There's been a lot of color challenges this year! This time the assignment for the swap was to use only yellow and white.

I chose a pattern that was designed for a bookmark and placed it on the edge of a white shimmery cardstock. I stitched with two tones of yellow to enhance the effect. After mounting to a shimmery yellow card base I added yellow clear sticker butterflies and a silver peel-off text.

The butterflies have a very fine silver outline that matches the sentiment.

Ddd


Posted by studio3d@ccgmail.net at 12:01 AM PST
Friday, 23 November 2012
White on White
Topic: Paper Embroidery

This card was made for a challenge to do paper embroidery with white on white.

I used cardstock with a shimmer to it and stitched with plain white thread. I used an embossing folder to make the frame in my Cuttlebug and then cut out the aperture with a craft knife and added to the front of the stitching. Then I put a tiny bit of Stickles glitter glue to the top of the stitching.

I diecut the lettering and glued it on before coating the top of the sentiment with 'opal' Liquid Pearls. Rounded corners echo the oval aperture.

Ddd


Posted by studio3d@ccgmail.net at 12:01 AM PST
Thursday, 22 November 2012
Playing It Straight
Topic: Sketch Challenge

Although this is an older sketch http://mojomonday.blogspot.nl/2012/04/mojo-monday-236.html it was issued as a challenge on one of the groups I am on. So I gave it a run - making it into another Love/Valentine card for OWH. Here is the original sketch for your reference:


For my card I used a striped paper as a base and used three border embossing folders as the three horizontal stripes. I added tiny borders to the top and bottom of this white panel and bordered all this in red. I created a white scalloped  circle and cut a black and white floral paper circle for the center of it. Diecut red words were glued in the center and I used a fine-line red pen to create dashed lines around it. I popped up this element on foam tape. I had some white seam binding and I dyed it with red pepper alcohol ink. While it was still damp I scrunched it and then dryed it with the heat gun. This was tied around the main panel and knotted.

There was still sommething missing so I added a black and white stripe around all the edges as a finish.

Me like!

Ddd


Posted by studio3d@ccgmail.net at 12:01 AM PST

Newer | Latest | Older