« January 2013 »
S M T W T F S
1 2 3 4 5
6 7 8 9 10 11 12
13 14 15 16 17 18 19
20 21 22 23 24 25 26
27 28 29 30 31
You are not logged in. Log in
Entries by Topic
All topics  «
3D paperwork
A - Z challenge 5
A - Z challenge 7
A - Z challenge round 4
A to Z challenge round 3
A to Z round 2
A to Z round 6
A-Z round 1
Around the House
Art Challenges
Artist Trading Cards
Backgrounds
Beads
Bible Journaling
Books
Boxes
Collage
Color Challenge
Coloring
cookbook
Die Cuts
Digital Projects
Digital Stamps
Drawing
Dry Embossing
Fabric Stuff
Fantastic Folds
Field Trip
Home Decor
How Does Your Garden Grow?
Hymnal Art
In The Kitchen
In the studio
Jewelry
Lettering
Links
Multi-Technique
Music to Work By
Musings
Nail Art
New Work
Online Class
Other Hobbies
Other Projects
Painting
Paper Embroidery
Paper Piecing
Photo
Pretty Paper
Quilting
Random
reading
Scrap Recovery
scrapbooking
Sewing
Sketch Challenge
Some Backlog
Stamping
Stencils
Stickers
Supplies
Teabag Folding
Techniques
Testing
tips and tricks
Tutorial
Web resources
Welcome to my Blog
Work By My Friends
workflow
Writing
Blog Tools
Edit your Blog
Build a Blog
RSS Feed
View Profile
Group One
In & Out of Studio 3D
Tuesday, 22 January 2013
Beautiful Inspiration
Topic: Stickers

Today's card is a repeat of the ballet girl stickers. I gave this set pink distressed circles and overlapped them over striped paper. I cut off the right edge before mounting on a pink card base and then used a pearlized border sticker strip along it.


The leotards were, again, filled with Pearl Pen - white this time, and the text is created with Tim Holtz word stickers.

Ddd


Posted by studio3d@ccgmail.net at 12:01 AM PST
Monday, 21 January 2013
You Go Girl
Topic: Stickers

I liked the outline stickers of ballet girls that I made last week and decided to use them again since I had more on the sheet. I wanted them to really be front and center so I mounted them each on a punched circle and distressed the edges before grouping them closely so the grid marks were all continuous between them.

I popped the group on foam tape over a Spellbinders label shape and a striped paper.

The lighting is not so good on this but you can see that I filled in the leotards with pink Pearl Pen.

The text is created with word stickers from Tim Holtz.

Ddd


Posted by studio3d@ccgmail.net at 12:01 AM PST
Sunday, 20 January 2013
Truly Amazing Kid
Topic: Stickers

These little framed girls in clear stickers are so cute. They remind me of Mary Englebreit but they are not. I had pulled out the two black papers to use with this one and then had to find some way to pull the other colors into it. I went with a red border and red rhinestones to go with her hair bow. Then I created the flags by stamping individual parts of a phrase so they could be cut out separately.

The only color not repeated is the yellow of her hair but I think that draws attention back to her.

Ddd


Posted by studio3d@ccgmail.net at 12:01 AM PST
Saturday, 19 January 2013
Drive, Fly, Sail
Topic: Stickers

Some little boy will love getting this card from mom or dad overseas. I started with the sticker - as with all those I have been making lately - and pulled papers and cardstock to match. The cream piece was too plain so I used a text stamp to create a background on it. (How can I NOT have any dark blue ink pads? This one really comes off looking purple.)

I used a stamp and black ink to create the caption at the top.

Ddd


Posted by studio3d@ccgmail.net at 12:01 AM PST
Friday, 18 January 2013
Take a Peek
Topic: Stickers

I usually don't have a lot of use for 'baby' stickers but have some in my files anyway. I thought there might be some soldier who would want to send a card to a real little one at home so I pulled out this clear sticker. I put it on a patterned paper with a scrolled corner so he had a place to rest.

I used my letter punches to create the phrase from the same paper as backs the side borders.

To line up the letters I placed a strip of clear removable tape sticky side up on a grid mat. Then I used the grid to place the letters and then applied glue to the letters, flipped the tape over and lowered the letters to the card front. When the glue was dry I peeled off the removable tape.

I used rhinestones for the dashes in 'peek-a-boo' and a heart rhinestone in the word 'love'.

Ddd


Posted by studio3d@ccgmail.net at 12:01 AM PST
Thursday, 17 January 2013
Tumbling Gymnasts
Topic: Stickers

I like stickers that can be combined to create a logical scene. Such is the case with the sheet these little gym rats came from. I chose the one doing a headstand just for fun and then added the two bending ones to surround her. I used three patterned papers with colors from the bears and created a border underneath them with washi tape with a musical print.

The text is a large holographic sticker.

Ddd


Posted by studio3d@ccgmail.net at 12:01 AM PST
Wednesday, 16 January 2013
You're So Tweet
Topic: Stickers

Back to the kids' cards made with stickers...

These 'Tweety' stickers came on a sheet with a pink plaid background. I cut pink circles for each of them and then created a setting for the using solid and patterned papers from the scrap bin. The three circles are all popped up on foam tape.


The text is created with sticker dots and white rubons. The apostrophe is created with a small rhinestone with a tail of green marker.

Ddd


Posted by studio3d@ccgmail.net at 12:01 AM PST
Tuesday, 15 January 2013
Make-Over
Topic: Sewing

Back in about 1978-9 I got tired of my wardrobe and decided to replace some clothes and use the old ones to recycle into new outfits for my daughter. There were quite a few of them but the only one I found evidence of in the old photo files was this transformation from 'mom jeans' to toddler overalls.

I kept the structural elements wherever I could to create the styling around them (front tucks, waistband, button closure, zipper) and used the parts that I cut away to add new elements as needed (shoulder straps).

I can't believe I had enough foresight to take a 'before' picture:


As well as an 'after' picture:

Fresh out of my degree in Clothing, Textiles and Design and THIS is the project I chose to memorialize! LOL!

Ddd


Posted by studio3d@ccgmail.net at 12:01 AM PST
Monday, 14 January 2013
Woven Falls
Topic: Other Hobbies

Oh, the joy of looking through huge boxes of old photos with adult children! Many memories, laughs and stories later, I pulled out a couple of art projects from 'w-a-a-a-y' back to share with you.

More than 30 years ago I made this wall hanging for my folks. It is an image of Multnomah Falls in Oregon. I wrapped a metal hoop with yarn then used a needle to string a warp of yarns vertically. This became the base for a tapestry weaving for the background. The falls themselves are in freefall made of a slub yarn. The trees are made in a rag rug style by tying tufts of yarn onto the base and then trimming them to shape. The bridge - an iconic part of the falls view - is crocheted.

Sorry about the quality of the photo as it is a digital pic of a printed snapshot.

I used to do a lot of weaving back in the 70's and may show some more of those projects along the way. I still have a few of them after all these years. I still have my floor loom, too, but haven't had a warp on it since about 1983!

Ddd


Posted by studio3d@ccgmail.net at 12:01 AM PST
Sunday, 13 January 2013
Hairy Lip
Topic: Backgrounds

Had an out-of-town visitor for a few days and took a day to play in the studio. We played with making waxed paper backgrounds with the Cuttlebug and embossing folders, coloring them with Distress ink pads and Distress markers, and then made them into cards. We also used the folders to emboss some of the backgrounds after we had colored them.

We each ended up to a background that was very masculine and chose to use the same combination of stamps to make embellishments for their fronts. We used different Spellbinders dies to cut out our stamped images and mounted them on foam tape.

Although we used the same colored card base, we chose different solid papers as borders for our backgrounds to match the patterned paper we had created.

This is hers:

and this is mine:


Hers is colored with Distress inks and a foam pad. Mine is colored with Distress markers. I also used Old Paper Distress ink to distress the cut pieces.

Ddd


Posted by studio3d@ccgmail.net at 12:01 AM PST
Saturday, 12 January 2013
Pinwheels On Parade
Topic: Quilting

With a few days off after Christmas I just had to get some more quilting time in. I opened up those new file boxes of quilting 'kits' and just pulled out the first one I came to.

The original pattern is for making a baby quilt in pink and two tones of purple. My selections were an orange, green, yellow paisley, a red with yellowish hearts and some of the multicolored dots on black. The pattern only uses three colors.

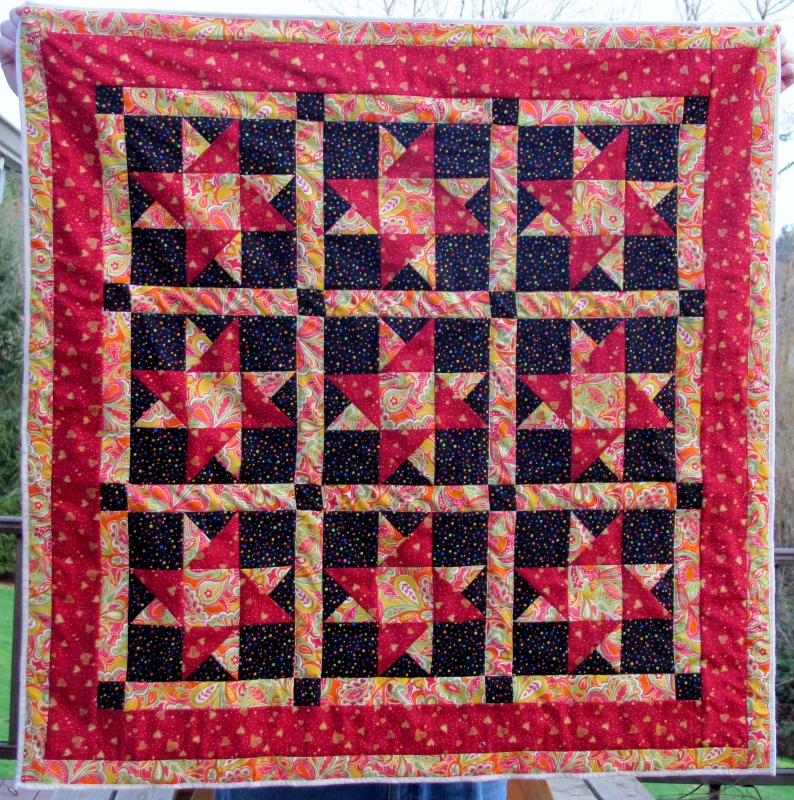
I had to make the red border narrower due to lack of fabric so I added the paisley border to compensate. Total scraps left over might equal 1 foot square if all combined.

I backed it with leftover fabric from a previous project and did a wrapped edge of the backing to the front with a top-stitch to finish it. Quilting is in the ditch just around the black pinsheel blocks and between the two borders.

This quilt is about 45-inches square and will go to the hospital's Passages program.

Ddd


Posted by studio3d@ccgmail.net at 12:01 AM PST
Updated: Saturday, 29 December 2012 7:54 PM PST
Friday, 11 January 2013
You Color My World
Topic: Stickers

Another of the OWH sketches was used for this kid's card. This time it is sketch 152:

I chose the sticker for this card and built the colors of the card around it. I also wanted to emphasize the circle in the center by repeating dots in the papers selected. I also rounded two corners to follow the circle theme.


I knew what phrase I wanted to put on this card but did not have it in stamp, stickers or rub-ons. To get this look I used a cream cardstock and impressed the letters individually with a set of metal punches. I sponged blue over the letters but they didn't stand out enough so I went over them with white gel pen.

Each word was cut out and then popped up on foam tape. The big circle is up on foam as well.

Ddd


Posted by studio3d@ccgmail.net at 12:01 AM PST
Updated: Saturday, 29 December 2012 7:54 PM PST
Thursday, 10 January 2013
Know I Care
Topic: Stickers

Still using stickers to create kids cards. This time I used one of the OWH sketches, too. This is sketch 147:

I chose the sticker first and built all the colors around it - green, yellow, black and white. I used three graphic black and white papers to create the background design of the sketch and used a little yellow marker to color the center of the dots.

Because the background was framed out in both colors I added the scalloped circle layer to include both colors there as well.


The graphic is a clear sticker and I popped up that whole circle element on foam tape.

The text is stamped directly on the striped background.

Ddd


Posted by studio3d@ccgmail.net at 12:01 AM PST
Updated: Saturday, 29 December 2012 7:53 PM PST
Wednesday, 9 January 2013
Teddy Trio
Topic: Stickers

A full sheet of teddy bear stickers was mostly singles but there was this one grouping of three little bears. The sheet also included little heart stickers so I added two to the bear chests.

I created a place for the bears to sit with a plaid carpet and a paneled wall.


While I had that text mounted to the block in a swoosh for yesterday's card I stamped it again for this one and cut along the top and bottom to create a waving flag. The right end is up on foam tape while the left end is flush with the card.

Little heart stickers from the sheet were added to frame the banner and the whole thing was mounted to a butterscotch card base.

Ddd


Posted by studio3d@ccgmail.net at 12:01 AM PST
Updated: Saturday, 29 December 2012 7:53 PM PST
Tuesday, 8 January 2013
Out Standing In Their Field
Topic: Stickers

OK, I am officially in love with this card!

I had a sheet of vellum stickers from the dollar store that were combined with little scriptures and blessings. However, I wanted to use multiple stickers and that made an odd mix of texts. So I stuck three of the stickers to a cream cardstock and cut out just the picture elements.

I had already decided on the green diagonal stripe for the ground - including the torn edge top, So I went on a search for a blue for the sky. This plaid just called out to me! I ran it through my brand-new cloudy sky embossing folder and then used the sanding block to reveal the raised edges.

I added a butterscotch folded card base and popped the sheep and rainbow up on foam tape. I mounted the text stamp on the acrylic block in a swoosh before stamping directly on the grassy area.

Ddd


Posted by studio3d@ccgmail.net at 12:01 AM PST
Updated: Saturday, 29 December 2012 7:52 PM PST
Monday, 7 January 2013
On The Up and Up
Topic: Stickers

After yesterday's girly card I wanted to make one that was strictly for the boys. I had gotten some sheets of construction stickers at the dollar store several years ago. This inspired me to make a hill-climbing road for them to drive upon.

I started with some green patterned cardstock to use as a mountain landscape. Then I cut three wedge-shaped road segments from a moss-green woodgrain paper. I drew edges on them with black Sharpie and arranged them in a zig-zag.

The loader and truck were added to their sections of the road and a signpost was created with a 'stick' and another sticker. This was all placed on a yellow card base.

I stamped the text directly onto the background.

Ddd


Posted by studio3d@ccgmail.net at 12:01 AM PST
Updated: Saturday, 29 December 2012 7:52 PM PST
Sunday, 6 January 2013
Dancing A-Round
Topic: Stickers

(See the January 2 entry for my appologies on sticker-naming) I had half a sheet of peel-off ballet dancer stickers I wanted to use for the card today. I had the perfectly sized circle die so they would extend right to the edges and chose a mottled pink cardstock to cut them from.

This card is all about creating a feminine but not fussy look - great for pre-teen and teen giving. I used black and white dots, a pastel blue with tiny pink + dn a small strip of script on cream.

I rounded the corners to keep it softer and pupped up the three circles on foam tape in an asymetrical arrangement.

Ddd


Posted by studio3d@ccgmail.net at 12:01 AM PST
Updated: Saturday, 29 December 2012 7:51 PM PST
Saturday, 5 January 2013
Bubble Bear
Topic: Stickers

This sticker set of baby items encased in tiny clear beads was mosty things like a rattle, a bottle, a pacifier, etc. This little teddy bear was the only one that wasn't reminiscent of a baby shower.

I chose the pink dotted background paper first and then added elements that coordinated with that and the bear. The bear got a dark chocolate circle with distressed edges and I cut a lacy scallop and plain scallop for backing it. I stamped the text in chocolate on the smaller scallop and tucked it behind the lacy scallop. The lacy one got pink dew drop stickers in every dot.


I bordered the sides of the background panel with narrow ribbon and added it all to a milk chocolate card base.

Ddd


Posted by studio3d@ccgmail.net at 12:01 AM PST
Updated: Saturday, 29 December 2012 7:51 PM PST
Friday, 4 January 2013
For Want of a Tiger
Topic: Stickers

I had Lions and Bears in this set of stickers but, alas, no Tigers. So I went with the Monkey instead. Each of these stickers was backed with a cardstock frame that matched the uppercase letter. I used a light yellow folded card base that matched the background of the stickers. By now we were on the way to a crayon box of colors so I just kept going down that road.

I liked the graphic character of the black and white stripe paper and added purple borders to the top and bottom. By now it was only lacking orange to use all the primary and secondary colors. I used that color to stamp the three words of a phrase stamp and cut into little flags.

Each of the stickers got an orange rhinestone in the feature letter and I added doodle lines around the perimeter. Lastly, the Lion sticker was popped up on foam while the rest were glued directly to the face of the card.

Ddd


Posted by studio3d@ccgmail.net at 12:01 AM PST
Updated: Saturday, 29 December 2012 7:50 PM PST
Thursday, 3 January 2013
Clowny Cat
Topic: Stickers

As with the rest of the recent kid cards I've been making, I started this with the sticker. Love this little clown cat! I cut a circle background for him along with a scalloped second layer. These were selected from the colors in the sticker, as were the card base and striped background.

I stamped three versions of "hello" greetings on green and cut little flags around them. Each got a cardstock standard with a rhinestone finial.


The cat module and the lower flag are mounted up on foam tape.

Ddd


Posted by studio3d@ccgmail.net at 12:01 AM PST
Updated: Saturday, 29 December 2012 7:50 PM PST

Newer | Latest | Older