« March 2013 »
S M T W T F S
1 2
3 4 5 6 7 8 9
10 11 12 13 14 15 16
17 18 19 20 21 22 23
24 25 26 27 28 29 30
31
You are not logged in. Log in
Entries by Topic
All topics  «
3D paperwork
A - Z challenge 5
A - Z challenge 7
A - Z challenge round 4
A to Z challenge round 3
A to Z round 2
A to Z round 6
A-Z round 1
Around the House
Art Challenges
Artist Trading Cards
Backgrounds
Beads
Bible Journaling
Books
Boxes
Collage
Color Challenge
Coloring
cookbook
Die Cuts
Digital Projects
Digital Stamps
Drawing
Dry Embossing
Fabric Stuff
Fantastic Folds
Field Trip
Home Decor
How Does Your Garden Grow?
Hymnal Art
In The Kitchen
In the studio
Jewelry
Lettering
Links
Multi-Technique
Music to Work By
Musings
Nail Art
New Work
Online Class
Other Hobbies
Other Projects
Painting
Paper Embroidery
Paper Piecing
Photo
Pretty Paper
Quilting
Random
reading
Scrap Recovery
scrapbooking
Sewing
Sketch Challenge
Some Backlog
Stamping
Stencils
Stickers
Supplies
Teabag Folding
Techniques
Testing
tips and tricks
Tutorial
Web resources
Welcome to my Blog
Work By My Friends
workflow
Writing
Blog Tools
Edit your Blog
Build a Blog
RSS Feed
View Profile
Group One
In & Out of Studio 3D
Tuesday, 19 March 2013
Checking In
Topic: Stamping

Every now and again I sort through a box where I have just tossed miscellaneous parts that didn't get used on a project where it was planned. In just such a foray I ran across this duo of a fully stamped image and a spotlight cut of part of the same stamp. Time to put these to use.

I popped the spotlight image up on foam and selected black papers as a contrast to the tan image. I chose a coffee brown to band all of them. A simple layout.


This is one of my hand carved stamps.

Ddd


Posted by studio3d@ccgmail.net at 12:01 AM PDT
Monday, 18 March 2013
Cut, Color, Paste
Topic: Stamping

I had lots of little bits of patterned paper so I used some of them up by stamping parts of an image on them for paper piecing.

I stamped the whole image on white cardstock to start. Then I colored the flesh areas, the blouse and the skirt ruffle using Copic markers. I used four patterned paper images to cut out the hair, pinafore, bunny and boots.

I used liquid pearls on the flowers in the hair and on the dress and the buttons on the boots. Then I put Stickles on the wings.

With two completed images I chose patterned papers and card bases for each trimmed the images and rounded the corners. These are the resulting cards.


I stamped the sentiments on them,

Ddd


Posted by studio3d@ccgmail.net at 12:01 AM PDT
Sunday, 17 March 2013
On a Bender
Topic: Paper Embroidery

This little field mouse seems to be a bit heavy for the stalk he's hanging out on.

I was supposed to stitch him up for a swap on 'animals' but delayed too long and missed the swap. Now I have this little card on hand whenever I need it for some other purpose.

After stitching I mounted on a gray-green to match the mouse over a goldenrod to match the stalk.

Ddd


Posted by studio3d@ccgmail.net at 12:01 AM PDT
Saturday, 16 March 2013
Right On Track
Topic: Quilting

Technically this is not a quilt since it is not batted and stitched through the layers. But it is pieced so I'm calling it quilting for the purposes of classifying this blog entry Wink.

This started with the train fabric I showed the other day. I bought it to feature as the central panel on an art piece. It was suggested that the border could be train tracks but I could not find any suitable fabric. I decided to piece tracks.

I used a fabric with a 'ground' print and one with 'wood' print to create railroad ties on a rail bed. Then I stitched it onto the black panel with mitered corners. I then used black bias tape and a roll of 1/2 inch Steam-a-Seam2 to create 'rails'.


It is installed in a black shadow-box frame.

Ddd


Posted by studio3d@ccgmail.net at 12:01 AM PDT
Friday, 15 March 2013
Stiff Upper Lip
Topic: Supplies

After pre-washing quilting fabrics they are limp and easily skewed out of square. Starching is one option but I fell in love with Mary Ellen's Best Press. The scent I was introduces to it with was lavender. But at the Sewing Expo I found the booth selling it and fell in love with the peaches and cream scented one.

This is so yummy I may be spraying even when I don't need to!

Ddd


Posted by studio3d@ccgmail.net at 12:01 AM PDT
Thursday, 14 March 2013
Towering Assistance
Topic: Supplies

I have wanted to buy thread on large cones as a time and money saver but my machine is not set up to accomodate them. I looked at several cone holders at the Sewing Expo and decided on this one.

It also has a side-facing holder so a standard spool winds off the side rather than spinning off the end like the sewing machine holder requires. This is especially good for metallic or other wrapped threads to keep them from tangling.

Ddd


Posted by studio3d@ccgmail.net at 12:01 AM PDT
Wednesday, 13 March 2013
Hold On
Topic: Supplies

When I am at the point of quilt binding next I will gladly be reaching for these little clips I picked up. Clover makes them in two sizes and these tiny ones are perfect for clipping binding in place in replacement of using pins that poke you. They can be used for either hand or machine stitching a binding, just taking them out as you come to them.

As you can see, I bought the box of 50 so I could do the whole binding at once instead of only clipping a bit at a time.

Ddd


Posted by studio3d@ccgmail.net at 12:01 AM PDT
Tuesday, 12 March 2013
Don't Cross this Line
Topic: Supplies

To mark the critical lines on my rulers for the current project I have mainly used blue painters tape, which blocks out the view below it or I have marked on the non-print side of the ruler with Sharpie marker, which is hard to see when used on darker fabrics (it can later be removed with rubbing alcohol)

At the Sewing Expo I saw demonstrators using GlowLine tape to mark their rulers. Makes it a snap to line up the right rule line over and over without error - and you can see right through it.

As you can see the package comes with pink, orange and yellow tapes so you can easily find one to use against any fabric.

Ddd


Posted by studio3d@ccgmail.net at 12:01 AM PDT
Monday, 11 March 2013
Make Your Mark
Topic: Supplies

Most of the quilting I have done is A) stitch in the ditch B) totally random like stippling or C) outlining a motif on the fabric. I have done a couple where I needed to mark the fabric to free-motion stitch and have had varied success with different methods of marking with disappearing pens, erasable pencils and stitching through printed papers.

I decided to pick up these marking sticks. They are very waxy feeling and supposedly disappear completely when passed over with a steam iron.

A standard pencil sharpener can be used on them to maintain a point.

Ddd


Posted by studio3d@ccgmail.net at 12:01 AM PST
Sunday, 10 March 2013
Rounders
Topic: Supplies

Since I started quilting I have been using this rotary cutter

Like many of the other rotary cutters cuts are made by pressing down on the blade which pushes the safety rim (the blue circle portion) out of the way. I have found though that when cutting through stacks of fabric (say 6 layers and up) the blue safety rim rides along the fabric causing it to bubble along the edge you are cutting and can mis-align it. If you are cutting with the created strips off the ruler this can be not so much of a problem. But if the measured parts are under the ruler then the layers becoming mis-aligned are those you need to cut next.

Well I decided to look for another type of rotary cutter and found two options. Option one was to go with one where the blade locks exposed. then you have to continually close it when you lay it down or risk cutting yourself if it is left locked open.

Option two was to go with the OLFA cutters that have a grip handle that exposed the blade and when you let off grip the blade retracts. This is what I chose to get. In fact I decided to get it in two sizes. The 45mm fits the blades I already had and the 60mm will allow me to cut faster on big units.


While I was at it I bought extra blades for each from KAI in tungstun steel. These are supposed to hold an edge longer.


Ready to roll!

Ddd


Posted by studio3d@ccgmail.net at 12:01 AM PST
Saturday, 9 March 2013
Getting My Ducks (um, Geese) In a Row
Topic: Supplies

While at the Sewing Expo I picked up a ruler for accurately trimming Flying Geese blocks. This ruler lets you trim out multiple sizes, which is just awesome.

Here you can see the variety of size markings

I am actually in the middle of a quilt project that the next step is trimming up flying geese blocks! Talk about timing!

Ddd


Posted by studio3d@ccgmail.net at 12:01 AM PST
Friday, 8 March 2013
Free For Me
Topic: Supplies

At the Sewing Expo I won a door prize at one of the sessions. I got to choose two patterns for paper pieced wall hangings at one of the vendors. YAY!

I chose a Christmas banner with mittens and snowmen and a spring pattern with three birdhouses.


I already have ideas for both of these.

Ddd


Posted by studio3d@ccgmail.net at 12:01 AM PST
Thursday, 7 March 2013
Fabulous Fabrique
Topic: Supplies

From the Sewing Expo:

For the next few days I will be sharing the goodies I picked up on my recent field trip. Today it is this totally cool piece of yardage.

Is this not truly awesome? Secret project in progress...

Ddd


Posted by studio3d@ccgmail.net at 12:01 AM PST
Wednesday, 6 March 2013
Double Delight Embossing
Topic: Dry Embossing

To make a special card with dry embossing I decided to double the delight.

I ran the cardstock through the Cuttlebug with a corner floral folder and used a foam blender to color the raised portion with 'Spun Sugar' distress ink. Then I ran the cardstock back through the Cuttlebug with the script embossing folder. I followed that with the foam blender and 'Old Paper' distress ink, keeping it off the floral area.

I added a couple of die-cut corner swirls embellished with pink 'dew drops'. I added a diecut text last.

Ddd


Posted by studio3d@ccgmail.net at 12:01 AM PST
Tuesday, 5 March 2013
It's In The Bag
Topic: Sewing

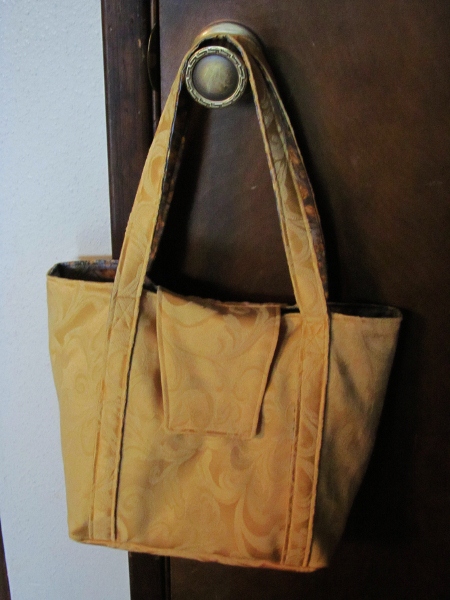
I was given a challenge to sew up a handbag using a plastic one as a model. It was the right size and shape but a poor choice of materials for the user.

I pulled out the leftover fabric that I had used on the cushion the other day and some complementary floral fabric to use as a liner. I used iron-on interfacing on both pieces before cutting.

I measured the model bag and wrote up a plan of cutting and construction. I had to make plans for a different way of attaching handles as the model had leather ones attached with rivets. The closing zipper and an inside pocket were also eliminated.

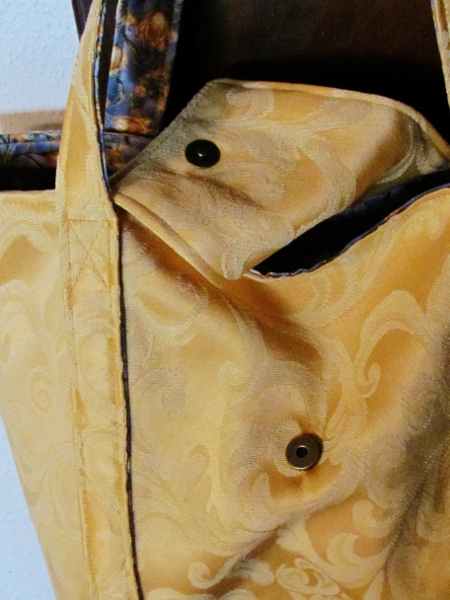
As it happened I had a packet of magnetic snaps in my stash that I had picked up on clearance several years ago.

So, here is the finished purse:


Here you can see the magnetic snap closure:

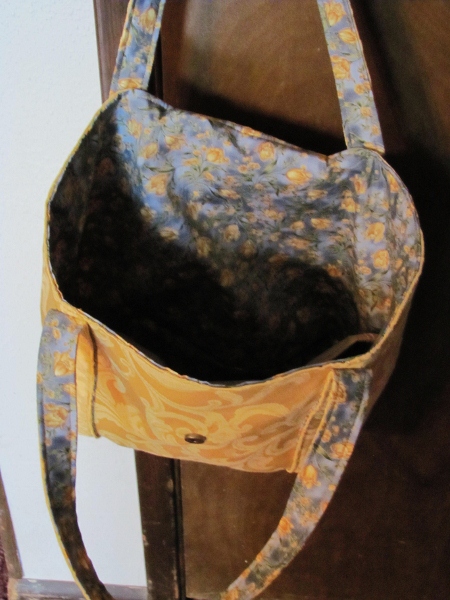
Here is a view of the lining. You can see that the straps are also lined so you get a little view of that blue and golden fabric there as well.


This all went together in a couple of hours - including planning time. Next ones (yes, there will be more) will go faster since I can skip that step altogether.

Ddd


Posted by studio3d@ccgmail.net at 12:01 AM PST
Updated: Tuesday, 26 February 2013 9:38 AM PST
Monday, 4 March 2013
Sleepy Bears
Topic: Stamping

In my new sets of MFT fundraiser stamps I got two of them with bears. I especially like this sleepy bear sharing his nap time with a little mouse.

I colored these up on watercolor paper with Distress Markers and added a little line with Sharpie marker to ground him. Rounding the corners lends a more casual feel to the image.

I matched each bear up to come background papers, drew in doodle lines, and stamped the sentiments.

On this last one I replaced the sentiment with some little dream hearts.

The background papers with hearts and 'love' text match the theme.

Ddd


Posted by studio3d@ccgmail.net at 12:01 AM PST
Updated: Tuesday, 26 February 2013 9:37 AM PST
Sunday, 3 March 2013
Bent Poppies
Topic: Stamping

As a followup to the whacked bunny ears I went looking for other line image stamps in my collection that could have the background removed to make them shape shifters. I came up with a poppy image and not only cut out the petals bue made slits between the elements of the inner flower so it could shift too.

I applied the image to the acrylic block, stamped one poppy on watercolor paper then adjusted the petals to stamp two different arrangements on each sheet. I ended up with 4 groupings.

After coloring (Distress Markers and watercolor techniques) I trimmed them very close so the images would spill out of the frame. Each was paired up with matching papers and mounted to card fronts.

The doodle lines were drawn in with Sharpie marker and the sentiments stamped from the new bunny stamp sets.

Ddd


Posted by studio3d@ccgmail.net at 12:01 AM PST
Updated: Tuesday, 26 February 2013 9:37 AM PST
Saturday, 2 March 2013
Field Trip - Sew and Stitchery Expo - Day 3
Topic: Field Trip

Today (like Thursday) is only a half day at the Expo so the list of workshops is shorter:

Quick Gifts From your Stash: Think all you can make from your treasured fabric scraps is Scrap Quilts? This class is filled with OTHER creative ways to use your mountain of scraps. Cindy has some great gift ideas and she will provide some unique sewing tips and techniques that will save time and money.


Stash Buster Scrap Quilts: Have more fabric than you can use in two lifetimes? This is all about making beautiful quilts from fabrics you already own. Marti’s trunk show is packed with tips about selecting fabrics, understanding and using color value effectively. Marti will share tricks and tools to make cutting and sewing scrap quilts easy and efficient.


Successful Quilt Piecing: Set yourself up for success!! Mech will review piecing and pressing techniques that help make quilting easier and more beautiful, whether you plan to do the quilting yourself or have it done. A great class for beginners. Limited to 30 people.

You'll note that I have focused mainly on quilts but did throw in some other workshops for using up fabrics in other ways.

Ddd


Posted by studio3d@ccgmail.net at 12:01 AM PST
Friday, 1 March 2013
Field Trip - Sew and Stitchery Expo - Day 2
Topic: Field Trip

Another day on my field trip. Today's workshops are:

More Quick Gifts to Make: Sue is known for Quick, Quicker, and Quickest Gifts and this class is all about her newest and favorite gift projects. You will see ideas for every age and virtually every occasion. This is Sue’s favorite topic and many of these projects can be made  in two or three hours.


Spring Leaves Art Quilt: Festive leaves floating through the air cheer your soul. Make this gentle leaf quilt with fused fabrics, an easy pattern transfer process, and decorative rotary cutter blades. It’s a simple design with lots of variation and options for embellishment and personal design.


Successful Paper Piecing: Trouble getting to the point in your quilt piecing? Paper piecing is easy, precise and variable (you can enlarge or reduce the  blocks). Most importantly, you get perfect points every time. We supply pattern, fabric, and inspiration. Bring scissors and glue stick for this hands-on experience.


Top Secret Bindings: Learn how to make a perfect binding in this Know Before You Sew™ lecture. Problems like rounded, pointed, and tucked corners, lumpy finishes, and bindings that are not filled to the edge will be covered. Make your own sample and learn about bias, grain, double-fold, strip width, mitered corners and a smooth ending.


Eleanor Burns Five Perky Patterns: Eleanor shares her five newest patterns featuring accurate techniques and tools to achieve great perky points. Braid in a Day, Kylee’s Kite, Storm at Sea, Oriental Fan and Mini Dresden Plate offer a great range of variety—something for everyone! Come join the humorous presentation Eleanor is famous for.


Finishing Touches for Your Quilt: This is the class for alternative quilt binding techniques. Learn ways to do a scalloped edge, or how and when to consider a picot treatment instead of traditional binding. Learn how to use tools combined with tips and tricks to make a flawless, unique finish for your original quilts.


Kick It Up a Stitch: Nancy Zieman and her side kick—or should we say Sous Chef—Mary Mulari invite you to a second helping of Kick It Up a Stitch. “Lettuce entertain you” is the motto of their newest sewing and cooking extravaganza. If you attended the first helping of Kick It Up a Stitch, you know that sewing and cooking have a lot in common. You can sew or cook very simply—then Shazam! you’ll learn how to Kick It Up A Stitch. Nancy and Mary promise plenty of sizzle, spice, and sass, plus an entirely new menu for the second helping show.

With the exception of the last, these are all 45 minute sessions.

Ddd


Posted by studio3d@ccgmail.net at 12:01 AM PST
Thursday, 28 February 2013
Field Trip - Sew and Stitchery Expo - Day 1
Topic: Field Trip

Today you will find me... gone! I am off to the Sew and Stitchery Expo in Puyallup Washington for a few days.

Today the workshops I will be taking are these:

Nancy's 30 Favorite Quilt Tips: Don’t miss this lecture featuring 30, yes, 30 tips to celebrate 30 years of Sewing With Nancy! Garnered over three decades, learn Nancy’s favorite cutting, piecing, layering and binding tips. You’ll ask, why didn’t I think of that?

Quilt Improvement Show Eleanor Burns: With years of experience and an impressive tool belt of quilting magic, Eleanor will once again bring her unique and humorous approach to the quilting stage. She will share insights into specific techniques she has pioneered aimed to help every quilter—from the beginner to the advanced. The long list of techniques discussed and quilts displayed will leave your head whirling.

These are a couple of ladies I have been watching on TV and the web for years so I am excited for the in-person exposure.

Ddd 


Posted by studio3d@ccgmail.net at 12:01 AM PST
Updated: Tuesday, 26 February 2013 9:39 AM PST

Newer | Latest | Older