« March 2013 »
S M T W T F S
1 2
3 4 5 6 7 8 9
10 11 12 13 14 15 16
17 18 19 20 21 22 23
24 25 26 27 28 29 30
31
You are not logged in. Log in
Entries by Topic
All topics  «
3D paperwork
A - Z challenge 5
A - Z challenge 7
A - Z challenge round 4
A to Z challenge round 3
A to Z round 2
A to Z round 6
A-Z round 1
Around the House
Art Challenges
Artist Trading Cards
Backgrounds
Beads
Bible Journaling
Books
Boxes
Collage
Color Challenge
Coloring
cookbook
Die Cuts
Digital Projects
Digital Stamps
Drawing
Dry Embossing
Fabric Stuff
Fantastic Folds
Field Trip
Home Decor
How Does Your Garden Grow?
Hymnal Art
In The Kitchen
In the studio
Jewelry
Lettering
Links
Multi-Technique
Music to Work By
Musings
Nail Art
New Work
Online Class
Other Hobbies
Other Projects
Painting
Paper Embroidery
Paper Piecing
Photo
Pretty Paper
Quilting
Random
reading
Scrap Recovery
scrapbooking
Sewing
Sketch Challenge
Some Backlog
Stamping
Stencils
Stickers
Supplies
Teabag Folding
Techniques
Testing
tips and tricks
Tutorial
Web resources
Welcome to my Blog
Work By My Friends
workflow
Writing
Blog Tools
Edit your Blog
Build a Blog
RSS Feed
View Profile
Group One
In & Out of Studio 3D
Sunday, 24 March 2013
Open Wide - Here Comes The Choo-Choo
Topic: Sewing

If you like to eat in front of the TV it can be super handy to have some kind of clothing protector against spills. this is especially true of eating things like soup, spachetti and the like.

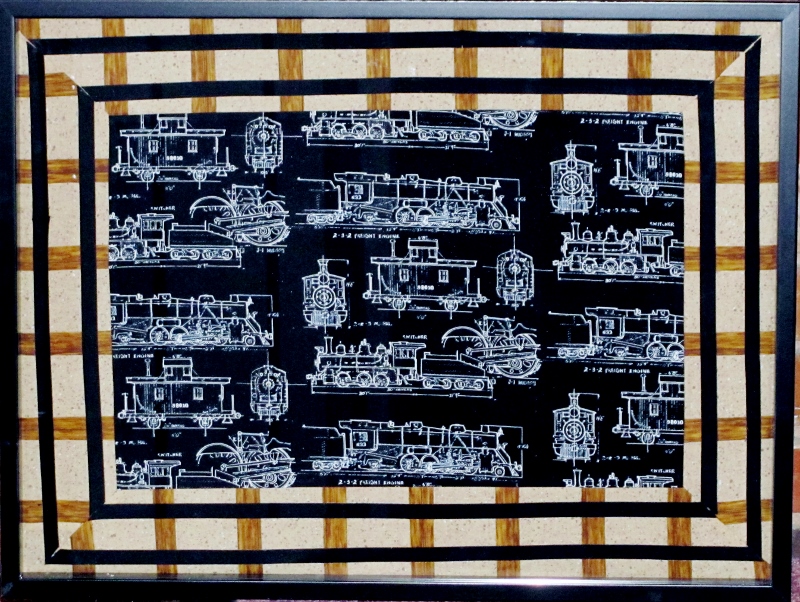
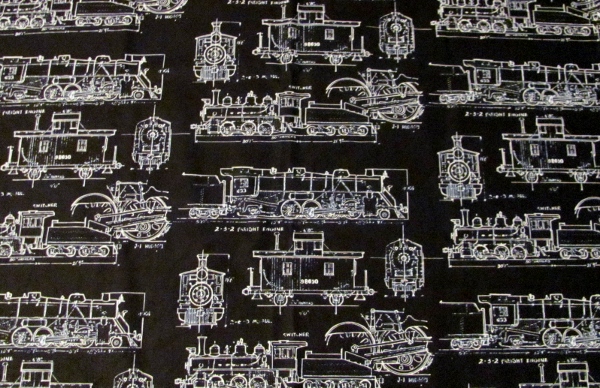
I made several of these and did not take photos of them. Then I had leftovers of the awesome train fabric and decided to make one more.

These measure 24" high by 15" wide and have a 6 1/2" neck hole. I rounded the corners with th same curve of the neck hole. The pocket is 5 1/2" high.

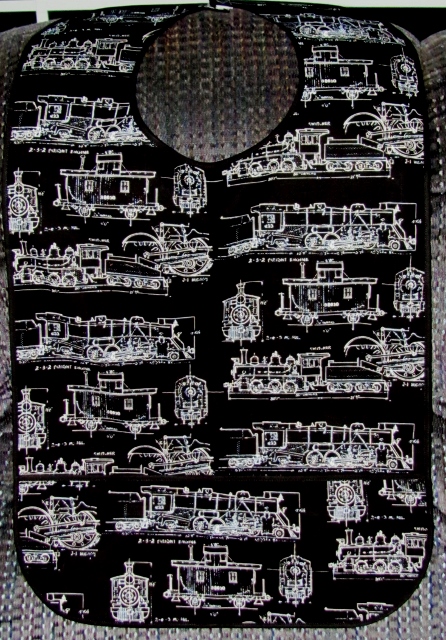
I used narrow double-fold bias tape to bind all the edges including the upper edge of the pocket. The back of the neck is cut open and there is velcro to facilitate closure.

Ddd


Posted by studio3d@ccgmail.net at 12:01 AM PDT
Saturday, 23 March 2013
Sitting Pretty
Topic: Stamping

This image came to me in a swap a long time ago and I just ran across it and decided to color it up. Since I didn't stamp it I took a chance by using Copic markers as I didn't know what kind of ink was used for the image. Only the yellows used on the headband and socks bled the image ink but I don't mind.

I used three tones in the hair and two each in the skin, sweater, skirt, socks and shoes. I used a combination of Copics, Spectrum Noir, and Bic Mark-It markers. I also added a cool grey halo around her and drew in some simple lines to provide seating for her.

I picked up the colors in her hair in the houndstooth, the dots in the socks in two black dotted papers, and her clothing in a teal band of patterned paper.

The girl and her background are popped up on foam. The sentiment is stamped onto the teal strip.

Ddd


Posted by studio3d@ccgmail.net at 12:01 AM PDT
Friday, 22 March 2013
Llama Always Thinking Of You
Topic: Stamping

This is the first time I have colored this llama (one of my hand carved stamps) with Copic markers. I've usually never even done any shading on it. I actually like this effect a lot.

I trimmed him with a very fine white edge so he would stand out from the background. I chose a houndstooth to pick up color from the fur and a plue panel to mimic the eyes. The main panel was cut to reveal a thin white edge like the llama and he is popped up on foam tape.

Three square brass 'nail head' stickers mimic brads.

Ddd


Posted by studio3d@ccgmail.net at 12:01 AM PDT
Thursday, 21 March 2013
Raccoon Love
Topic: Stamping

To feature this raccoon (one of my hand carved stamps) I chose a striped paper and added a thin band of black dot paper plus a wide band of white with a scalloped border punch. I thought this would evoke the feeling of water. I popped the raccoon up on foam tape.

I added a white diecut spiral heart and added text with diedut words in tones to match the brown stripes in the paper.

Ddd


Posted by studio3d@ccgmail.net at 12:01 AM PDT
Wednesday, 20 March 2013
They're Ba-a-ack
Topic: Stamping

Just LOOK! I found even more of these stamped LOVE hearts hiding in the parts and starts drawer. SIGH, will I never see the end of these? I guess if I do I can always stamp more.

For the blue one I chose a tag and a couple of muted toned papers. This is on a soft pink card base. I also added a diecut swirl and three tinted acrylic heart stickers along the bottom.


I had a bright yellow heart as well and found some striped paper that I had colored with yellow and printed a herringbone pattern on. Some black and white herringbone coordinates with that which leads to the black and white dot. From the red in the paper I chose to add three tones of reds in blocks and swirls.

No sentiments added because, after you've said 'love' 35 times, what more do you need?

Ddd


Posted by studio3d@ccgmail.net at 12:01 AM PDT
Tuesday, 19 March 2013
Checking In
Topic: Stamping

Every now and again I sort through a box where I have just tossed miscellaneous parts that didn't get used on a project where it was planned. In just such a foray I ran across this duo of a fully stamped image and a spotlight cut of part of the same stamp. Time to put these to use.

I popped the spotlight image up on foam and selected black papers as a contrast to the tan image. I chose a coffee brown to band all of them. A simple layout.


This is one of my hand carved stamps.

Ddd


Posted by studio3d@ccgmail.net at 12:01 AM PDT
Monday, 18 March 2013
Cut, Color, Paste
Topic: Stamping

I had lots of little bits of patterned paper so I used some of them up by stamping parts of an image on them for paper piecing.

I stamped the whole image on white cardstock to start. Then I colored the flesh areas, the blouse and the skirt ruffle using Copic markers. I used four patterned paper images to cut out the hair, pinafore, bunny and boots.

I used liquid pearls on the flowers in the hair and on the dress and the buttons on the boots. Then I put Stickles on the wings.

With two completed images I chose patterned papers and card bases for each trimmed the images and rounded the corners. These are the resulting cards.


I stamped the sentiments on them,

Ddd


Posted by studio3d@ccgmail.net at 12:01 AM PDT
Sunday, 17 March 2013
On a Bender
Topic: Paper Embroidery

This little field mouse seems to be a bit heavy for the stalk he's hanging out on.

I was supposed to stitch him up for a swap on 'animals' but delayed too long and missed the swap. Now I have this little card on hand whenever I need it for some other purpose.

After stitching I mounted on a gray-green to match the mouse over a goldenrod to match the stalk.

Ddd


Posted by studio3d@ccgmail.net at 12:01 AM PDT
Saturday, 16 March 2013
Right On Track
Topic: Quilting

Technically this is not a quilt since it is not batted and stitched through the layers. But it is pieced so I'm calling it quilting for the purposes of classifying this blog entry Wink.

This started with the train fabric I showed the other day. I bought it to feature as the central panel on an art piece. It was suggested that the border could be train tracks but I could not find any suitable fabric. I decided to piece tracks.

I used a fabric with a 'ground' print and one with 'wood' print to create railroad ties on a rail bed. Then I stitched it onto the black panel with mitered corners. I then used black bias tape and a roll of 1/2 inch Steam-a-Seam2 to create 'rails'.


It is installed in a black shadow-box frame.

Ddd


Posted by studio3d@ccgmail.net at 12:01 AM PDT
Friday, 15 March 2013
Stiff Upper Lip
Topic: Supplies

After pre-washing quilting fabrics they are limp and easily skewed out of square. Starching is one option but I fell in love with Mary Ellen's Best Press. The scent I was introduces to it with was lavender. But at the Sewing Expo I found the booth selling it and fell in love with the peaches and cream scented one.

This is so yummy I may be spraying even when I don't need to!

Ddd


Posted by studio3d@ccgmail.net at 12:01 AM PDT
Thursday, 14 March 2013
Towering Assistance
Topic: Supplies

I have wanted to buy thread on large cones as a time and money saver but my machine is not set up to accomodate them. I looked at several cone holders at the Sewing Expo and decided on this one.

It also has a side-facing holder so a standard spool winds off the side rather than spinning off the end like the sewing machine holder requires. This is especially good for metallic or other wrapped threads to keep them from tangling.

Ddd


Posted by studio3d@ccgmail.net at 12:01 AM PDT
Wednesday, 13 March 2013
Hold On
Topic: Supplies

When I am at the point of quilt binding next I will gladly be reaching for these little clips I picked up. Clover makes them in two sizes and these tiny ones are perfect for clipping binding in place in replacement of using pins that poke you. They can be used for either hand or machine stitching a binding, just taking them out as you come to them.

As you can see, I bought the box of 50 so I could do the whole binding at once instead of only clipping a bit at a time.

Ddd


Posted by studio3d@ccgmail.net at 12:01 AM PDT
Tuesday, 12 March 2013
Don't Cross this Line
Topic: Supplies

To mark the critical lines on my rulers for the current project I have mainly used blue painters tape, which blocks out the view below it or I have marked on the non-print side of the ruler with Sharpie marker, which is hard to see when used on darker fabrics (it can later be removed with rubbing alcohol)

At the Sewing Expo I saw demonstrators using GlowLine tape to mark their rulers. Makes it a snap to line up the right rule line over and over without error - and you can see right through it.

As you can see the package comes with pink, orange and yellow tapes so you can easily find one to use against any fabric.

Ddd


Posted by studio3d@ccgmail.net at 12:01 AM PDT
Monday, 11 March 2013
Make Your Mark
Topic: Supplies

Most of the quilting I have done is A) stitch in the ditch B) totally random like stippling or C) outlining a motif on the fabric. I have done a couple where I needed to mark the fabric to free-motion stitch and have had varied success with different methods of marking with disappearing pens, erasable pencils and stitching through printed papers.

I decided to pick up these marking sticks. They are very waxy feeling and supposedly disappear completely when passed over with a steam iron.

A standard pencil sharpener can be used on them to maintain a point.

Ddd


Posted by studio3d@ccgmail.net at 12:01 AM PST
Sunday, 10 March 2013
Rounders
Topic: Supplies

Since I started quilting I have been using this rotary cutter

Like many of the other rotary cutters cuts are made by pressing down on the blade which pushes the safety rim (the blue circle portion) out of the way. I have found though that when cutting through stacks of fabric (say 6 layers and up) the blue safety rim rides along the fabric causing it to bubble along the edge you are cutting and can mis-align it. If you are cutting with the created strips off the ruler this can be not so much of a problem. But if the measured parts are under the ruler then the layers becoming mis-aligned are those you need to cut next.

Well I decided to look for another type of rotary cutter and found two options. Option one was to go with one where the blade locks exposed. then you have to continually close it when you lay it down or risk cutting yourself if it is left locked open.

Option two was to go with the OLFA cutters that have a grip handle that exposed the blade and when you let off grip the blade retracts. This is what I chose to get. In fact I decided to get it in two sizes. The 45mm fits the blades I already had and the 60mm will allow me to cut faster on big units.


While I was at it I bought extra blades for each from KAI in tungstun steel. These are supposed to hold an edge longer.


Ready to roll!

Ddd


Posted by studio3d@ccgmail.net at 12:01 AM PST
Saturday, 9 March 2013
Getting My Ducks (um, Geese) In a Row
Topic: Supplies

While at the Sewing Expo I picked up a ruler for accurately trimming Flying Geese blocks. This ruler lets you trim out multiple sizes, which is just awesome.

Here you can see the variety of size markings

I am actually in the middle of a quilt project that the next step is trimming up flying geese blocks! Talk about timing!

Ddd


Posted by studio3d@ccgmail.net at 12:01 AM PST
Friday, 8 March 2013
Free For Me
Topic: Supplies

At the Sewing Expo I won a door prize at one of the sessions. I got to choose two patterns for paper pieced wall hangings at one of the vendors. YAY!

I chose a Christmas banner with mittens and snowmen and a spring pattern with three birdhouses.


I already have ideas for both of these.

Ddd


Posted by studio3d@ccgmail.net at 12:01 AM PST
Thursday, 7 March 2013
Fabulous Fabrique
Topic: Supplies

From the Sewing Expo:

For the next few days I will be sharing the goodies I picked up on my recent field trip. Today it is this totally cool piece of yardage.

Is this not truly awesome? Secret project in progress...

Ddd


Posted by studio3d@ccgmail.net at 12:01 AM PST
Wednesday, 6 March 2013
Double Delight Embossing
Topic: Dry Embossing

To make a special card with dry embossing I decided to double the delight.

I ran the cardstock through the Cuttlebug with a corner floral folder and used a foam blender to color the raised portion with 'Spun Sugar' distress ink. Then I ran the cardstock back through the Cuttlebug with the script embossing folder. I followed that with the foam blender and 'Old Paper' distress ink, keeping it off the floral area.

I added a couple of die-cut corner swirls embellished with pink 'dew drops'. I added a diecut text last.

Ddd


Posted by studio3d@ccgmail.net at 12:01 AM PST
Tuesday, 5 March 2013
It's In The Bag
Topic: Sewing

I was given a challenge to sew up a handbag using a plastic one as a model. It was the right size and shape but a poor choice of materials for the user.

I pulled out the leftover fabric that I had used on the cushion the other day and some complementary floral fabric to use as a liner. I used iron-on interfacing on both pieces before cutting.

I measured the model bag and wrote up a plan of cutting and construction. I had to make plans for a different way of attaching handles as the model had leather ones attached with rivets. The closing zipper and an inside pocket were also eliminated.

As it happened I had a packet of magnetic snaps in my stash that I had picked up on clearance several years ago.

So, here is the finished purse:


Here you can see the magnetic snap closure:

Here is a view of the lining. You can see that the straps are also lined so you get a little view of that blue and golden fabric there as well.


This all went together in a couple of hours - including planning time. Next ones (yes, there will be more) will go faster since I can skip that step altogether.

Ddd


Posted by studio3d@ccgmail.net at 12:01 AM PST
Updated: Tuesday, 26 February 2013 9:38 AM PST

Newer | Latest | Older