« May 2013 »
S M T W T F S
1 2 3 4
5 6 7 8 9 10 11
12 13 14 15 16 17 18
19 20 21 22 23 24 25
26 27 28 29 30 31
You are not logged in. Log in
Entries by Topic
All topics  «
3D paperwork
A - Z challenge 5
A - Z challenge 7
A - Z challenge round 4
A to Z challenge round 3
A to Z round 2
A to Z round 6
A-Z round 1
Around the House
Art Challenges
Artist Trading Cards
Backgrounds
Beads
Bible Journaling
Books
Boxes
Collage
Color Challenge
Coloring
cookbook
Die Cuts
Digital Projects
Digital Stamps
Drawing
Dry Embossing
Fabric Stuff
Fantastic Folds
Field Trip
Home Decor
How Does Your Garden Grow?
Hymnal Art
In The Kitchen
In the studio
Jewelry
Lettering
Links
Multi-Technique
Music to Work By
Musings
Nail Art
New Work
Online Class
Other Hobbies
Other Projects
Painting
Paper Embroidery
Paper Piecing
Photo
Pretty Paper
Quilting
Random
reading
Scrap Recovery
scrapbooking
Sewing
Sketch Challenge
Some Backlog
Stamping
Stencils
Stickers
Supplies
Teabag Folding
Techniques
Testing
tips and tricks
Tutorial
Web resources
Welcome to my Blog
Work By My Friends
workflow
Writing
Blog Tools
Edit your Blog
Build a Blog
RSS Feed
View Profile
Group One
In & Out of Studio 3D
Friday, 10 May 2013
Pearl Band
Topic: Jewelry

When I was sidetracked yesterday, I was really just looking for the lobster-claw clasps to construct this project.

I found these free-form black pearls on discount for .97 cents. I wanted to make another band for the medical alert bracelet and these seemed like a good choice. All I needed was 2 clasps, stretchy beading cord, and 2 crimp beads.

This will dress up my utilitarian band and I will wear it with my black pearl necklace.

Ddd


Posted by studio3d@ccgmail.net at 12:01 AM PDT
Thursday, 9 May 2013
When The Stars Come Out
Topic: Jewelry

I went looking through my jewelry findings drawer for something and had to take a baggie off the top first. As I spied the contents I suddenly had an idea and the original project got sidelined. What? Like that never happens to you?

Anyway, the contents of the baggie were these wire stars that were wire-wrapped. I used jumprings to attach them together. I also attached some spare chain to the back to make it long enough and gave it a lobster claw clasp. Ooh ooh ooh - I spied in the front of another clear drawer some star-shaped buttons. I had the idea to encase them inside the wire stars, which took some doing because they were just a bit too big. Some manovering of the wire wrap was required and then I used some flat-nosed pliers to clamp the wrap flat so the buttons could not shift around or escape.

I like this a lot!

Ddd


Posted by studio3d@ccgmail.net at 12:01 AM PDT
Wednesday, 8 May 2013
Yeah, I Made That
Topic: How Does Your Garden Grow?

OK, technically I should say 'I assembled that'! I wanted a potting bench for the patio so I would not have to go trooping into the house to get tools, seeds, fertilizer, gloves and pots. We found this steel workbench at Harbor Freight Tools on sale for $100!

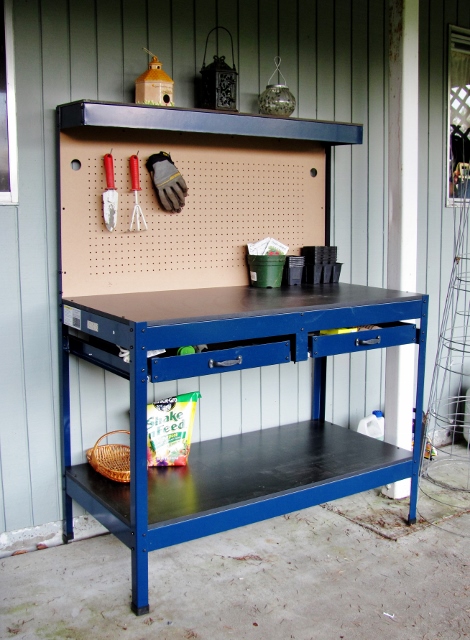
This is not 'some assembly required'. It is 'here's your box of parts, get a box end wrench and a screwdriver'. Even the drawers had to be assembled. The only thing that comes pre-assembled are the runners on the drawers and the sides they fit into... oh yeah the caps are already on the legs, too.

It comes with a light assembly that mounts under the top shelf but it won't be used at night and it is out of doors, so I did not install that. It has a built in extension cord that has three outlets on the side of the unit, too, but it is not likely that I will need those for potting plants and seeds.

Nice pegboard on the back wall with hooks included. I used them for hanging my trowel, mini-rake and gloves. A lower shelf can be used for chemicals, pots, etc.

Bring on the nice weather, it's time to get planting!

Ddd


Posted by studio3d@ccgmail.net at 12:01 AM PDT
Tuesday, 7 May 2013
Copper Poppy
Topic: Backgrounds

Another of the ColorMe papers I had on hand is imprinted with copper instead of white embossing. I decided to leave the background white and color just one set of the blooms. I used distress markers for this.

I echoed the colors by bordering with canary yellow over a rose card base. The sentiment got stamped on green and a flag end cut.

Ddd


Posted by studio3d@ccgmail.net at 12:01 AM PDT
Monday, 6 May 2013
A Great, Bright Day
Topic: Backgrounds

With another piece of the ColorMe paper I used distress ink to color over the whole front. I started to add a darker color just to the butterflies but as it started to smear outside the images I just continued to blend it into the background and really was pleased with the effect.

Ooooh, yummy! I stamped the sentiment on apricot and bordered it in red to echo the background. A white border and orange card base bring it all together.

Ddd


Posted by studio3d@ccgmail.net at 12:01 AM PDT
Sunday, 5 May 2013
Blue Butterfly
Topic: Backgrounds

I pulled out another piece of the butterfly ColorMe paper to play with. This time I used distress ink pad to color the whole thing and then went back in with color for the butterfly. I added red distress pad to add some dimension to the background.


I added a white border and orange card base then stamped the sentiment on a strip of canary yellow card. After adhering I added doodle lines with a fine line blue Sharpie.

Ddd


Posted by studio3d@ccgmail.net at 12:01 AM PDT
Saturday, 4 May 2013
Great Golden Day
Topic: Backgrounds

I had some large (12 x 12) sheets of ColorMe papers and decided to cut them down into card-sized pieces. This gave me 6 pieces from each sheet.

I selected one that had white embossing on white paper, imprinted with butterflies and swirls. I used markers to color each of the butterflies and then the background. A buffing with a rag brings all the embossing back to white.

I used a white border over a teal blue card base and then stamped a sentiment on teal green. I cut a flag end on the left and drew in some dashed white lines before adhering.

Ddd


Posted by studio3d@ccgmail.net at 12:01 AM PDT
Friday, 3 May 2013
You... Today
Topic: Backgrounds

I liked this set of two backgrounds so much that I did not want to cover them up. I decided to mount a combination of small stamps together on an acrylic block to create a little scene with lots of open space.

On the first one I used some soft pinks and blues

...and the second one has a range of pinks and reds

I used markers to color in the dragonfly, the flower centers and the floral graphics in the large word stamp.

Mountings are on coordinating card bases under black bordering.

Ddd


Posted by studio3d@ccgmail.net at 12:01 AM PDT
Thursday, 2 May 2013
Sweet Treat
Topic: Backgrounds

More with the daisy... I loved the cheerful look of this background after coloring it and wanted to keep that light-hearted spirit going. I did this by spreading the daisies apart to expose more of the background and by using a fun sentiment in a casual font.

Black border reinforces the stamping and a pink card base reinfordes the dots in the background.

Ddd


Posted by studio3d@ccgmail.net at 12:01 AM PDT
Wednesday, 1 May 2013
Bright Birthday
Topic: Backgrounds

The color combination on this card almost looks like neon ink! I LIKE! It is still a combination of a distress ink colored waxed paper background over which a Staz-on stamped image is colored with distress markers.

In this case I spread the flowers out around a stamped sentiment and bordered it with black to reinforce the line images.

I used a card base that matched the background for contiuity.

Ddd


Posted by studio3d@ccgmail.net at 12:01 AM PDT
Tuesday, 30 April 2013
Dusty Daisies
Topic: Backgrounds

I wasn't sure what I was going to do once I colored up this background with such a bright purple. Once I pulled out the large daisy stamp, though, I knew I was on the right track. I used dusty purple and rose to color in the petals and centers. YUM!

Rose was selected for the card base to reinforce the flower centers.

The sentiment is constructed from a multi-word set that lets you mix and match for a variety of text.

Ddd


Posted by studio3d@ccgmail.net at 12:01 AM PDT
Monday, 29 April 2013
Three More Thoughts
Topic: Backgrounds

In the stamp set I used yesterday there is a second graphic flower. I decided to use that one for the card today.

The background was very soft and subdued and these flowers are casual so they made a restful combination. By using the black bordering and a sand colored card base I kept it monochrome.

As a finishing touch I placed 5-petal paper flowers in the center of each and anchored them with a black rhinestone.

Ddd


Posted by studio3d@ccgmail.net at 12:01 AM PDT
Sunday, 28 April 2013
Blocky Blooms
Topic: Backgrounds

With a busy pattern in the background I selected a more graphic type of stamp for the flowers. I colored in the open areas with distress markers and stamped a sentiment in the open area.

Behind the fine black border I added a golden card base to echo the color in the flower centers.

Ddd


Posted by studio3d@ccgmail.net at 12:01 AM PDT
Saturday, 27 April 2013
All Smiles
Topic: Backgrounds

This background turned out a little busy so I wanted to use a little boldness to bring the focus back to the sentiment.

I stamped the sentiment on a white punched circle from the scrap pile. Then I used distress ink to color the edges to match the background. a fne line marker was used to draw in some faux stitching. I had some die-cut swirls o hand so I tucked them around the circle and glued them down.

I fiinished off each of the swirls with a teal rhinestone and added one more to dot the I.

Ddd


Posted by studio3d@ccgmail.net at 12:01 AM PDT
Friday, 26 April 2013
Row Houses
Topic: Backgrounds

With this background I colored with a blue distress ink first. Since I had the house out from yesterday I used it again, stamping three times across the page. I used a fine line Sharpie to draw in architectural and siding details. I used distress markers to color in the houses and Staz-on ink to add the sentiment.

Black bordering over violet card base brings the color in to match the center house.

Ddd


Posted by studio3d@ccgmail.net at 12:01 AM PDT
Thursday, 25 April 2013
Thinking Of Home
Topic: Backgrounds

The background for this was so angular that I wanted to reinforce that look. So I used the house stamp and colored it in with markers. I stamped sentiments foloring the angles of the roof and wrapped around the bottom corner. The large word has some oen area graphics embedded so I colored them with marker as well.


A black border over a bright orange folded card base frames it out.

Ddd


Posted by studio3d@ccgmail.net at 12:01 AM PDT
Wednesday, 24 April 2013
In The Woods
Topic: Backgrounds

I had two more of the woodgrain waxed paper backgrounds made up so worked them up with the same general technique for two cards today. I had the set of skeleton leaves out for yesterday's card so I stamped three different ones as borders around the card. I used Staz-On ink for this so it would not smear when coloring. Each leaf type was colored with a different distress marker.

These panels were trimmed and bordered with black over a raspberry card base.

In each case I stamped a sentiment on green, rounded the corners, bordered in black.

In both cases the sentiment block is raised on foam tape.

Ddd


Posted by studio3d@ccgmail.net at 12:01 AM PDT
Tuesday, 23 April 2013
Treestand
Topic: Backgrounds

Back with more of the waxed paper backgrounds. This time I had woodgrain that I colored with distress ink in brown over all. Then I stamped a stand of trees at the bottom edge. They weren't wuite dense enough so I overstamped them with a skeleton leaf. Not noticable in detail but increases the density.

I used golden marker to color over the tree shapes, green over the ground, yellow over the knothole to turn it into a moon, and blue over the rest of the sky.

Hmmm, that photo is a little dark.

Anyway, I bordered with black over a lemon yellow card base and added a strip of yellow card with a stamped greeting.

Ddd


Posted by studio3d@ccgmail.net at 12:01 AM PDT
Monday, 22 April 2013
Dizzy Daisies
Topic: Quilting

My latest quilt is 41 x 48 made from two coordinating daisy fabrics that were donated to me. I used a double pinwheel pattern from Eleanor Burns for the blocks but did my own layout as I did not have enough fabric for all the blocks her layout called for. I ended up with 14 of each block style so I used 12 of one for the center and 12 of the other for the border, separated by a white sashing. Two more blocks were split on the diagonal to make corner pieces and the rest of them will be used to make some potholders.

I used a golden yellow thread to quilt using free-motion daisies in the center of each pinwheel, both large and small. On corners and edges I made just half or quarter flowers as needed.

You actually see the quilting better on the back as I used the same thread over a dark green dot.

I think daisies are such a cheerful flower, don't you?

Ddd


Posted by studio3d@ccgmail.net at 12:01 AM PDT
Sunday, 21 April 2013
It's A Dry Heat
Topic: In The Kitchen

I enjoyed (past tense) so much the banana chips and dried apples that I made so decided to make more. I also wondered how it would be to have some dried mushrooms on hand so I first made a batch of those

The second day I dried banana chips:

The third and fourth days I dried batches of apples. Here is the last batch in the racks ready for the dehydrator:

What delicious, healthy snacks!

Ddd


Posted by studio3d@ccgmail.net at 12:01 AM PDT

Newer | Latest | Older