« July 2013 »
S M T W T F S
1 2 3 4 5 6
7 8 9 10 11 12 13
14 15 16 17 18 19 20
21 22 23 24 25 26 27
28 29 30 31
You are not logged in. Log in
Entries by Topic
All topics  «
3D paperwork
A - Z challenge 5
A - Z challenge 7
A - Z challenge round 4
A to Z challenge round 3
A to Z round 2
A to Z round 6
A-Z round 1
Around the House
Art Challenges
Artist Trading Cards
Backgrounds
Beads
Bible Journaling
Books
Boxes
Collage
Color Challenge
Coloring
cookbook
Die Cuts
Digital Projects
Digital Stamps
Drawing
Dry Embossing
Fabric Stuff
Fantastic Folds
Field Trip
Home Decor
How Does Your Garden Grow?
Hymnal Art
In The Kitchen
In the studio
Jewelry
Lettering
Links
Multi-Technique
Music to Work By
Musings
Nail Art
New Work
Online Class
Other Hobbies
Other Projects
Painting
Paper Embroidery
Paper Piecing
Photo
Pretty Paper
Quilting
Random
reading
Scrap Recovery
scrapbooking
Sewing
Sketch Challenge
Some Backlog
Stamping
Stencils
Stickers
Supplies
Teabag Folding
Techniques
Testing
tips and tricks
Tutorial
Web resources
Welcome to my Blog
Work By My Friends
workflow
Writing
Blog Tools
Edit your Blog
Build a Blog
RSS Feed
View Profile
Group One
In & Out of Studio 3D
Wednesday, 10 July 2013
Leafy Greens
Topic: Coloring

Here is another image that I got in a swap. This time I used inks from Distress markers to watercolor in 4 different greens. I LOVE how this came out!

I gathered patterned papers and a base cardstock in a variety of greens with just one pop of brown for a break while keeping the theme of vegetation.


This has no sentiment so it can be used as a notecard for any occasion.

Ddd


Posted by studio3d@ccgmail.net at 12:01 AM PDT
Tuesday, 9 July 2013
Golf Birdie
Topic: Coloring

Here is an example of why I created the 'coloring' topic - I didn't stamp this image. I got it in a swap of images. Thereby hangs some risk... I didn't know what kind of ink was used for the stamping so I wasn''t sure what medium was safe to use that would not smear the ink.

I took a chance and worked with alcohol markers. I tried not to spend too much time going over stamped lines to reduce the risk of ruining them. For this reason I went with straightforward colors without any shading/blending.

I pulled all the colors from the image for the backing papers and built a little flag for the hole to reinforce the theme.

The sentiment was cut into a shape to support the flag.

Ddd


Posted by studio3d@ccgmail.net at 12:01 AM PDT
Monday, 8 July 2013
Patchwork Angel
Topic: Coloring

This is an image I stamped on white cardstock and colored with alcohol markers. I chose a very busy paper for the background so this card is quite cheery as a result.

The background picks up the green, pink and red from the coloring. The proximity of the red and gold give a nod to the orange coloring as well. I chose a shimmer cardstock in dark copper for the base and borders and did a fancy diecut backing for the image out of it. The image was so large that I fussy cut it with a narrow border.


I did not add a sentiment to this one.

Ddd


Posted by studio3d@ccgmail.net at 12:01 AM PDT
Sunday, 7 July 2013
Handcarved Bed of Roses
Topic: Coloring

Starting with the colored images and working to find papers that work to showcase them is kind of a backward process for me. I usually choose papers and then look for an image, sticker or other embellishments to match.

For this set I stamped my handcarved rose on three pieces of watercolor paper and watercolored them with ink from Distress Markers. In each case I added some micro-dot shading at the base.

First up is an orange rose. I used a warm beige as the base color and built a grid of denim image papers. A couple of burnt orange strips frame the ends. I popped up the image panel on foam tape and added a clear sticker scripture.


For a rosy rose I used a tan base again and backed it with a block of paper and strips from a 6x6 pad. The rose is up on foam tape and a clear sticker word placed on it.


For the final rose I watercolored in yellow. I selected papers with black, white and a bit of green. Somehow it still comes off looking pretty clean. I stamped a greeting directly on the image panel.

I very seldom use this rose without its companions but I like the result.

Ddd


Posted by studio3d@ccgmail.net at 12:01 AM PDT
Saturday, 6 July 2013
Barrow Of Blooms
Topic: Coloring

I'm starting a new topic category with this entry - coloring. For many of these the images will be stamped but they might be digitals or something else. The coloring might be done with alcohol markers, watercolor markers, watercolor pencils, colored pencils, airbrush, or even acrylics. I might find some other things to color with along the way, but all will fit the category.

For today's card I stamped on watercolor paper and used Distress markers as inks and painted with an aquamarker. I used a black pen to add dots as shading in the ground. I used some papers from a 6x6 pad and pordered everything in lavender.


I stamped a sentiment directly onto the background paper.

Ddd


Posted by studio3d@ccgmail.net at 12:01 AM PDT
Friday, 5 July 2013
What's Your Bag?
Topic: Sewing

The recipient of the gold colored purse I made this spring really liked it and wanted another in a dark color for fall/winter. I used a wool blend charcoal gray pinstripe that looks like a man's suit fabric. I stabilized it with iron on interfacing to control the stretch on the weft.

It closes with a magnetic snap and has long straps that are attached all down the sides and sealed in the bottom seam. The base is 6.5 x 10 and the sides are 11 inches high.

I found a beautiful toile fabric for the lining, too. Every part of it is lined - purse, flap, and straps.

I don't build in any pockets as she has a drop-in purse organizer that has all the pockets she requires.

Ddd


Posted by studio3d@ccgmail.net at 12:01 AM PDT
Thursday, 4 July 2013
Soup's On
Topic: Sewing

I wanted to have a gift for a guy and thought a necktie would be classic. However, this guy doesn't really have a need for more ties and but could use a fancier clothing protector for 'nice' occasions.

I decided to make a Sunday dinner necktie bib.

I pieced it with a background 'shirt' fabric, a checked 'tie' fabric and bias tape binding. The knot in the tie is a separate piece as is the collar. The bottom of the tie is loose and under the point is a faux placket with a shirt button. I added small buttons to the collar points.

My model has a larger neck so it is not lying as smoothly as it will with the actual recipient.

I used a single bead and bead cap to make a faux tie tac.


I think this will be a hit!

Ddd


Posted by studio3d@ccgmail.net at 12:01 AM PDT
Wednesday, 3 July 2013
Long May She Wave
Topic: Quilting

I went to a quilt retreat recently and had fun stitching up a new banner for my fireplace wall. It was a good break between massive amounts of block making in paper piecing, regular piecing and applique for a big project I am working on.

The quilt is constructed like this one I did last year (http://www.mystudio3d.com/blog/index.blog/2273178/twist-and-shout/) and is the exact same size, too.

I used a flag print plus red and blue for a truly patriotic banner.


Here you can see the twisting stripes in a closeup:


I bought the fabric for this a year ago, as soon as I had finished the pink and green one. Barely made it for the 4th of July!

Ddd


Posted by studio3d@ccgmail.net at 12:01 AM PDT
Tuesday, 2 July 2013
Singing the Blues (And Reds, And Greens)
Topic: Quilting

Somewhere online I saw a single quilt block that inspired me to create a large wall banner for my guitar-playing son-in-law. I used Quilt Wizard to draft the individual units that would be combined to create interlocking guitars.

I bought fat quarters in 4 each of red, blue and green and combined these with black and woodgrain from my stash. The banner measures 42 x 81 inches.

Quilting is around the black triangles, the dividing lines between the two colors of guitars and 6 zigzag lines down the neck of each guitar. These represent the strings.

I needed a bit more quilting in the large blocks of color in the guitar bodies so I used a bit of artistic license and made large nested circles on each.

I used a black with music symbols for the border and binding.

At the ends of the necks of each guitar I stitched on 6 mis-matched buttons in colors to match the guitar they are part of.

There are hanging sleeves on both the top and bottom so it can hang as well as use another rod to weight it. It is actually large enough to be used as a lap quilt should he desire to.

Ddd


Posted by studio3d@ccgmail.net at 12:01 AM PDT
Updated: Friday, 7 June 2013 7:35 PM PDT
Monday, 1 July 2013
Whiz-Bang
Topic: In The Kitchen

I really love the dehydrated apples slices I've been making but often delayed making them because I dreaded all the peeling, coring and slicing it takes. To the rescue, a chance encounter with an awesome kitchen gadget. At slightly less than $20 I was enthralled.

Simply push the base of the apple onto the 4 prongs:

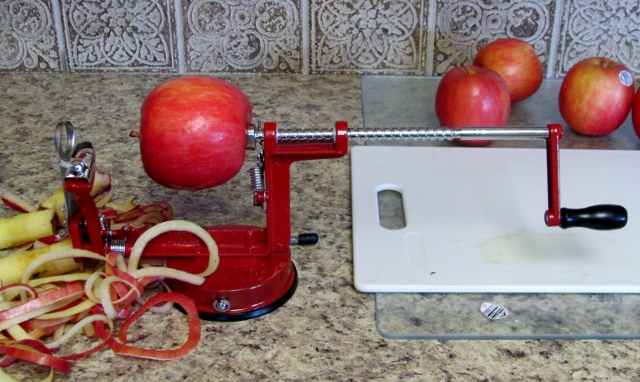
Start cranking the handle and your apple is peeled, cored and spiral sliced all in one step. One apple takes about 15 seconds.

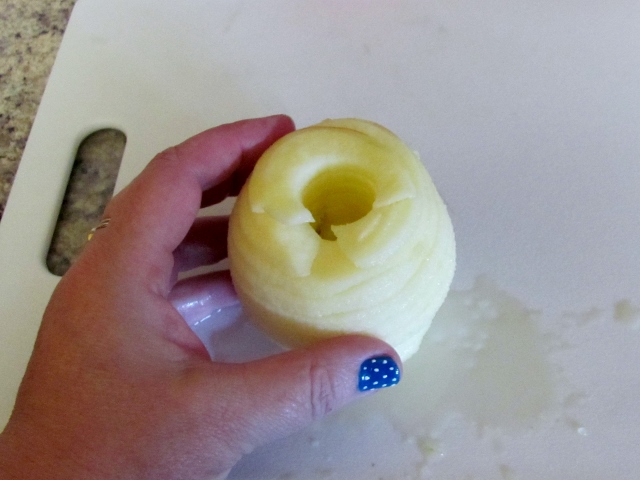
The entire apple can be slid off the core in one stack:

I then quarter the stack:

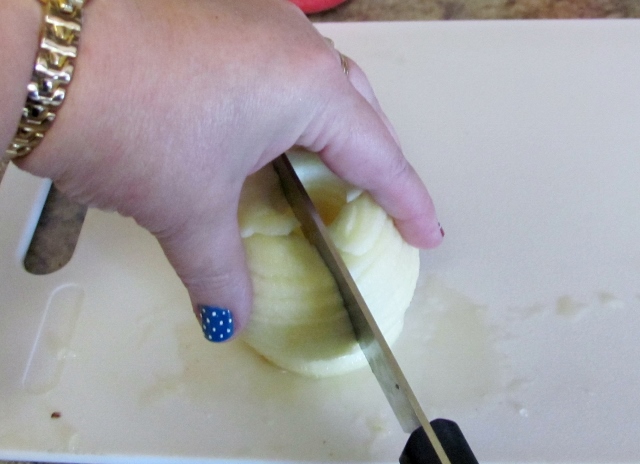
And drop the pieces into cool water with a little lemon juice in it:

My dehydrator holds two apples per tray:

The most time consuming part of the process is now laying out the slices on the trays. Tomorrow I will have a brand new batch of dehydrated apples to munch.

I used it to peel potatoes for a salad the other day, also. It will peel only, peel and slice and core, core and slice. No peel and slice without coring as the corer and slicer are one unit.

This tool was definitly worth the price!

Ddd


Posted by studio3d@ccgmail.net at 12:01 AM PDT
Sunday, 30 June 2013
Reflections of Summer
Topic: Around the House

I put up the summer decor (red, white and blue - stars and stripes theme) a few weeks ago then forgot to post. Most of it is the same (or similar) to the last couple of years but I wanted to show the display in the dining room.

The mirror trivets are a new item in my decor box (thanks, Mom). They are in three sizes. I used them as an element to tie disparate items together. I included the painted wooden stars, the summer lighthouses, a candle in a hurricane vase and clear flat marbles.


Everything is carefully arranged to look casually arranged!

Ddd


Posted by studio3d@ccgmail.net at 12:01 AM PDT
Saturday, 29 June 2013
Some Summer Silliness
Topic: Nail Art

I generally don't do up my nails until they are a 'certain' length. But I had an idea for a fun summer look and didn't have time to grow them out before summer would be gone. So I just decided to go with it.

I used a base coat, red and blue polishes from the dollar store (2 coats), a white nail art polish, clear coat (2 coats) and instant dry.

I painted both thumbnails blue and applied small white dots (for stars) and painted all the fingernails red with two thin white stripes. I did the stripes in varying directions for the look of waving flags.

Ready for the Independence holiday!

Ddd


Posted by studio3d@ccgmail.net at 12:01 AM PDT
Friday, 28 June 2013
Hard-Working Friends
Topic: Around the House

New appliances make me happy! I've been babying my old washer and dryer for a while now but they have not been pulling their weight. After 20+ years the washer agitation was spotty and loads had to be 1/2 sized to allow clothes to get moved around enough to get clean. The dryer took 1 1/2 cycles to get a load dry - even those 1/2 loads. Grrrr.

So, we went shopping for some new friends to live in the laundry room and they look very nice in their new home. I would have prefered a colored set but, when you shop the sales, you take what is available!

Here are my high capacity, front load machines on their pedestals.


I debated on the pedestals but then reminded myself that I do not stand around in there looking out the window, anyway, so why not. There is still enough light coming in.

Now, I have to go teach them to fold laundry and my life will be complete.

Ddd


Posted by studio3d@ccgmail.net at 12:01 AM PDT
Thursday, 27 June 2013
Feelin' Hot, Hot, Hot
Topic: Sewing

I had some 'orphan blocks' left from a recent quilt project and they were just the right size to make potholders. The pinwheels are 7 1/2 inches and the others are 9 1/2 inches.

I got batting with a thermal barrier built in and also added a layer of cotton batting for a heavier 'hand'. They got a yellow tone-on-tone striped binding to pick up the yellow center in the daisies.


I have no immediate need for these so thought I'd put them in the 'gift cupboard' for an occasion to arise. they might end up being a donation to a cause, too.

Ddd


Posted by studio3d@ccgmail.net at 12:01 AM PDT
Wednesday, 26 June 2013
6x6 Cut-Ups - Fourteenth Installment
Topic: Multi-Technique

...and the LAST installment, too!

This final group of cards uses a sheet of thick word stickers I was gifted in a swap.


for this one I 'joined' them with a stamped word

...and one punched butterfly.

So, there we are with 42 cards all in one 'style' of construction/design.


Ddd


Posted by studio3d@ccgmail.net at 12:01 AM PDT
Tuesday, 25 June 2013
6x6 Cut-Ups - Thirteenth Installment
Topic: Multi-Technique

Feeling a bit punchy today? Although I used punched butterflies on a few of the other cards in this series, for this card that is ALL I used. I glued down a solid colored one then 3D mounted a patterned one over the top.


I couldn't leave it at that so I added a cardstock sticker of text.

Ddd


Posted by studio3d@ccgmail.net at 12:01 AM PDT
Monday, 24 June 2013
6x6 Cut-Ups - Twelfth Installment
Topic: Multi-Technique

I had a sheet with just three vinyl stickers. Had I more of these I might have used them, but alas...

I mounted them on bordering materials to match the rest of the card and they are all popped up on foam tape.


This one got an extra strip of patterned paper.


This one had a large open space so I stamped a sentiment in it.


You can see why it would have been nice to have more of these.

Ddd


Posted by studio3d@ccgmail.net at 12:01 AM PDT
Sunday, 23 June 2013
6x6 Cut-Ups - Eleventh Installment
Topic: Multi-Technique

One lone card - that's all I have for today as it is all I made with a hard acrylic sticker. This was one left on an old sticker sheet.


What a romantic feel!

Ddd


Posted by studio3d@ccgmail.net at 12:01 AM PDT
Saturday, 22 June 2013
6x6 Cut-Ups - Tenth Installment
Topic: Multi-Technique

Another gift of supplies contained some black and white acrylic text stickers. YUMMY!


I didn't use very many of these because the high contrast was a bit much for most of the cards I had set up.

Ddd


Posted by studio3d@ccgmail.net at 12:01 AM PDT
Friday, 21 June 2013
6x6 Cut-Ups - Ninth Installment
Topic: Multi-Technique

Next to butterflies, I guess I like flowers next best. I chose some flower stickers to embellish the cards being shown today in the 6x6 cutup project.


This one also got a 3D text sticker


Love the scalloped border punch on this one.

Ddd


Posted by studio3d@ccgmail.net at 12:01 AM PDT

Newer | Latest | Older