« September 2013 »
S M T W T F S
1 2 3 4 5 6 7
8 9 10 11 12 13 14
15 16 17 18 19 20 21
22 23 24 25 26 27 28
29 30
You are not logged in. Log in
Entries by Topic
All topics  «
3D paperwork
A - Z challenge 5
A - Z challenge 7
A - Z challenge round 4
A to Z challenge round 3
A to Z round 2
A to Z round 6
A-Z round 1
Around the House
Art Challenges
Artist Trading Cards
Backgrounds
Beads
Bible Journaling
Books
Boxes
Collage
Color Challenge
Coloring
cookbook
Die Cuts
Digital Projects
Digital Stamps
Drawing
Dry Embossing
Fabric Stuff
Fantastic Folds
Field Trip
Home Decor
How Does Your Garden Grow?
Hymnal Art
In The Kitchen
In the studio
Jewelry
Lettering
Links
Multi-Technique
Music to Work By
Musings
Nail Art
New Work
Online Class
Other Hobbies
Other Projects
Painting
Paper Embroidery
Paper Piecing
Photo
Pretty Paper
Quilting
Random
reading
Scrap Recovery
scrapbooking
Sewing
Sketch Challenge
Some Backlog
Stamping
Stencils
Stickers
Supplies
Teabag Folding
Techniques
Testing
tips and tricks
Tutorial
Web resources
Welcome to my Blog
Work By My Friends
workflow
Writing
Blog Tools
Edit your Blog
Build a Blog
RSS Feed
View Profile
Group One
In & Out of Studio 3D
Wednesday, 25 September 2013
Four Random Flowers
Topic: Pretty Paper

I was going gangbusters on using up the cut parts from the RANDOM 6x6 pad. I decided to slow things down and just post one card per day for a while. I needed some breathing room.

Today's card uses a grouping of four blocks. In the 'plan' they were all 2 x 2 but it was too overwhelming for the card so I cut them down to 1.75 x 1.75 inches. This gave them room for a center split revealing their backing. After I placed a stamped sentiment The card face was still too plain so I dressed the squares up with premade paper flowers.

The centers of the flowers were covered with glitter so I used Glossy Accents to seal them.

Ddd


Posted by studio3d@ccgmail.net at 12:01 AM PDT
Tuesday, 24 September 2013
Two More Random Cards
Topic: Pretty Paper

I took a few moments to complete two more of the cards I had prepped from the 'Random' paper pad.

Both of them make use of the zigzag paper in a strip. The first one uses a background paper from a different pad.


Ddd

Posted by studio3d@ccgmail.net at 12:01 AM PDT
Monday, 23 September 2013
Joint Efforts
Topic: Jewelry

My niece was here for a crafting day recently and we got distracted by shiny objects... One thing led to another and we found ourselves making pins. I should say SHE was making pins, I was making A pin!

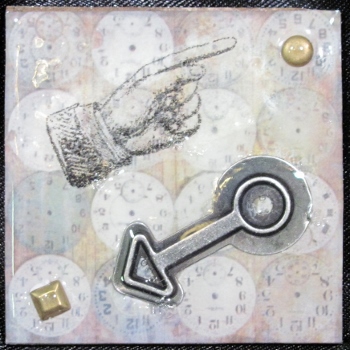
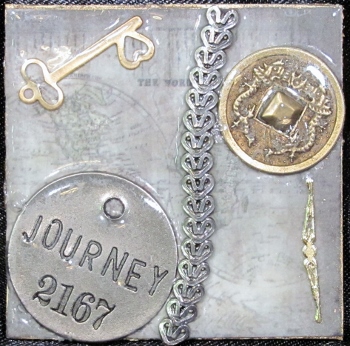
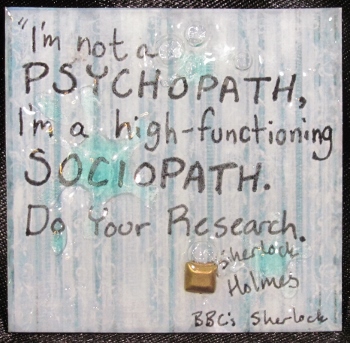
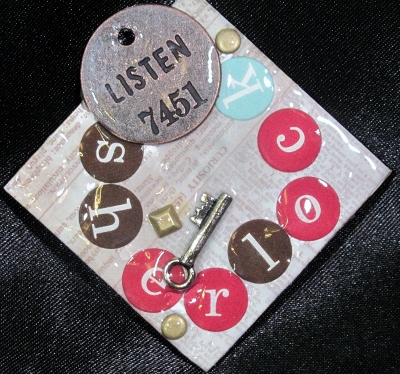
We used davy board as the base for most of them and added in liberal amounts of old inchies, charms, stickers, rub ons, gold trim, coins, rhinestones, nail head stickers, patterned paper, jewelry findings, old chain, old broken jewelry, addage tags, metal embellishments, shrinky dinks, bottle caps, and tissue tape. While I made my one pin, she finished twelve.

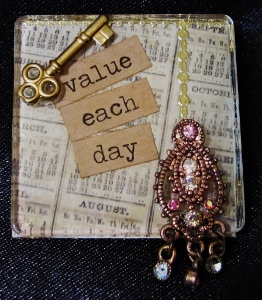
This is mine which has a plexiglass top on it and then a key charm and a broken earring fixed to the front. It is 1 1/2 inch across. They all have pin backs on them - held with E6000 glue.


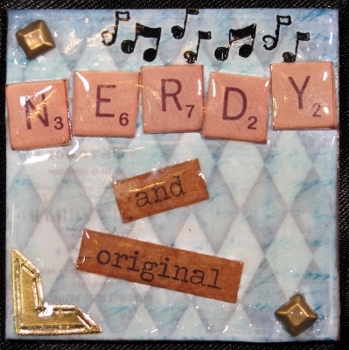
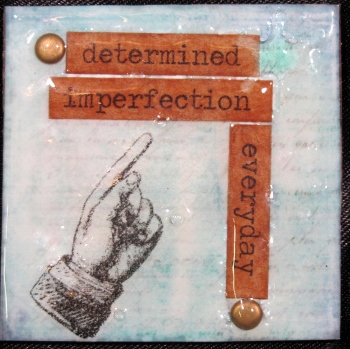
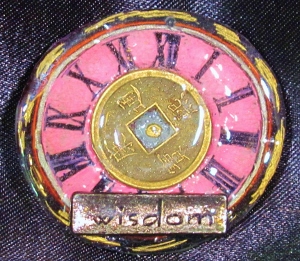
Her collection is quite eclectic. Steampunk, Sherlock Holmes and Vintage are more her style. Most of hers were sealed with two to three coats of UTEE. These squares are all 2 inch.


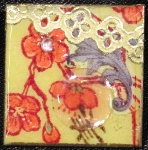
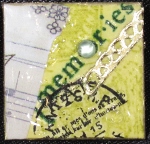
These two are some inchies I had left over from 2008.


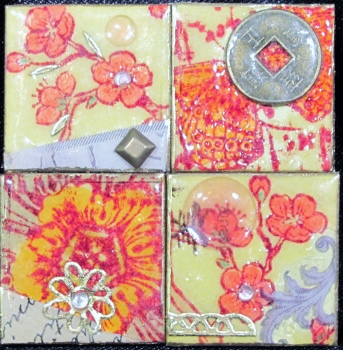
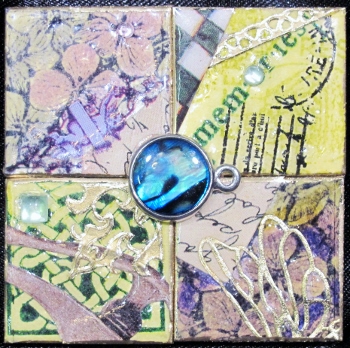
Then she made a couple of companion pieces by combining four inchies on each base.


This one was made from an old shrinky ding charm I had that someone gifted to me.


For this one we flattened a bottle cap as the base.


Can you tell we had tons of fun?

Ddd


Posted by studio3d@ccgmail.net at 12:01 AM PDT
Sunday, 22 September 2013
Random Paper Pad
Topic: Pretty Paper

I did NOT know that the store Tuesday Morning had craft supplies till I stopped in the other day trying to waste time before an appointment. In the store I found 6x6 paper pads for $2.99! I bought three of them in different styles.

The first one I used is by Crate Paper and is called Random (thus the title of this blog post).


The only paper I don't care for is the one that is just a plain piece with a black border around it... boring!

I used two cutting formulas to chop two sheets each of all the other patterns (there are 4 of each pattern in the pad). I mixed and matched the chopped pieces together into card layouts and selected bordering colors of cardstock for them.

After this session I took some time to complete 8 cards. They were each finished off with a stamped sentiment popped up on foam tape.

Starting at the END of the layout process, the strips for this card are the trim where the hang tag hole is printed at the top of the pad. In this pad it is a contrasting pattern and is in addition to the 6x6 size. I glued them all down side to side and then used another strip to cover up all the holes.


This one is also made of scraps where several of the cut strips in the cutting diagram needed a trim at the end. I just arranged 5 of them on a left over block from another cuttin. I also pulled out a background paper from my large bin of papers.


This card also uses a background from outside the set.


This one is CLOSE to the layout as designed except I turned the center block on point.


To this one I added some butterflies punched out of the bordering material.


These three are all the same pieces. The feature piece is the same on all of them and the backgrounds change.


I added a strip of left over text on this one:


I have many more cards laid out so there will be more to come.

Ddd


Posted by studio3d@ccgmail.net at 12:01 AM PDT
Saturday, 21 September 2013
Red Giants
Topic: How Does Your Garden Grow?

Wishing to make a potato salad I dug up a hill of red potatoes. Oh my word! I dug up 10 pounds from one hill!

I peeled the small and medium sized ones and still had all these giant potatoes left for later.


For the sake of scale the upper center round one is about 7 inches across! Big enough for a pot of mashed potatoes all by itself.

Ddd 


Posted by studio3d@ccgmail.net at 12:01 AM PDT
Friday, 20 September 2013
A Plaid For Dad
Topic: Quilting

I had some fun with a plaid fabric I've been contemplating for a long time. It just took a combination of the right companion fabrics to make it sing!

The plaid has teal, cranberry, salmon and butter yellow. I combined it with a butter yellow with tiny teal and salmon diamonds. Then I pulled out a rose pink with cranberry scrollwork and just like that I had a dark, light and medium as well as a large, medium and small pattern.

The pattern is a disappearing nine-patch with a 6 inch square of the plaid. I did all the quilting on the diagonal through the yellow and plaid squares.


This quilt fits a twin bed.

Ddd


Posted by studio3d@ccgmail.net at 12:01 AM PDT
Thursday, 19 September 2013
You Say Potato, I Say Tomato
Topic: How Does Your Garden Grow?

I couldn't pass up the opportunity to show off some more garden produce. We added just a glazed chicken breast to complete a meal including fresh sliced tomatoes, hand cut oven fries, and corn on the cob.

YUMMO!

Ddd


Posted by studio3d@ccgmail.net at 12:01 AM PDT
Wednesday, 18 September 2013
Apples and Asters Time
Topic: Around the House

With the approaching fall it was time to change out the home decor. This time of year I bring out the plastic apples and silk flowers for a theme I call 'apples and asters'.

On the two matching living room mirrored cabinets I used arrangements with a taper candle in them.


The hearth features a plated arrangement which has nested straight wide jars. I used a vine of silk leaves to fill the space between the jars and arranged crabapples and grapes at the base.


Above, on the mantle, are the calendar blocks with a bit of fruit around them.


On the ledge in the entryway is a low arrangement that includes some decorated balls:


On the top of the roll top desk I used my favorite candle holder with some burgundy candles and granny smith apples I used some apple print fabric as a base.


The last place I decorated was the alcove of the china hutch. Here I inserted some of the flowers into a faux potted plant. More of the apple fabric lines the lower shelf and the glass upper shelf features more of the decorated balls.


And that concludes our fall home tour.

Ddd


Posted by studio3d@ccgmail.net at 12:01 AM PDT
Tuesday, 17 September 2013
Two By Two
Topic: Dry Embossing

I had a bunch of small scraps in the patterned paper bin and cut them into 1 1/2 inch squares. I then paired them in sets. For each set I chose a patterned paper backing and a color to use for bordering.

Each of the patterned papers was run through the Cuttlebug with an embossing folder and then the texture was either sanded to reveal white or sponged to color the raised pattern.

For this first set I used a 1/4 inch corner rounder on all four corners of the little squares. This one uses a 'mesh' embossing folder and sanding. All bordering in white to continue the red, white and blue theme.


For this one I chose a map background and a script embossing folder, sanded. All pink bordering and stamped sentiment.


The last of this style has a floral background with a daisy embossing folde, sanded. All bordering in blue and a green sentiment to pull color from the background.


For the remaining cards I rounded opposite corners of the little squares with a 1/2 inch corner punch. The placement of these with the points outward make them look like a flower. The first one uses a floral print with a leafy scroll embossing folder. I sanded this one, too and used kraft for the bordering.


I followed this with an inked scroll embossing folder on a tiny floral paper. Bordering with green picks up color from thebackground and provides contrast for the feature elements.


There's more contrast in this one. I started with a blue patterned paper with tiny fleur-de-lis in gold. I used a fleur-de-lis embossing folder and inked it with gold. Bordering in blue and an fold sentiment finishes this classy card.

And finally, an all-green card. The background paper was embossed with vines and birds and then I sanded it to reveal the pattern. The sentiment is a grayed green to echo the background paper.

By now you've probably noticed the 4 squared on every card are popped up on foam. The sentiments are all glued directly to the face of the squares.

Ddd 


Posted by studio3d@ccgmail.net at 12:01 AM PDT
Monday, 16 September 2013
Branching Out
Topic: Die Cuts

Start with a piece of white cardstock... that's the way this card began.

I sponged the cardstock with three Distress Inks (a yellow orange, a red, and a brown. Then I used a brown chalk ink to stamp a script in the background, wiping some of the ink off before stamping. I used a leafy branch die to cut from three solids and two printed papers. [BY THE WAY: I hate this die. Love the design but getting it to cut cleanly all the way through and release the leaves from the background is a giant, annoying pain.]

I glued all the leaves on the background, rounded the corners and sponged the edges with brown ink.


The feature panel is mounted on a dark green card base with rounded corners. A stamped sentiment on green is bordered in brown.

Ddd 


Posted by studio3d@ccgmail.net at 12:01 AM PDT
Sunday, 15 September 2013
Some Of My Hangups
Topic: Paper Embroidery

The hardest part about using these ornament stitching stickers was cutting out the little ornament hooks! I did the stitching before the cutting so I wouldn't keep catching the thread on the hook and leaving tape overhanging the edges. This worked out very well.

After I stitched the string of lights I used a craft knofe to make a slit in the loops so the ornament hooks would slide in there. Then the ornaments were stuck down with foam tape.

A Christmas paper was used for the background and I added a gold peel-off sticker for the sentiment.

Ddd 


Posted by studio3d@ccgmail.net at 12:01 AM PDT
Saturday, 14 September 2013
Purple Bells
Topic: Paper Embroidery

Stitching stickers today are gold and red bells on purple. I rounded the corners and mounted on a gold on gold text page, also with rounded corners.

I wanted to do something unexpected with the background so I covered the purple card base with a parchment printed with gold snowflakes.

With the text on the backing paper I didn't need to add a sentiment.

Ddd 


Posted by studio3d@ccgmail.net at 12:01 AM PDT
Friday, 13 September 2013
We've Got Snow
Topic: Paper Embroidery

Actually, we've got snowMEN. On a card. That was the assignment coming up in a couple of months and I decided to get ahead of the curve and make it now.

I had the oval cutout left over from a different project and used a stitching sticker for the snowman. I mounted it on foam tape over a shimmer green panel with rounded corners.

The snowman paper was just too perfect to miss out on. I love all the goofy faces on them.


A littlepen doodling around the oval and a couple of shiny red text stickers finish it off.

Ddd 


Posted by studio3d@ccgmail.net at 12:01 AM PDT
Thursday, 12 September 2013
Onions Big, Onions Little
Topic: How Does Your Garden Grow?

In the past I have grown sweet or yellow onions from sets and had only marginal success with the bulbs only getting about 2 inches across. This year the store did not have any sets but had starts instead. So I planted these and, WOW! They took off! I don't think a single one failed and I have probably 15 to 20 pounds of sweet onions.


I still did the green onions in a barrel from seeds and they have done really well this year as well.

You can see bare spots where we have been pulling these for snacking.

Ddd


Posted by studio3d@ccgmail.net at 12:01 AM PDT
Wednesday, 11 September 2013
Eat What 'Maters
Topic: How Does Your Garden Grow?

In past years I have had such poor luck with tomatoes that I planted more this year. I figured that if yield was down I could compensate that way.

Wouldn't you know it ALL of the plants are heavy with fruit. I planted three each of cherry tomatoes and large grape tomatoes (I thought they were Roma) and 9 (yes NINE) of slicing tomatoes.

None of the slicing tomatoes have ripened yet so we are eating ones shared by a neighbor. These are some of mine:


We have been eating the cherry tomatoes though and are getting a handful every day


Love summer fruit!

Ddd


Posted by studio3d@ccgmail.net at 12:01 AM PDT
Tuesday, 10 September 2013
That's A Little Corny
Topic: How Does Your Garden Grow?

Update on the garden. We have had great success with the new corn patch this year. Big, tall stalks and well polinized. However, I may have planted too densely.


We've only had one ear of corn harvested yet but you can see it is coming right along.


LOVE fresh corn on the cob.

Ddd


Posted by studio3d@ccgmail.net at 12:01 AM PDT
Monday, 9 September 2013
Roll On!
Topic: Quilting

Today I'm sharing NOT a quilting project but the wonderful birthday gift my hubby gave me.

Yes, that IS an entire roll (40 yards) of quilt batting. We already had big eye hooks in the ceiling so he got some high test chain and some snap hooks and mounted it so I can roll off and cut what I need.


Yes, I really am short enough to stand up under it without knocking my head!


You can also see that I moved my loom into the quilt studio. I guess this technically makes it a 'fiber' studio as I also do sewing here that is not quilting.

Ddd


Posted by studio3d@ccgmail.net at 12:01 AM PDT
Sunday, 8 September 2013
That's A Little Flakey
Topic: Paper Embroidery

Stitching sticker snowflakes mounted on pink dot cardstock were stitched in maroon thread for today's card. I love this combination for a non-traditional winter card.

The stitched panel was mounted on maroon to match the thread and then a white card base.


Leaving off a sentiment allows this card to be used for Christmas OR Winter, extending the 'shelf life'.

Ddd


Posted by studio3d@ccgmail.net at 12:01 AM PDT
Saturday, 7 September 2013
Winter Cheer
Topic: Paper Embroidery

One of the stitching sticker sheets had lots of stars on it so I gathered several sizes and prickeing patterns and combined them on one sheet of shiny silver cardstock. The bird is a stitching sticker too though it is just the eye that is done.

I mounted on a shiny dark blue cardstock to echo the blue metallic thread in the stitching. A red card base echoes the bird color.


The sentiment is a Dazzles sticker.

Ddd


Posted by studio3d@ccgmail.net at 12:01 AM PDT
Friday, 6 September 2013
To Be Jolly
Topic: Paper Embroidery

Three stitching stickers were combined on a green background for a grouping of ornaments. They are stitched with metallic thread and the hanging 'chains' extended with more stickers.

As usual the metallic background paper (purple around the edge) does not play nicely with the camera which darkens everything when there is too much shine.


Apparently I am NOT smarter than the camera because I can' make it stop doing this.

Ddd


Posted by studio3d@ccgmail.net at 12:01 AM PDT

Newer | Latest | Older