« November 2013 »
S M T W T F S
1 2
3 4 5 6 7 8 9
10 11 12 13 14 15 16
17 18 19 20 21 22 23
24 25 26 27 28 29 30
You are not logged in. Log in
Entries by Topic
All topics  «
3D paperwork
A - Z challenge 5
A - Z challenge 7
A - Z challenge round 4
A to Z challenge round 3
A to Z round 2
A to Z round 6
A-Z round 1
Around the House
Art Challenges
Artist Trading Cards
Backgrounds
Beads
Bible Journaling
Books
Boxes
Collage
Color Challenge
Coloring
cookbook
Die Cuts
Digital Projects
Digital Stamps
Drawing
Dry Embossing
Fabric Stuff
Fantastic Folds
Field Trip
Home Decor
How Does Your Garden Grow?
Hymnal Art
In The Kitchen
In the studio
Jewelry
Lettering
Links
Multi-Technique
Music to Work By
Musings
Nail Art
New Work
Online Class
Other Hobbies
Other Projects
Painting
Paper Embroidery
Paper Piecing
Photo
Pretty Paper
Quilting
Random
reading
Scrap Recovery
scrapbooking
Sewing
Sketch Challenge
Some Backlog
Stamping
Stencils
Stickers
Supplies
Teabag Folding
Techniques
Testing
tips and tricks
Tutorial
Web resources
Welcome to my Blog
Work By My Friends
workflow
Writing
Blog Tools
Edit your Blog
Build a Blog
RSS Feed
View Profile
Group One
In & Out of Studio 3D
Thursday, 28 November 2013
Blue Belle
Topic: Quilting

Yet another quilt from my marathon cutting/piecing sessions. The fabric for this one started out as a wide stripe repeated 5 times across the width of the fabric. By leaving 1/4 inch on each side of the dark blue strip the width was 7 1/4. I cross-cut these long borders to 7 1/4 lengths giving me that size of a square.

I turned every other block and the result looks like long strips that are woven together. That's it! 25 big blocks and 4 borders. Easy-peasy!


Here you can see what ONE block lookks like:


Like the three previous quilts this one is done with a meandering line. On those with only 2 inch borders I did not quilt in the borders. This one had 6 inch borders to the quilting goes all the way to the edge.

I chose a tone-on-tone dark blue for the binding.

Ddd


Posted by studio3d@ccgmail.net at 12:01 AM PST
Wednesday, 27 November 2013
Christmas Crush
Topic: Quilting

Here is the third quilt I made with the same pattern. This one features a Christmas print of holly, poinettia and amaryllis in teal, cream and berry pink. I used a teal print and a tone-on-tone cream for accents.

The border is a wine tone with small multicolored dots in teal, cream, pink and yellow. 


I think I am REALLY done with this pattern, though I reserve the right to change my mind and make another sometime down the road!

Ddd


Posted by studio3d@ccgmail.net at 12:01 AM PST
Tuesday, 26 November 2013
Fruit Basket Upset
Topic: Quilting

Mystery of the Vanishing Blog Post - I have NO idea where the post went for today. I'll tey to recreate it with all of the original wit and wisdom but who knows how that will go. And, it may always magically turn up at some point and make me look foolish!

This is another of the three quilts I made from the same pattern. For this one I wanted to use this rich fruit fabric but did not have enough for the 20 block called for in the pattern. So I re-drew the pattern! I enlarged the feature square from 6 to 7.5 inches and this allowed me to get 12 out of the fabric I had available. 

Then I decided to made 12 inch blocks so redrafted the surrounding parts of the block to make that work.


I used a golden yellow as the background and a green marble for the boxes. The border is a rich purple with a tiny flower.


In the above shot you get a better view of the feature fabric as well as a hint of the meander quilting I used.

Ddd


Posted by studio3d@ccgmail.net at 8:38 AM PST
Monday, 25 November 2013
Dutch Treat
Topic: Quilting

It does seem rather quickly that this quilt finish is following on the heels of another but it is really true! I did a massive one-day scrap sorting, pattern selecting, piece cutting session and managed to wrangle all the parts for five lap quilts. I then did two days of piecing them, one after the other, and one day of pinning them all to backings.

After having finished up the birdhouse quilt I then had all five of these lap quilts ready for quilting. With meander quilting I can do two per day and then I can stitch the binding down at a rate of one per evening.

So, expect to see several coming up here right-quick.

The first I finished off features a tulip print that was gifted to me in a box of leftovers from a friend's stash (thanks, Kim!). I added some green left from the birdhouse quilt and some red solid left from the backing of the long-ago Nebraska Huskers quilt. The yellow is from a short yardage I bought for the stash because I needed a bright.

The pattern is from a Sewing With Nancy session that my mentor watched and calculated out. She drew it out in three size variations and gave copies to us to play with for making lap quilts for the hospital's Passages program.


Finished size is 40 x 49 inches.

The backing is red with white polkadots.

Ddd


Posted by studio3d@ccgmail.net at 12:01 AM PST
Sunday, 24 November 2013
Scrappy Garden
Topic: Scrap Recovery

From the paper scrap strips I sorted yesterday I created a red/pink background to use today. I also added some strips from the scrap bins.

In scoring through my vast collection of stickers I found a sheet of flower stickers made from layers of colored papers.

I 'planted' all of them along the edge of a black piece of cardstock and then used a craft knife to trim out the top and side edges.

The bottom edge is adhered directly to the card background while the leaves and flowers are up on foam tape.


I used a yellow sentmient to key off the centers of the flowers.

Ddd 


Posted by studio3d@ccgmail.net at 12:01 AM PST
Saturday, 23 November 2013
Scrappy Birds
Topic: Scrap Recovery

After doing so many cards with background using 6 x 6 pads I end up with a lot of paper strips. I grabbed a bunch of these and sorted them into color groups to use as striped backgrounds.

To create the background I run a piece of white cardstock through the Xyron to cover it completely with adhesive. Then, starting at one end, I lay strips side by side and then trim the piece to size with the paper cutter.

For this piece I used strips in greens and golden yellows. I pulled a few older strips from the scrap bin to have more variety than I found on the tabletop.

I added a rub-on illustration that I got in a swap. The little birds just floated in space so I used a Sharpie marker to sketch in a branch. I added some black peel-off leaves and mounted the whole piece with a black border.


The rub-on is a style I have not used before as it is very plastic-y and has some fine glitter embedded in it.

I added a black-trimmed greeting stamped on green cardstock.

Ddd


Posted by studio3d@ccgmail.net at 12:01 AM PST
Friday, 22 November 2013
The Three (er, Four) Bears
Topic: Coloring

I grabbed another set of those free digital images to color up for cards. These are again colored with alcohol markers.

I used the same two reds for the balloons on all of them and then pulled some color off with the colorless blender to create 'shine' to make them look 3-dimensional.

I colored each of the bears with a different set of two browns and gave each a different outfit color using two coordinating markers. Each bear was trimmed into a rectangle and the corners rounded. Then I chose a background to go with the bear colors and accents to pick up on the other parts of the stamp.

First bear actually got a green background and bordering to go with the clothing. The hearts paper repeats the heart balloons and I added some tiny green rhinestones down the left edge of hearts as an accent.


Bear two is dressed in purple so the bordering paper is also. I used red accent paper to echo the balloons and a strip of self-stick ribbon to pull some of the pink from the outfit. 5 rhinestones in pink are the accent.


I didn't want to go too bold with the fuschia of the outfit so I used the honey color of the bear, red hearts like the balloons ad then added a soft green accent strip. The light pink bordering gives nod to the outfit colors without competing for attention.


Lots of red hearts to key off the balloons on this one. I used the bear color for the accent strip and a strip of blue self-stick ribbon to echo the stripe in the outfit. Three blue rhinestones finish it off.


These cards will go to Operation Write Home to be used as 'Love', Valentines' or 'Kids' cards.

Ddd 


Posted by studio3d@ccgmail.net at 12:01 AM PST
Thursday, 21 November 2013
Around The Neighborhood
Topic: Quilting

Warning: Today's blog entry is a L-O-O-O-N-N-N-G-G-G one. Really Long!

For quite some time I have wanted to make a quilt with a birdhouse theme. I searched on the internet and in books and magazines trying to find a pattern I liked but nothing just suited what I had in mind. 

Then I found a pattern that I thought could be adapted to my own vision and I set about doing it.


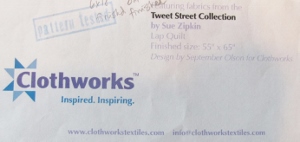
This free pattern I started with is from www.clothworkstextiles.com and is called Tweet Street. It uses their Tweet Street Collection of fabrics.


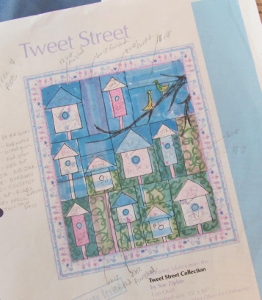
This picture of the pattern instructions shows how I had already started sketching in changes.


Then I went back to the colored version and inked in the changes and colored them.


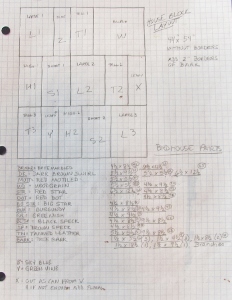
I needed to see how these changes could be accomplished with the actual block sizes since I was adding several birdhouses to replace those banded solid blocks. So I redrew each of the birdhouse sizes to scale on graph paper.

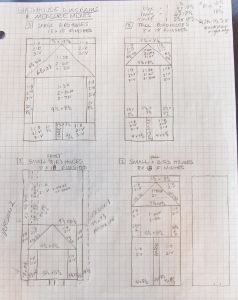
There are two versions of the medium sized house (at the borrom) as some would be set at the top of their block and some at the bottom. Then I photocopied the page to have enough of each birdhouse block. There are three large, three tall, two top medium and two bottom medium.

These were pieced together on another sheet of graph paper and colored in the new scheme. The individual pieces of each block got cutting size notations.


I assigned letter codes to each of the blocks on the map and used this along with the color map and piece notations to list out what fabric and cut size for every piece of the houses would be. Since I was working entirely from scraps it was important to measure and list everything before doing any cutting. I kept the houses in the browns and dark reds so they would stand out from the background. All of the posts were to be of a 'bark' print.

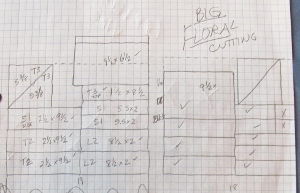
I then used the color plan to list out the sizes of every background patch that was needed from sky, floral and bushes materials and where they would be used.


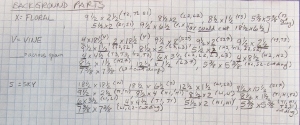
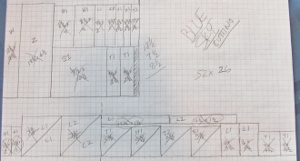
The background fabrics were also scraps so I made diagrams of the fabric I had and did a cutting chart of all the pieces. This is the cutting diagram for the bushes: (this one was complicated by the fact that the fabric was directional!)

This is the cutting diagram for the floral:


And this is the diagram for cutting the pieces for the sky:

And then I cut all those pieces.....

And then I pieced all the birdhouse blocks...

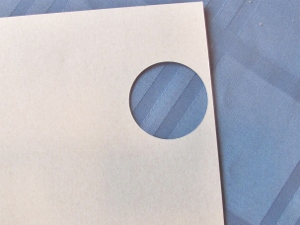
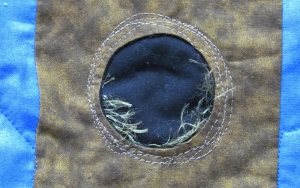
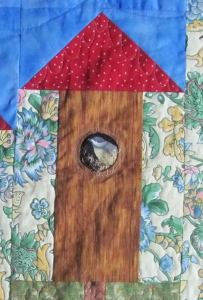
I decided that I wanted the holes in the houses to really be holes so I first created a cardboard template of a 2 inch circle. 


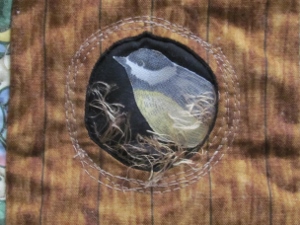
This was traced in white on black fabric which was then pinned on the center of a birdhouse. I stitched on the white line, trimmed out the center, clipped the seams and turned this black 'facing' to the inside. COOL! 

On the back I laid Steam-A-Seam2 around the edge of the hole and added some eyelash yarn. Another piece of black fabric went over this and it was steam-pressed together. The last step was to free-motion stitch wonky circles around the holes to add definition and hold the facing in place. I went around three times and a fourth round would be added as part of the quilting.

As soon as I got one done a friend in my quilting group gifted me with some scraps of fabric she was using that had birds printed on it. They were exactly the right size to fussy cut and fuse to the black backing before putting it behind the hole. So 8 of the 10 birdhouses have someone 'at home'.


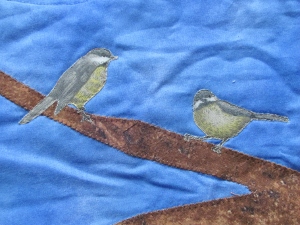
Two of the houses are empty

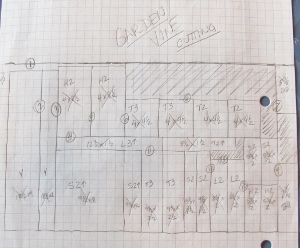
The quilt was then pieced. It contains three houses in the large size:


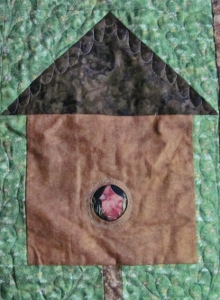
Four in the medium size:


And three in the tall size:


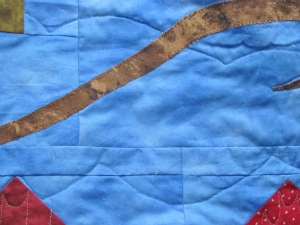
Before attaching the borders, I created some free-form tree branches of 'bark' print fabric and attached them with Steam-A-Seam2. Then I used a blanket stitch to applique the edges.


I placed the two birds from the empty houses in a tree branch.


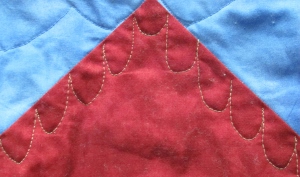
The quilting was done by area. I already mentioned the holes getting one more round of stitching. The roof lines got a row of scalloped trim.


The sky was quilted with large clouds.


The floral were quilted with free-motion outlining:


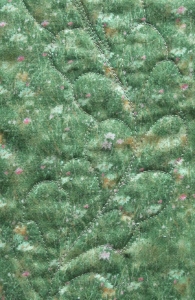
And the bushes were quilted with 'feathers'. These are the first feathers I have ever done!


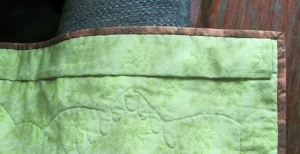
When I got to this point I decided I wanted the recipient to have the option of using the quilt for a throw or a wall hanging so I added a sleeve.


With all THAT being said (and shown), are you ready for the big reveal?

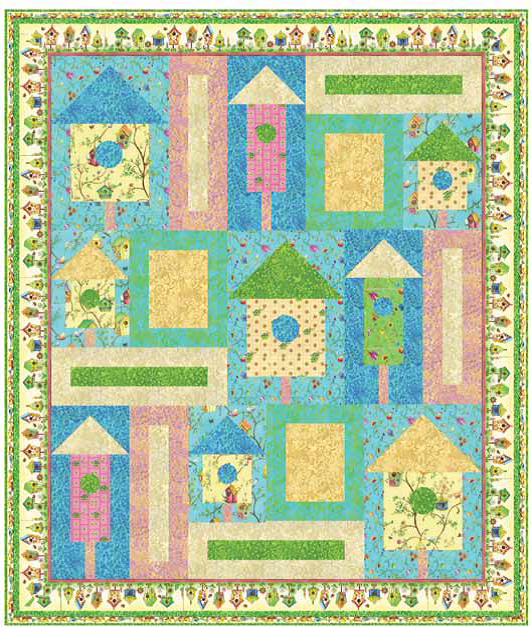
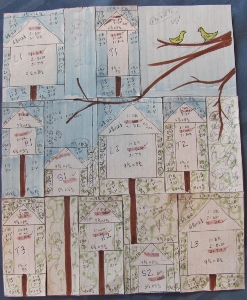
First, a reminder of the original pattern:


And here is MY version:


The finished size is 48 x 58 inches.

Ddd


Posted by studio3d@ccgmail.net at 12:01 AM PST
Wednesday, 20 November 2013
Blocky The Snowman
Topic: Coloring

This free digital image is self-contained in that the frame is part of the image file. I colored the frame in red, the sky in blue - using care to NOT color the snowflakes, the trees in green, and the scarf, hat and nose in traditional colors. The image was then trimmed close to the border.


I used a red, busy print for the background since the image was so simple. The image was backed with dark blue with rounded corners. Finally, I tied a length of dark green ribbon around the base.

Ddd


Posted by studio3d@ccgmail.net at 12:01 AM PST
Tuesday, 19 November 2013
I Believe This Is Yours
Topic: Coloring

A couple of the free digitials I downloaded were winter images. Love little snowmen!

This image has a snowman whose hat got blown away. Fortunately ther is a helping hand available.

I used blue marker and a bit of light gray for shading on all the snowy elements. The man's overcoat was made into a plaid with markers, striping first one way then the other.

I bordered the image in burgundy to match the neckscarf and added a plaid background paper to echo the overcoat.


The greeting is a combination of a clear sticker and a foil sticker.

Ddd


Posted by studio3d@ccgmail.net at 12:01 AM PST
Monday, 18 November 2013
These Roses Are Only Sew-Sew
Topic: Coloring

More of the free digitals I downloaded for coloring. These roses and leaves come as separate images so they can be colored, cut and mounted individually.

I started with two tones of red-violet for the rose and two grassy greens. I used a red-violet for bordering the card covered with two green patterned papers. The leaf tips and whole rose are on foam tape. Leaf bases are flat to the card face.


This one is brighter than the camera depicts. The rose is two-toned purple, the leaves are yellow-green, the backing paper is olive and the wood strip is NOT purple as it appears but a soft milk-chocolate brown.


Green is the bordering for this card tomatch the leaves. I chose the rosebud print to go with the yellow rose and accented with some old striped paper in bright colors.


Larger cream-colored roses on the backing paper echo the orange feature piece. The greens on the leaves are darker so I went with a dark blue accent strip. 

Cream color for the bordering echoes the rose-print paper.

Ddd 


Posted by studio3d@ccgmail.net at 12:01 AM PST
Sunday, 17 November 2013
Little Papa Bird
Topic: Coloring

Today's cards are companions to yesterday's. This time I colored them up with the big bird as Papa.

The first uses background papers in yellow and pink patterns and bordering in blue.


I used pink bordering and background paper for this one along with a yellow patterned paper strip.


This background paper has a very subtle watercolor effect and I added a light pink lacy print strip. Bordering in pink again.

Digitals are a good way of having an image available in the size you need it. I resized these to get exactly the proportions I wanted on the card.

Ddd


Posted by studio3d@ccgmail.net at 12:01 AM PST
Saturday, 16 November 2013
Little Mama Bird
Topic: Coloring

I recently got a link to a site with digital images. They had several that were freebies so I scooped them up and printed multiples to color with alcohol markers.

The first was this little bird pair. I colored three of them up like the big birds are the Mama. On the first one I used blue as the bordering color and a light patterned background. I added a strip of coral patterned paper and popped the image panel up on foam tape.


For the second one I reversed the papers and then bordered the image panel with yellow to pick up color from the flowers.


For the last one I replaced the strip of paper with two lengths of sticky-backed ribbon in blue.


I went for a very simple coloring on these, without any shading.

Ddd


Posted by studio3d@ccgmail.net at 12:01 AM PST
Friday, 15 November 2013
On The Drift
Topic: Die Cuts

I know it is early to be talking about SNOW but I had an idea for a Christmas card that required the white stuff. This is a multi-step, multi technique project AND an experiment so...

First, I used an oval shaped dry embossing frame in the Cuttlebug to cut some snowflakes on the edge while leaving two legs of each attached to the oval. Then I used a craft knife to cut the rest of the oval away.

The next step was to use the oval shape from the center of the frame to spot-emboss a snowflake folder onto the oval portion of the shaped piece. I then used the whole folder to emboss a background piece.

The shaped piece was mounted on the background with foam tape so all the snowflakes stand away from the card face. I used a Martha Stewart punch to make another large snowflake and mounted that on top of the oval with foam tape.


I applied a clear text sticker to the upper right and burnished it to flatten the embossing under it. The whole piece was then mounted to a white base card which creates a frame around the edges. Here you can see the oval line a little better.


The last step was to use a Sakura Stardust pen in silver to trace lines on all the diecut/punched snowflakes and the smallest embossed ones in the backgrounds.


All in all I think I like it. I was trying to find a style to mass-produce for Christmas this year. This may be more than I want to do over and over... and over... and over.

We'll see as time progresses.

Ddd


Posted by studio3d@ccgmail.net at 12:01 AM PST
Thursday, 14 November 2013
The Seed Of a Great Idea
Topic: How Does Your Garden Grow?

This first year growing sunflowers was a reasonable success. Out of the 10 seeds I planted there were 7 that germinated and all rose to great heights.

The tallest plant reached exactly 12 feet tall and got the largest, and latest, head on it. We left the plants to mature as much as they would while still on the stalks but an extremely heavy rainfall in early October began to topple the plants.

We still let them dry on the stalks until late October when we chopped off their heads and put the stalks on the burn pile. The largest stalk was about 3" across at the base and the largest head was over 12 inches.

We put two of the heads on the deck to see if the squirrels would eat them from there but nobody touched them. So we moved all 7 heads to the tree that the squirrel feeder is in. The biggest head is actually in the tree sitting atop the feeder. 

Apparently this is the yummiest one!


The other 6 are arranged around the base of the tree and are getting some attention of their own. Squirrels and birds of all types have been picking at them. The most activity they get is when the one up high is 'occupied' and a second or third squirrel wants a snack too.

Nobody at home at the moment.


I just grew these for entertainment: in watching them grow, in seeing how large they would get, in watching the squirrels eat them. I guess this experiment was a success.

Ddd


Posted by studio3d@ccgmail.net at 12:01 AM PST
Wednesday, 13 November 2013
Med Beads
Topic: Beads

While I had the jewelry findings out on my work table I grabbed the bins of beads and put together more stretchy bands to attach to a medical bracelet.

Some are similar to ones I have made before (working from the same stash) but will go to different wearers so it is not a problem.

I made 10 of them and they are all 5.5 inches in the beaded part. Because of cropping some of the beads appear here larger or smaller than actual size.

Rose and Pink


Amber, Green and Beige


Cobalt Blue and Silver


Black and Gray


Lavender in Two Finishes


Rose


Wooden


Amber and Ivory


Letter Beads and Black Faceted


Agate and Tiger Eye


A whole wardrobe of beaded bliss.

Ddd


Posted by studio3d@ccgmail.net at 12:01 AM PST
Tuesday, 12 November 2013
Stitching Up A Bracelet
Topic: Jewelry

I ran across the most darling charms at the fabric store and bought several that carried the theme of quilting. A link bracelet was available, too, and every one of the charms came with a snap-link to attach it with.

I put this together as a gift in about 15 minutes.


I had the pink heart stone charm already on hand and added that to the dangle to say "I love quilting" when combined with the charm of the quilt block.

Very reasonable pricing on all the parts, too.

Ddd


Posted by studio3d@ccgmail.net at 12:01 AM PST
Monday, 11 November 2013
Birdhouse of Love
Topic: Coloring

This is the last in the project of stamping images on fancy diecuts and coloring them with the custom palette for the Cosmo Cricket Tea For Two kit.

The image of two lovebirds in front of their house sent me right to the red paper covered with hearts. There was not enough definition behind the bracket portion of the diecut when placed on the patterned paper so I added a diecut panel of pink. The center is popped up on foam tape and I tacked the edges down with red heart brads.


Borderin of blue to pick up the sky in the image is continued around the stamped pink sentiment panel. The pink was choses to match the pink flowers in the stamped image.

So... what's next?

Ddd


Posted by studio3d@ccgmail.net at 12:01 AM PST
Sunday, 10 November 2013
Family Time
Topic: Coloring

When I colored up this image I was thinking 'fall' but the first person who looked at it immediately thought of 'genealogy'. So I changed the focus of the card to a family tree and took the project in a different direction than I had initially intended.

I used blue bordering papers to go with the sky in the image. Green backing papers coordinate with the letter stickers I pulled from the Tea For Two kit.


I stamped the top phrase using separate word stamps from a set. Each of the letter stickers got a bottom and right side line drawn in to create a drop shadow.

The image panel and its border are popped up on foam tape.

Ddd


Posted by studio3d@ccgmail.net at 12:01 AM PST
Saturday, 9 November 2013
Roses For You
Topic: Coloring

Back to stamping and coloring images on fancy diecuts... For today's card I stamped the simple rose and colored it up in yellows from the custom palette. One of the papers in the Tea for Two kit is covered with tiny yellow rosebuds so that was a natural background choice.

I used bright yellow for bordering and accented with a green strip from the kit.


Grey dots around the image mimic some in the backing paper and I used two stickers from the kit for the sentiment. Green rhinestones anchor the sentiment.

Ddd


Posted by studio3d@ccgmail.net at 12:01 AM PST

Newer | Latest | Older