« March 2014 »
S M T W T F S
1
2 3 4 5 6 7 8
9 10 11 12 13 14 15
16 17 18 19 20 21 22
23 24 25 26 27 28 29
30 31
You are not logged in. Log in
Entries by Topic
All topics  «
3D paperwork
A - Z challenge 5
A - Z challenge 7
A - Z challenge round 4
A to Z challenge round 3
A to Z round 2
A to Z round 6
A-Z round 1
Around the House
Art Challenges
Artist Trading Cards
Backgrounds
Beads
Bible Journaling
Books
Boxes
Collage
Color Challenge
Coloring
cookbook
Die Cuts
Digital Projects
Digital Stamps
Drawing
Dry Embossing
Fabric Stuff
Fantastic Folds
Field Trip
Home Decor
How Does Your Garden Grow?
Hymnal Art
In The Kitchen
In the studio
Jewelry
Lettering
Links
Multi-Technique
Music to Work By
Musings
Nail Art
New Work
Online Class
Other Hobbies
Other Projects
Painting
Paper Embroidery
Paper Piecing
Photo
Pretty Paper
Quilting
Random
reading
Scrap Recovery
scrapbooking
Sewing
Sketch Challenge
Some Backlog
Stamping
Stencils
Stickers
Supplies
Teabag Folding
Techniques
Testing
tips and tricks
Tutorial
Web resources
Welcome to my Blog
Work By My Friends
workflow
Writing
Blog Tools
Edit your Blog
Build a Blog
RSS Feed
View Profile
Group One
In & Out of Studio 3D
Saturday, 15 March 2014
A Layered Birdhouse
Topic: Stencils

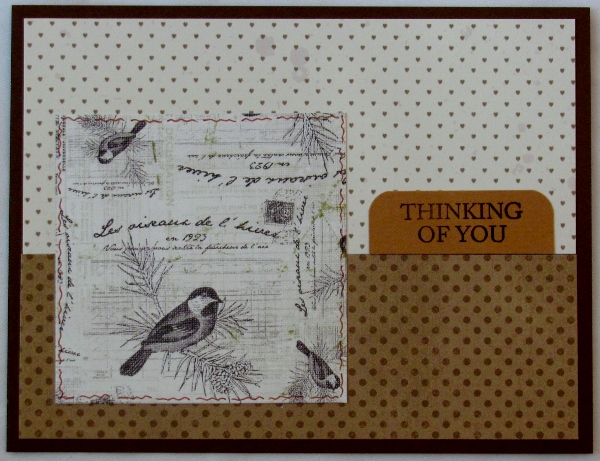
For a February swap we were to make a card using birds or birdhouses. I immediately thought of the stencil I have of birdcages hanging in a tree.

I only wanted one birdcage so I blocked out all the others with removeable tape. I used daubers and Distress Ink to color the open areas of the stencil: green for the leaves, brown for the branches, teal for the birds and grey for the birdcage.

Then I removed this stencil and replaced it with a chevron stencil. This time I used glimmer sprays in blue and pink to spritz the card. This required a heat gun drying step.

I followed this by running the piece through the Cuttlebug with the script folder. Then I used a foam pad to sponge on some Distress Ink in old paper to the raised portions except inside the birdcage.

Then I trimmed down the panel and mounted it on teal and brown cardstock.

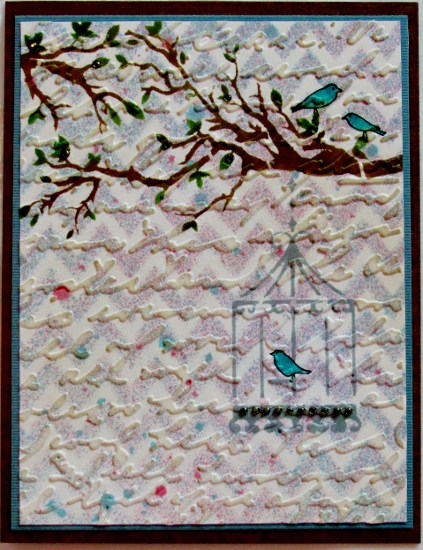
I added a string of rhinestones across the base of the birdhouse and some matching individual ones at the base of some of the leaves.

This came out precisely as I envisioned it. How often does THAT happen?

Ddd


Posted by studio3d@ccgmail.net at 12:01 AM PDT
Friday, 14 March 2014
Jazzy Cupcake
Topic: Paper Embroidery

Have you been keeping count? This is paper embroidery number 11 from the vacation series.

On assignment to make a birthday card for our stash, I chose the cupcake by Darsie Burno. I pricked it out on red swirly paper and stitched in bright threads.


Backing with red chevrons adds to the jazzy feel of this card. Hard NOT to get excited by this.

Ddd


Posted by studio3d@ccgmail.net at 12:01 AM PDT
Thursday, 13 March 2014
Sitting Pretty
Topic: Paper Embroidery

What a combo! I selected the bunny from a pattern that had several images around the borders and then decided to place him on cardstock with a corner of flowers. Now it looks like he just emerged from the garden hedge.

I chose an unconventional teal for the figure to make him an Easter Bunny and bordered with more teal - a little darker.


I found that Distress Ink in Peacock was a perfect match and used that to stamp the greeting.

Ddd


Posted by studio3d@ccgmail.net at 12:01 AM PDT
Wednesday, 12 March 2014
Twisted Tree
Topic: Paper Embroidery

Lots of thread - little time. That is the definition of this Christmas tree stitching. I think more time was used to keep threading the needle than in actual stitching.

I used the snowflake and text paper for a background on this one and layered it over some tan chevrons.

Rhinestones, placed between the stitching lines, turn this potted pine into a real Christmas tree.

Ddd


Posted by studio3d@ccgmail.net at 12:01 AM PDT
Tuesday, 11 March 2014
Hexies for the Holidays
Topic: Paper Embroidery

I don't like hexagons! Don't know why, either. They just rub me the wrong way. Octogons - OK; triangles - So-so; squares - oh yes! Hexagons - take them away please! LOL!

Anyway - I had a pattern for a cross make up of 'snow crystals' and I wanted to just use the flakes independently. Because of their six-sided nature I decided to actually use a hexagon background (it came in a 6x6 pad I bought). I pricked out three of the flakes and nine of the little centers to stitch. 

Now, you can't tell it from the photo but the flakes are stitched with navy blue AND royal purple.

No reason why I backed it with dark teal other than it looked good with the yellow and pink background.

I added a blue rhinestone to each of the large flakes.

Ddd


Posted by studio3d@ccgmail.net at 12:01 AM PDT
Monday, 10 March 2014
Spring Venus
Topic: Paper Embroidery

On assignment to make a 'spring' card I hacked a couple of patterns and combined into one.

The seated woman is from a breast cancer pattern. The flowers are from another free pattern but I've cut it into so many bits and rearranged them that I don't have a record of whose pattern it is.

I used verigated thread for the flowers and vines and selected solid colors for the woman, butterfly and leaves.

I don't make many square cards because they cost more to mail, but this pattern really looked best when cut that way. I added backing of a field of flowers all in muted tones that are found in the feature.

Ddd


Posted by studio3d@ccgmail.net at 12:01 AM PST
Sunday, 9 March 2014
Playing Cricket
Topic: Paper Embroidery

Assignment: Insects

Other than butterflies and dragonflies I don't have 'insect' patterns. Oh, wait! There is that really lame lady bug... Well in one of the books I own I came up with this cricket. 

I pricked it out at home and photocopied the instructions with the colors. However, I didn't take the photo of the finished product so I had to guess at the stitching of the back legs. I don't hang around looking at crickets either, so either they are right or wrong - but they're done!


Not my favorite pattern - kind of creepy!

I bordered to match the leaves and then backed with a triple honeycomb print.

Ddd


Posted by studio3d@ccgmail.net at 12:01 AM PST
Saturday, 8 March 2014
Beddy Teddy
Topic: Paper Embroidery

For a swap the assignment was 'teddy bear'. I only have one pattern for a bear and it was for a baby card with a bear sleeping on a cloud. I'm not sure WHY the bear was on a cloud but I only pricked out enough of those lines (and added a couple) to turn the cloud into a blanket.

The blanket was stitched in light teal and the bear in light brown (with little pink ears).


Bordeering with teal and backing with a brown chevron ( which says "Zzzz" to me ) was the finishing for this.

Ddd 


Posted by studio3d@ccgmail.net at 12:01 AM PST
Friday, 7 March 2014
Shimmering Thanks
Topic: Paper Embroidery

A group's swap assignment was to make a paper embroidery thank you card. I decided to stitcch just the frame for a sentiment.

The cardstock is a large swirl (cut down from 12x12) with a shimmer finish. I did all the stitching in silver metallic thread, trimmed and backed it with a mint green card base.


I used a 'Dazzles' brand peel-off sticker in silver for the sentiment.

Ddd


Posted by studio3d@ccgmail.net at 12:01 AM PST
Thursday, 6 March 2014
Five Tree Forest
Topic: Paper Embroidery

For my second card of the Christmas stash-builders I selected a pattern of a forest of trees. I pricked it out on a green holly paper and stitched using three shades of green thread. The star uses golden yellow thread.

I framed it top and bottom with a red chevron.


I decided it needed more to define it as Christmas so I added red rhinestones all over the center tree.

Ddd


Posted by studio3d@ccgmail.net at 12:01 AM PST
Wednesday, 5 March 2014
Baubling Along
Topic: Paper Embroidery

For the February Christmas card stash-builder challenge I chose a free pattern with words and baubles. I used a background ovf words and snowflakes and stitched with metallic threads.

This really comes together quickly.

I used a border of shimmer red cardstock to go with the thread choice.

Ddd


Posted by studio3d@ccgmail.net at 12:01 AM PST
Tuesday, 4 March 2014
A Stitch of Sympathy
Topic: Paper Embroidery

I had a recent vacation with a LOT of time to sit and stitch for cards. In a week's time I had 11 images stitched and then did a marathon session when I got home to turn them all into cards. NO, you don't get to see them all today - you have to take 11 days to see them.

First up was an assignment on two lists to make a sympathy card. One was for a challenge in February and the other for a swap in September. So I shared this for the challenge and will set it aside for the later swap - getting double duty.

I really liked the background paper pulled from a recently purchased 6x6 pad. The radiating design sets off this cross perfectly. I pricked out the bordering elements on the cross, leaving the centers blank to give it a more restful feeling. This was then stitched in burgundy thread.

I used similar colored papers for layering and bordering.


I added a silver peel-off sentiment for the finishing touch.

Ddd


Posted by studio3d@ccgmail.net at 12:01 AM PST
Monday, 3 March 2014
Operation Write Home sketch 40
Topic: Sketch Challenge

Another milestone - we're 40 sketches into this personal challenge! Here's OWH sketch 40:


I worked from the scrap envelopes again and, because of where the bird appeared on my feature block, I flipped the sketch right to left.

The feature blended in too much to the top paper so I bordered it with some brown doodle lines.


I added a sentiment tab with rounded corners to fill space on the right and balance the layout better.

Ddd


Posted by studio3d@ccgmail.net at 12:01 AM PST
Sunday, 2 March 2014
Operation Write Home sketch 39
Topic: Sketch Challenge

BLAST FROM THE PAST!

Today we're up to another sketch that I already have used in the past; OWH sketch 39:

In fact, this is one that Club Scrap created a cutting diagram for that allows for one big cutting session that provides all the parts for mixing and matching to make multiple cards from the same materials.

So, back in 2012 I made a slew of these from September 23 to 29. http://www.mystudio3d.com/blog/index.blog/2283775/owh-and-club-scrap-cutup/

I got bored and started using the parts in different configurations, too. The one that most represents the sketch is this one:

Wow! I still have some of that pink dot paper in my scraps and have used it very recently, too.

Ddd


Posted by studio3d@ccgmail.net at 12:01 AM PST
Saturday, 1 March 2014
Operation Write Home sketch 38
Topic: Sketch Challenge

This card was a happy accident! I worked from OWH sketch 38:


In the scrap envelope I had the coral plus the blue and floral strips which I cut to sie. Then I went looking for a good background in the stash and chose the pink plaid. I decided on the blue card base to repeat the blue in the strips and cut the background down to show that blue as a border.

OK, now. What to put in the middle? Oooooh, this floral sticker would be perfect if it was not so pinky-pink and went vertical instead of horizontal.

Ha! I turned the sketch on its side and solved one problem. Then I chose a couple of alcohol ink markers and re-colored the flower to give it more of a coral hue.


You'd never know it wasn't planned this way from the beginning!

Ddd


Posted by studio3d@ccgmail.net at 12:01 AM PST
Friday, 28 February 2014
Operation Write Home sketch 37
Topic: Sketch Challenge

I'm beginning to feel like a broken record... "and here's sketch #..."

Just so you know, I don't sit down and do one of these cards every day. Instead, I will work on 4 (or 8) at a sitting. Four sketches are printed per page in the OWH sketch pdf and that is what I have in my notebook to work from. I pull out a page, make up those 4 sketches (sometimes including multiples), put the page back and pull the next one. I do spread them out for posting, though, as you've noticed. 

Anyway, today we're looking at OWH sketch 37

The scrap envelope included the floral and the postal strip. I went to new stock for the dotted background, choosing a shabby look to go with the vintage-look pieces. Then I snitched the embossed stock from another envelope.

That embossed piece was too creamy so I used some Spun Sugar Distress Ink sponged over it.

I added a sentiment strip that was not in the sketch.

Ddd


Posted by studio3d@ccgmail.net at 12:01 AM PST
Thursday, 27 February 2014
Operation Write Home sketch 36
Topic: Sketch Challenge

Sometimes it is so simple! Here is OWH Sketch 36:

In my scrap envelope I had included everything you see here! It was just a matter of cutting the parts to the specified sizes, adding some details, and assembling. Easy Peasy!

I stamped a sentiment onto one piece of the soft blue and used a large circle punch on it. The white embossed dots paper got part of those dots colored with an alcohol ink marker, and I drew doodle lines around the edge of the background to echo black from the stamped sentiment.

The tiny embossed butterflies got bodies added on top and both the circle and the butterflies are mounted 3D.

Ddd 


Posted by studio3d@ccgmail.net at 12:01 AM PST
Wednesday, 26 February 2014
Operation Write Home sketch 35
Topic: Sketch Challenge

Sketch as a foundation... OWH sketch 35 is a good one to use this way.

The blue and the coral strips were from the scrap envelope and I added the yellow background and bordering. The pieces were cut according to the sketch dimensions.

So that made a good BASE but it was far from a finished card! I went through my sticker stash and came up with a set of three flowers. I took the stemm from another one and created a cluster of blooms and buds.


I used a warm gray alcohol pen to create a shadow to separate the flowers from the background and from one another. Then I added a gold peel-off sentiment to the center bloom.

Ddd


Posted by studio3d@ccgmail.net at 12:01 AM PST
Tuesday, 25 February 2014
Operation Write Home sketch 34
Topic: Sketch Challenge

There's some confusion over on the OWH site on what sketch 34 really is. The individually listed ones have one picture and the collective pdf file has another. I decided to just pick one and go with it. Here is the sketch I chose:

I'm still working out of the envelopes of sorted scraps (that's why these are starting to look a lot the same) and here is what I came up with:

I added the striped background from a 6x6 pad and used a lot of bordering. The framed sentiment is not in the sketch but looks good there, don't you think?

Ddd


Posted by studio3d@ccgmail.net at 12:01 AM PST
Monday, 24 February 2014
Operation Write Home sketch 33
Topic: Sketch Challenge

Forced compliance... when you take two papers that really have nothing in common and force them to work together. This is the story of OWH sketch 33:

I started in the scrap bin envelopes with the red patterned paper and the slightly violet script paper. Nothing in common whatsoever. they are different in color, in style, in value, everything!

So I introduced yet another color with a vibrant background cardstock, keeping it un-patterned to provide 'white space'. I layered up the two feature papers even though the central piece was not as large as the sketch.

Needing something to provide focus, I punched a sentiment on gray paper with a round punch and then used Distress Ink in Milled Lavender to bring the color into the same color family as the script paper. A lavender ribbon trapped underneath reinforces this.

I used faux stitching on the backbround and the punched circle to tie these elements together.

Ddd


Posted by studio3d@ccgmail.net at 12:01 AM PST

Newer | Latest | Older