« May 2014 »
S M T W T F S
1 2 3
4 5 6 7 8 9 10
11 12 13 14 15 16 17
18 19 20 21 22 23 24
25 26 27 28 29 30 31
You are not logged in. Log in
Entries by Topic
All topics  «
3D paperwork
A - Z challenge 5
A - Z challenge 7
A - Z challenge round 4
A to Z challenge round 3
A to Z round 2
A to Z round 6
A-Z round 1
Around the House
Art Challenges
Artist Trading Cards
Backgrounds
Beads
Bible Journaling
Books
Boxes
Collage
Color Challenge
Coloring
cookbook
Die Cuts
Digital Projects
Digital Stamps
Drawing
Dry Embossing
Fabric Stuff
Fantastic Folds
Field Trip
Home Decor
How Does Your Garden Grow?
Hymnal Art
In The Kitchen
In the studio
Jewelry
Lettering
Links
Multi-Technique
Music to Work By
Musings
Nail Art
New Work
Online Class
Other Hobbies
Other Projects
Painting
Paper Embroidery
Paper Piecing
Photo
Pretty Paper
Quilting
Random
reading
Scrap Recovery
scrapbooking
Sewing
Sketch Challenge
Some Backlog
Stamping
Stencils
Stickers
Supplies
Teabag Folding
Techniques
Testing
tips and tricks
Tutorial
Web resources
Welcome to my Blog
Work By My Friends
workflow
Writing
Blog Tools
Edit your Blog
Build a Blog
RSS Feed
View Profile
Group One
In & Out of Studio 3D
Sunday, 25 May 2014
Operation Write Home - sketch 62
Topic: Sketch Challenge

Hey, I'm back with more OWH sketches - working my way through from beginning to end. Today we are up to sketch 62:

I wanted this to be a 'manly' card so I started with papers with woodgrain on them. The background is printed like boards and the frame is just stained wood. I pulled out a paper with a mesh print on it and stamped a star sketch stamp from a new set I bought.

I colored the star with Distress markers then roughed up the panel edges and used Distress ink pad to darken them. 

Three star brads were mounted in place of the single element on the sketch and the panel was popped up on foam tape.

I used a lattice strip across the card bottom and stamped with a sentiment.

I used the same two Distress markers to color in the stars in the sentiment.

Ddd


Posted by studio3d@ccgmail.net at 12:01 AM PDT
Saturday, 24 May 2014
Pinwheel Parade
Topic: Quilting

On the Missouri Star Quilt Company's video tutorials I found one for what they have called disappearing pinwheels - churndash version: (http://www.youtube.com/watch?v=zZUXNMpKF74)

This fascinating construction starts out by facing two contrasting squares together (I used 11 inch) and stitching around all 4 sides with a 1/4 inch seam. Then the blocks are cut on both diagonals and opened up to reveal 4 matching half-square triangles. These are then placed together to form a pinwheel and stitched into a single block. 

I made these pinwheels with six each of red/white and blue/white fabric combinations. Each red and each blue were different fabrics from my stash.

All of the pinwheels got trimmed to 12.75 inches and then were cut into 9-patches of 4.25 inches. I rotated the corner blocks and the side blocks so all the color faced the pinwheel and then swapped the pinwheel centers to the opposite color of block. I then swapped the reds from block to block to make then scrappy and repeated the process with the blue ones. These were all assembled back into churndashes with contrasting pinwheel centers.

I cut strips to frammed the blocks with one-inch of contrasting color and assembled my quilt top with 1/2 inch white sashing. A white border wraps it all up.

The most challenging element of this construction is that, after that initial cut, every seam is on the bias until the block frames go on.

I quilted this in the ditch on the inside of the frames and on the 'tic-tac-toe' lines of the blocks.

Ddd


Posted by studio3d@ccgmail.net at 12:01 AM PDT
Friday, 23 May 2014
Hydrangea Nails
Topic: Nail Art

I needed a new manicure and decided I wanted to do something with sponging which gives a gradient effect. For this to work you need to have at least three related colors of polish. The only ones I had were blue and purple - by chance two shades of each.

The first step is to base coat and then apply the polish you want to be closest to the nail bed over the whole nail. Apply a second coat to the half nearest the cuticle. I chose my darker blue for these coats.

Then a makeup sponge is used to pat on the next color to 3/4 of the nail starting at the tip of the nail, blending as this color ends. This polish was my light blue.

Repeat this process to only half of the nail from the tip up with the next color. This was my light purple.

Finish with the fourth color on only the 1/4 of the nail at the tip. This was my dark purple. Then everything gets one to two coats of topcoat to smooth and seal the nails.

Here is a closeup of the thumb so you can see the way the blend works.


This color combination reminds me of hydrangea blooms which are my favorite flower.

This is a really easy treatment to accomplish - on both hands. Some manicures are hard to do on your dominant hand because of coordination/control issues. But this one only requires patting with the sponge and does not need precision.

Both the dark blue and dark purple are dollar store polishes while the light tones were coupon specials. What a beautiful effect for a bargain price!

Ddd


Posted by studio3d@ccgmail.net at 12:01 AM PDT
Thursday, 22 May 2014
New Residents or Tourists?
Topic: Around the House

We seem to have some new residents in our yard. For a few weeks, this pair of geese have been seen strolling about the back lawn, up the access road, and in the pasture.


Unlike the ducks who have also been frequenting the area, you can't tell who is the 'he' and who is the 'she' as one takes the lead for a while and then the other. Usually one is grazing while the other keeps a watch for danger and then they will switch off.

We assume they are nesting in here since they only appear as a pair and it is the right time of year for that sort of thing. 


We're hoping we'll get to see little goslings waddling around at some time and also hope these will become permanent residents and not just tourists passing through.

The duck pair do have at least three little black and yellow splotched ducklings. I was uable to get a photo of them but did manage to catch dad in a couple of shots.


Mom is there on the left but blends in too well to pick out.

UPDATE: Okay, a few hours after this post went live the mama duck broght out EIGHT babies and herded them up and down the road, right up to the edge of the back lawn.


Aren't they so cute?

Then we had the first visitors to the new birdfeeders we put out off the deck railing. I believe these are goldfinches and we had put thistle seed in the feeder to attract them.


What a lot of fun in our backyard this year!

Ddd


Posted by studio3d@ccgmail.net at 12:01 AM PDT
Updated: Thursday, 22 May 2014 8:26 AM PDT
Wednesday, 21 May 2014
Monkeyshines
Topic: Quilting

****This is the 50th quilt I have made since starting in September 2010****

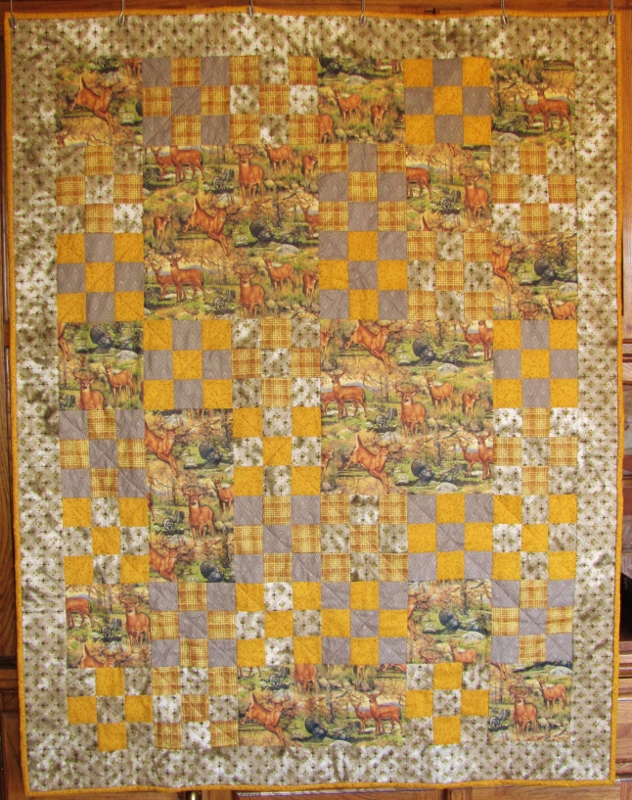
Project Linus is a charity that gives handmade blankets to children in need due to illness, catastrophe, trauma, etc., as a source of comfort. These can be knitted, crocheted, quilted or tied fleece and they cover all ages birth to age 18. I had read about it in one of Jennifer Chiaverinni's Elm Creek Quilters novels (The Giving Quilt) and then picked up a book at the library about the organization as well (Quilt it with love : the Project Linus story : 20+ quilt patterns and stories to warm your heart by Mary Balagna). This group immediately came to mind when I was gifted with THIS fabric:

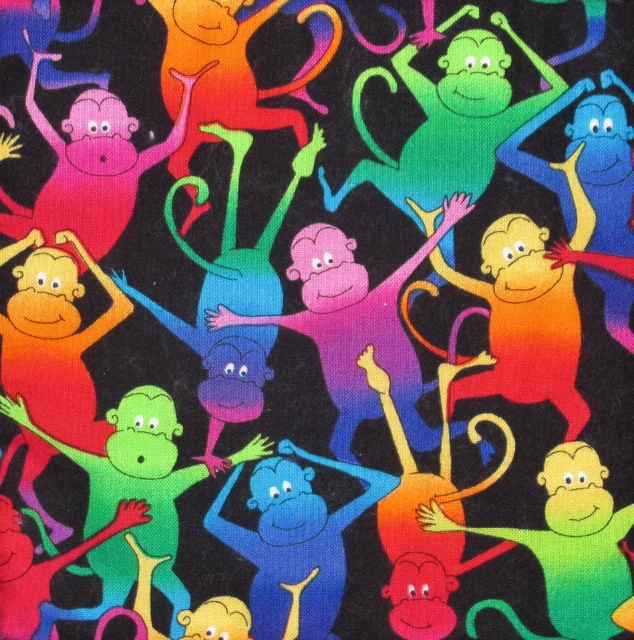
I mean, REALLY? That just screams to be a kid's quilt!

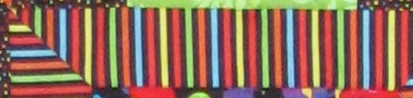
It did take me a long time to come up with an inspiration pattern and companion fabrics, though. The first thing I knew I wanted to do was contain those critters in a frame. I found the perfect stripe for this and knew that I wanted to miter the corners of the frame.

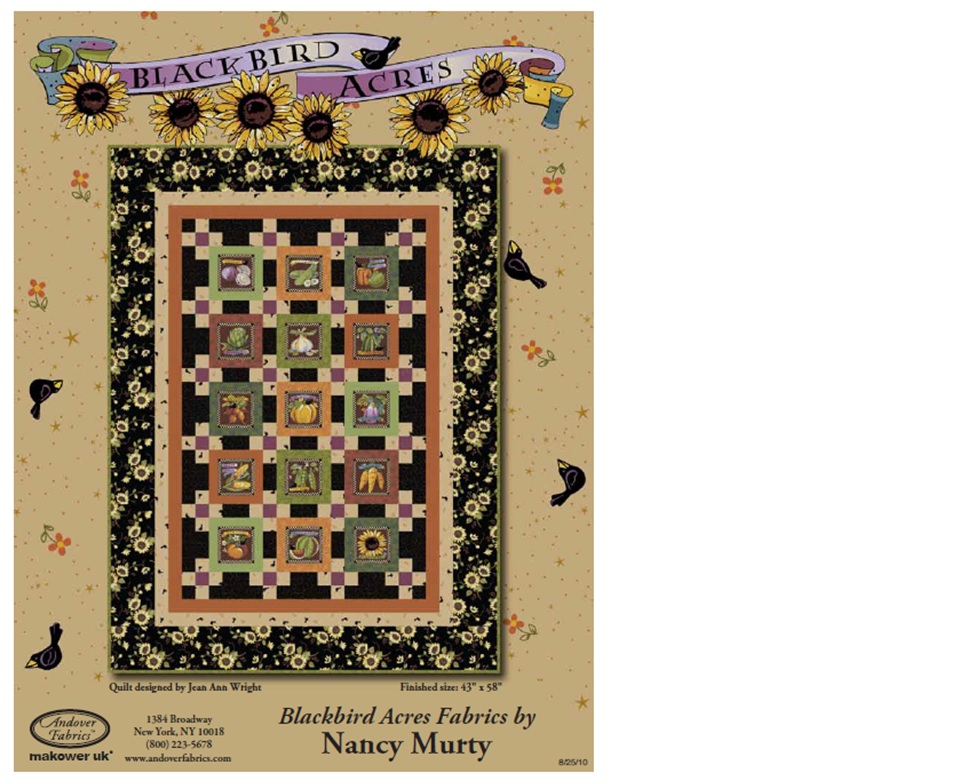
Then I ran across a pattern advertising a new line by Andover Fabrics called Blackbird Acres and knew I had my pattern:

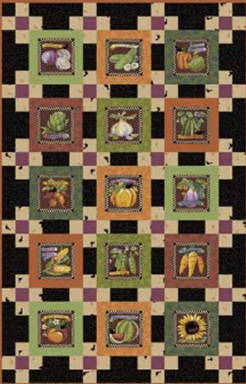
I whittled the layout down to just the center part with no borders and shortened it by one row:

Then I went to Electric Quilt 7 on my computer and re-drafted it to suit the sizes I wanted for the purple blocks because I had in mind to use some other already-cut scraps for those. Once I had it in EQ7 I worked on some color schemes and then it was off to buy fabrics.

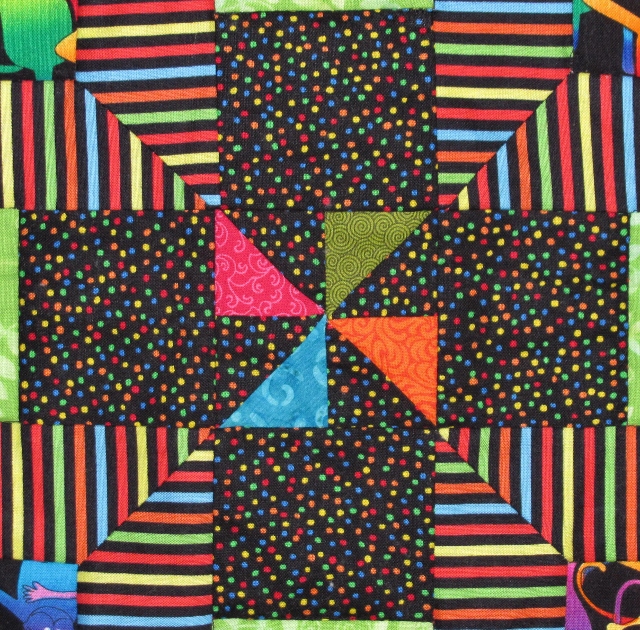
I started with some black with colored dots for what is white in the pattern and to use with the purple blocks to create this: (the pinwheel triangles were accidentally cut extra when I made the Four Friends quilt)


Then I needed something to carry the jungle theme while remaining cartoony but more as a support fabric so it wouldn't compete with the monkeys. I found the perfect green print:

So what is the final result?


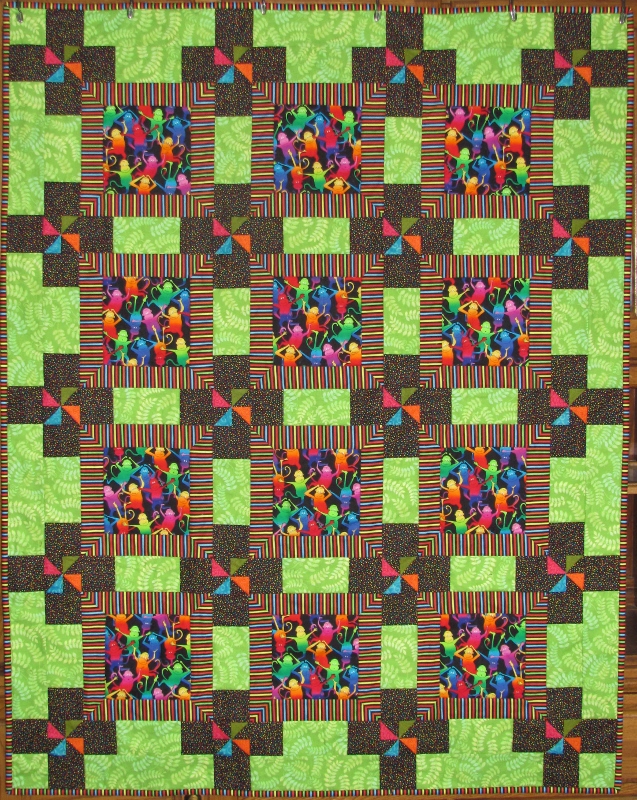
As you can see, I used the stripe for the binding. The back is red with monkey heads on it in an all-over pattern and multicolored dots in the background.

So there you have "Monkey Shines" my first quilt as a 'blanketeer' for Project Linus and my 50th quilt overall.

Ddd


Posted by studio3d@ccgmail.net at 12:01 AM PDT
Updated: Tuesday, 6 May 2014 2:42 PM PDT
Tuesday, 20 May 2014
Strippety Serendipity
Topic: Quilting

This large lap quilt is made in the style of 'jelly roll race' construction. The initial 6 strips were gifted from someone's binding leftovers. I used them as the color palette inspiration and selected more greens, pinks, creams and purples from my own scraps. After the main panel was done I pulled a striped fabric from my stash and it had the same colors but in darker tones. Serendipity!


The striped body is quilted with 'feathers'...


...and the borders are echo quilted around the birds and two large flowers.

This is the 24th quilt I've made for the hospital's Passages Quilt Project.

Ddd


Posted by studio3d@ccgmail.net at 12:01 AM PDT
Monday, 19 May 2014
Yes, Deer
Topic: Quilting

I had so much fun selecting fabrics and layout for the Silent Runners wolf quilt that I had another go at it with some fabric featuring deer. Because of the elusive nature of deer I wanted them to blend into their background more so selected fabrics that were closer in tone to one another and to the colors in the feature fabric. The deer are actually much smaller than the wolves so they blen in better by scale also.

I used the same layout for the quilt as for the wolves and did the same quilting - large X through every 9-patch and free-motion outline on all the deer. I made the 9-patch blocks with four fabrics rather than just three but mixed both oranges with both gray/green so they would  create more of a blend instead of patches of color.


The back of the quilt is cammoflage fabric which is in keeping with the hunting/nature theme.

This lap quilt will go to the Passages program at the local hospital.

Ddd


Posted by studio3d@ccgmail.net at 12:01 AM PDT
Sunday, 18 May 2014
Chewing Your Fingernails?
Topic: Nail Art

If your nails looked as refreshing as these, you might be tempted to have a little nibble! I saw an ad in a magazine, advertising nail polish in a 'pen' and showing various ways to use them for nail art. I liked the look of the watermelon slices and thought I'd give it a go with my regular nail polishes.

The layers/sequence: base coat, red (2 coats), white strip at tip, green strip at tip over most of the white, black dots, top coat, quick dry. The white and black have very fine tip brushes but the rest are all regular - in fact the red and green are from the dollar store.


I think I'm ready for a little taste of summer.

Ddd


Posted by studio3d@ccgmail.net at 12:01 AM PDT
Saturday, 17 May 2014
Tiptoe Through the Tulip Festival
Topic: Field Trip

After living here for 34 years we finally had a year when the weather, the festival and our schedules made a favorable conjunction that allowed us to go to the Wooden Shoe Tulip Festival in Woodburn, Oregon. It wasn't warm but we came prepared with jackets and the sun actually shined enough to stave off the worst of the wind. No rain, either, so we were not slogging through muddy paths.

So many beautiful colors of tulips, in various sizes and styles. A few beds were planted with mixed bulbs so they can be harvested and sold that way. But most are in separate beds by color and variety, making a stunning display across the landscape.

This working farm is primarily for propagating bulbs for mail-order sales. Opening for the public to ramble about is a profitable sideline.

Without too much comment, here are my favorite pictures from our tour.


I believe I'll go back again someday - hopefully, not another 34 years!

Ddd


Posted by studio3d@ccgmail.net at 12:01 AM PDT
Friday, 16 May 2014
Silent Runners
Topic: Quilting

At the Sew and Stitchery Expo in February I bought a short yardage of some running wolves and then added short yardages that I thought would complement it.I had in mind to use a layout I found in the book "Nine-Patch Pizazz".  A couple of people in my quilting group had used this book for neat quilts, too.


As  you can see below, all the 9-patches are quilted with an X and the wolves are all free-motion outlined. You also get a better look at the fabric selection and the mitered corners on the border.


This quilt is roughly 42x54 and will go to the hospital's Passages program.

Ddd


Posted by studio3d@ccgmail.net at 12:01 AM PDT
Thursday, 15 May 2014
You're Not Seeing Double
Topic: Quilting

At first glance you might think this is a repeat of the quilt I showed yesterday. However, I did warn you there that I had enough blocks to create two lap quilts - this is the 'other' one.

I changed the layout of the blocks so the four quadrants had diagonal lines of the small blocks radiating out from the center.

To quilt it I just stitched a center line down each of those diagonals.

I call this one "The More Things Change" as a nod to the book the block comes from (Loose Change) and the fact that I changed the layout.

This is quilt 21 for the Passages program at the hospital.

Ddd


Posted by studio3d@ccgmail.net at 12:01 AM PDT
Updated: Thursday, 17 April 2014 11:41 AM PDT
Wednesday, 14 May 2014
Raggedy Bows
Topic: Quilting

This is my 20th quilt for the hospital Passages program!

It was inspired by a video from the Missouri Star Quilt Company (http://www.youtube.com/watch?v=gyZu-j720nw) with a guest from Kansas Troubles. This was from their new book called Loose Change.

It uses one 'layer cake' and one 'charm pack' and takes advantage of the fact that these precuts have pinked edges. I used a marbled layer cake (10 inch squares) and a charm pack (5 inch squares) from Kansas Troubles called Sweet Pea.

The process is to center a charm on a contrasting layer cake with BOTH pieces right sides up. Then the edges of the charm are stitched down 1/8 inch from its edges. Then the pieces are cut through into quarters and arranged pleasingly. This created enough squares to make two lap quilts. I added a border of yardage from Kansas Troubles.

On this quilt I arranged the squares so the little surface blocks formed bows.

For the quilting I did free-motion double loops inside the bows.

I used the border material to create the binding.

Ddd


Posted by studio3d@ccgmail.net at 12:01 AM PDT
Tuesday, 13 May 2014
Dance Music
Topic: Paper Embroidery

In an alphabetical paper embroidery swap we're up to the letter D and the assignment was "D is for Dance".

I had the pattern for my ballet dancer and pricked it out on an embossed cardstock with a colored background. I used only a taupe for the skin and hair and pink for the dress.

I selected a kraft cardstock and diecut a frame. This was run through the Cuttlebug with a music score folder and I used some Distress Ink to color up the raised areas and popped the whole frame up on foam tape.

As a last step I used a paint brush to apply taupe and pink Liquid Pearls to the dancer.


The text is a puffy acrylic sticker.

Ddd


Posted by studio3d@ccgmail.net at 12:01 AM PDT
Monday, 12 May 2014
Four Friends
Topic: Quilting

While waiting for someone I had driven to an extended medical appointment I took out a graph paper notebook and started doodling quilt block designs. One that I really liked I drew up in Electric Quilt 7 when I got home and worked on coloring it up.

Loved it! Once I had decided to use two bright warms and two bright cools - with two values of each on a light grey background, I was off to the fabric store. I selected fabrics from P&B Textiles for the most part. I did have to select a teal batik to get one tone and the black and grey are both marble/shadow fabrics.

This quilt came together exactly as I envisioned it - a lap quilt for friends who are moving to a new home. I named this quilt "Four Friends".


I love how the use of a darker triangle at the intersection really reinforces the visual illusion that one block weaves under the next.

I quilted with shadow lines 1/2-inch inside each of the grey areas.

I decided to use the black borders to work as a logical break point for the continuous design.

Ddd


Posted by studio3d@ccgmail.net at 12:01 AM PDT
Sunday, 11 May 2014
Fresh Scraps
Topic: Scrap Recovery

I am trying not to let the scraps get too out of hand again. Yesterday I had used most, but not all, of a blue pinstripe paper from a 6x6 pad. I scrambled through the table scraps I had left from the recent marathon session of collage backgrounds and came up with some other bits of paper that would combine well with this large chunk.

By chance, I noticed a tag in the bin that looked great with this background. I had to border it with a bit of burgundy to keep it from fading right in. I even used a bit of the pinstripe to create a faux ribbon for the tag.

I had some stickers that suited this color scheme, too. So I used one on the background and one on the tag, aligned along their edges. With the tag and top flower mounted up on foam tape the flower becomes 3D.

The three hearts on the right are from the same sticker sheet as the flower.


The bottom of the tag made the perfect place to stamp a sentiment. It is subtle because of the pattern there but with the little black stitching printed on the tag the sentiment fits right in.

Ddd


Posted by studio3d@ccgmail.net at 12:01 AM PDT
Saturday, 10 May 2014
Sticking To It
Topic: Stickers

I recently picked up some vellum stickers of flowers. I had used some of the hydrangeas to create a background a few days ago and wanted to play with more of them.

This time I layered six of them on plain white paper and fussy cut around the whole border. Then I used some warm grey Copic markers to shade those in the back tomake them recede. From a new paper pad I selected a greyed blue pinstripe and then a scrap of green for the background.


The front bouquet had a violet ribbon printed on it so I tied an actual ribbon bow and glued that on over it.

No sentiment was used as this allows the card to be used on any occasion.

Ddd


Posted by studio3d@ccgmail.net at 12:01 AM PDT
Friday, 9 May 2014
Looking Like It Was Planned
Topic: Scrap Recovery

Serendipity came into full play in the construction of this scrappy card. I had a big chunk of the floral and used narrow strips left and right that reflected the same colors as the print.

Lo and behold, a sheet of text stickers matched in both theme and color as did the last two pink layered flowers I had left.


The flower centers had glitter so I sealed it with Glossy Accents.

Ddd


Posted by studio3d@ccgmail.net at 12:01 AM PDT
Thursday, 8 May 2014
Stripes of Stripes
Topic: Scrap Recovery

This card is not as complicated as it appears. The upper portion is actually a print of various strips and the first seam on the background is not until below the pink chevron. I just added a few more pastel strips from the scraps to fill the bottom area.

Someone sent me a sheet of the HUGE glittery birthday stickers and one made the perfect centerpiece for this card.

Ddd


Posted by studio3d@ccgmail.net at 12:01 AM PDT
Wednesday, 7 May 2014
Going Green
Topic: Scrap Recovery

Green scraps took the stage next. With such big bold blocks of color I needed to go with black Dazzles for enough contrast.

I used 6 stickers from a sheet featuring bicycles: the bike, the balloons, handlebar tassles (2), gift on the back, and the 'road' at the bottom.

The greeting is from a peel-off sheet of stickers - not Dazzles.

Ddd


Posted by studio3d@ccgmail.net at 12:01 AM PDT
Tuesday, 6 May 2014
Grey Lady
Topic: Scrap Recovery

Scraps in shades of grey make for a very elegant background. I wanted to keep that classy feel so I used a white Dazzles sheet in a doily cut.

To create contrast I had to diecut a round as a backer for the doily. It was not quite large enough to go to the edges so I drew around those extending tips with a fine line black marker.

The text is a clear sticker.

Ddd


Posted by studio3d@ccgmail.net at 12:01 AM PDT

Newer | Latest | Older