« June 2014 »
S M T W T F S
1 2 3 4 5 6 7
8 9 10 11 12 13 14
15 16 17 18 19 20 21
22 23 24 25 26 27 28
29 30
You are not logged in. Log in
Entries by Topic
All topics  «
3D paperwork
A - Z challenge 5
A - Z challenge 7
A - Z challenge round 4
A to Z challenge round 3
A to Z round 2
A to Z round 6
A-Z round 1
Around the House
Art Challenges
Artist Trading Cards
Backgrounds
Beads
Bible Journaling
Books
Boxes
Collage
Color Challenge
Coloring
cookbook
Die Cuts
Digital Projects
Digital Stamps
Drawing
Dry Embossing
Fabric Stuff
Fantastic Folds
Field Trip
Home Decor
How Does Your Garden Grow?
Hymnal Art
In The Kitchen
In the studio
Jewelry
Lettering
Links
Multi-Technique
Music to Work By
Musings
Nail Art
New Work
Online Class
Other Hobbies
Other Projects
Painting
Paper Embroidery
Paper Piecing
Photo
Pretty Paper
Quilting
Random
reading
Scrap Recovery
scrapbooking
Sewing
Sketch Challenge
Some Backlog
Stamping
Stencils
Stickers
Supplies
Teabag Folding
Techniques
Testing
tips and tricks
Tutorial
Web resources
Welcome to my Blog
Work By My Friends
workflow
Writing
Blog Tools
Edit your Blog
Build a Blog
RSS Feed
View Profile
Group One
In & Out of Studio 3D
Friday, 27 June 2014
Operation Write Home - sketch 90 (repeat)
Topic: Sketch Challenge

Occasionally Club Scrap puts together a 'cutting formula' for chopping multiple papers to create multiple cards for OWH sketches. They did this for sketch 90 and I used the scraps October 15, 2012.

However, I thought the sketch itself was boring and it did nothing to inspire me. So I just used the scraps I had cut up to make random cards.

Here is one of those.

And here is another:

Yeah, so NOT the sketch.

Maybe I should go back and do that again?

Ddd


Posted by studio3d@ccgmail.net at 12:01 AM PDT
Thursday, 26 June 2014
Operation Write Home - sketch 89
Topic: Sketch Challenge

Oh, I think you're going to like this one. I know I do. Here is OWH sketch 89.

So, are you thrilled yet?

I made a few 'adjustments' like widening the three strips, cutting another layer on the square, and using some gold sticker trim. I wanted to use more of the watercolor stamping images and there were none that could be cut into that diamond shape and maintain a good orientation on the bloom. But adding it as another layer just made me happy.


The key to the beauty of this card is coordinating the papers. The only pink is in the image which makes it the star of the show.

Ddd


Posted by studio3d@ccgmail.net at 12:01 AM PDT
Wednesday, 25 June 2014
Operation Write Home - sketch 88 (repeat)
Topic: Sketch Challenge

I used the heck out of OWH sketch 88 back on January 3, 2012.

At least I started out that way, cutting a zillion scraps of the right sizes. But along the way I got bored and started rearranging the parts into other configurations.

Since technically that is not 'following the sketch' I'll refrain from showing those again and just stick with the ones that do.


These cards are all about the paper and I added some pre-made paper floral embellishments. I also used some text stamps for a sentiment.

Ddd


Posted by studio3d@ccgmail.net at 12:01 AM PDT
Tuesday, 24 June 2014
Operation Write Home - sketch 87 (repeat)
Topic: Sketch Challenge

This was a harder sketch to use than I expected when I used it January 1, 2012. Have a look at OWH 87.

There aren't that many stamped images in my collection that look good in multiples and overlapped. I did come up with a few, though, and am re-sharing a couple of them today.

On this one I used more layers than the sketch called for, stamped the image three times and colored it.

For this version I stamped three parts of a set of border stamps. It also got some extra pieces added and I used another stamp set to create the swoosh of hearts on the right.

Both of these use some scraps of 'Color-Me' papers that I had inked up.

Ddd


Posted by studio3d@ccgmail.net at 12:01 AM PDT
Monday, 23 June 2014
Operation Write Home - sketch 86
Topic: Sketch Challenge

A perfect sketch for showcasing a beautiful image... this is OWH sketch 86:


Using a watercolor stamp image I cut it large to preserve as much of the beauty as possible. The background of pink chevron was a perfect match but needed to be separated from the image with a band of green.

Instead of using a band across so much of the image I mounted a black Dazzles sticker on matching green and trimmed it out  to the banner shape.

For the embellishment I used more black Dazzles stickers and added one on the lower left for a little balance.

Ddd


Posted by studio3d@ccgmail.net at 12:01 AM PDT
Sunday, 22 June 2014
Operation Write Home - sketch 85 (repeat)
Topic: Sketch Challenge

I'm glad I decided to only 'reference' all of these sketches I had used before instead of creating new works from them. Especially since some of them I had used multiple times the first time around.

Such is the case with OWH sketch 85 which I used December 28, 2012.

I made 8 cards with this sketch but will only show one of them here.


The sketch did not have any filler brads in the lower right corner but I put them on every one of the cards I made.

Ddd


Posted by studio3d@ccgmail.net at 12:01 AM PDT
Saturday, 21 June 2014
Operation Write Home - sketch 84
Topic: Sketch Challenge

You may want to stand on your head while viewing the sketch today. That's how I turned it when I used OWH sketch 84


I wanted to use more of the watercolor stamp images so I trimmed one down to work with this sketch. The background was chosen to recede and not compete with the floral.To make it blend in more I ran it out to the edges of the card instead of leaving that thin border.

A piece of tatted trim serves as the center vertical piece and I used foam tape to mount the floral panel to raise it up over the trim.

A bow of ribbon ited onto the trim brings up back to the sketch as designed - but on its head.

I used a black pens in ultra-fine and medium to do a little detailing in the image and to outline the panel with doodle lines.

Ddd


Posted by studio3d@ccgmail.net at 12:01 AM PDT
Friday, 20 June 2014
Operation Write Home - sketch 83 (repeat)
Topic: Sketch Challenge

Today we will reprise another sketch that I used for a slew of Christmas cards back on November 11, 2011. This is OWH sketch 83:

Many of these used pairs of opposing papers and repurposed old Christmas cards, sticker sheets or images from a stamp catalog:


I did break out of the Christmas mold for one card by using the same shimmer paper for all four quadrants and using two kinds of butterfly stickers for embellishment.

The text is also from a sticker sheet.

Ddd


Posted by studio3d@ccgmail.net at 12:01 AM PDT
Thursday, 19 June 2014
Operation Write Home - sketch 82
Topic: Sketch Challenge

Oh here's another one of those slanty sketches that I don't care for so much. OWH 82 is here - what can I say. I did commit to using them all.


This started out to be all about the papers but when I needed something for the embellishment I chose to cut down one of the watercolor stamp images (this time without the scribbly background).

The paper under it came with scroll work on the top which I loved.

I cut up a clear text sticker for the sentiment and mounted it in a casual arrangement. The scrolls upper right and lower left are from the same clear sticker sheet.

Ddd


Posted by studio3d@ccgmail.net at 12:01 AM PDT
Wednesday, 18 June 2014
Operation Write Home - sketch 81
Topic: Sketch Challenge

Wide open spaces is how I would describe OWH sketch 81 - at least the way I played it:

I wanted to use more of the watercolor stamping I had done and chose one with a Stampin' Up two layer rose stamp. All the stamping was done first and then the water spraying.

I chose a yellow and white chevron for the background but it was pretty bright so I muted it by overlaying with tissue tape. I added Dazzles butterflies for the embellishment.

The sentiment is a cardstock sticker.

Ddd


Posted by studio3d@ccgmail.net at 12:01 AM PDT
Tuesday, 17 June 2014
Operation Write Home - sketch 80
Topic: Sketch Challenge

OWH sketch 80 is a previously unused (by me) one:


I saw on a blog where rubber stamps were used with Distress Ink pads to stamp on watercolor paper. These images were then spritzed with water to mute and blend. Neat-o!

For this sketch I used Distress markers to scribble colors and stamped over them with a solid stamp. When the image was dry I used black marker to thinly outline it for more definition.

Coordinating papers were used to construct the sketch and the floral head served as the embellishment. I used black as a bordering color to set off the layers from one another.

I used a gold Dazzle sticker for the text on a coordinating red solid.

Ddd


Posted by studio3d@ccgmail.net at 12:01 AM PDT
Monday, 16 June 2014
Operation Write Home - sketch 79 (repeat)
Topic: Sketch Challenge

We suddenly come to a stretch of sketches where I used about half of them and skipped half. So for the next twelve days you'll get to see repeats on six of them. Today we are reprising OWH sketch 79


I was in the midst of making Christmas cards back at the end of October 2011 when I pulled this sketch to use. I used a lot of pieces from a Christmas pad of papers and many of the feature pieces were from old Christmas cards and a catalog of stamps that I colored.

Here are my three favorites:


This one got rotated:

Today was easy...

Ddd


Posted by studio3d@ccgmail.net at 12:01 AM PDT
Sunday, 15 June 2014
How Do You Say 'Pfaff'?
Topic: Supplies

This was a hard entry to label with a 'topic'. Perhaps I should have created a new 'tools' category. Why? Because my dear hubby bought me a new sewing machine! Squeeeal!!!

I bought the last one a little over three years ago when my really old one totally crumbled (see entry at http://www.mystudio3d.com/blog/index.blog/2094566/breaking-up-is-hard-to-do/)

At that time I was midway through my second quilt and didn't expect that creative phase to last long. So I got a very inexpensive mechanical machine - the Janome MyStyle 100.


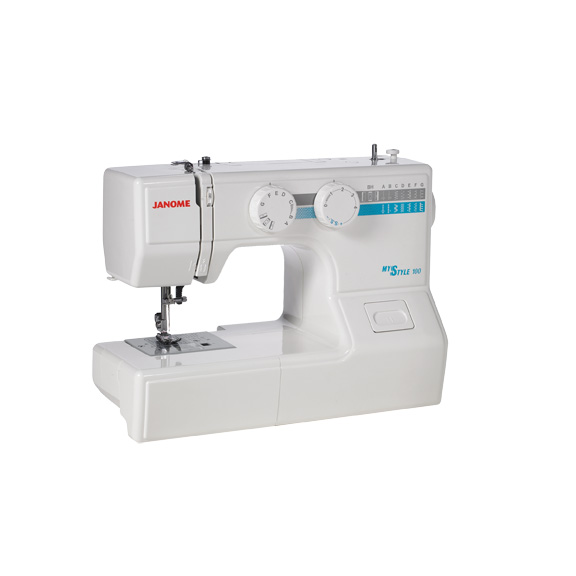
I liked it because it was simple to operate but, in the long run, it had a lot of limitations. There are only 12 stitches and half of those are the 'stretch' versions of 6 basics. Other than the zigzag there is no control over the stitch width of any of the stitches. Needle positions are either straight down the middle or at the far left with nothing in between. Switching out presser feet is not easy. Poor speed control. And the most problematic thing is the very small throat that seriously limits the size of quilt you can work on. Yes, I know I have done a king size and several queen size but these were assembled and quilted in sections to accomodate the limitations of the machine.

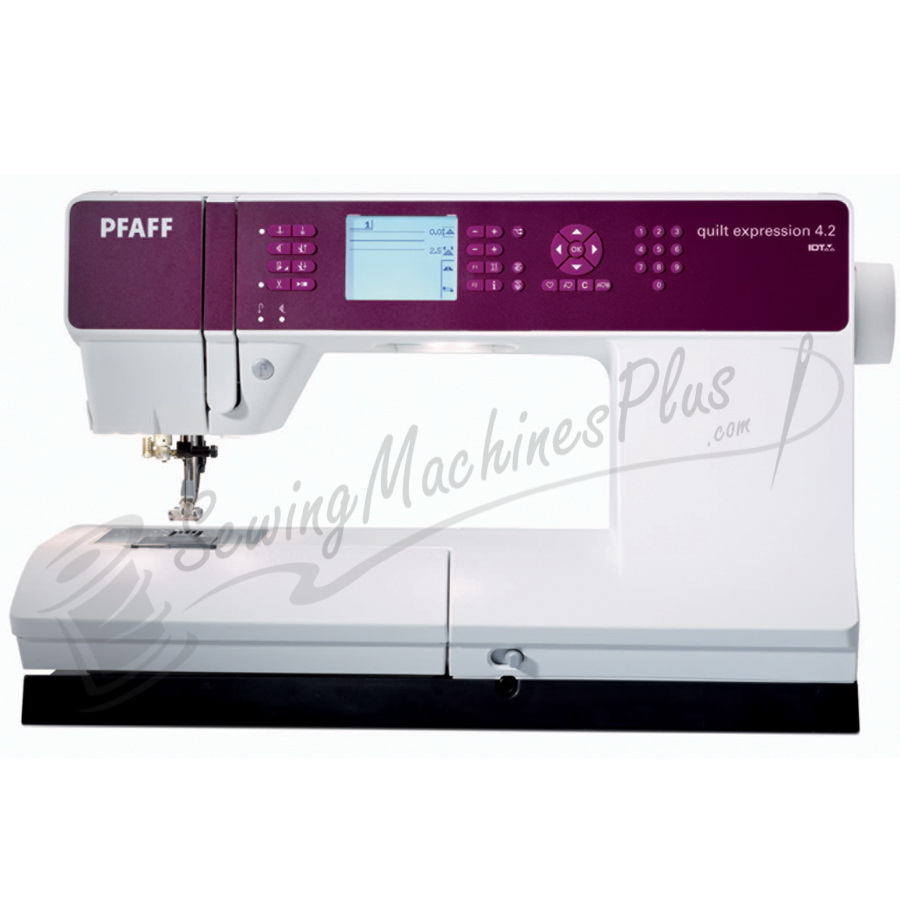
Well, I sat down with the salesman at Montavilla Sewing Center and told him what I wanted my machine to do. He answered every concern, one by one, with the Pfaff Quilt Expression 4.2 and even demonstrated other features that were a bonus.

This is the machine - look at that awesome throat opening!


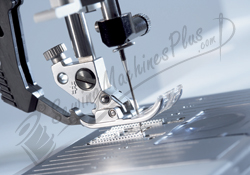
I Love, Love, Love the built-in walking foot:


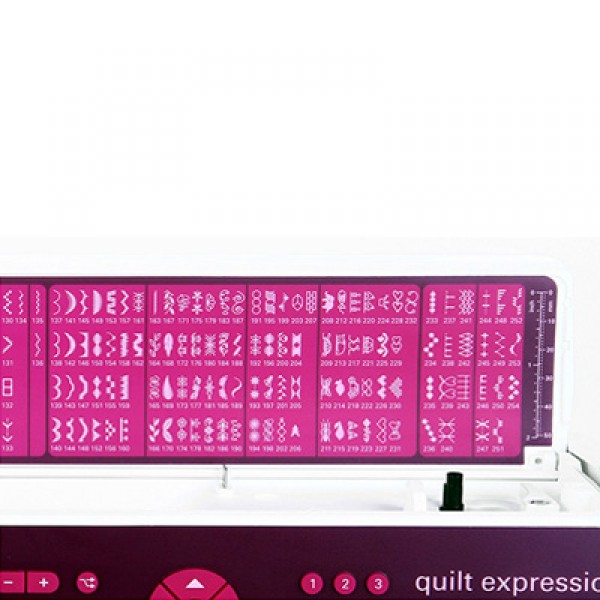
The chart of stitches and features is on a flip-up panel on the top of the machine (saves having to always have the reference book at hand)

The controls on the face are well marked and intuitive:


Here are the features listed by the retailers:

PFAFF Quilt Expression 4.2 Sewing Machine

Features and Benefits:

The Original IDT™ System

Integrated Dual Feed only from PFAFF® for over 40 years!.
Absolutely even fabric feed from both the top and the bottom.

Electronic Knee Lift

Raises the presser foot with an easy movement, allowing you to kee your hands on your project.

Sewing Features:

Quilt Stitches
Enjoy quilting with 47 different quilt stitches, with a beautiful hand-stitched character.

Automatic Presser Foot Lift
Raises the presser foot instantly when the needle is set to stop down and/or at the end of a seam after a thread snip.

Thread Snips
Automatically cut top and bobbin threads, pulling thread ends to the back side of fabric.

Start/Stop
Sew without the foot control - Makes sewing long seams, free-motion and buttonholes easy.

A Wide Variety of Beautiful Stitches
Select from over 250 stitches. Includes utility stitches, buttonholes, 9mm wide decorative stitches, quilt stitches, cross stitches and hemstitches.

2 Built-In Stitch Fonts
Choose from 2 fonts to personalize your project.

Tapering on all 9mm Decorative Stitches
Taper at the beginning and/or at the end of any stitch. Change the angle of taper for unlimited opportunities

Mirror Image of Stitches
Flip the stitch side to side and/or end to end for even more possibilities.

Stitch Positioning
Moves complete stitch right or left to easily align decorative stitches.

Three Free-motion Modes
Different modes for free-motion quilting, thread painting or darning. Select the best mode for your specific technique.

Needle Up/Down
Set needle to stop up or down in the fabric for pivoting, appliqué and more.

Sensormatic Buttonhole
Buttonhole columns are sewn in the same direction for precise stitch quality.

37 Needle Positions
For exact placement of your straight stitch.

Stitch Width Safety
Limits stitch width to center needle straight stitch while using straight stitch foot to prevent needle breakage.

Twin Needle Program
Enter twin needle size to automatically adjust the stitch width. See the twin needle stitch on the screen.

Easy-access Stitch Selection
Quick and easy stitch selection by means of the Direct Selection Buttons.

Immediate Tie-off
When pressed the machine will tie-off and stop automatically for a quick and easy finish.

Extra Presser Foot Lift
Raises the presser foot to its highest position so that thick fabrics can be placed easily under the presser foot.

Electronic Thread Tension
Needle thread tension is set electronically for every stitch – makes sewing simple.

Integrated Needle Threader
Makes threading the needle fast and easy.

Stitch Restart
Return to the beginning of a stitch or sequence without having to reset any special adjustments you’ve made.

Large Stitch Plate
Features seam markings to the left and right of the needle to help you guide your fabric.

Stitch Density
The stitch density control adjusts the density, the distance between stitch points that make up the entire stitch. Density can be increased or decreased without affecting stitch length.

Accessory Feet Included
Standard presser foot 0A, Fancy stitch foot 1A with IDT™, Fancy stitch foot 2A, Blindhem foot 3 with IDT™, Zipper foot 4 with IDT™, Sensormatic buttonhole foot 5A, Manual buttonhole foot 5M, Sensormatic free-motion/embroidery foot 6A, 1/4" Quilting Foot.

Other Machine Features:

Illuminated Graphic Display
The graphic display shows the stitch in actual size and all important information.


LED Lights
Optimized bright lights illuminate the entire work area with no shadows.


Large Sewing Space
Your PFAFF® quilt expression™ 4.2 sewing machine is the perfect choice for quilters, home decor sewers, fashion enthusiasts – anyone who creates. The sewing area to the right of the needle is supersized for sewing large amounts of fabric or batting.


Bobbin Thread Sensor
Alerts you when your bobbin thread is running low.


External Feed Dog Drop
Convenient location; lower the feed dogs from the front of the machine. Ideal for stippling, freemotion embroidery or darning.


Languages
Choose from different languages in the Settings menu. Make sure your PFAFF® quilt expression 4.2 speaks the same language you do.


Info Button
Simply touch to see important sewing recommendations on the illuminated graphic display.


Speed Ranges
Adjust your sewing speed for specialty threads, techniques and personal taste.


Stitch Sequencing and Memories
Combine and save up to 40 stitches and/or letters in one of 20 sequence memories - sew in one step repeatedly.


Personal Stitch Settings
Change the settings on built-in stitches to your personal liking. Save in one of the 20 personal stitch memories.


Program Sequencing Commands
Program a stop, thread snips or tie-off into a stitch sequence. Your sequence does exactly what you want every time.


Optimized Feeding
Enhanced to provide more control when sewing through thick layers or seaming small pieces.

----------------------------------------------------------

/\/\/\/\/\/\/\/\/\/\/\/\/\/\/\/\/\/\/\/\/\/\/\/\/\/\/\/\/\/\/\/\/\/


_ _ _ _ _ _ _ _ _ _ _ _ _ _ _ _ _ _ _ _ _ _ _ _ _ _ _ _ _ _ _

============================================

^^^^^^^^^^^^^^^^^^^^^^^^^^^^^^^^^^^^

********************************************

|_|_|_|_|_|_|_|_|_|_|_|_|_|_|_|_|_|_|_|_|_|_|_|_|_|_|


Now if I can do this ^ on my computer keyboard, imagine how impressive it will be when I learn how to do all that (and more) on my new sewing machine!

Ddd


Posted by studio3d@ccgmail.net at 12:01 AM PDT
Updated: Friday, 6 June 2014 7:37 AM PDT
Saturday, 14 June 2014
Kid Art
Topic: In the studio

Disclaimer: I did not make art for today.

Grandson's nearly first question when coming to our house is 'do you think we can do some art while we're here?'. After doing the panda carving shown yesterday I only made off-limits the stamp carving tools and the paper cutter. 

With the understanding that all the supplies are available TO BE USED I gave him full reign to use whatever he came across. Several times a day he would disappear down the stairs to work on one thing or another. Occasionally I would get a request (got any google eyes? What's the best glue for this? Can I really use these wooden birdhouses?) but mostly he was self-guided (he is almost 9).

He was fascinated with the bins of papers - especially one labeled WOW papers and my handcarved stamps.

Here is a 12 x 12 page on which he used various background papers and carved stamps to create a nature scene. He did this while I carved the panda.

He and a cousin made art from the 'test stamps' on the tabletop scratch paper.


And they used Distress Markers to 'paint' birdhouses.

The other grandson's talents lie in the technology and humor areas so he would use his ipad to film the artists and create little movie and movie trailers that are hysterical.

Good to know that my studio can be creative, even when I'm nowhere near it!

Ddd


Posted by studio3d@ccgmail.net at 12:01 AM PDT
Friday, 13 June 2014
Panda Stamp
Topic: Stamping

Grandmas tend to be rather accomodating with their grandkids and this Grammie is no exception. When some of the grands came to visit one made a special request that I do some crafts with him. Oh yeah! That's a big "Yes".

He was working on stamping a scene using some of my hand carved stamps and wanted to know about the process I used to make them. I got out the carving toolbox to show him and he asked if I would carve a stamp just for him.

He wanted a panda as that is his favorite animal and I was happy to do this for him:


Actual size is about 3 1/2 inches.

Ddd 


Posted by studio3d@ccgmail.net at 12:01 AM PDT
Thursday, 12 June 2014
Operation Write Home sketch 78
Topic: Sketch Challenge

No drama at all in OWH sketch 78:

Also no excitement or interest. So I decided to create a little drama through the use of stark color choices, a little excitement with beautiful elements, and a little interest by varying the size and placement of the florals.

Black and white make a dramatic statement as the background on this card. I selected a paper with a subtle stripe for the feature panel. It also has little line-drawn florals around the three bottom sides as a natural setting for the featured flowers.

The central elements are those three vellum pansy stickers. I chose one larger and with more foliage for the centerpiece smaller blooms were placed on either side with a slight arc for more interest.

So hard to get the color right on this photo! It is actually more purple (less blue) and there is no violet tint to the background paper.

The sentiment is a silver Dazzles sticker.

Ddd 


Posted by studio3d@ccgmail.net at 12:01 AM PDT
Wednesday, 11 June 2014
Operation Write Home sketch 77
Topic: Sketch Challenge

I'm not sure who thought it looked good to create a 'bulls eye' on OWH sketch 77 but I did not like it at all:


I decided to create the elements but play with the arrangement.

I went back to my new stamps and did some tone-on-tone doilies. I selected three solid pastel papers and used a darker Distress Ink to stamp on them. These were hand cut and layered onto a background paper of stripes of lace in silver and gold. The heart doily is popped up on foam tape.


So much romance in this lace look that I decided to stay with hearts for the embellishments like the sketch shows. These are gold Dazzles stickers. On the small ones I colored in the center with Distress Marker.

Ddd


Posted by studio3d@ccgmail.net at 12:01 AM PDT
Tuesday, 10 June 2014
Operation Write Home sketch 76
Topic: Sketch Challenge

Time for OWH sketch 76:


When I first saw this sketch it reminded me of the one with the circle element on the end that I did not too long ago. But I decided not to fuss with turning the circle into anything and played it pretty straight.

The interest it built through the paper selections. I started with the stripe for the circle then chose the background because the pattern was subtle and it worked well with the neutral in the circle.

I found the center panel and the blue was a perfect match for the circle. I did have to give it a little border to separate it from the background. Note now the border slides behind the blue floral elements.

The sentiment is made up of cardstock stickers.

This is another case where I am trying to use up some of the scraps I create on a card soon after I cut that initial piece of paper.

Ddd


Posted by studio3d@ccgmail.net at 12:01 AM PDT
Monday, 9 June 2014
Operation Write Home sketch 75
Topic: Sketch Challenge

Yes, that DOES say sketch 75. Can you believe we've come this far?


I should call this card 'no imagination' because it is a straight-up version of the sketch.

I chose a tone on tome green for the background and added strips of alternating yellow-toned and blue-toned papers. I did a bit of fine marker bordering to separate the strips from one another.

Rather than the ribbon called for in the sketch I used a striped paper strip and extended the top and bottom. The botton edge got a banner end and I also used the pen bordering on this.


In place of the bow in the sketch I used a thick acrylic tag sticker and looped twine through the hole.

Ddd


Posted by studio3d@ccgmail.net at 12:01 AM PDT
Sunday, 8 June 2014
Operation Write Home sketch 74
Topic: Sketch Challenge

I'm so glad I started this slef-challenge. It gives me an automatic starting point when I sit down to create and don't know what I want to make. I just open up the sketch, riffle through some papers, select some embellishments and the next thing you know I've got a card.

Today I'm using OWH sketch 74:


As soon as I saw this I knew I wanted to use a new Tim Holtz stamp I had picked up but not used yet. I stamped the globe on a patterned background paper and, since it had those sketchy lines on it I used colored pencils in sketchy lines for coloring. Then I trimmed off all the background around it to turn it into the round elements for the sketch.

Nifty distressed striped papers form the background.

I drew in some axis lines above and below the globe and popped it up on foam tape.

The words are cardstock stickers.

Ddd


Posted by studio3d@ccgmail.net at 12:01 AM PDT

Newer | Latest | Older