« February 2015 »
S M T W T F S
1 2 3 4 5 6 7
8 9 10 11 12 13 14
15 16 17 18 19 20 21
22 23 24 25 26 27 28
You are not logged in. Log in
Entries by Topic
All topics  «
3D paperwork
A - Z challenge 5
A - Z challenge 7
A - Z challenge round 4
A to Z challenge round 3
A to Z round 2
A to Z round 6
A-Z round 1
Around the House
Art Challenges
Artist Trading Cards
Backgrounds
Beads
Bible Journaling
Books
Boxes
Collage
Color Challenge
Coloring
cookbook
Die Cuts
Digital Projects
Digital Stamps
Drawing
Dry Embossing
Fabric Stuff
Fantastic Folds
Field Trip
Home Decor
How Does Your Garden Grow?
Hymnal Art
In The Kitchen
In the studio
Jewelry
Lettering
Links
Multi-Technique
Music to Work By
Musings
Nail Art
New Work
Online Class
Other Hobbies
Other Projects
Painting
Paper Embroidery
Paper Piecing
Photo
Pretty Paper
Quilting
Random
reading
Scrap Recovery
scrapbooking
Sewing
Sketch Challenge
Some Backlog
Stamping
Stencils
Stickers
Supplies
Teabag Folding
Techniques
Testing
tips and tricks
Tutorial
Web resources
Welcome to my Blog
Work By My Friends
workflow
Writing
Blog Tools
Edit your Blog
Build a Blog
RSS Feed
View Profile
Group One
In & Out of Studio 3D
Friday, 20 February 2015
Washout
Topic: Stencils

I was reading the Hero Arts blog the other day and came across this technique for using a stencil. It was what I had been aiming for when I did one of my stencil tutorials that kinda failed.

I had inked up my watercolor paper with Distress Inks using foam applicators then laid the stencil on top and spritzed with water to remove some of the color. What happened was that the water went under the stencil and I did not get clean outlines.

Well, in the above link and also this one and this one a different approach is used.

So I had to give it a go with these new instructions and got a better result.

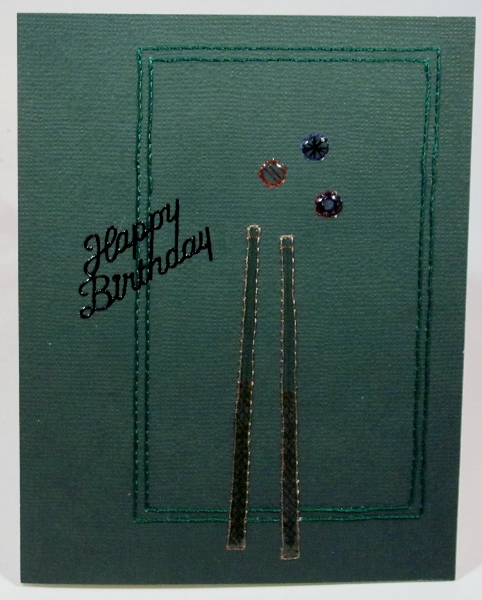
I started by using Distress Inks in Iced Spruce and Weathered Wood. These were blended onto the watercolor paper using a foam applicator. Then I used a mister to spritz a stencil of birch trees and flipped it over (water side down) and placed it on the paper. I held it in place for about 30 seconds then carefully lifted it up. 

I used a paper towel to blot away some of the water and then dried it with the heat gun.

The result was very low contrast so I laid the dried stencil back in place and drew around the shaped with a Distress Marker in Bundled Sage.

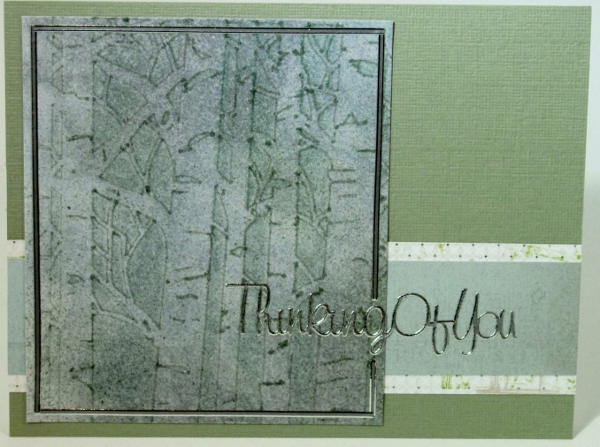
I trimmed down to the best part and mounted this on doordinating green papers.

All of the trim work and sentiment are silver peel-off stickers.

Ddd


Posted by studio3d@ccgmail.net at 12:01 AM PST
Thursday, 19 February 2015
Red Rose in Scrollwork
Topic: Paper Embroidery

One list mom issued a pattern challenge. I actually took the time to go print off the pattern for use and I'm glad I did.

I found some illustrations I wanted to use and actually pricked out the pattern onto three printed papers to use with them. The two others will show up here later but I wanted to post the one I got stitched out.

I used threads to go with the illustration and then used a craft knife to trim out inside the circle with a bit of a margin.

I mounted the stitched paper over the illustration with foam tape and onto a base card in a coordinating color.

I added a strip of gold peel-off sticker trim at the top and bottom.

Ddd


Posted by studio3d@ccgmail.net at 12:01 AM PST
Wednesday, 18 February 2015
This I Love
Topic: Techniques

I set out to use the techniques presented by Tim Holtz in his February posting for the 12 Tags of 2015.

This is the project he made:

The idea was to create a collage tag with the theme presenting things you love.

Here are the steps used to create my piece:

--Gather stickers, scrapbook paper, printed tissue, tissue tape, etc. with the theme (in my case this was all related to sewing and cooking)

--Run a base piece through the Xyron to cover with adhesive (in my case the base was tagboard and I used a piece 5.75 x 4.5 instead of a tag)

--Adhere the printed tissue as a base layer (I used sewing pattern)

--Adhere other selected items in collage arrangement (I used two handwritten recipe stickers, cardstock with dress forms, a strip of graph paper, cardstock with fabric print, sticker of a quilt and button stickers)

--Trimmed all the overhanging elements to the edges of the base piece.

--Added tissue tape in two styles with measurements and numbers (to represent measuring tapes)

--Lightly sanded the edges of the piece then used the sanding block to scuff the surfaces of the elements to distress them.

--Sealed the whole surface with clear matte medium. Dried it.

--Applied 'Picket Fence' Distress Stain over the whole surface. Dried it.

--Sealed with clear matte medium again. Dried it.

--Outlined the elements with Distress Marker in Walnut Stain and smeared with a fingertip to create shading.

--Applied a gold sticker frame, gold sticker corner and gold sticker lace trim.

--Smudged shading around all of these elements with same Distress Marker.

--Selected a copper heart element with engraved text.

--Sanded surface and applied Picket Fence Distress Stain to it. Dried. Glued to surface with Glossy Accents.

--Used black Sharpie to reinforce the engraved text.

--Cut out tiny letters and glued in place with Glossy Accents.

--Darkened the letters with the Walnut Stain Distress Marker and smudged with my finger.

--Used a bulb sprayer and a Black Soot Distress Marker to spatter the whole surface of the piece. Dried it.

--Punched 1/8" holes in the button stickers.

--Tied coordinating twine through the button holes with the knots in the back.

--Used same twine to tie a real button in place inside the frame with the knot on the front.

--Used foam tape to mount the piece to a fabric-covered mat board backing.

Here is the finished piece:


This will be a display piece on the door of my quilting/sewing studio.

Ddd


Posted by studio3d@ccgmail.net at 12:01 AM PST
Tuesday, 17 February 2015
This Old Thing
Topic: Paper Embroidery

Challenge from a paper embroidery group Make a card with a 'vintage' theme.

I selected the 3D image first and then chose a pattern for a stitched frame for it. The background paper went with some of the leaves and I matched the threads to various parts of the illustration: a dark green, verigated pink/rose and verigated beige/tan.

I used a round punch on the illustration before assembling it. Then I trimmed it all out to a square.

I attached a scallop-punched paper at the top and backed this with 1/2 of a paper doily. I attached the other half of the doily at the bottom and wrapped with a ribbon trim.

A dark green card base was trimmed with a fancy scissor corner.

I used 'champagne' pearls in two sizes to decorate the card.

Ddd


Posted by studio3d@ccgmail.net at 12:01 AM PST
Monday, 16 February 2015
Keep Your Eye On the Ball
Topic: Paper Embroidery

Assignment: make (for a swap) a paper embroidery card for a guy.

A quick search through my patterns brought me to this billiard table from a book by Joke de Vette. Her sample was all in gold threads but I wanted to make it more 'realistic' so I selected a dark green cardstock to stitch on.

The outer rims of the table are done in green. I then stitched the cues with a tan and the balls with burgundy, purple and rust. Each of the balls is stitched with a different sequence, too.

I decided that the balls and cues needed to look more dimensional so I covered them with Glossy Accents.


Here you can see the shine and rounded shape on the balls due to the Glossy Accents.


I finiahed off the card with the addition of a black peel-off stitcker sentiment.

Ddd


Posted by studio3d@ccgmail.net at 12:01 AM PST
Sunday, 15 February 2015
Brrrr-r-r-r Bloom
Topic: Paper Embroidery

Here's my latest paper embroidery challenge for the new year. The group leader selected 'Winter Flowers' for the theme and to me that always comes back to Poinsettias.

I used my own pattern for this card, chose a grey cardstock with red dots and set to stitching. Yellow for the center, Christmas red for the flower and true green for the leaves.


I decided to skip a sentiment after mounting the stitching onto a bright yellow folded card base which matches the center.

Since this is a challenge rather than a swap, I now have the beginning of a stash of Christmas cards.

Ddd


Posted by studio3d@ccgmail.net at 12:01 AM PST
Updated: Sunday, 25 January 2015 6:19 PM PST
Saturday, 14 February 2015
Table Taker
Topic: Sewing

When I bought my new sewing machine, the SewSteady clear acrylic table I had used with my Janome did not fit. So I ordered a new table when I got the machine.

When the table came, it did not come with a carry case so I have been hauling it back and forth to workshops, tucked under my arm. I always remove the legs and drop them in one of my supply cases.

Flash forward to Christmas when I received a stack of 1/2 yard cuts of 6 fabrics with sewing materials printed on them. they are all in blacks, reds and white. The minute I saw them I knew I was going to construct a carry case for my acrylic table.

I measured the table, drew a plan on graph paper, wrote myself some step-by-step directions and started cutting.


The front and back of the case are sandwiched with batting and backing and I did overall loopy quilting.

I constructed a pocket for the outside which closes with velcro and hold the table legs.


I bought 1" webbing and top-stitched fabric onto it before stitching to the case.


The case closes with velcro. For the lining, I used a gifted-to-me fabric that was so ugly I couldn't imagine what else I would ever do with it (note blue, yellow, red, white above).

The case fabrics are MUCH cooler than the lining:


I used the reds and blacks for the front and back of the case. I used smaller amounts of the whites as I thought they might show dirt sooner. The scissors are only used on the pocket and the buttons are used for the carry straps as well as a binding for the raw edges of the flap, front of case under the flap and the flap of the pocket.

The table measures 23 inches square and the case is about 25 inches square when closed.

Ddd


Posted by studio3d@ccgmail.net at 12:01 AM PST
Friday, 13 February 2015
Keeping Your Friends in Stitches
Topic: Paper Embroidery

I needed a card for an upcoming swap on a paper embroidery list and the assigned theme was 'friends'.

In flipping through my file of patterns, I ran across this cutie - printed for free from a blog. I perfectly suited the theme.

I chose a medium brown and a dark orange for the two puppies with black features on both. The noses were designed to be stitches through the whole circle but I though it looked nore dimensional with them only done 3/4 of the way.

I rounded the corners with a punch and added a brown cross-hatch and a solid black for the background. An orange solid was punched with a scallop and tucked under the right side of the image.

Ddd


Posted by studio3d@ccgmail.net at 12:01 AM PST
Thursday, 12 February 2015
Sprocket Gem
Topic: Jewelry

Weekday mornings I watch four arts and crafts shows on OPB+ (Oregon Public Broadcasting). They range from painting to quilting, scrapbooking to crochet, and sewing to jewelry. One of these is Beads, Baubles and Jewels.

A while back I viewed an interesting project that used a large rhinestone, thin wire and a sprocket. It looked interesting to try.

Here’s a photo of a pendant she made. It is about one inch across.

There is a YouTube video of the project here.

I looked through my supplies and found that: 1) I had no sprockets – so I bought some but the store only had the mini size. 2) My rhinestones were much flatter than theirs and 3) my wire was thicker and I only had colored wire.

I soldiered on; doing the best I could with the supplies I had and came up with a ‘passable’ version. Here is my pendant:


Mine is actually about 1/2 inch across. I'd like to try this again with the proper materials but it's not worth it to me to actually go buy new product just to give it a go.

So I will have to live with this one.

Ddd


Posted by studio3d@ccgmail.net at 12:01 AM PST
Wednesday, 11 February 2015
Operation Write Home - sketch 172
Topic: Sketch Challenge

My scraps speak to me. I guess they are always in the back of my mind and, when I see a new sketch, someone will call out from the depths of my brain with, "hey, remember me? I'd be perfect for this. Come find me."

This is the sketch I started with - OWH 172:

The element that called out was a floral scene sticker that I had recently come across when sorting my sticker file (after two sets of grahdkids has used them).

I went through the 6x6 sheets of patterned cardstock to select pieces for the two squares and the background, then chose the purple for the base.

I had tested out a text border folder on a shimmery purple strip so I used a round punch to isolate one word. This left the word at the top of the circle and I added a gold peel-off sticker to the lower half.

I wanted a bit more gold so I seleccted some sheer ribbon to tuck in behind the circle which is popped up on foam tape.

Ddd


Posted by studio3d@ccgmail.net at 12:01 AM PST
Tuesday, 10 February 2015
Operation Write Home - sketch 171
Topic: Sketch Challenge

Too simple for my taste - here is OWH sketch 171:

I had a photo - taken years ago in either Nebraska, Tennessee or Virginia - that has never been just right for using on a card until now. I cut it down for the three panels and backed that with blue to work with the sky.

A light woodgrain paper served for the card background.

I had one moose left on a sheet of gold Dazzles but he did not stand out enough when applied directly to the photos. So I stuck him on some golden paper and trummed him out with a craft knife. He was facing the wrong way to use on the sketch where they have the circle element so I placed him in the lower right facing inward.

This left me the opportunity to punch two circle elements in the same solid papers and use a gold sticker greeting inside. This was popped up on foam tape.

I used a gold gel pen to add a doodle line around the perimeter.

Ddd


Posted by studio3d@ccgmail.net at 12:01 AM PST
Monday, 9 February 2015
Operation Write Home - sketch 170
Topic: Sketch Challenge

Some sketches just tell you if they want to be feminine or masculine. I got a masculine vibe from OWH sketch 170.

I immediately knew I wanted to use that stamped dragonfly again and I already had it colored in the file of stuff I did on the day with no power. It was not quite the specified size and the orientation was landscape instead of portrait. But it worked well in this layout anyway.

I selected papers from the scrap bin and trimmed the dragonfly with a thin white border. This meant I needed a thin white border elsewhere so I cut the background down to allow the card base to show on the edges.

More white was called for so I used a single word from a sheet of rubons.

What appears to be three brass brads are actually sticky-back dots.

Ddd


Posted by studio3d@ccgmail.net at 12:01 AM PST
Updated: Wednesday, 21 January 2015 5:13 PM PST
Sunday, 8 February 2015
Operation Write Home - sketch 169
Topic: Sketch Challenge

I jumped back into the sketches for a bit. Here is OWH 169:

I had an image stamped on white cardstock where I had used masking with my handcarved roses. I colored these with Copic markers and then selected papers and cardstock to complement the illustration.

Some of the papers were table scraps including some that were trimmings from my stencil projects a few months back.

I used Spellbinders dies to cut the circle and a border punch for the scallop.


The white text is rubons and the butterflies are stickers. I used warm grey Copic markers to add drop shadows unter the roses and the butterflies.

Ddd


Posted by studio3d@ccgmail.net at 12:01 AM PST
Saturday, 7 February 2015
Inspired by an Alphabet Channel
Topic: Dry Embossing

I was flipping through the channels on the TV last month and stopped to watch Anna Griffin on one of the '24-hour-we-can-sell-you-anything' channels. She was showing some new Cuttlebug folders she had designed. I didn' want any of them but watched just to see what new techniques she was using.

Only one thing really caught my eye and that was her use of a gold paint pen traced over the raised embossing.

Well, I HAD to try that!

I pulled out some glossy cardstock with a color-changing blue/purple/green finish. It reminds me of the look of oil on water.

I ran this through the Cuttlebug with a folder from the 'friends' set and then used a gold Krylon paint pen to trace over all the dandelions. I put it back through the Cuttlebug with a text border folder and then used the gold paint pen on the words and the swirl.

A piece of shiny gold cardstock was embossed with the 'heart blocks' folder and I cut a strip of that to apply under the text.


I trimmed the embossed panel right next to the raised border and mounted on purple for framing.

I do like this style and may try it again.

Ddd


Posted by studio3d@ccgmail.net at 12:01 AM PST
Friday, 6 February 2015
Hello Cupcake
Topic: Paper Embroidery

Next up for a swap on a paper embroidery group is the theme 'cupcakes'. I have more than one pattern for them but this is one I have never used before.

I stitched it up on a textured blue cardstock using a verigated pink and a verigated purple. They ended up looking very much alike but I really don't mind.

I mounted this on a printed background cardstock and pricked out the text from another pattern. This got stitched in burgundy.

I added puffy acrylic heart stickers to be 'sprinkles' on the cupcake.


I selected a bright pink card base to go with the hearts.

Ddd


Posted by studio3d@ccgmail.net at 12:01 AM PST
Thursday, 5 February 2015
Operation Write Home - sketch 168
Topic: Sketch Challenge

Now here's a sketch I can get behind - OWH 168:

The illustration I had on hand was not the specified size but I decided to just go with the flow. I selected bordering and backing papers based on the stamped and colored image.

The assembly was pretty straightforward and I didn't even rotate the sketch. Woo-hoo! The image is popped up on foam tape.

I decided to add a sentiment and found one already stamped onto the same  green I had been using. Sweet, indeed! I bordered it with some of the dots from the background.

Ddd 


Posted by studio3d@ccgmail.net at 12:01 AM PST
Wednesday, 4 February 2015
Operation Write Home - sketch 167
Topic: Sketch Challenge

Today I have another OWH sketch that is awfully simplistic for my taste - OWH 167:


Unfortunately, this time I did not have a giant illustration to use. What I did have was a colored stamp that would work for the round element so I started by cutting that and embossing the edges with the Cuttlebug and a Spellbinders die.

I selected orange for the border and punched it with a scallop. Then I chose a printed background to coordinate with the doily under the teapot and a lavender card base to go with the table under the doily.

When these were all assembled there was not enough contrast between the layers so I did some sketchy drawing on the circle and the printed background.

I thought there was too much white space so I selected and bordered a stamped sentiment with a banner end.


I used the pen again to add lines to the sentiment and across the top of the table.

Ddd 


Posted by studio3d@ccgmail.net at 12:01 AM PST
Tuesday, 3 February 2015
Operation Write Home - sketch 166
Topic: Sketch Challenge

Simple Simon - that is OWH sketch 166:


Fortunately I had an image already colored that was large enough for the center panel.

I  selected color blocking and bordering papers based on the colors in the illustration - pink and blue from the hearts and brown from the bunny. I used a little of the brown border around the image even though it was not in the sketch.

To fit the picture I needed to rotate the sketch to a vertical format.

I cut apart a stamped sentiment and bordered the words separately. These took the place of the dots in the sketch and they are popped up on foam tape.

Then I covered the main heart with Glossy Accents. You can see the shine of it in the photo.

Ddd 


Posted by studio3d@ccgmail.net at 12:01 AM PST
Monday, 2 February 2015
Operation Write Home - sketch 165
Topic: Sketch Challenge

After a lengthy break I'm back with another OWH sketch for my self-challenge.

I did a few calculations trying to decide how long it might take me to finish up this project.

There are currently 247 regular sketches plus 36 bonus sketches - total 283. I finished have finished 164 leaving 116 to do. New sketches are being issued twice a month so there will be 22 more by the end of 2015. That is a new grand total of 138. Since I did 164 in 13 months, I should be able to finish up by the end of the year.

Now, on to OWH sketch 165:

I had an already colored floral that I wanted to use but it was vertical instead of horizontal. So I rotated the sketch to suit its use.

I drew colors for the background and scalloped borders from the flower and played it pretty straight on design.

The stamped piece was not as long as the sketch so I extended it with black at the ends.


In place of the ribbon and bow I used a sentiment strip and a punched butterfly.

Ddd


Posted by studio3d@ccgmail.net at 12:01 AM PST
Updated: Thursday, 15 January 2015 6:25 PM PST
Sunday, 1 February 2015
Dance...Where Music and the Feet Meet
Topic: Paper Embroidery

On challenge to create a paper embroideried card with the theme of 'music' I decided to use my pattern for a dancer. For this I used four metallic threads on a paper with music notations.

I used a stamp positioner to add a stamp of a musical score below her feet.


I backed the stitched panel with black and purple. Then I layered a purple butterfly with a black layer and balanced it on her upraised hand.

Ddd


Posted by studio3d@ccgmail.net at 12:01 AM PST

Newer | Latest | Older