« April 2015 »
S M T W T F S
1 2 3 4
5 6 7 8 9 10 11
12 13 14 15 16 17 18
19 20 21 22 23 24 25
26 27 28 29 30
You are not logged in. Log in
Entries by Topic
All topics  «
3D paperwork
A - Z challenge 5
A - Z challenge 7
A - Z challenge round 4
A to Z challenge round 3
A to Z round 2
A to Z round 6
A-Z round 1
Around the House
Art Challenges
Artist Trading Cards
Backgrounds
Beads
Bible Journaling
Books
Boxes
Collage
Color Challenge
Coloring
cookbook
Die Cuts
Digital Projects
Digital Stamps
Drawing
Dry Embossing
Fabric Stuff
Fantastic Folds
Field Trip
Home Decor
How Does Your Garden Grow?
Hymnal Art
In The Kitchen
In the studio
Jewelry
Lettering
Links
Multi-Technique
Music to Work By
Musings
Nail Art
New Work
Online Class
Other Hobbies
Other Projects
Painting
Paper Embroidery
Paper Piecing
Photo
Pretty Paper
Quilting
Random
reading
Scrap Recovery
scrapbooking
Sewing
Sketch Challenge
Some Backlog
Stamping
Stencils
Stickers
Supplies
Teabag Folding
Techniques
Testing
tips and tricks
Tutorial
Web resources
Welcome to my Blog
Work By My Friends
workflow
Writing
Blog Tools
Edit your Blog
Build a Blog
RSS Feed
View Profile
Group One
In & Out of Studio 3D
Thursday, 23 April 2015
Operation Write Home - bonus sketch B4
Topic: Sketch Challenge

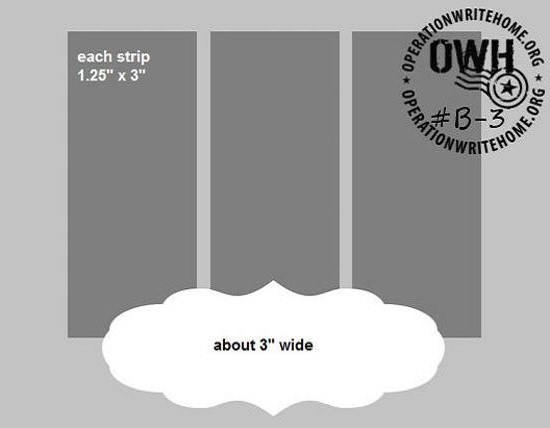
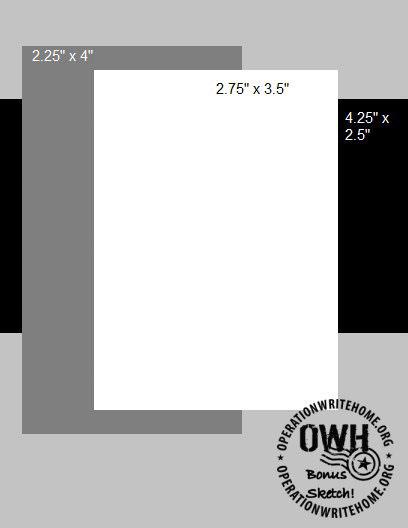
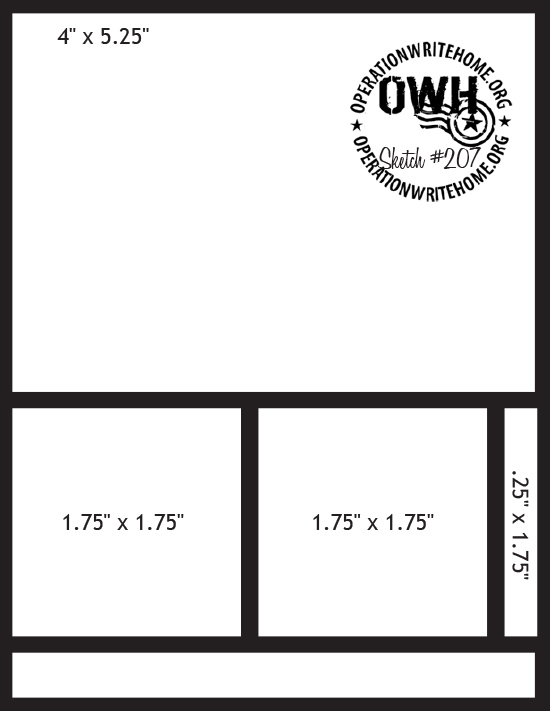
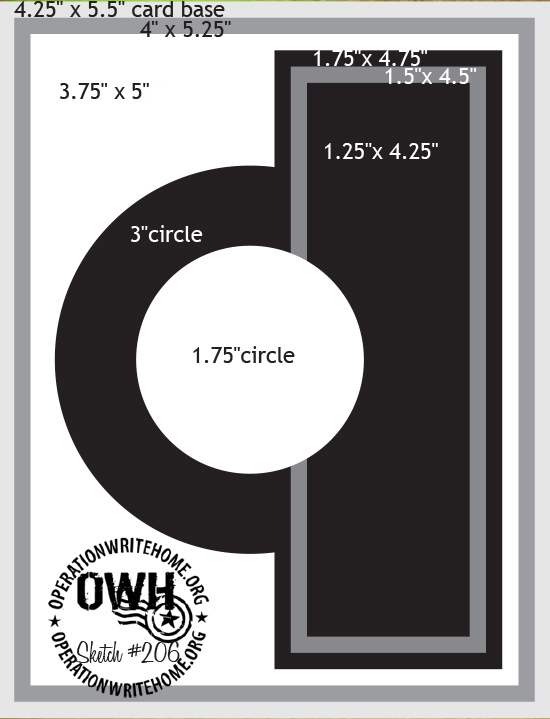
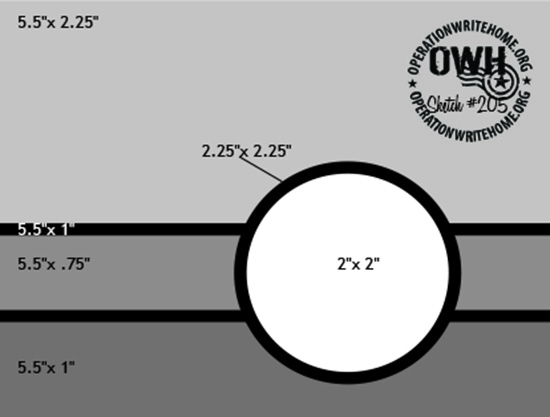
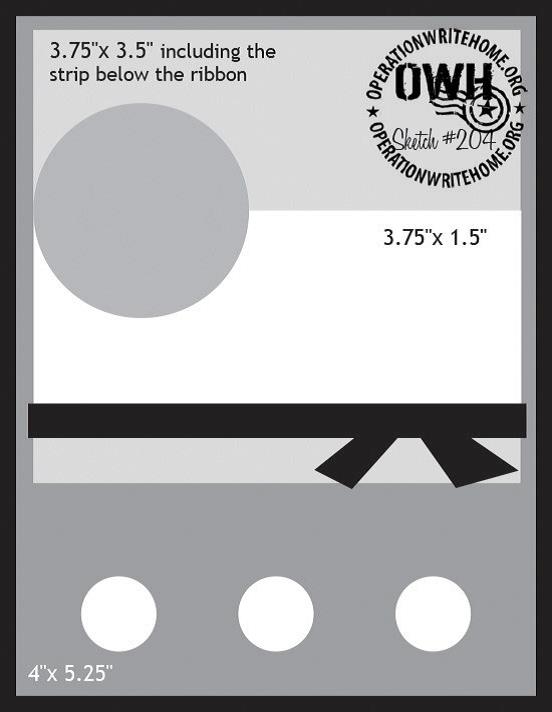
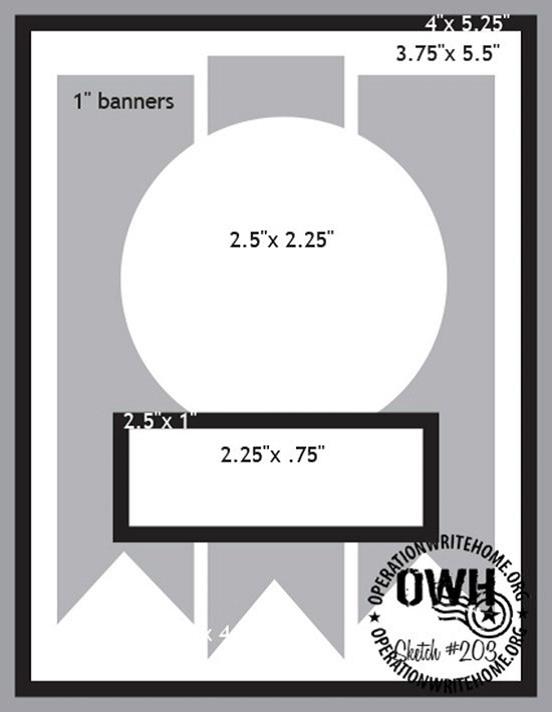
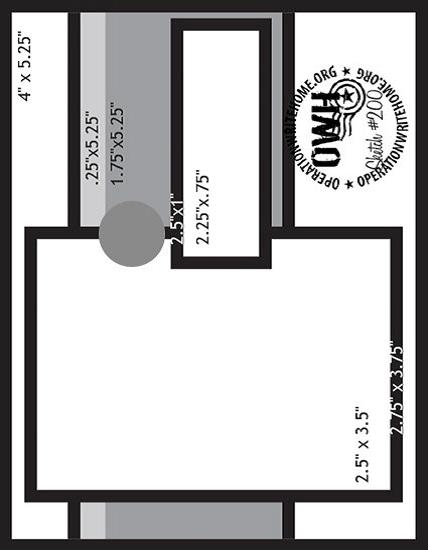
Another bonus sketch for you today! This is OWH sketch B4:


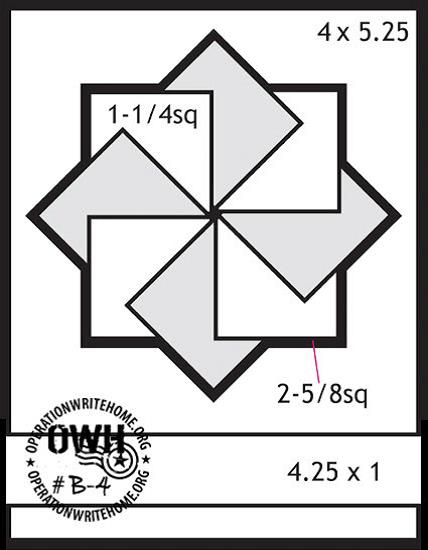
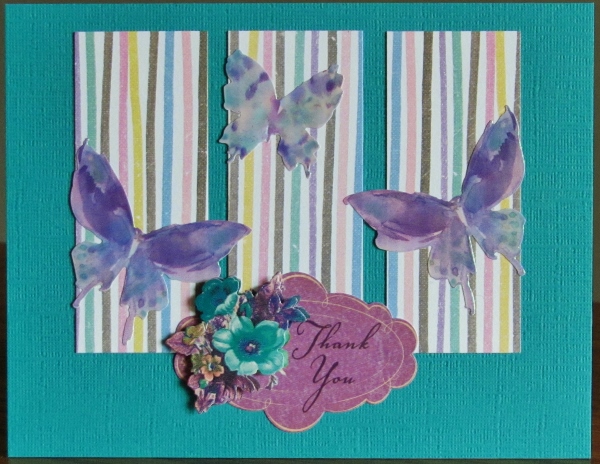
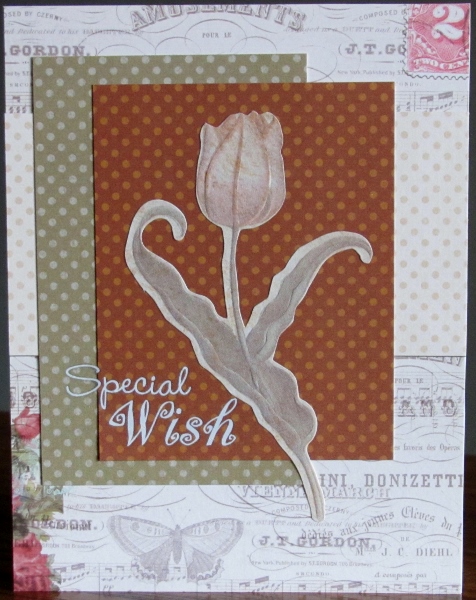
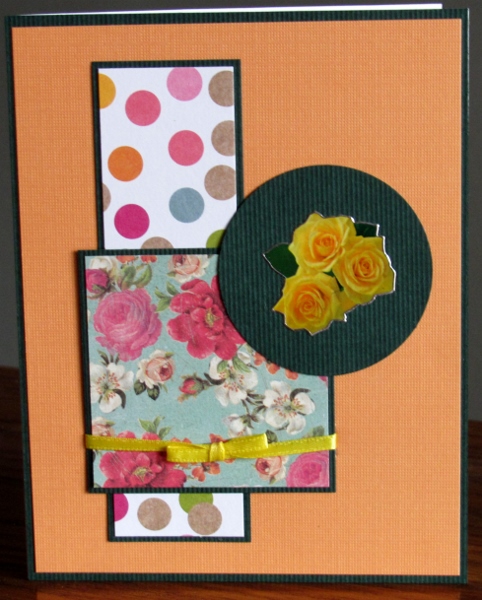
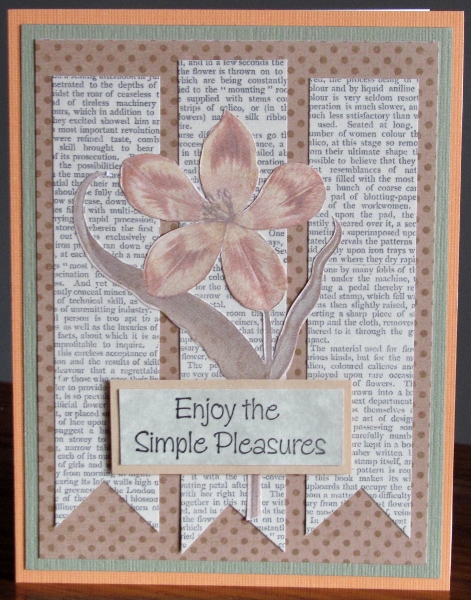
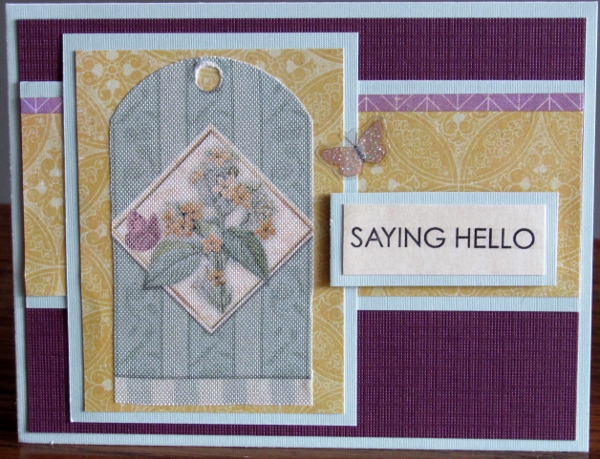
That centerpiece made me think of the teabagfolding I used to do a lot of. I looked in the drawer of those supplies and found a couple of packets of papers that were gifted to me in a swap. I used one set to made a simple folded medallion. The result was much smaller than the sketch but ther ARE just guidelines, after all.

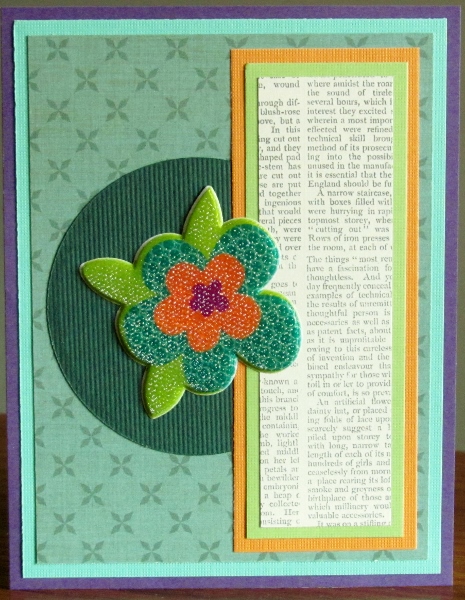
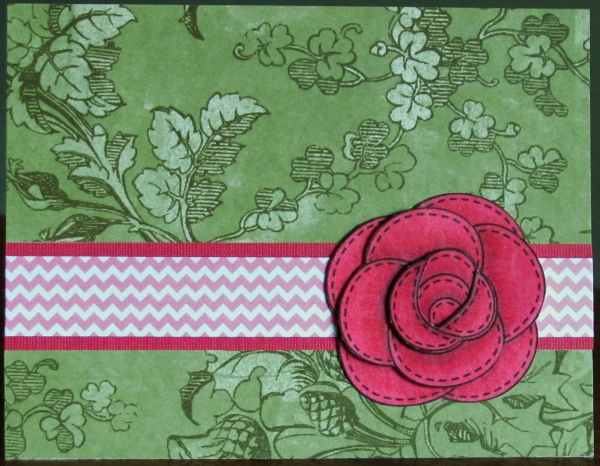
I used the colors of the folding papers to choose the rest of the papers, orange for bordering, yellow for the sentiment and a green pattern for the background.

I used the orange to border the medallion and the sentiment, but cut the sentiment down so it did not compete.


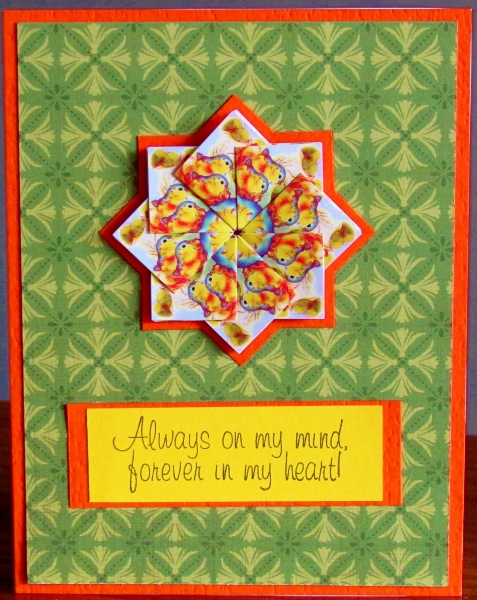
I don't know if you can tell, but the papers for the medallion feature little yellow and orange birds. The fold exposes a pair of them in each corner.

Ddd


Posted by studio3d@ccgmail.net at 12:01 AM PDT
Wednesday, 22 April 2015
Operation Write Home - bonus sketch B3
Topic: Sketch Challenge

For this sketch I made it all about color coordination. This is OWH sketch B3:

The shaped label in the sketch made me think about the 3D text stickers that I had in the files. I selected one of these and then chose the background paper and butterflies to match it.

The striped papers have these colors plus more to enliven the energy.


The true colors are actually brighter than this, but you get the idea.

Ddd


Posted by studio3d@ccgmail.net at 12:01 AM PDT
Tuesday, 21 April 2015
Operation Write Home - bonus sketch B2
Topic: Sketch Challenge

Another of the bonus sketches today - this is OWH B2:


Not much to go on, right?

I created some interest by using busier papers than I normally would. The little hedgehog was my jumping off point. Then I added thebanner paper for the celebratory nature of it.

The black was selected to separate the banners from the striped background. It also echoes the quills on the hedgehog while the striped background echoes his belly color.


I kept looking at those wider strips of color in the banners and decided to use them for the sentiment by using white rub-ons.

Ddd


Posted by studio3d@ccgmail.net at 12:01 AM PDT
Monday, 20 April 2015
Operation Write Home - bonus sketch B1
Topic: Sketch Challenge

Some special challenges, presentations and blog hops resulted in a number of bonus sketches in the OWH sketch collection. These have been numbered in a 'B' series. I thought I intersperse a few of them in here.

This is OWH sketch B1:


Because the space was so wide open I decided to focus it a bit by using a larger scale sticker. This low contrast tulip fit the bill perfectly.

I chose papers that borrowed colors from the illustration and the background also has a vintage feel.

Bu repeating the dots in three of the papers it gives the layout some unity.


I used white rub-on words for the sentiment.

Ddd


Posted by studio3d@ccgmail.net at 12:01 AM PDT
Sunday, 19 April 2015
Operation Write Home - sketch 208
Topic: Sketch Challenge

Suddenly an ugly duckling turns into a swan! Here is OWH sketch 208:


Well, that looked awfully clunky to me. I selected soft colors, stickers in vellum and kept a pretty tight pallette and value scale.

Just shades of pink, aqua and a touch of tan make this a low key card:

This just makes me happy!

Ddd


Posted by studio3d@ccgmail.net at 12:01 AM PDT
Saturday, 18 April 2015
Operation Write Home - sketch 207
Topic: Sketch Challenge

Want something wide open for interpretation? Then you want OWH sketch 207:


I wanted to tie all of the spaces together so I selected silver peel-off sticker elements for each of them. I colored these with alcohol markers while they were still on their sheets making sure to use the same colors in all the elements.

The bird has green, brown and red - the flower has red, brown and green - the words have red.

To reinforce the hummingbird color I used brown again in the bordering. Then I used the same background paper throughout for unity.

I set up the bird to be eating from the flower and it all came together.

Ddd


Posted by studio3d@ccgmail.net at 12:01 AM PDT
Friday, 17 April 2015
Operation Write Home - sketch 206
Topic: Sketch Challenge

Sorry if the intros for these are getting monotonous. Here is OWH sketch 206:


I was glad to learn any years ago that just because a sketch had a circle, a heart or a flower that did not mean it could not be swapped out or interpreted as another shape or element. That give a lot more freedom to design.

I used that interpretive gift to turn the smaller circle into a flower by selecting one of the textured puffy acrylic blooms.

I chose colors from that flower for layering papers, including some with pattern. I kept the brightest papers in the background as borders.

The camera behaved a little better when photographing this flower but you can tell it is confused by the texture.

Ddd


Posted by studio3d@ccgmail.net at 12:01 AM PDT
Thursday, 16 April 2015
Operation Write Home - sketch 205
Topic: Sketch Challenge

What SHALL I do when I've used all the OWH sketches? I do have a ways to go but I still should be thinking about that!

Here's sketch 205:

When I had the digital stamps out yesterday I occured to me that this rose digi would work well for the round element on this sketch.

I colored 4 of the images with shading in the petals and then cut away background petals on successive layers and assembled them into one stacked illustration with foam tape. By offsetting the foam behind the layers the image squashes down flat for mailing.

For the main background I used a tone-on tone green floral. Then I selected a small pink chevron for the strip and backed it with a dark coral to match the rose.

I like these digital images because I can easily just print up more of them if I want to and can even resize them if needed.

Ddd


Posted by studio3d@ccgmail.net at 12:01 AM PDT
Wednesday, 15 April 2015
Tribute to Patricia
Topic: Multi-Technique

Upon the news of the death of one of Operation Write Home's volunteers we were challenged to make a card cased from one she had made as a tribute to her.

I chose to make one based on this:


I actually had the same little workman as he is a digital that I downloaded from OWH some time back. I colored him with alcohol markers (three tones of each color) and I fussy cut him to use.

I embossed the background of silver cardstock with the diamond plate Cuttlebug folder and added two strips of 'masculine' papers.

After creating the text block I remembered these brads that look like phillips screws. So cute!


I gave the little guy some eyes inside his blank glasses and popped him up on foam tape.

Ddd


Posted by studio3d@ccgmail.net at 12:01 AM PDT
Tuesday, 14 April 2015
How Do You Like Them Taters?
Topic: How Does Your Garden Grow?

When the conditions are just right you can get some big surprises:

1) very mild winter

2) sunny spring

3) reasonable amount of rain in late spring

4) not being careful in fully turning the soil in the fall

5) somebody ignoring the spring garden weeding

I was using a shovel in damp soil to loosen the weed roots for easier pulling on the 1st of April. What I got from these 'ideal' conditions and action was 4 potato plants about 18 inches tall with a lot of new potatoes and some larger ones.

Now, I haven't planted potatoes for two years! We dug a few volunteers last summer and even won a blue ribbon at the fair with them. Mom dug up more volunteers last fall but apparently not all were discovered.

The missed taters snuggled in for the winter and, due to great weather - no snow and very light frost - these new plants sprung up.

I dug enough of Yukon Gold, Red Potatoes and Russetts to put together a potato salad for Easter. I tossed out 4 small purple potatoes (which I haven't planted for FOUR YEARS) as we never liked them much.

Here's my potato bounty:


There were more of the Russetts but something had nibbled at them and I didn't want to eat their leftovers!

FIRST GARDEN PRODUCE OF 2015

Ddd


Posted by studio3d@ccgmail.net at 12:01 AM PDT
Monday, 13 April 2015
12 Tags of 2015 - April - version 3
Topic: Multi-Technique

We're still working on April in the projects inspired by Tim's 12 Tags of 2015.

As a reminder - this is Tim's version:

Here is the process for my third card:

-cut watercolor paper

-stamp flower heads and stems with Archival Ink in jet black

-mist paper with water

-use bulb sprayer to apply two colors of Distress Ink to background

-dry with heat tool

-use darker Distress Marker to draw partial outline on some of the petals

-use aquabrush to pull color into the petal

-dry

-scribble that color and another lighter one on acrylic block

-use aquabrush to color the petals with these inks

-use same process for stems

-dry

-use Pumice Stone distress marker scribbled on acrylic block to aquabrush a drop shadow around flowers and stems

-ink outer edges of paper with dark distress ink using a foam tool

-put black soot Distress Marker in bulb sprayer

-lightly speckle the background

-cut a backing piece

-ink edges with dark distress ink

-use die to cut out words

-cut a slit above and below the words

-feed the floral behind the diecut strip

-use sewing machine to stitch around all four edges of floral tag

-diecut another word from matching paper

-use very fine line marker to faintly outline the diecut areas and words to separate from the background

-use some of the floral marker ink to watercolor inside the cutout diecut area

-adhere whole to a card base coordinating with the florals

And here is the resulting third card:

So, these were the three versions I made from Tim's directions.

Ddd


Posted by studio3d@ccgmail.net at 12:01 AM PDT
Sunday, 12 April 2015
12 Tags of 2015 - April - version 2
Topic: Multi-Technique

Continung with my creations inspired by Tim's 12 Tags of 2015. We're working on April.

As a reminder - this is Tim's version:

Here is the process for my second version:

-cut watercolor paper

-stamp flower heads and stems with Archival Ink in jet black

-mist paper with water

-use bulb sprayer to apply two colors of Distress Ink to background

-dry with heat tool

-use darker Distress Marker to draw partial outline on some of the petals

-use aquabrush to pull color into the petal

-dry

-scribble that color and another lighter one on acrylic block

-use aquabrush to color the petals with these inks

-use same process for stems

-dry

-use Pumice Stone distress marker scribbled on acrylic block to aquabrush a drop shadow around flowers and stems

-ink outer edges of paper with dark distress ink using a foam tool

-put black soot Distress Marker in bulb sprayer

-lightly speckle the background

-cut a backing piece the size of the card front

-ink edges with dark distress ink

-use die to cut out word

-cut a slit above and below the word

-feed the floral behind the diecut strip

-use sewing machine to stitch around all four edges of floral tag

-diecut a word from matching paper

-attach rhinestones to front of diecut strip

-adhere whole to a card base

That being said, here is the resulting second card:

Version 3 will be up tomorrow.

Ddd


Posted by studio3d@ccgmail.net at 12:01 AM PDT
Saturday, 11 April 2015
12 Tags of 2015 - April - version 1
Topic: Multi-Technique

Time for another creation inspired by Tim's 12 Tags of 2015. We're now up to April.

This is Tim's version:

I made three cards from this inspiration but will only show one today (saving the others for the next couple of days). Here is the process:

-cut watercolor paper

-stamp flower heads and stems with Archival Ink in jet black

-mist paper with water

-use bulb sprayer to apply two colors of Distress Ink to background

-dry with heat tool

-use darker Distress Marker to draw partial outline on some of the petals

-use aquabrush to pull color into the petal

-dry

-scribble that color and another lighter one on acrylic block

-use aquabrush to color the petals with these inks

-use same process for stems

-dry

-use Pumice Stone distress marker scribbled on acrylic block to aquabrush a drop shadow around flowers and stems

-ink outer edges of paper with dark distress ink using a foam tool

-put black soot Distress Marker in bulb sprayer

-lightly speckle the background

-cut a backing piece

-use distress tool on edges

-ink edges with dark distress ink

-use die to cut out word

-cut a slit above and below the word

-feed the floral behind the diecut strip

-use sewing machine to stitch around all four edges of floral tag

-diecut a word from dark paper

-attach an embellishment to front of diecut strip

-adhere whole to a card base

That being said, here is the resulting first card:

Back tomorrow with version 2.

Ddd


Posted by studio3d@ccgmail.net at 12:01 AM PDT
Friday, 10 April 2015
Heaven and Earth
Topic: Quilting

I've been wanting to do a blue and brown quilt for a long time. Love that color combination. I designed this one around the toile. WHY was this fabric in the 'bargain bin'? It's beautiful!


The pattern is from Nancy Zieman's 'Big Blocks' book, in the smaller size.

The quilt finished at 49 x 58.

So why that title? It recognizes the blue of the sky and the brown of the earth. Also, Mom noticed the zig zags like lightening bolts and I notice the flowers.


I quilted with blue verigated thread in a medium meander.

The backing is the same dark blue used on the front, as is the binding.

Ddd


Posted by studio3d@ccgmail.net at 12:01 AM PDT
Thursday, 9 April 2015
Rewind
Topic: Sketch Challenge

Remember this?


You should... it's only been 3 days since I posted it.

If you do remember it you'll probably also remember that I was very disappointed in its outcome. It bugged me so much that I decided to re-work it.

I took off the yellow roses cluster sticker and replaced it with a yellow puffy acrylic flower. That set of stickers had some smaller blooms, too, so I included two of those spilling over into the floral paper. Only one leaf on the sticker sheet and it was used on the top of the main bloom.

I like this MUCH better. The only drawback is the surface of the flowers is textured and reflective and my camera absolutely refuses to focus properly. Impossible to get a good clear photo of this.

Anyway, here's the new version:


I'm satisfied, now.

Ddd


Posted by studio3d@ccgmail.net at 12:01 AM PDT
Wednesday, 8 April 2015
Operation Write Home - sketch 204
Topic: Sketch Challenge

And finally, at the end of 12 days we have the final sketch of this run - OWH sketch 204:

Hey, look at me - following the sketch and all!

I liked the calm, subdued look I achieved yesterday and decided to continue in that vein.

I started with the large butterfly sticker and added papers that were in the same palette - but lighter. Soft coral, taupe, cream and kraft make up the colors I selected. I combined dots and florals, too.

I added a cream satin ribbon where indicated on the sketch and selected three smaller butterflies for the embellishments at the bottom.

Ddd


Posted by studio3d@ccgmail.net at 12:01 AM PDT
Tuesday, 7 April 2015
Operation Write Home - sketch 203
Topic: Sketch Challenge

I think OWH sketch 203 is one I can use to redeem myself from yesterday:

Yesterday I used all bright papers so I decided to swing completely opposite and go with muted patterns instead.

I started with the selection of a flower sticker with a circular head that represents the circle in the sketch. Backing this are the three banners elements cut from text with a slight green tinge. Dotted backing pulls some colors from the flower.

Double borders in soft green and a coral surround the card with a pop of color.


I finished the card with a bordered stamped sentiment popped up on foam tape.

Ddd


Posted by studio3d@ccgmail.net at 12:01 AM PDT
Monday, 6 April 2015
Operation Write Home - sketch 202
Topic: Sketch Challenge

Disconnected. That is how I see OWH sketch 202:

Sure enough, my card came out looking disconnected, as well.

I started with the yellow roses sticker and punched a circle to back it. I kept trying to find papers that went with this and started with a paper with roses in other colors. Those colors carried over to the dotted paper.

Even though I backed all the elements and the card with dark green to unite them I think they all seem to be playing their own tune.


I guess I'll put this one in the 'fail' column and move on to the next sketch.

Ddd


Posted by studio3d@ccgmail.net at 12:01 AM PDT
Sunday, 5 April 2015
Operation Write Home - sketch 201
Topic: Sketch Challenge

I think the main element in OWH sketch 201 is supposed to remind one of a polaroid photo.


The sticker I chose is a train photo but not as large as the sketch. So I just backed it with a paper in proportion to the design instead. This got a doodle line around it.

I pulled colors from the photo when selecting my backing papers. The blue piece was too blue so I used Distress Ink to bring it more to the turquoise.


Because the main element was reduced it left a large space at the bottom of the design. I bordered a stamped sentiment and popped it up on foam tape.

Ddd


Posted by studio3d@ccgmail.net at 12:01 AM PDT
Saturday, 4 April 2015
Operation Write Home - sketch 200
Topic: Sketch Challenge

Can you believe it? We are up to OWH sketch 200 today!


Another sketch tipped up on end, but I treated it in it's actual orientation.

Many years ago I bought a grab-bag of stickers from a craft supply website. There were a couple of sheets that were printed on fabric and the tag I used today was one of them.

I pulled papers that matched or coordinated with the colors in the tag. I went with lighter papers for bordering which gives the card a softer look than the sketch.

I used a single butterfly sticker for the embellishment which echoes the one of the left in the tag.

Ddd


Posted by studio3d@ccgmail.net at 12:01 AM PDT

Newer | Latest | Older