« May 2015 »
S M T W T F S
1 2
3 4 5 6 7 8 9
10 11 12 13 14 15 16
17 18 19 20 21 22 23
24 25 26 27 28 29 30
31
You are not logged in. Log in
Entries by Topic
All topics  «
3D paperwork
A - Z challenge 5
A - Z challenge 7
A - Z challenge round 4
A to Z challenge round 3
A to Z round 2
A to Z round 6
A-Z round 1
Around the House
Art Challenges
Artist Trading Cards
Backgrounds
Beads
Bible Journaling
Books
Boxes
Collage
Color Challenge
Coloring
cookbook
Die Cuts
Digital Projects
Digital Stamps
Drawing
Dry Embossing
Fabric Stuff
Fantastic Folds
Field Trip
Home Decor
How Does Your Garden Grow?
Hymnal Art
In The Kitchen
In the studio
Jewelry
Lettering
Links
Multi-Technique
Music to Work By
Musings
Nail Art
New Work
Online Class
Other Hobbies
Other Projects
Painting
Paper Embroidery
Paper Piecing
Photo
Pretty Paper
Quilting
Random
reading
Scrap Recovery
scrapbooking
Sewing
Sketch Challenge
Some Backlog
Stamping
Stencils
Stickers
Supplies
Teabag Folding
Techniques
Testing
tips and tricks
Tutorial
Web resources
Welcome to my Blog
Work By My Friends
workflow
Writing
Blog Tools
Edit your Blog
Build a Blog
RSS Feed
View Profile
Group One
In & Out of Studio 3D
Friday, 22 May 2015
Operation Write Home - sketch 229
Topic: Sketch Challenge

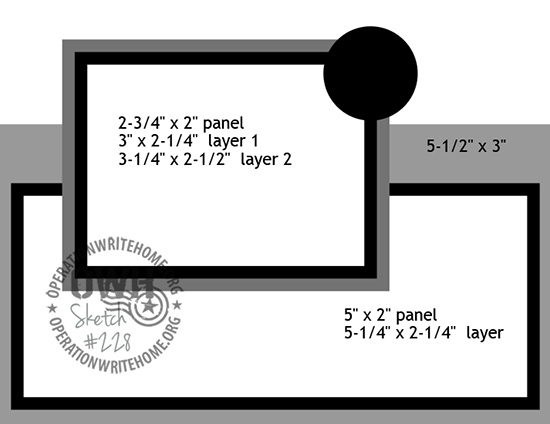
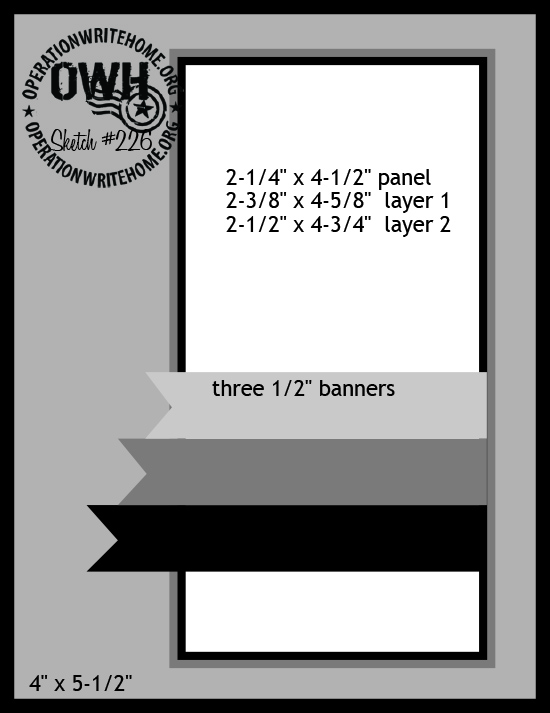
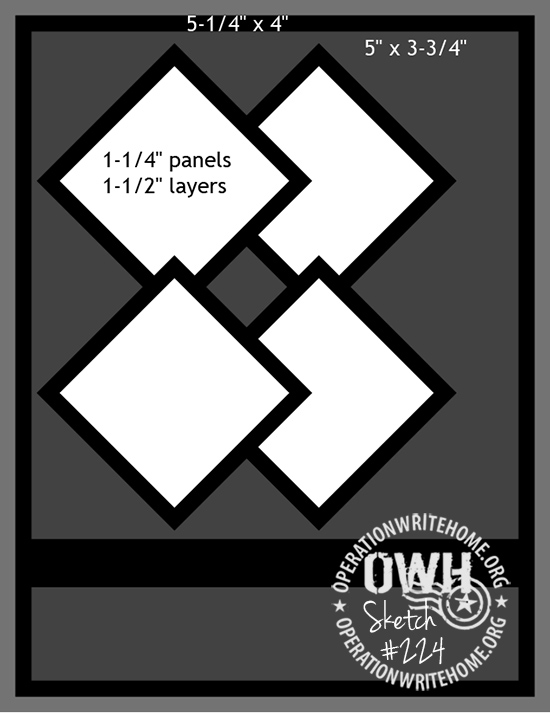
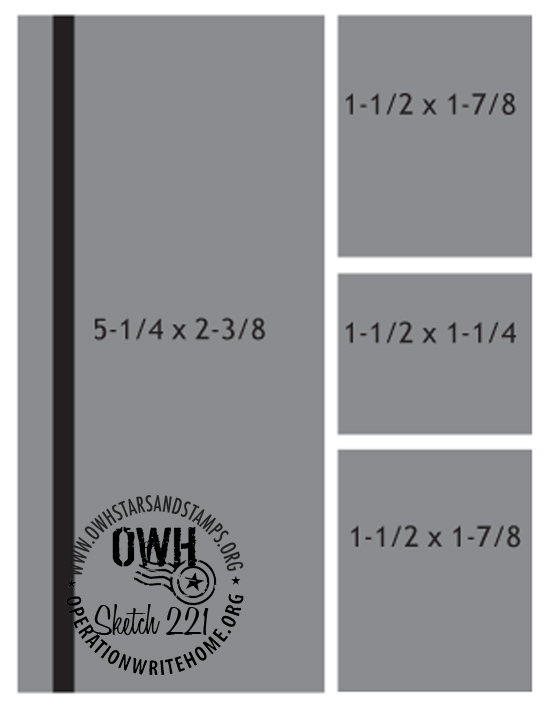
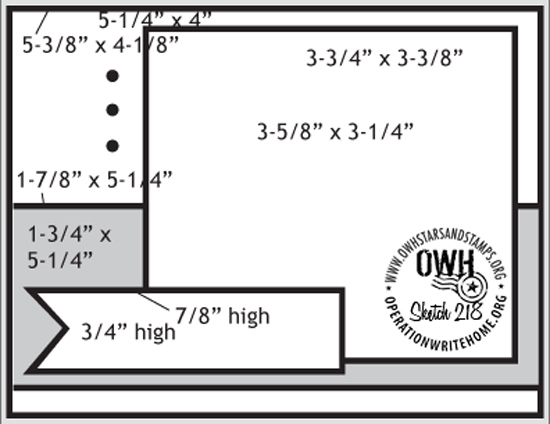
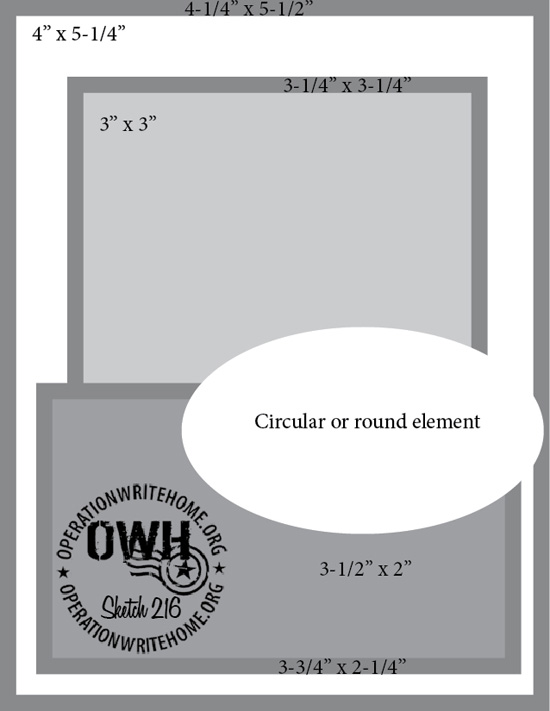
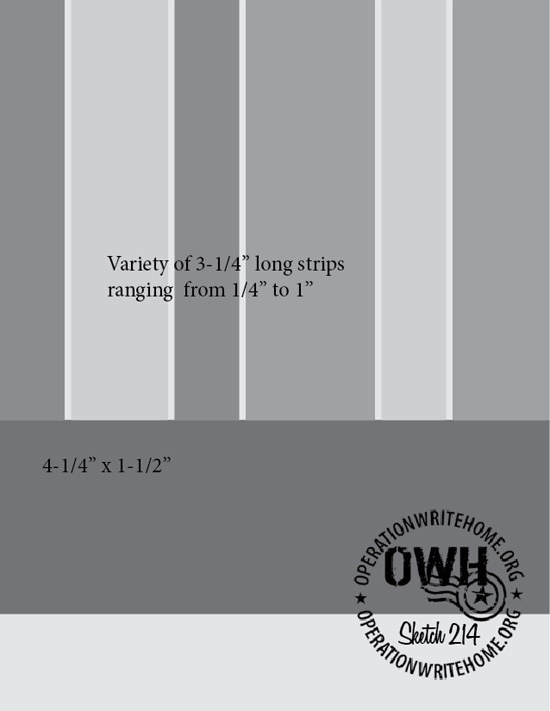
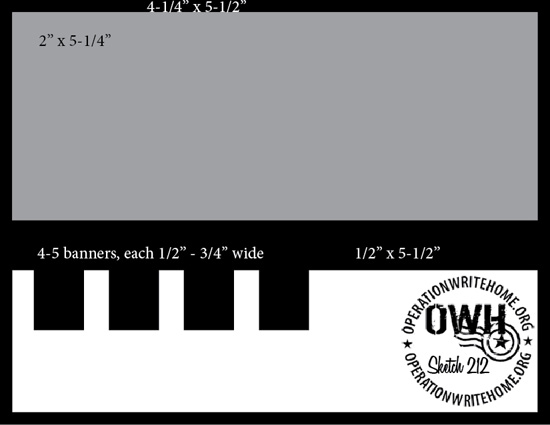
This could be a very busy sketch if it got away from you. Here is OWH sketch 229:


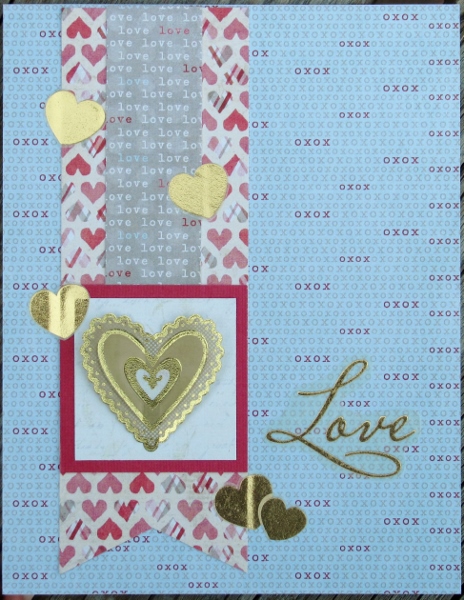
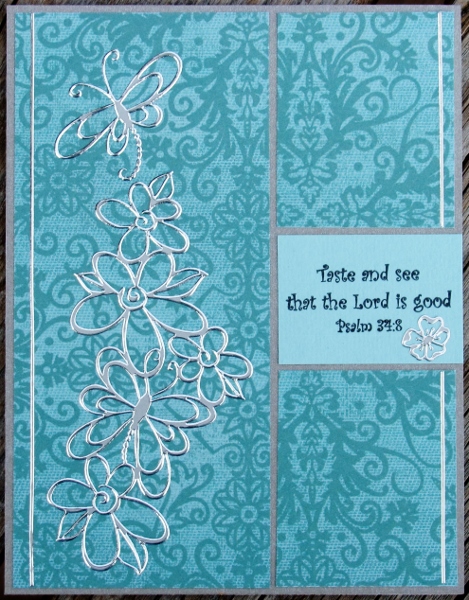
I reined it in by going with a muted palette and by getting rid of the circle borders.

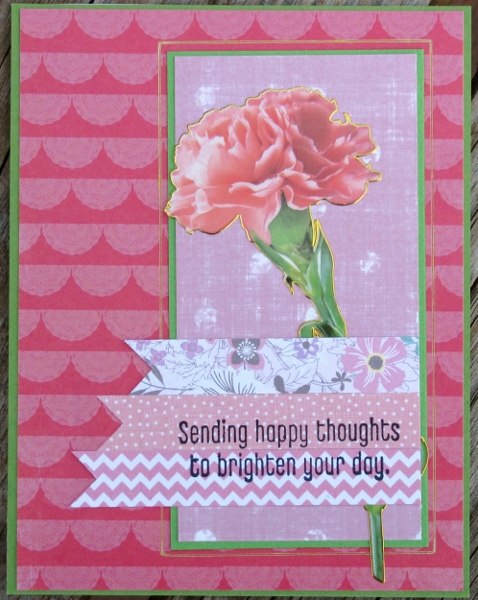
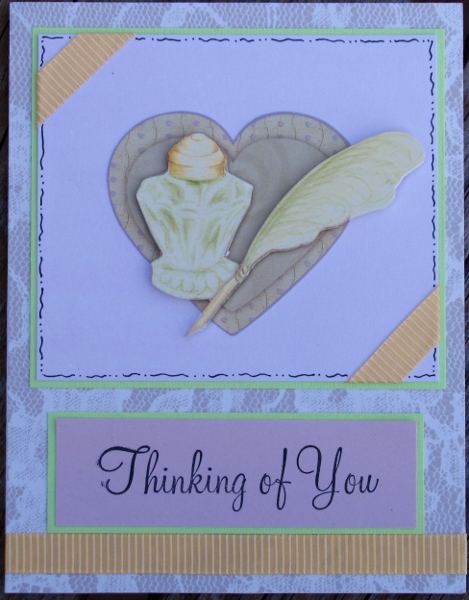
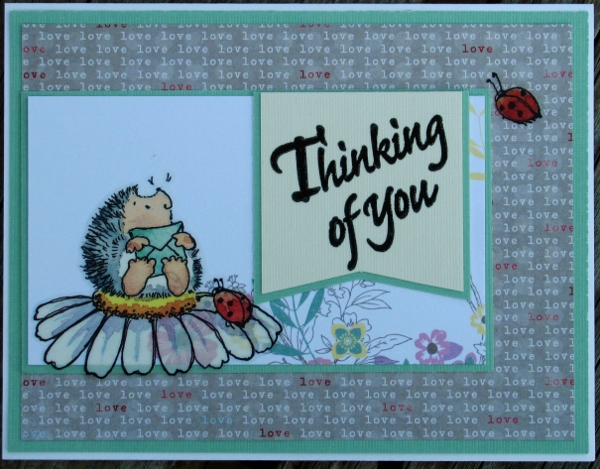
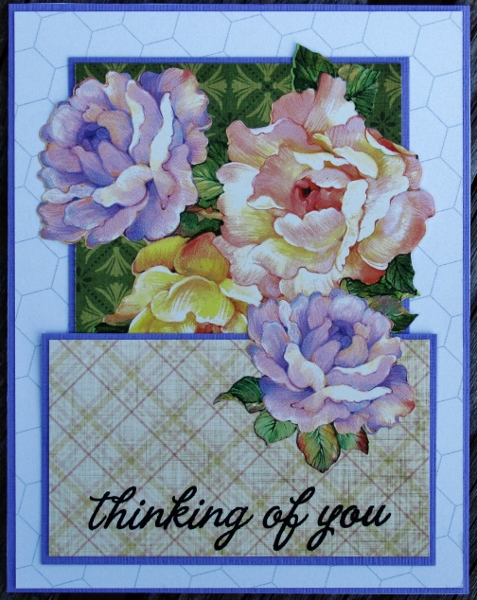
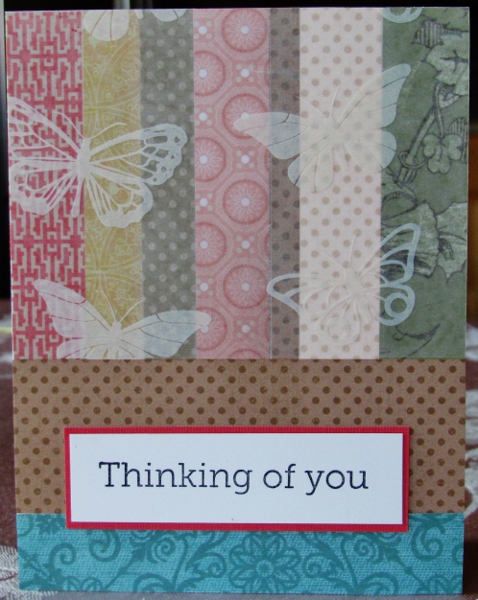
I had a number of vellum pansy stickers that I applied to plain white cardstock. These were cut with a die in the Cuttlebug. Then I cut a circle of a pre-stamped sentiment.

I chose the background paper to go with the blue flowers, the lefthand strip to go with the purple flowers and the white card base to go with the circles.


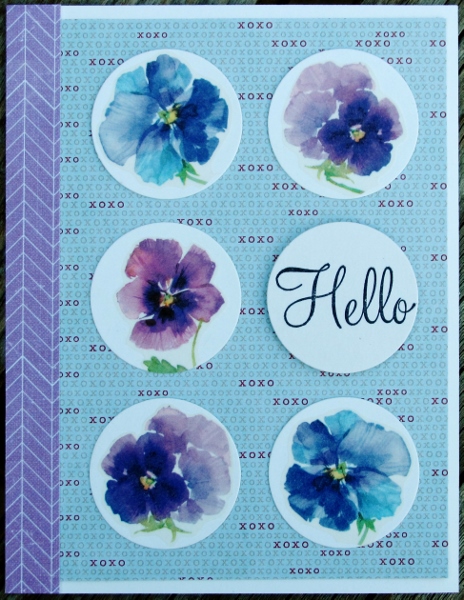
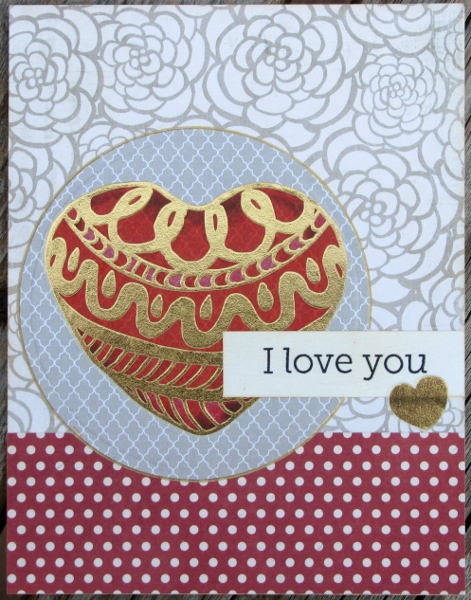
The sentiment circle is popped up on foam tape for a little dimension.

Ddd


Posted by studio3d@ccgmail.net at 12:01 AM PDT
Thursday, 21 May 2015
Operation Write Home - sketch 228
Topic: Sketch Challenge

Twist and turn - that's what I did to OWH sketch 228:


Actually, I didn't so much twist it as I did flip it - from top to bottom. I just needed it to work with the orientation of another of those adorable hedgehog stickers.

Greys, reds and peach were pulled from the image to become the paper colors on this card. You'll recognize the floral, the grey diamond and the red dots from yesterday. How much that peach changes things!

The upper panel was too plain in this orientation so I added a pre-stamped sentiment with a bit of red border.


The final ladybug from this sheet of stickers makes an appearance here, too.

Ddd


Posted by studio3d@ccgmail.net at 12:01 AM PDT
Wednesday, 20 May 2015
Operation Write Home - sketch 227
Topic: Sketch Challenge

Ready for another sketch? Here is OWH sketch 227:

NO, wait! HERE is OWH sketch 227:


Will the REAL sketch 227 please step forward? Actually, we were given our choice of using the rectangle element or the round element. I chose the latter.

I wanted to use this big red and gold vellum heart sticker so that was the jumping off place. I first found the red dot paper and then the floral. The last selected paper was the grey for the circle.

It all came together so perfectly, too!

I used a pre-stamped sentiment and used form distress ink to knock back the stark white of it. The second, smaller, heart is more from the vellum sticker sheet.

I needed a bit of definition around the circle so I used the gold gel pen right along the edge.

Ddd


Posted by studio3d@ccgmail.net at 12:01 AM PDT
Tuesday, 19 May 2015
Operation Write Home - sketch 226
Topic: Sketch Challenge

Yawn. Here is OWH sketch 226:

I wanted to liven this up so I chose a shiny floral with a gold border.

I chose a variety of pink papers and used some green for bordering to echo the stem. 

I stamped the sentiment directly onto two of the strips.

I wanted to reinforce the gold border on the flower so I used a gold gel pen to add some lines around the feature panel.

Ddd


Posted by studio3d@ccgmail.net at 12:01 AM PDT
Monday, 18 May 2015
Operation Write Home - sketch 225
Topic: Sketch Challenge

OWH sketch 225 is a sketch I LOVE:

Knowing I wanted to use gold hearts I chose papers for the panels that featured 'love' and 'xoxox' text as will as some hearts. These are all part of the same 6x6 pad so they naturally coordinate in colors.

I pulled coral from the scrap bin to make the border for the feature panel and used a paper with a light script for its center.

The main heart is a 3D element in that the center sticks but the sides are loose. The smaller gold hearts are part of a vellum sticker sheet.


The narrower panel is extra (not in the sketch) and the text is more from the vellum sticker sheet.

Ddd


Posted by studio3d@ccgmail.net at 12:01 AM PDT
Sunday, 17 May 2015
Operation Write Home - sketch 224
Topic: Sketch Challenge

Little squares say 'repeating elements' to me. And thats what we get with OWH sketch 224:


I used some of the lace paper and some of the green from yesterday for the caard today. They were the perfect foil for the holographic dragonfly stickers in three sizes.

I used the true given measurements from the sketch for the borders so they are 1/8 inch all around instead of 1/16. With all these solids, it was needed.

I stamped the sentiment directly on some of the lace paper and bordered that with green as well.

The result was too plain so I used some border strips from the same sticker sheet along the edges.

Much better.

Ddd


Posted by studio3d@ccgmail.net at 12:01 AM PDT
Saturday, 16 May 2015
Operation Write Home - sketch 223
Topic: Sketch Challenge

OWH sketch 223 is simple and sweet:


I started with a cardstock sticker that I had a duplicate of. This allowed me to apply the second copy to plain paper and cut out the forward elements. When I used some foam tape I turned this into a 3D element.

I uplled soft lavender and soft green from the image for my papers and added a backing paper with lace printed on it.

I needed a bit of yellow so I pulled a striped ribbon and used it on two corners of the image panel and the as a horizontal band instead of the strange vertical one on the sketch.

I needed a little definition for the main panel so I chose to make a black doodle line around it. This also ties into the stamped sentiment.

Ddd


Posted by studio3d@ccgmail.net at 12:01 AM PDT
Friday, 15 May 2015
Operation Write Home - sketch 222
Topic: Sketch Challenge

I'm going to turn OWH sketch 222 on its ear:


The clear scripture sticker dictated the direction just by the size and orientation of the text. The cross sticker is off the same sheet and I added that coral dot that was left over from a project eons ago. I wanted to use it for matching the color in the heart strip and to ech the dots all over the other two papers.

I used the same coral for the card base to pull it all together.

Ddd


Posted by studio3d@ccgmail.net at 12:01 AM PDT
Thursday, 14 May 2015
Operation Write Home - sketch 221
Topic: Sketch Challenge

Sometimes (OK, a LOT of times) I look at a sketch and ask myself what in the world am I going to do with THAT? There was a lot of that going on with OWH sketch 221:

What unifies this card is using the same paper over the whole surface. Since I wanted to use the silver peel-off sticker I used a silver backing and placed the cut elements on top with small spacing to create borders.

The pre-stamped scripture dictated the size of the upper and lower sections and I still had to run it out to the margin.


I added a smaller silver flower for a little balance and then used thin silver border strips on the left in place of the border strip on the sketch, plus a marching pair on the right.

Ddd


Posted by studio3d@ccgmail.net at 12:01 AM PDT
Wednesday, 13 May 2015
Operation Write Home - sketch 220
Topic: Sketch Challenge

There is something totally different about OWH sketch 220 - no measurements! I'm not sure if they didn't know how to list them or if they really wanted us to just go with the flow!


I added my own twist on it by cutting the panel down to reveal an a outer border.

I chose a dark brown dot for the feature paper and decorated it all with some of those silver peel-off stickers which I had colored with alcohol markers while they were still on the sheet.

In the background and borders is a text print.

Ddd


Posted by studio3d@ccgmail.net at 12:01 AM PDT
Tuesday, 12 May 2015
Operation Write Home - sketch 219
Topic: Sketch Challenge

Nothing new here - that's how I approached OWH sketch 219:

Leftovers used: green from the elegant floral that went out of bounds, yellow chevron from yesterday's card, purple strip from the scrap bin, grey dot from the scrap bin, chevron circle from a long-ago project and vellum round overlay from sticker sheet used last week.

All these were pulled in response to the choice of the floral sticker! I stamped the sentiment directly onto the background and 'oopsed' a little smear which I covered with some lavender pearls, which I added to the dotted I's as well.

The dot embellishments were represented with some blush 'clear' dots.

Ddd


Posted by studio3d@ccgmail.net at 12:01 AM PDT
Monday, 11 May 2015
Operation Write Home - sketch 218
Topic: Sketch Challenge

I found exactly the sketch to use for a diecut I had left over from another project - OWH sketch 218:

WOW! Look at all those measurements! It's really much simpler than that. I use the measurements of the main elements and cut the backing pieces 1/8 inch larger each way. I like the thinner 1/16 borders that result for most cards. That is especially true when the borders are very high contrast, like this red.

I pulled the colors from the vinyl sticker of the girl with her birthday cake. I was glad to have the perfect place to use the diecut word, too.

The multicolored dots and the bright yellow chevrons are calmed down by the black stripe but still looks fresh and fun.

Everything is unified by those thin red borders.

Ddd


Posted by studio3d@ccgmail.net at 12:01 AM PDT
Updated: Wednesday, 20 May 2015 10:36 AM PDT
Sunday, 10 May 2015
Operation Write Home - sketch 217
Topic: Sketch Challenge

Look this way, no, look that way! I had to do a bit of a change-up with OWH sketch 217:

The hedgenog sticker (yes I found three more of them in my stash -YAY!) was looking the wrong way for the sketch so I flipped it side to side.

I keyed all the backing papers and borders off the colors in the sticker - in fact, gray, teal, red and white are all in the 'love love love' background paper!

The sentiment was already stamped but I had to do a bit of refining in the coloring as the stamp was not solid on the textured paper.

I had one last ladybug on the sticker sheet so I added him in place of tthe three dot embellishments, although in a different placement.

Ddd


Posted by studio3d@ccgmail.net at 12:01 AM PDT
Saturday, 9 May 2015
Operation Write Home - sketch 216
Topic: Sketch Challenge

Would you believe you can turn OWH sketch 216 into pure elegance?

On this sketch there are some options built in - although it says 'circular or round element' (aren't those the same thing?) the sketch actually shows an oval!

I had a large floral sticker set that I wanted to use and it was even larger than the background panel. So I let it spill over the edges and I LOVE it! I chose a green pattern for back there and it looks like more leaves.

I pulled lavender from the floral for all the borders and used a smaller version of one bloom for the 'round' element.


The patterned paper up front picks up all the colors of the floral and I stamped the sentiment directly onto it.

Ddd


Posted by studio3d@ccgmail.net at 12:01 AM PDT
Friday, 8 May 2015
Operation Write Home - sketch 215
Topic: Sketch Challenge

It takes several days to weeks to make one quilt and I can make 12-16 cards in one day - but each item only gets one day featured on the blog. I guess it all evens out.

Today the feature is OWH sketch 215:

Lots of layers on this one. I chose to start with a sticker that wasn't even the shape or size of any of the designated parts.

I added a dotted layer behind the butterfly sticker to start it off. The floral layer came next and I chose the cream layer to lighten it all up. I chose to use coral for the stamped sentiment.

Black backing throughout unifies everything and keeps the black stamping from standing out too much.


Looks like that butterfly is just flitting through the garden!

Ddd


Posted by studio3d@ccgmail.net at 12:01 AM PDT
Thursday, 7 May 2015
Waves Of Mystery
Topic: Quilting

I participated in a mystery quilt through Missouri Star Quilt Company a couple of months ago. It was an interesting experience, especially choosing colors without knowing how they would be used together.

We needed a background fabric - I chose red. Then we needed 5 colors with a dark and a light of each. For these I chose brown,

teal,

gray,

blue

and green.

Of each color combination, ONE of the fabrics has a metallic shine in the pattern. The red does, too.

This was a 6 week adventure, plus the run-up that gave us the fabric requirements and the initial cutting instructions. I added one more column to the left side to balance it.

I quilted it in diagonal squares and added binding with the red.

The finished size is 50 x 62.

Ddd


Posted by studio3d@ccgmail.net at 12:01 AM PDT
Wednesday, 6 May 2015
Birds All Around
Topic: Quilting

This quilt is made with a totally different method as it is NOT pieced.

Instead, each circle is made inside out with feature fabric, batting and backing and stitched all around. Then batting is trimmed close to the stitching and a slit is made on the feature fabric near the side edge. The circle is turned right side out through this slit and pressed.

Rows are sewn together along one edge (a straight line across, not following the curve) then these rows are sewn to one another and all the curved edges are turned back over the front side and topstitched.

I used bird fabric for the center section and a floral around the outside. The birds are all backed with various greens to call to mind leaves in the trees and the florals are all backed with various teals to represent the sky.


I did not turn in the outer edges so it leaves a beautiful scallop.


Because all of the rounded edges come to the front the back becomes a grid of squares. Actually, because I stitched my circles with wider margins on the sides than the top and bottom My back came out as rectangles.


The resulting quilt is 42 x 50.

Ddd


Posted by studio3d@ccgmail.net at 12:01 AM PDT
Tuesday, 5 May 2015
Operation Write Home - sketch 214
Topic: Sketch Challenge

At last, a chance to use up LOTS of table scraps! Here is OWH sketch 214:


There is a lot of flexibility in the use of the strips along to top. I gathered a variety and cut different widths. These were adhered to a base piece of cardstock and then trimmed to the specified size for the panel.

I then chose a piece of vellum printed in white with butterflies. I ran this through the Xyron to cover the back with adhesive and laid it over the stripped panel. Trimmed to size, it was then adhered to the top of the card front.

I then added the two bottom panels.


I went 'off sketch' at this point and added a pre-stamped sentiment panel, bordered in coral.

Ddd


Posted by studio3d@ccgmail.net at 12:01 AM PDT
Monday, 4 May 2015
Operation Write Home - sketch 213
Topic: Sketch Challenge

How about another sketch? Today we have OWH sketch 213:

As usual, I started by selecting a feature element, in this case a rose sticker, followed by choosing coordinating papers first from the scrap bin and then the 6x6 paper.

I chose a diagonal plaid for the background and it has a little pink line through it that goes with the flower.

Two strips of green pull color from the leaves and this is echoed in the bordering green.

A little strip of text adds to the casual feel.


The sketch does nothave a sentiment block but It had a nice open space to hold one. I used a pre-stamped sentiment with a whimsical look and used alcohol marker to tine the paper to blend better with the background.

Ddd


Posted by studio3d@ccgmail.net at 12:01 AM PDT
Sunday, 3 May 2015
Operation Write Home - sketch 212
Topic: Sketch Challenge

OWH sketch 212 is presented with some options:

I chose to take the options further and eliminated the outer border.

I decided to use four tabs as the sketch illustrates but I wanted to make them of folded ribbon for a different look. Then I thought, why not use ribbon for the narrow band as well? Why not?

I had started out by selecting a 3D sentiment sticker (the very last one I have) and keyed all the paper and ribbon colors off of that.

Truly love the rich teal papers which are actually greener than they appear here.


I have visions of someday using this sketch again by using those little banners to stand in for piano keys.

Ddd


Posted by studio3d@ccgmail.net at 12:01 AM PDT

Newer | Latest | Older