« April 2017 »
S M T W T F S
1
2 3 4 5 6 7 8
9 10 11 12 13 14 15
16 17 18 19 20 21 22
23 24 25 26 27 28 29
30
You are not logged in. Log in
Entries by Topic
All topics  «
3D paperwork
A - Z challenge 5
A - Z challenge 7
A - Z challenge round 4
A to Z challenge round 3
A to Z round 2
A to Z round 6
A-Z round 1
Around the House
Art Challenges
Artist Trading Cards
Backgrounds
Beads
Bible Journaling
Books
Boxes
Collage
Color Challenge
Coloring
cookbook
Die Cuts
Digital Projects
Digital Stamps
Drawing
Dry Embossing
Fabric Stuff
Fantastic Folds
Field Trip
Home Decor
How Does Your Garden Grow?
Hymnal Art
In The Kitchen
In the studio
Jewelry
Lettering
Links
Multi-Technique
Music to Work By
Musings
Nail Art
New Work
Online Class
Other Hobbies
Other Projects
Painting
Paper Embroidery
Paper Piecing
Photo
Pretty Paper
Quilting
Random
reading
Scrap Recovery
scrapbooking
Sewing
Sketch Challenge
Some Backlog
Stamping
Stencils
Stickers
Supplies
Teabag Folding
Techniques
Testing
tips and tricks
Tutorial
Web resources
Welcome to my Blog
Work By My Friends
workflow
Writing
Blog Tools
Edit your Blog
Build a Blog
RSS Feed
View Profile
Group One
In & Out of Studio 3D
Thursday, 6 April 2017
John 15:1
Topic: Bible Journaling

It took me a while to get back to putting artwork in my journaling Bible. But I was actually spending a lot of time going line-by-line through the index and making notes of scriptures that I wanted to use. I ended up with 8 pages!

This section of scripture is one I had already planned to draw out before I did the index search, though.

The hardest part was actually deciding how to do the lettering. I tried to make them look like vines.


Although I noted the reference as verses 1-4 I only used the first part of verse one and one phrase out of verse 4. I hope to encourage the reader to look at the whole section of scripture.

Ddd


Posted by studio3d@ccgmail.net at 10:18 PM PDT
Wednesday, 5 April 2017
Seaside Candle Trio
Topic: Home Decor

I had to add a new caregory for this craft as I had never done anything like it. With a general theme like Home Decor I will be able to add a variety of crafts under this heading.

Pinterest popped up with a photo the other day from an Etsy listing:


I thought that was pretty cute and went to Dollar Tree to see how much of the supplies I could come up with.

- I could get the blue sand there but really wanted regular sand. That I had at home already.

- I got the wine glasses for $1 each

- I got three candles there but then switched them out for battery-operated candles at Michaels

- No twine at Dollar Tree?!?!? Michaels had that, too

- No seashells at Dollar Tree either. Michaels had them

- Dollar Tree DID have the mirrors for bases

I already had E6000 glue and sheet magnets and clear acetate so I was ready to tackle the project.

First, I mixed my two sands together. Some was from Maui and some from the Oregon coast. I poured 1/3 of it into each of the three wine glasses. I sorted the shells so I had the same mix in each glass - a variety of sizes and types. Then I applied a line of E6000 glue around the rim and added a square of clear transparency acetate. This seals in all the loose sand and shells for when the glass is turned over.

While that was setting up I glued several rounds of twine around the base of each candle. I used the E6000 glue for this, too. In fact the same glue is used for every step of the whole project.

After allowing both of these steps to dry overnight, I turned the glasses upside down and glued several rounds of twine at the rim where it meets the acetate.

Several rounds of twine were wrapped and tied on the stems (I did not glue these at all)

I used scissors to trim the acetate next to the twine on the glass.

The candles were pretty slippery setting on the foot of the glassware so I used some sheets of magnet to cover the foot and then glued a ring of magnet sheet on the candle base. This had to be a ring so the battery access door and the on/off switch could still be accessed.

To display, a glass is centered on a mirror base and a candle is turned on and set upon the foot of the glass.

Like the Etsy listing, I made a set of three, but mine are all the same size instead of the varied glassware they used.


I really like how the project turned out. I may shop at a larger Dollar Tree to see if I can find more of the elements there. I know they've had all of these things at one time or another.

Ddd


Posted by studio3d@ccgmail.net at 8:08 PM PDT
Monday, 3 April 2017
Frosty's All Buttoned Up
Topic: Jewelry

I ended up in the craft studio today (as opposed to the quilt studio) to put new clasps on some necklaces that were too hard to fasten with older fingers. They all got changed to magnetic clasps.

Then I had some charms to add to my charm bracelet and a clasp to swap out on a second one.

I had some fun on a project that I can't show until it is gifted and then I picked up a page I had copied from a recent craft magazine and decided to make one of the items they showed.

I dug out the button box and sorted until I found just the right sizes and colors. Then I pulled out the jewelry tools and some wire. The wire was bent into a long loop and the buttons threaded on using two holes in each one.

At the top, I wrapped one wire end around the other and then created a loop.

A snippet of checked ribbon was tied in a knot around the narrowest part and details were added with Sharpie markers.


These are so stinkin' cute! I'm adding chains to make them into necklace pendants.

Ddd


Posted by studio3d@ccgmail.net at 6:23 PM PDT
Sunday, 2 April 2017
A Little Birdie Told Me
Topic: Quilting

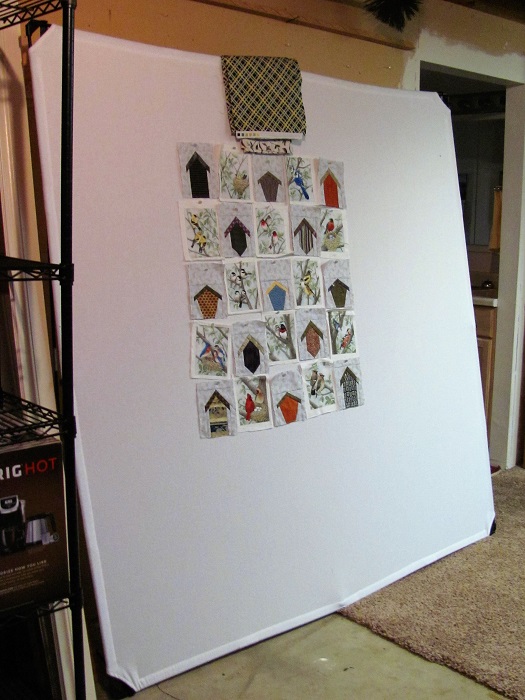
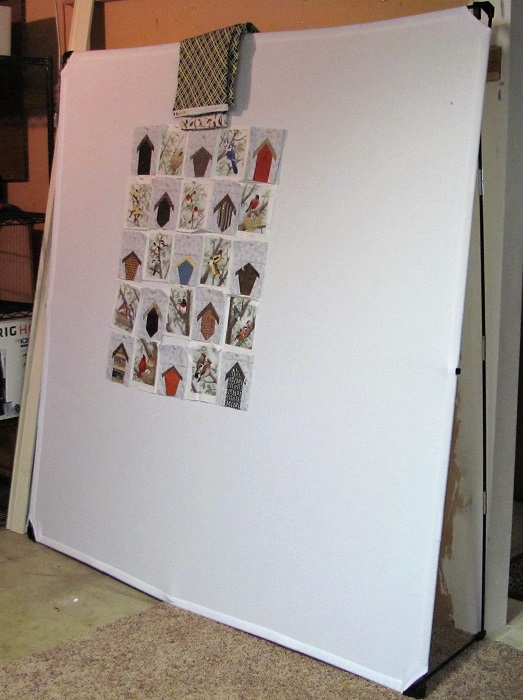
Well, since I gave a sneak peek of this quilt yesterday on the design wall, I thought I'd go ahead and update it with the top finished. It still needs to be sandwiched, quilted and bound.

I'm throwing in a step by step for some of the process, as well.

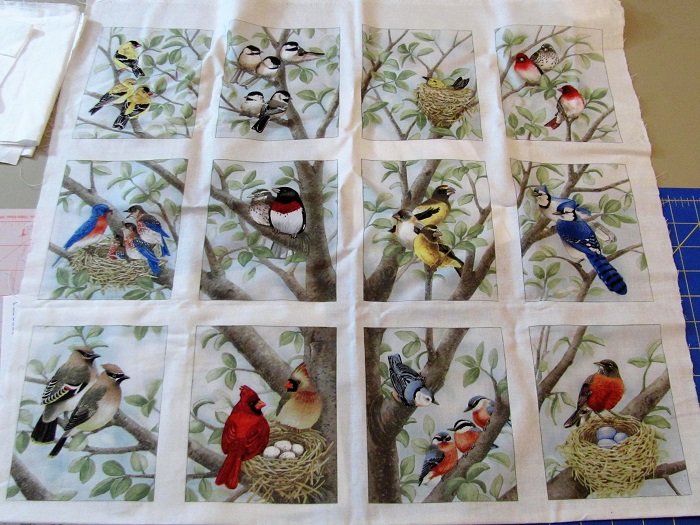
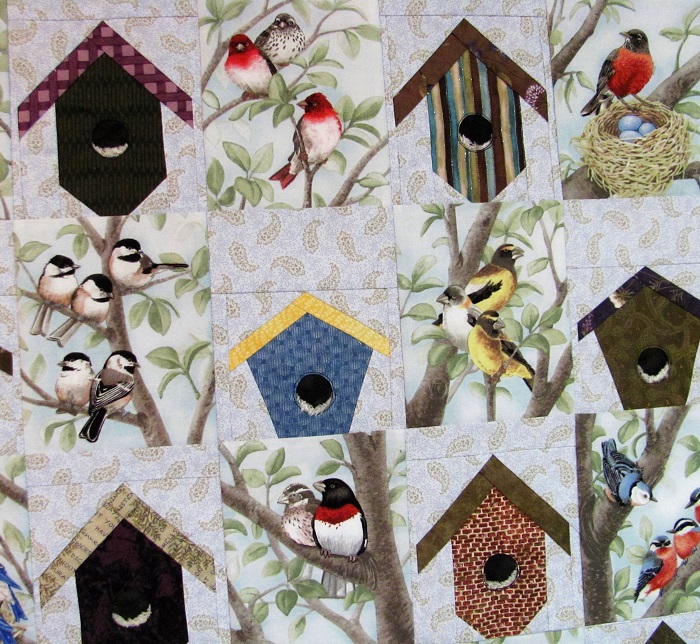
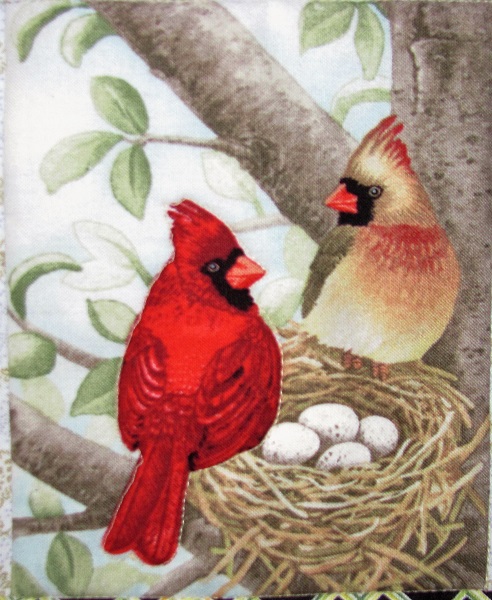
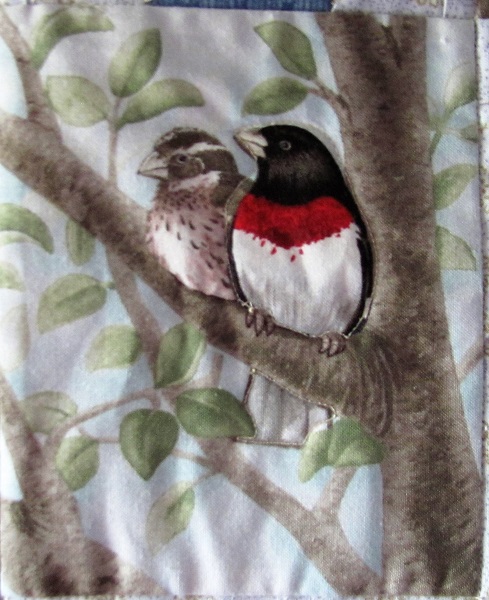
I started out with a panel of bird pictures, all camped out in the branches of one tree. There are 12 bird pictures on the panel and duplicates on the other half of the fabric.


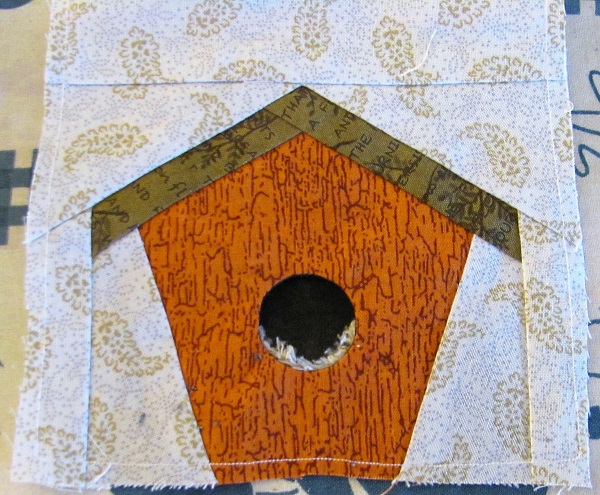
In deciding how to arrange these I remembered I had a paper-piecing pattern for three birdhouses. I checked and they were about the right size for interspersing with the birds.

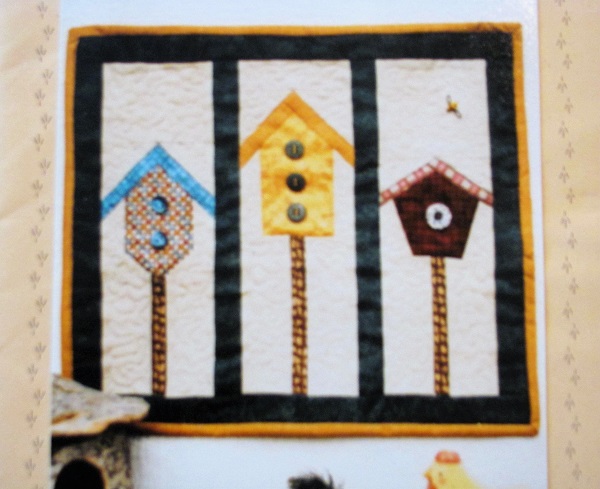
This is the pattern cover (bad photo):

I made up four of each style with a consistent sky and a mix of siding and roofs. I had to make one extra for the final layout.

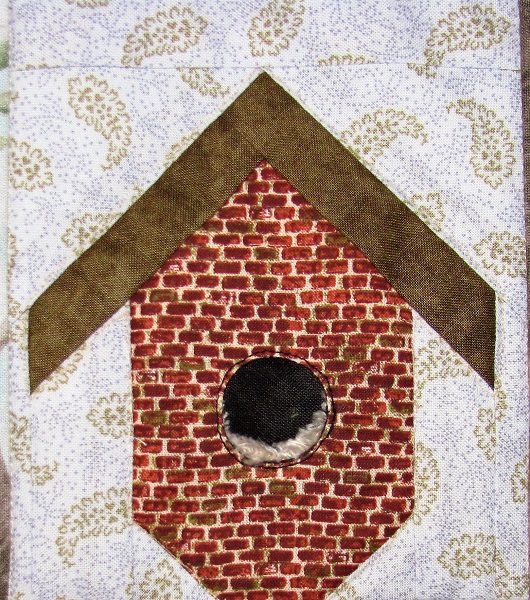
I didn't want to use buttons for the entrance holes like the pattern indicated, so I used a process that I had done on a birdhouse quilt several years ago. Here's the method I used.

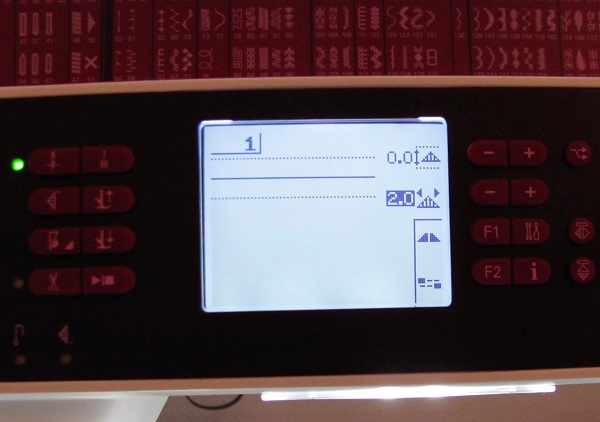
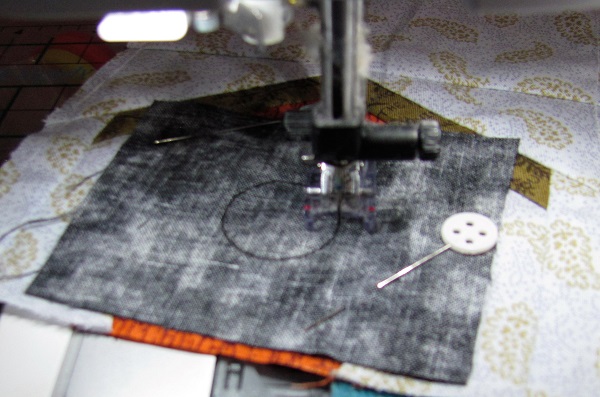
I set my machine stitch short (2.0) and set needle down to 'on'. I used black thread throughout.


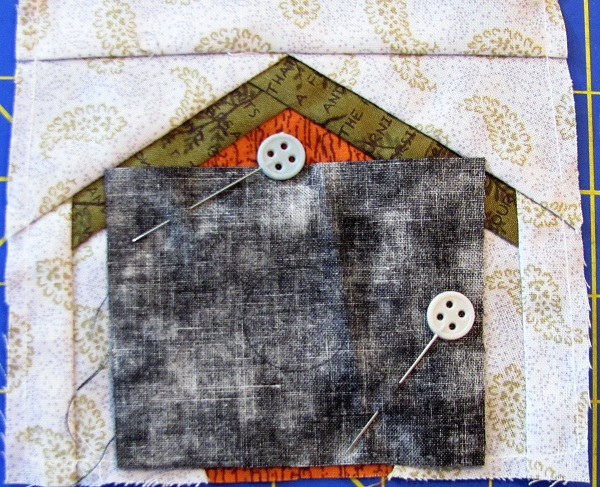
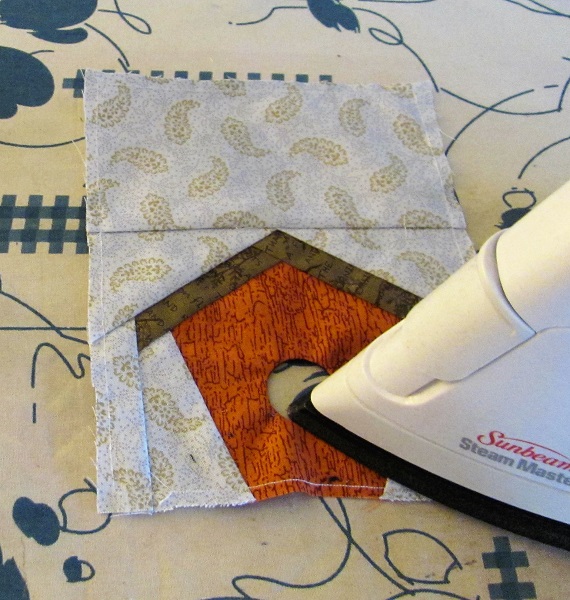
I started with a plain house:


Then I used black pen to draw a circle on the back of a square of black fabric.


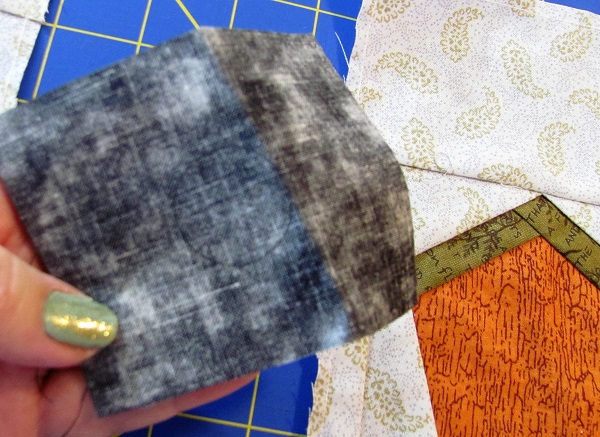
This was centered on the front of the house, right sides together and pinned in place


I very carefully stitched on the lines around the circle


With tiny, sharp-point scissors I cut a whole through both layers leaving about 3/16 from the stitching line


From whichever side the stitching showed best I snipped right up to the stitching leaving very narrow fringes


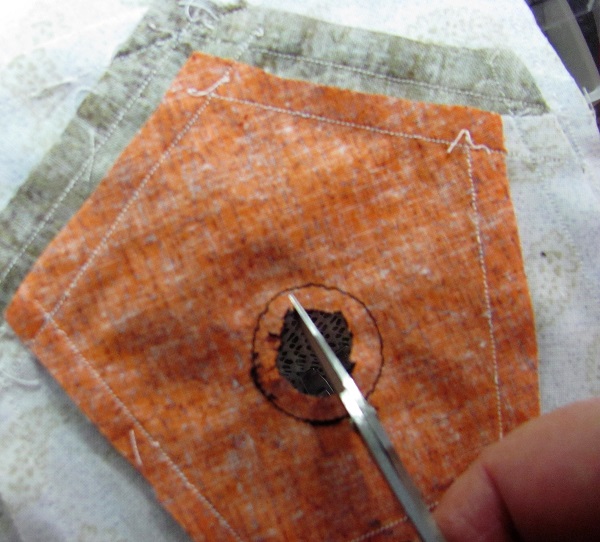
You can see how finely cut the fringes are


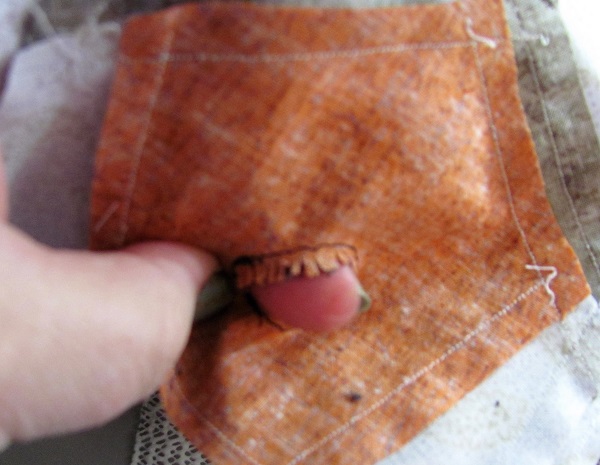
Pushed all of the black fabric through the hole to the wrong side of the house


Used a wooden tool to smooth and press the opening round and flat


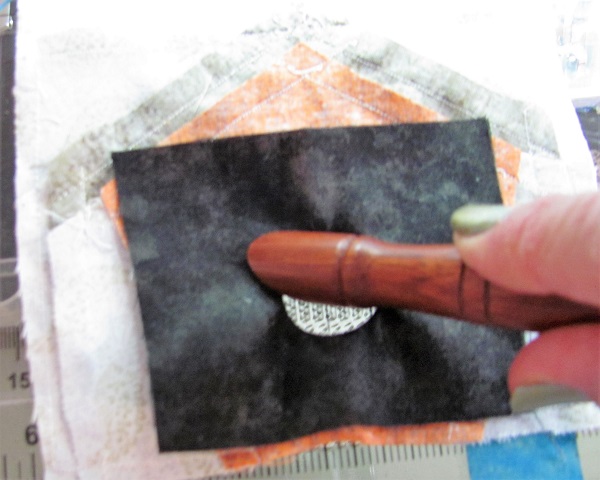
Took to the pressing surface and steam ironed completely flat


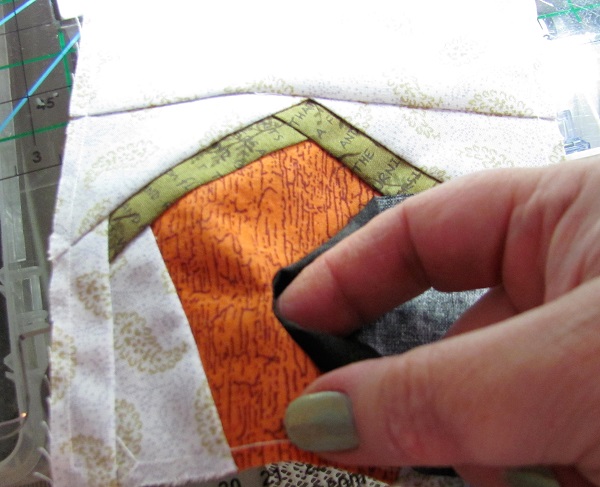
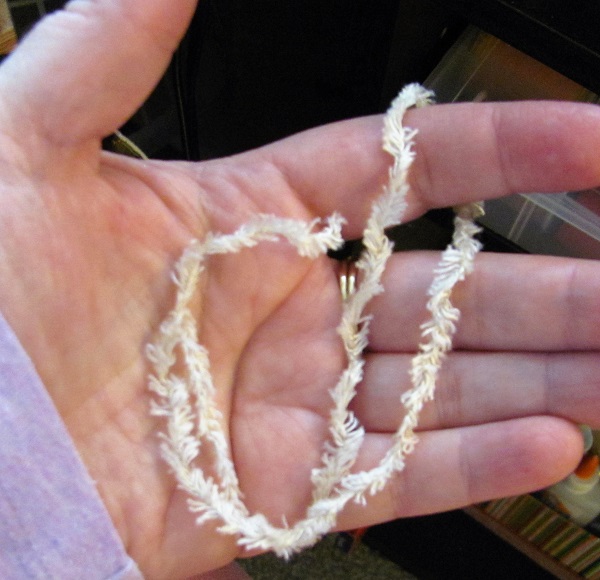
Cut a length of wooly or eyelash yarn in light tan (amout 3 inches)


Drape it on a second square of black mimicing the curve of the bottom of the hole


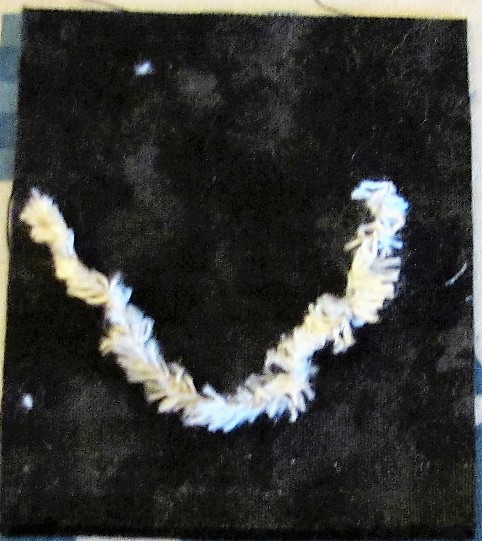
Lay the birdhouse on top of the yarn, allowing just a fringe to peek out


Carefully top-stitch around the hole very close to the edge to secure the yarn and the backing in place


Trim the two layers of black about 1/2 inch from the stitching
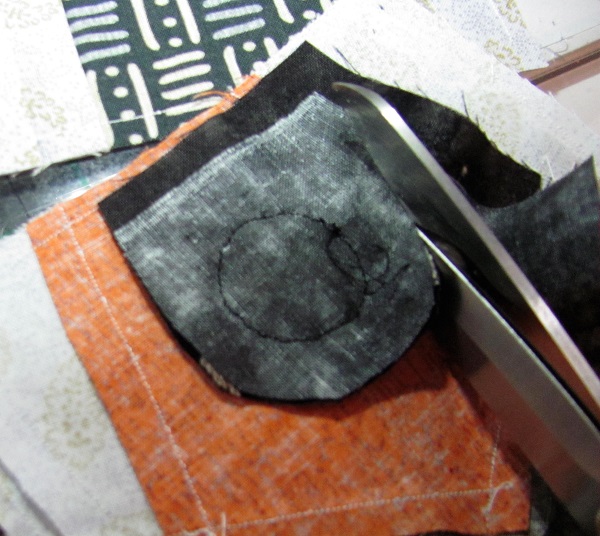

One house done


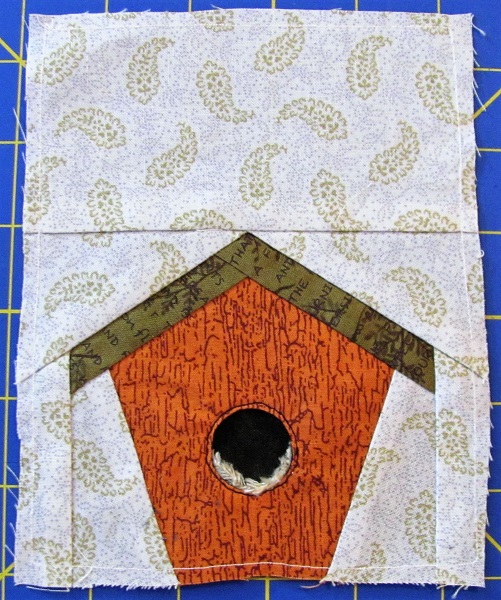
Return houses to the layout


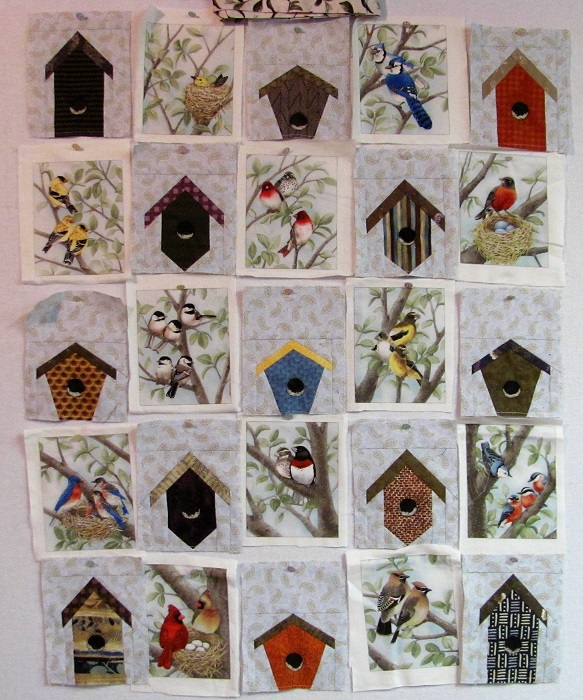
Trim all the birds to a standard size (mine were cut at 5 x 6 inches) and cut the birdhouse blocks the same

Assemble the top


Borders of complementary fabric were added


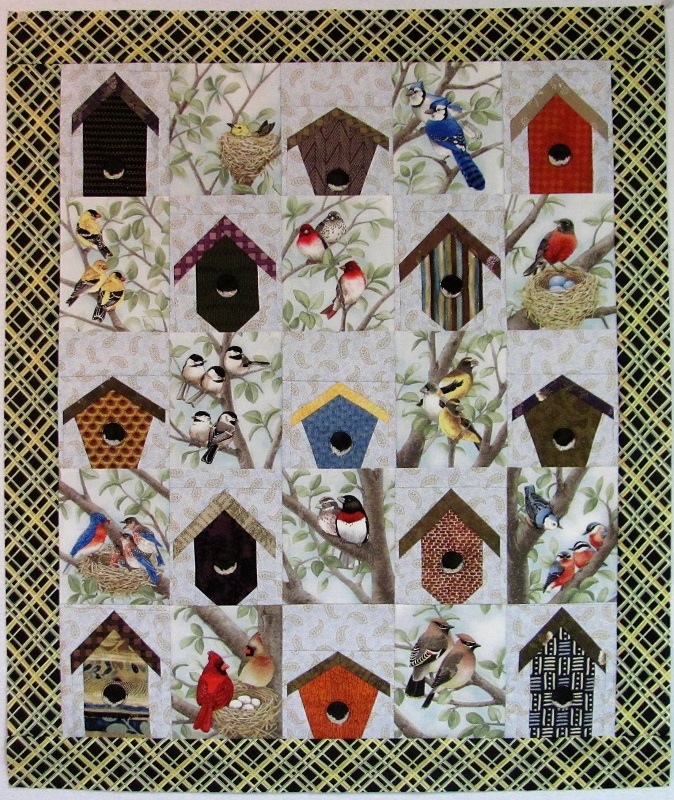
After quilting I will finish this with a black binding.

The top measures 27 wide by 32 tall and will be a wall hanging for the fireplace.


UPDATED 4/11/17


I finished this off by quilting around one main bird in each panel and around each birdhouse:


I attached a hanging sleeve to the top border and bound it with black.

Here is the finish:


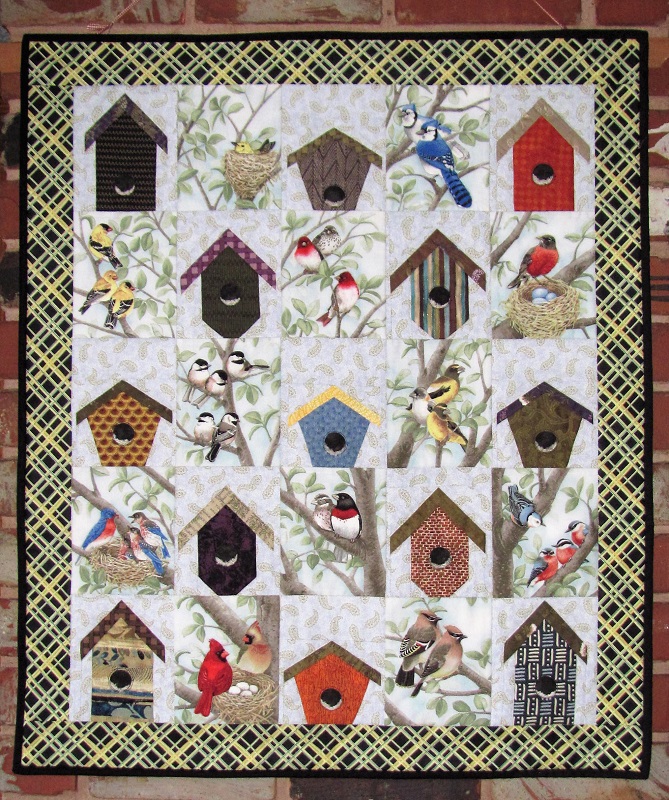
I like this very much!


Ddd


Posted by studio3d@ccgmail.net at 12:01 AM PDT
Saturday, 1 April 2017
Great Wall
Topic: In the studio

I've got a great new addition in the quilt studio! I first found this item in the Nancy's Notions catalog but, while at the Sewing and Stitchery Expo the end of February, I found it at a better price.

In my studio, I have no room for a design wall without moving out half the furniture. But this portable wall comes in several sizes. I got the 72x72 size. 

Not only is it free-standing, it is light and portable. It breaks down in about 5 minutes and all fits in its own little duffel bag that is about 6 inches across and 18 inches long.

You can see the wall here from the front.


It has a flannel cover, four outer braces, two cross-braces, and two legs with their own braces.

Here is a view from the other side.


In this side view you can see the legs and braces.


In this back view, you can see the cross-braces that hold it taut.


Because it breaks down so easily, I can leave it up while at home but take it along to set up at quilt workshop days and on retreat.

Sure easier than trying to arrange blocks on the bed or floor.

I set it just outside the quilt room on an unused basement wall.

Ddd


Posted by studio3d@ccgmail.net at 10:51 PM PDT
Thursday, 9 March 2017
When The Bough Breaks
Topic: Quilting

When Pinterest popped up with a picture of a Swoon Block I immediately envisioned it as a single big block for making a baby quilt.

I had identical fabrics in three colors. (Color rendition is poor as they are actually cream, steel grey and shell pink.) This is 40 inches square made up of 4-inch units.


Because of the little branches printed on the fabrics I used an embroidery stitch of leafy vines for quilting. I used the stitch to outline every block of color and separate the border from the block. I also used it to hold down the binding.


The backing uses the same shell pink fabric.

Ddd


Posted by studio3d@ccgmail.net at 8:07 PM PST
Tuesday, 28 February 2017
Flower Girl
Topic: Quilting

Three baby quilts in a row? What's up with that?

Our church donates to a local pregnancy clinic (Hope 360) and our quilt group that meets at the church makes donation quilts for them to give the new babies.

We have made Passages quilts for the local hospital for several years but Hope 360 is only a couple years old. Other ladies in our group have already donated several baby quilts but I had never done so. I decided to make some and, since I didn't have other projects waiting, I quickly finished off three of them.

The quilt today is from a tutorial by the Missouri Star Quilt Company. They called it 'Dizzy Daisies'. 

In the tutorial, they used a line of fabric that was quite subdued in coloring. I wanted to go bold and bright. I chose, from my stash, 5 bright pinks, 4 bright oranges, bright yellow, bright green, bright turquoise and crisp white.

The petals of the flowers start out as 5-inch squares and are snowballed on three sides - two white and a yellow - using 2 1/2 inch squares. Then these are joined together with the yellows together to make the flower.

The blocks were joined with 2 1/2 inch white sashing with green cornerstones. Then the turquoise border was added - also 2 1/2 inches wide.


I quilted the orange flowers like daisies (all of the flowers got spiral centers):


The pink flowers got rose-type petals:


The vertical sashing was quilted first with vines and leaves. Then the horizontal sashing got rows of tiny flowers:


The turquoise border has dragonflies printed on it so I just quilted with loop-the-loops down the length.

The binding matches the border and the backing is green flannel.

Ddd


Posted by studio3d@ccgmail.net at 5:40 PM PST
Saturday, 25 February 2017
Sweet Pea Weave
Topic: Quilting

A quilting supplies catalog arrived in my mail box just as I was looking for a pattern to make another baby quilt. One pattern looked very complicated but the notes at the bottom said it was only three blocks and showed them. All were made from squares and half-square triangles and only five fabrics required: black, a dark and a light of color one, a dark and a light of color two.

Well, I did some calculations to see what size of blocks and building units it would take to make a baby quilt between 36 to 40 inches. I cut all the units to finish at 2.5 inches. Therefore the blocks would be 7.5 inches.

Then I went off to find fabrics and was delighted to run across a set of fabrics I bought to use together and they met the criteria precicely. I had a black with tiny roses, a tone-on-tone dark green with leafy shapes, a light green with sweet peas, a dark pink with open flowers and a light pink with small white flowers.

I calculated the number of each unit I needed and cut/sewed them. Then the blocks were assembled. I needed 13 of one block and 6 of each of the other two blocks and they lay out in a 5 x 5 grid.

The assembly that makes all the cane weaving look requires that there be no sashing between the blocks.

Ready?


Don't you love it?

I used a light green flannel on the back and did large meander quilting.


A border around the outside would have broken up the pattern so I just finished it with a binding in the black floral.

Finished size is 38 inches.

Ddd


Posted by studio3d@ccgmail.net at 3:17 PM PST
Friday, 24 February 2017
Picking Up the Pieces
Topic: Scrap Recovery

When I heard of the sudden devastating loss of a friend's husband I wanted to send a sympathy card to her right away. In looking through my supply of cards I found I had none suitable.

I started picking up random scraps from the bins on my desktop and thumbed through a couple of pads of printed vellum sentiments. The pieces I settled on were: an embossed black cardstock from which I had sometime punched a heart, a strip of dotted paper, a narrow scrap of grey paper, a lightly patterned paper, a diecut square frame, a vellum sentiment and a torn strip of text-printed tissue paper.

I arranged and shuffled until I came up with this arrangement and then adhered everything together on a folded white card base:


I loved how the dotted strip exactly fit into the heart opening. I also love how the tissue text ends with the words 'by heart'.

After 49+ years of being together, this sets the perfect tone for what I wanted to express to the widow.

Ddd


Posted by studio3d@ccgmail.net at 9:10 PM PST
Wednesday, 22 February 2017
Baby Buggy
Topic: Quilting
This is my first quilt for Hope 360 Pregnancy Clinic. It is 40 inches square.

I got some pieced blocks from a warehouse sale, all packaged together and made of solids. Each block was different in pattern and mostly in colors. I don't know if they were assembled for a demo, a sampler, a class or something else? There were just these 5 in the pack, all stitched up into 8 1/2 (unfinished) blocks.

I found a salmon with tiny dragonflies that matched some of the solicd and added in a grey marble that matched some of the dragonflies. The only consistent color in the pieced blocks was a dark blue/grey so I bought a yard of solid as close to that as I could find.
 

I quilted overall with large meander.


Then I quilted the borders with dragonflies.


It is backed with flannel.


Some of the colors in the backing are similar (but not identical) to the solids on the front.

Ddd


Posted by studio3d@ccgmail.net at 12:37 PM PST
Wednesday, 15 February 2017
Garden Maze
Topic: Quilting

Final Finish!

I am officially caught up with all of my UFO quilting and sewing projects. 

The fabrics for this quilt were pre-cuts from a fabric line featuring a garden theme. There weren't enough strips for the pattern so I added in a few from my stash and also provided the creamy background and border from the stash.

The pattern is from a book on quilting with precuts and I cut it down considerably to end up with a lap quilt size.


I quilted with an over-all pattern of vines and leaves. I love using this when I am working with garden or flower fabrics.


I won't stay without projects for long though. I already have fabrics and patterns set aside and can't wait to get cutting again. And then there's that big fabric sale going on this weekend....

Ddd


Posted by studio3d@ccgmail.net at 11:54 PM PST
Tuesday, 14 February 2017
Tropical Twist
Topic: Quilting

ANOTHER FINISH! I'm on a roll now.

I did a repeat of the Twizzle pattern used for Pixie Sticks - this time using Teal, Green and Purple. This gave it a tropical look to me leading to the name 'Tropical Twist'.

I gave this one a wide border matching the background and used that for the binding as well. This makes the pattern float above the background.


Here is the background fabric. It reminds me of coconut husk so fits the tropical theme.


Because of the pattern on the background it did not lend itself to the converging lines quilting that I used on the other quilt. So I just did stitch in the ditch quilting and called it good.

This quilt will go to the hospital Passages program.

Ddd


Posted by studio3d@ccgmail.net at 8:14 PM PST
Saturday, 11 February 2017
Pixie Sticks
Topic: Quilting

Today was an all day (9 am to 4 pm) quilting session at the church. We do this two Saturdays a month September through June.

My project for the day was to work on quilting one of my donations quilts that will go to the hospital's Passages program.

The pattern I started with was a free download from Craftsy.


Although it was designed with four sections of color running top to bottom I didn't want mine to be that big so I cut only three colors. When I laid them out in these vertical bars I didn't like it so I mixed the colors all together.


This has such a modern, graphic look that I decided to quilt it with converging lines running top to bottom. It really reinforces the modern look.


The name came about because these colored bars remind me of those sugar-filled straws that children so love.

Ddd


Posted by studio3d@ccgmail.net at 5:57 PM PST
Thursday, 9 February 2017
Art Deco Dreams
Topic: Quilting

I've been working hard on getting caught up with quilt projects that just need the quilting and binding done.

The one I finished today was made from a pattern I tore out of a magazine soon after I started making quilts. When I bought the main fabric with those swirls of teal and brown I went right for this pattern even though it was featured in purple and black. 

This is actually a very simple pattern - one big block in the center with 4 snowballed corners - 8 squares around the sides with one snowballed corner each then joined into pairs - 4 squares in the corners. I alternated between the teal and the cream in placement.

The sashing in stripe has all the other colors in it and I used the same brown in the cornerstones as the snowball corners.


When I was ready to quilt I designed some art deco corners and a scalloped center motif. I made 36 copies of the line art. I would pin one into a corner and free-motion stitch through the paper and then tear it away. It took a lot of practice to figure out how to stitch the corner without too many back-tracks.

I did the same with the centers.


I am now down to 3 'Works In Progress'.

Ddd


Posted by studio3d@ccgmail.net at 6:20 PM PST
Friday, 3 February 2017
Grand Floral Parade
Topic: Quilting

Some quilts I absolutely fall in love with before I even start stitching on them. That was the case with this one - just because the fabric was so yummy!

I bought a wide stripe black floral from the bargain bin and realized that at home I already had a black with little rosebuds that would look great combined with it. Once I found a pattern I liked, I chose the yellow, green and coral in the florals and in my stash. I added in a white with tiny dots in yellow and coral for the background.

Before I even started sewing this, I realized I had enough of the floral, yellow and green as well as the rosebuds and big florals to make another quilt and cut this one to sew up (showed back on August 14, 2016):


So, I got sidetracked and made several other quilts along the way but I finally got around to finishing up this originally cut one!

You'd hardly know they were the same fabrics, would you?


The coral and white really changes the feel of it.

In the original wide stripe fabric there was a funky separating stripe running lengthwise. I cut that 2 1/4 inches wide and used it for the binding.


For the first time, I bound from back to front so I could topstitch the binding. This left the back binding with a narrow black stripe that helps separate it from the large orange polkadot backing.

I call this one Grand Floral Parade because the large blossoms remind me of the Rose Festival.

Ddd


Posted by studio3d@ccgmail.net at 7:32 PM PST
Tuesday, 31 January 2017
Le Jardin En Provence
Topic: Quilting

I finished my New Year's Day mystery quilt from Bonnie Hunter (Quiltville) today. She calls this pattern En Provence for the colors she witnessed when she travelled there last year.

I kept her color scheme and dug deep into my stash for the colors I needed. She had designated Sherwin-Williams paint colors to set the palette and I used their ColorSnap tool on my phone to create a color bar for reference.


I could carry this right to my drawers and pull fabrics to build the scrappy units. Totally scrappy is SO not my style but I persevered and I am happy with the result.

The cutting and sewing of units were clues released over the course of several weeks - x number of neutral 4-patches, x number of tri-recs squares in dark purple and neutral, etc. I made only 9 of the 16 blocks she designed it for so I was making half the stated number of units for both the blocks and the sashings (which make up the magenta stars).

When she got to the reveal I counted the actual number of each type of unit and made enough of each to fill out the design.


I used different free-motion quilting on various elements: stalks of lavender through the purple chains -


roses, leaves and vines in the yellow block areas -


leaves and vines along the borders -


and echo quilting on the magenta stars -


The backing is purple marbled fabric and I added a binding of dark purple.


This is the final look showing the full layout:


Though the units were scrappy the top is not random. I worked very hard on the layout so that identical fabrics would not end up smack against each other. I also tried to alternate the darks and lights in the neutrals of the borders.
 
I am pleased! And I am keeping this one for myself.
 
Ddd


Posted by studio3d@ccgmail.net at 3:18 PM PST
Monday, 30 January 2017
Bible Journaling - Isaiah 35:1
Topic: Bible Journaling

I'm so glad I discovered this form of art. I had read a lot about art journaling and viewed others' work but the multi-media, and mostly abstract, stuff I was seeing was just not speaking to me.

Then I saw some Bible artwork by Sandy Allnock (she used to run Operation Write Home for whom I made cards for servicemen) and knew I had found the focus I wanted.

The key for me is that I have a verse in mind and can draw artwork specifically for that page. It doesn't have to be frame-worthy nor does it have to be hidden away in an art journal with other random art. It has purpose - a devotional focus.

I experiment with lettering styles that I would have no reason to study were I not trying to marry the text to the illustration.

For this page I reflected on Isaiah 35:1.


I wanted to illustrate the profusion of blossoms so drew (from memory) a wide variety of flowers. I also made the desert cactuses bloom in the mid-ground.

I searched a font library for 'flower fonts' and sketched several to use, repeating them down the text for continuity.

I came upon this scripture by thumbing through the concordance in the back of my Bible the other day. I'm going entry by entry making a note of phrases that evoke an illustration in my mind. In the first session of this cataloging I have reached the middle of the 'C's.

Ddd


Posted by studio3d@ccgmail.net at 12:01 AM PST
Sunday, 29 January 2017
A Walk In the Woods
Topic: Quilting

I signed up for a mystery quilt for New Year's Day.

Prior to the day of, we were provided with guidelines on selecting 6 fabrics that would contrast and blend well in the pattern and how much of each to have on hand.

Then, over several days we were given cutting instructions for various colors and instructed on labeling them.

On New Year's Day the designer released instructions every few hours - 'stitch A1 squares to B2 triangles to create X number of usits that look like this' (for example).

Of course, nobody could actually sew as fast as the instructions were published as many steps were time-consuming or complicated.

It took me about a week to finish, including layout and assembly of the quilt top. I then had to wait for the next quilting get-together at the church to use the big tables to sandwich the quilt. That caused another delay as bad winter weather cancelled the first scheduled session.

Finally, I got it all together and then this week I got to quilt it. I did this with loopy vines and leaves all over the top.


The name fo this quilt has a two-fold origin. One is the arrows pointing this way and that over the pattern. The other is the fabric selection.

You can see in this close-up that there is a leafy forest floor, a wood grain and a sweet little country plaid. I also used a green and a blue as well as a dark brown with gold circles.


I used the dark brown for the backing and the little plaid for the binding.

On to the next.

Ddd


Posted by studio3d@ccgmail.net at 1:21 PM PST
Wednesday, 25 January 2017
Bible Journaling - Matthew 10:31
Topic: Bible Journaling

When I have read through this section of scripture in the past, I have always zeroed in on the phrases 'the hairs of your head are numbered' and 'fear not'. This time I wanted to focus on the fact that God treasures us and finds us to be of great worth to himself.

I looked up photos of sparrows on the internet to get their shape and coloring right. I wanted to make sure they looked like sparrows and not like robins, hawks or parrots! Good photo reference is essential.

I had just thumbed through a book on botanical drawing and took a few photos from the back pages. In that, I studied the structure of a branch that I could incorporate into the drawing for the birds to perch upon.

I drew with a pencil, traced with fine-line pen, erased the pencil lines and added colored pencil to the drawing.

Various lettering styles were pencilled in, inked and colored before I added lots of doodle swirls and colored them.


I used my favorite color to lightly color the sky as my finishing touch.

Ddd


Posted by studio3d@ccgmail.net at 2:23 PM PST
Friday, 20 January 2017
Bible Journaling - Zephaniah 3:17
Topic: Bible Journaling

I trolled Pinterest for Bible Journaling ideas when I first started and have combined several for this scripture. Some used the keyboard or the staff for other scriptures.

The roses were sketched in from memory of some I once saw. I used the lines in the journaling border as a guide to drawing the keyboard - very handy. I looked up 'treble clef' to get the shape and shading right.

The handwriting on the scripture is my own and I used notes for all the dots over the 'j' and 'i's.

My extra-fine line pen is getting low on ink so I moved up to a wider tip for the inking. It lends more weight to the drawing over the coloring.

The colored pencil work was used primarily on the roses, leaves and goldenrod, but I did use some smudged color on the staff, treble clef and scripture.


You'll also note that I started dating the artwork above the reference at the top of the page. I went back to my already-posted pages and added the dates on them as well.

Ddd


Posted by studio3d@ccgmail.net at 9:18 PM PST

Newer | Latest | Older