« August 2020 »
S M T W T F S
1
2 3 4 5 6 7 8
9 10 11 12 13 14 15
16 17 18 19 20 21 22
23 24 25 26 27 28 29
30 31
You are not logged in. Log in
Entries by Topic
All topics  «
3D paperwork
A - Z challenge 5
A - Z challenge 7
A - Z challenge round 4
A to Z challenge round 3
A to Z round 2
A to Z round 6
A-Z round 1
Around the House
Art Challenges
Artist Trading Cards
Backgrounds
Beads
Bible Journaling
Books
Boxes
Collage
Color Challenge
Coloring
cookbook
Die Cuts
Digital Projects
Digital Stamps
Drawing
Dry Embossing
Fabric Stuff
Fantastic Folds
Field Trip
Home Decor
How Does Your Garden Grow?
Hymnal Art
In The Kitchen
In the studio
Jewelry
Lettering
Links
Multi-Technique
Music to Work By
Musings
Nail Art
New Work
Online Class
Other Hobbies
Other Projects
Painting
Paper Embroidery
Paper Piecing
Photo
Pretty Paper
Quilting
Random
reading
Scrap Recovery
scrapbooking
Sewing
Sketch Challenge
Some Backlog
Stamping
Stencils
Stickers
Supplies
Teabag Folding
Techniques
Testing
tips and tricks
Tutorial
Web resources
Welcome to my Blog
Work By My Friends
workflow
Writing
Blog Tools
Edit your Blog
Build a Blog
RSS Feed
View Profile
Group One
In & Out of Studio 3D
Thursday, 20 August 2020
Hark! Is That a Christmas Carol I Hear?
Topic: Hymnal Art

When pairing up hymns with books of the bible and working straight through all the books in the course of 52 weeks, there can come some interesting arrivals on the schedule. If this Christmas hymn had appeared in July some might have been on board with the irony of Christmas in July.

But here we are in late August in the book of Mark and the assigned hymn is Hark the Herald Angels Sing!

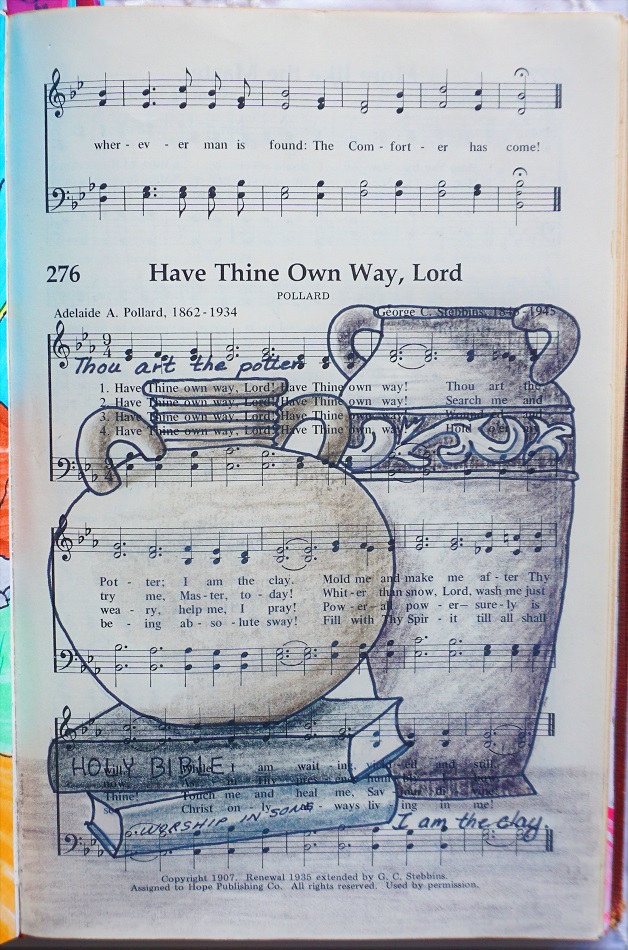
When I began to plan my page I remembered a pattern I had drawn about 15-20 years ago (at least) for an angel to be worked in parchment craft. I really had to go a-digging in paper files, computer files and old photos to find that pattern.

Then it wasn't exactly what I remembered it to be so I brought it into photo editing software and gave it a bit of an update, a resizing and a color change (it was drawn in pink) and then printed it out.

I had the intention of tracing it onto the page with the lightpad but it was too detailed and the musical notations became too distracting. So I used my glitter gel pens directly on the print and cut it out.


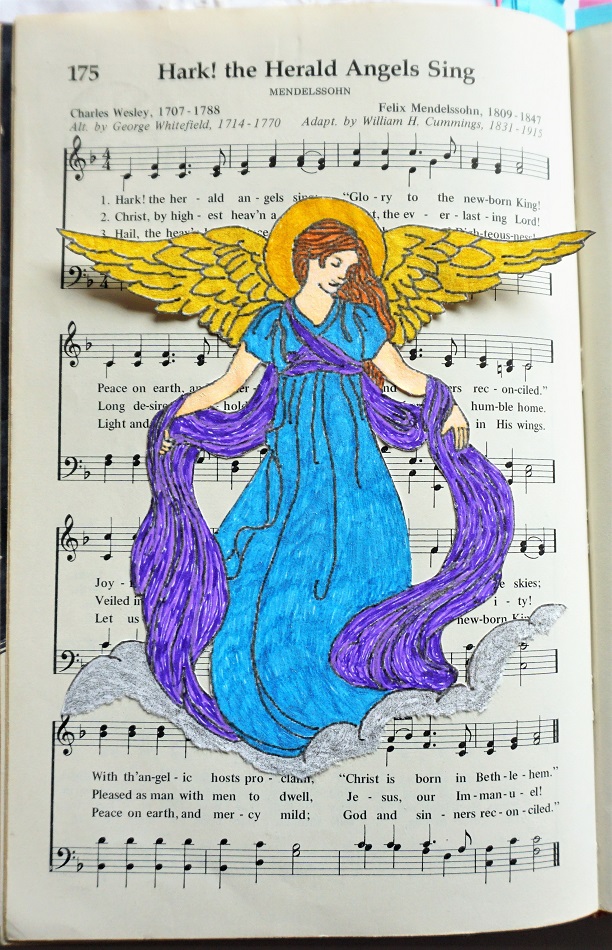
I glued down all of the illustration except the outer 1/2 of the wings as I wanted them to remain free and floating. Note that the lower edge of the clouds is torn rather than cut.

Below, you can see the effect of the glitteriness of the pen when the page is tilted in the light.


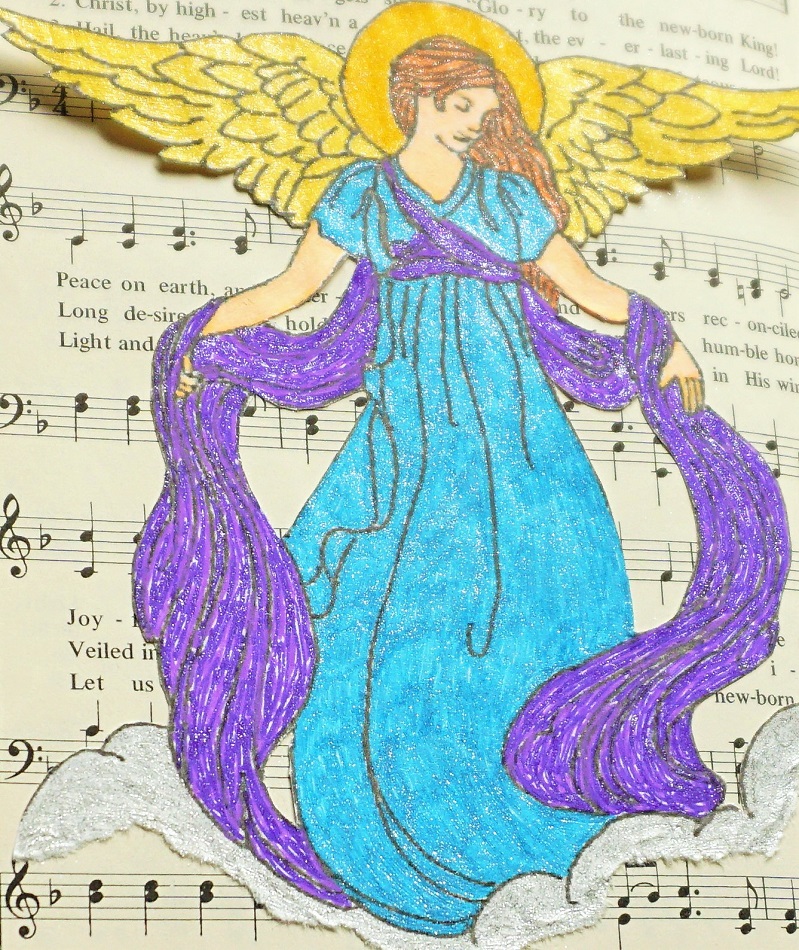
I really was pleased with how this came out!

Ddd


Posted by studio3d@ccgmail.net at 10:30 AM PDT
Wednesday, 19 August 2020
A Boat For Luke
Topic: Bible Journaling

The tutorial I did for drawing a boat was in 2019 and appeared in the book of Luke. In order for it to be used in Luke again, I moved over to my interleaved ESV bible and made it a ful page illustration.


Given that the scripture reference involves the quieting of the storm I used the lettering style 'still'. It also fits well with the curls in the waves.

Ddd


Posted by studio3d@ccgmail.net at 12:01 AM PDT
Thursday, 13 August 2020
Where He Leads Me
Topic: Hymnal Art

 I try to use my own hands as a model (photos of them) when I need to draw specific poses. But sometimes it is just impossible to get the right angle and I have to go searching for photos online. Such was the case for these.

I ended up using two different models and drew them on scrap paper. Then they were out of scale with each other so I had to copy them in various percentages till I had a set that matched.

They were not properly aligned so I cut them apart and rotated the drawings until I liked the arrangemet and taped them together.

In the end, I didn't want to try to draw them again so I used my lightpad to trace them into my hymnal.

I used the refrain, written in italics below the verses, and highlighted a portion to tell the story.


I might use a thinner pen nib to do this in the future as it looks a bit clunky. I used markers for the coloring.

Ddd


Posted by studio3d@ccgmail.net at 12:01 AM PDT
Wednesday, 12 August 2020
Net Effect of Mark
Topic: Bible Journaling

I must say that every time I use this technique I am amazed all over again with how easy it is and how nifty it turns out! What am I talking about? Drawing nets.

I had already used the net in the book of Mark before so I switched to my interleaved bible this time. Lo and behold, I had used the blank page next to the scripture I was referencing. So, what to do?

I used the full page of text with the scripture and designed my net as a background treatment. In order to highlight the verse, I left the area free of the net drawing and filled it with some 'water' color with my colored pencils.


Mark 1:16-20 tells of Jesus' calling of Peter and Andrew, out of their lives as fishermen and into his ministry as 'fishers of men'.

Ddd


Posted by studio3d@ccgmail.net at 12:40 PM PDT
Tuesday, 11 August 2020
The Kingdom In Mark
Topic: Bible Journaling

Our group got bogged down in working through journaling in the Old Testament. I kept up with the schedule though which is why you've been seeing the pages right on time. I just haven't been posting them over there.

Now they simply skipped ahead on the schedule to the New Testament so we will be working in sync again.

The lessons we are working on this week are in the book of Mark. The lettering lesson for this book is KINGDOM. Yes, I wrote in all caps on purpose as there are no lowercase letters in this font.

I used Mark 4:11 as my reference. 

This style has diamonds decorating one of the uprights on each letter. For this page I used color in each of them. You can also leave them all blank or color only the first one in each word. Lots of options.


Notice that all the tops and bottoms have triangle feet.

Ddd


Posted by studio3d@ccgmail.net at 1:00 PM PDT
Wednesday, 5 August 2020
Fishing Around With Matthew
Topic: Bible Journaling

I hadn't done any journaling in my ESV Interleaved Bible for a while. So I used the assigned font (come) and drawing lesson (fish) together to do this page.

I used Prismacolor Premier marker for both the lettering and drawing and Prismacolor Premier colored pencils on the fish.


I made a few edits on the fish to change them up from the drawing lesson but they still represent no particular species of fish.

Ddd


Posted by studio3d@ccgmail.net at 12:01 AM PDT
Tuesday, 4 August 2020
The Old and the New
Topic: Bible Journaling

Many, many, many years ago I heard this quote used by a pastor and I wrote it inside the cover of my Bible. When I started bible journaling I wrote it on a piece of paper and used it as a bookmark for awhile.

This year as our journaling group is working through the bible we have come to the New Testament and I thought it was a great time to journal this quote. So I lettered it with brush pen on the blank page that divides the Old and New testaments.

I decorated it with silver peel-off stickers and used my brush pens to tint the silver and to color in the voids.


The statement makes sense whether written in this order or with the two sentences reversed. This is the order I first heard it so that is what I used.

There are other versions out there, where the words are changed to concealed and revealed.

Ddd


Posted by studio3d@ccgmail.net at 12:01 AM PDT
Friday, 31 July 2020
Lettering Practice in July
Topic: Lettering

This being the last day of July it is time for the wrap-up of the sample sheets for lettering styles I used in my bible this month.

I use the pink dot grid paper that is designed by Happy Planner.

GARDEN - used in Micah

JOYFUL - used inBabakkuk and Zephaniah


BRANCH - used inHaggai and Zechariah


WALK - used in Malachi


I also used COME in Matthew but only for a partial week so that one will show up at the end of August inlettering review.

Ddd


Posted by studio3d@ccgmail.net at 2:13 PM PDT
Wednesday, 29 July 2020
All-Star Animals
Topic: Quilting

Even though I am not being paid for making this quilt, I am still considering it to be a commisioned piece. The fabric was furnished to me with the request that I make a large lap quilt for a fundraiser for the Oregon Zoo.

This was such fun fabric and great colors. I did add some of my fabric from the stash to broaden the variety but kept them in the same colors (black, medium and light grey, and yellow.

I had a general idea of what I wanted to do - fussy-cut centers of stars that featured the animals from the print. I used graph paper to draft out a plan that used:

1) 170 two inch half-square triangles with a light grey floral print and 4 black fabrics with figures in taupe:


2) 36 four inch blocks of zebra print set on point inside white corners.


3) 22 six inch blocks of sawtooth stars with a variety of fabrics used for the points, white background and animal centers.


4) 10 eight inch blocks of sawtooth stars with two different fabrics used for the points, white background and animal centers.


5) 8 ten inch blocks of two-toned stars with animal centers set on point.


6) 8 twelve inch blocks of four fabric sawtooth stars with 6 inch stars in the centers.


When you put it all together you get a colorful and fun layout with lots of movement.


A grey 3 inch border frames this, followed by a binding of the small black polkadot.

The backing is the zebra fabric and I used a 5-point star-and-loops pantograph to quilt it with light grey thread.

You cannot see it in the photos but I used bright yellow thread to write in script "The Oregon Zoo" up the lower left border and "All-Star Animals" down the upper right border.

The auction for the items donated to the Oregon Zoo will start August 1st and continue for 2 weeks. I hope this makes a lot of money for them.

Ddd


Posted by studio3d@ccgmail.net at 10:15 PM PDT
Tuesday, 28 July 2020
Caution About the Sword
Topic: Bible Journaling

I thought it was fun to use the sword drawing as a paragraph divider on this page in Matthew.

This was one of the drawing tutorials I designed a couple of years ago.


Ddd


Posted by studio3d@ccgmail.net at 12:01 AM PDT
Monday, 27 July 2020
Now We Come to Matthew
Topic: Bible Journaling

The lettering style called 'Come' was assigned to the book of Matthew.

I love the little curls inside the letters and that the letters are still easily readable despite the details. This is a casual font rather than formal.


Ddd


Posted by studio3d@ccgmail.net at 12:01 AM PDT
Monday, 20 July 2020
Dragonfly in Malachi
Topic: Bible Journaling

Today's page is actually a combination of three assignments: 1) the 'walk' font 2) drawing a dragonfly and 3) journaling in the book of Malachi. I often will split assignments into two but these all combined well.

The dragonfly actually has nothing to do with the verse or the font but fills the spae and gives a focus on the page.

I used a handful of pastel colors of colored pencils on the wings which make them look glassine and quite lovely.


This is a nicely shaped italic print font that features graceful curves in the upper-case letters.

Ddd


Posted by studio3d@ccgmail.net at 2:26 PM PDT
Sunday, 19 July 2020
Have Thine Own Way Lord
Topic: Hymnal Art

For this hymn that says 'thou art the potter, I am the clay' I chose to recreate artwork I did of two pots in a drawing class last year.

I did the drawing with fine-line markers and did the shading with colored pencils.


The original art did not have titles on the books but I added them to this piece so they would make sense in this context.

Ddd


Posted by studio3d@ccgmail.net at 5:09 PM PDT
Saturday, 18 July 2020
Little Orphan Angles
Topic: Quilting

Well, I think I am done rooting in the 'orphan blocks' bin for a while! The 'Mitered Mania' quilt I made in January yielded 5 extra blocks and 2 additional strip triangles that did not match up. So I tore apart the 5th block into two triangles and made an arrangement with four blocks in the center with two triangles placed on each end.

Strange shape. I pulled out some recently used backing fabric to add corner triangles and then side borders (blue floral). 

Still needing to grow this I looked in my drawer of fabrics with a variety of colors in them. Eureka! I found a piece of butterfly fabric with all the right colors. It was then that I noticed that the green strips in the blocks had butterflies. I used this new fabric (leftover from my sister's stash) for uneven borders to expand the width more than the length.

To keep expanding the size I pulled out another recent backing fabric (the yellow pinstripe was back for all of the last three quilts I finished) and added another round of uneven borders.


Now with a 'theme' of butterflies emerging I decided to quilt with loops and butterflies. I used a fine, light yellow thread for this.


The binding is the same as the backing used on this quilt.

Ddd


Posted by studio3d@ccgmail.net at 11:55 AM PDT
Friday, 17 July 2020
Sweet Osmanthus in Zechariah
Topic: Bible Journaling

I first learned to draw this flower from a book of daily doodles. It is so simple to do and has such a great effect. Some day I want to try the same concept to draw hydrangea blossoms since they have the same basic construction (just different flower shapes).

For this page I combined the art with a scripture in Zechariah written in a simple script.


The Sweet Osmanthus comes in different colors - most common are orange, white and yellow. I like the orange best and it combines well with the bright lime green even though the real leaves would be darker - artistic license, ya know.

Ddd


Posted by studio3d@ccgmail.net at 10:23 AM PDT
Thursday, 16 July 2020
Point Taken
Topic: Quilting

Having used up all the squares I could get out of the recent strip sets I found that I still had an upright triangle that could be cut from each end of each set. I did this and when I opened them and rotated two of them together on the long edge they made little hourglass units.

Of course now I am dealing with true leftovers and having created all these units I had to figure out a way to set them together to create a quilt top. I measured the hourglass units and discovered I could sliver trim them and get 5 inch squares. This meant I could set them alternating with charm squares for a perfect fit.

The question was, 'do I have any charm squares?' Yay, the answer was, 'yes'!

I had leftovers of a couple of stacks in a range of orange/golden/rust that I set in a gradiant arrangement and alternated with the hourglasses turned this way and that to form a secondary pattern of diagonal squares.


How those metallic finish warm colors changed the look of these scraps (again). I accented the teal in the blocks by adding a narrow inner border.

Here you can see the metallic finish on the squares and the brown border as well as the edge to edge quilting.


I truly used up every scrap of these orphaned strip sets after cutting all I needed for that first quilt, 'Get To The Point'.

Ddd


Posted by studio3d@ccgmail.net at 6:40 PM PDT
Wednesday, 15 July 2020
More To The Point
Topic: Quilting

The reason for naming this quilt as I have is a direct result of the block origins.

You will remember the last quilt entry was titled 'Get To The Point' - an arrangement of mountain-like peaks. Well, when cutting the tube strips for that quilt one must match up identical squares. But it you cut more blocks to the end of the strip set you end up with one extra block that does not match anything. In fact, you could get one extra from each side making TWO mismatched blocks.

So I cut all those extras and then arranged them as pinwheels with no matching combinations. This was not large enough and I wanted some sashing so I went back to the orphan blocks bin and found several black and white blocks from my late sister's stash. These I cut into sashing for the verticals and then I cut whole black and white strips for the horizontal sashing.

A couple of borders brought it up to a small lap size.

Look how the orange border transforms the 'theme' from gold and gray of the previous quilt to a lovely orange and black, perfect for a fan of the Oregon State Beavers.


Even though the pinwheels are all straight lines and points I wanted to make the quilting in swirls to show their potential for movement.


This is a pantograph from Urban Elementz.

Ddd


Posted by studio3d@ccgmail.net at 12:01 AM PDT
Tuesday, 14 July 2020
Get To The Point
Topic: Quilting

This quilt has been languishing in the longarm pile because I couldn't decide how to do the quilting on it. I ended up doing a lot of research while other quilts jumped the line to get completed first. Sometimes it just happens that way.

The pattern for this was from an online blog entry and is a 'tube quilt' I used a jelly roll I picked up at a quilt guild's stash-buster sale for $10. I didn't really like the prints in the roll but for $10 I couldn't leave it there!

A tube quilt like this starts with two strips sewn together side by side, then laid on a wide strip of the background fabric and stitched up both sides, creating a tube.

One then cuts triangles from alternate side seams and, when they are pressed open they become a half-square triangle block with two colors in the one side and a solid background in the other. (Got that?)

As you move down the tube you get two block colorways depending on the side of the strips you car cutting from. Match up two that are the same and rotate one of them and you create a mountain.

These are placed side by side to create rows which are then stacked for the overall layout.

The jelly roll was not enough to complete enough matching sets so I threw in a few strips from my stash. The background is made up of a mixture of white-on-white fabrics.

When it came to the quilting I did not want to use an overall edge to edge design. This stumped me for quite a while but I finally settled on swirly clouds for the background and point to point arcs for the strip sets.


This was all done with free-motion quilting as was the continuous pattern in the borders.


This was a totally new process for me as I waited until all of the other quilting was done and then rolled the quilt forward and back on the machine to complete each section.

The binding was just a bit brighter than I would have liked but it was what I had on hand.

Ddd


Posted by studio3d@ccgmail.net at 10:02 AM PDT
Monday, 13 July 2020
Here's a Branch of Zechariah
Topic: Bible Journaling

Just revisiting a font from a couple of years ago that is designed to mimic branches. I combined it with a scripture referencing the word 'branch'.

In our Cover 2 Cover bible journaling plan we've reached the book of Zechariah. That means we are almost up to starting the New Testament!


On this font there is the option of leaving the letters open, filling with color or filling with solid black.

This font does not have a lower case.

Ddd


Posted by studio3d@ccgmail.net at 12:01 AM PDT
Saturday, 11 July 2020
The Greatest of These
Topic: Quilting

This quilt was FOURTH on my list to finish. I had the first three already pieced, matched with backing and batting and ready to go on the longarm.

Then I caught a new glimpse of the supplies for this one and I just had to pull it out and work on it.

The supplies included two charm packs of coral solids that I got on sale for less than $5 each. I had cut four fabrics from my stash to have enough for the pattern. Speaking of that, the pattern was only a magazine ad for a fabric line from 3 years back and I couldn't find the actual pattern for it. Fortunately, it was a simple thing to see that I just needed half-square triangles and blocks with two snowballed corners.

The background fabric was from my stash, a print with a little basket-weave look to it.


As usual, my camera colors are off - this is much too orange. Think pink!

I used a new pantograph for the quilting pattern - hearts! and used pink thread top and bottom.


I had originally planned to bind with the same fabric as the outer border, but it just looked unfinished. So I pulled out a red and white stripe and I am SO glad I did.


This is a 52x60lap quilt that will be an engagement gift.

Ddd


Posted by studio3d@ccgmail.net at 3:14 PM PDT

Newer | Latest | Older