Now Playing: more scrappy crafting
Topic: New Work
I truly can't remember where I found this great illustration but I found a paint strip that perfectly enhanced the colors.
One little sticker says it all.
« | October 2007 | » | ||||
S | M | T | W | T | F | S |
1 | 2 | 3 | 4 | 5 | 6 | |
7 | 8 | 9 | 10 | 11 | 12 | 13 |
14 | 15 | 16 | 17 | 18 | 19 | 20 |
21 | 22 | 23 | 24 | 25 | 26 | 27 |
28 | 29 | 30 | 31 |
I truly can't remember where I found this great illustration but I found a paint strip that perfectly enhanced the colors.
One little sticker says it all.
This is another of the Cuttlebug background shared with me by an online friend. I found this great teddy on a sheet of stickers from the dollar store.
I gave him the tea set and he is set to have a party.
Lately it seems that I am stuck on doing 3D cards! Have you noticed?
I really like this poinsettia illustration and found some vellum in my stash printed with white diamonds. I laid this over some scrapbook paper of sheet music.
The finishing touch is the gold peel-off greeting.
I got a notecard from someone a few years back. It was a shaped card and consisted of these stacked teacups. Well, I have been saving it for reuse and finally put it together.
I used scraps of striped scrapbook paper up the sides and a patterned paper up the middle. The text is a vellum sticker.
I got several of these sheets of vellum stickers at the dollar store.
I really like to cull illustrations from good quality jewelery catalogs. Their photography is so crisp and the images enhance cards like nothing else.
The center square of this card is a paint sample of a Ralph Lauren paint . Into it is mounted the cloisonne butterfly from the catalog and enhanced it with self-stick rhinestones in green and gold - including a green teardrop for the body.
At the top and the bottom of the opalescent white card are irridescent rubons from the dollar store - made for use on blue jeans!
On one of the groups I belong to we were given a challenge to make a card from leftovers from previous projects.
This card uses a scrap of printed sheer ribbon, a scrap of 1/8 inch satin ribbon, and a scrapbook paper. A leftover green tag with an illustration from a collage sheet is affixed and more ribbon used for a bow. The text is the final scrap from a sheet of vellum stickers. And finally the oval 3D sticker finishes it off.
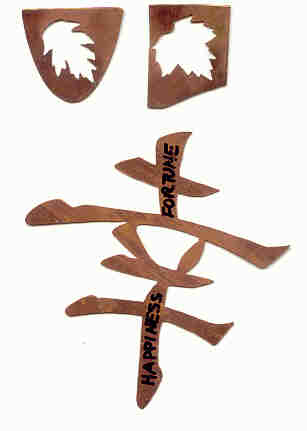
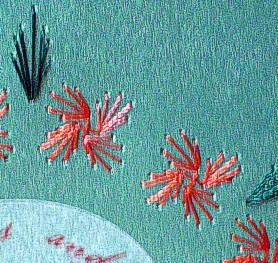
Related to quilling, husking is a technique that creates images with strips of paper mounted on edge. The major difference is that quilling features rolling the paper into a coil and then shaping it.
Husking, on the other hand, uses a board with pins in it and the strip of paper is wound out around a far pin and back, then glued to the point of origination.
At our retreat in Pittsburgh, J'Lu taught us to do both quilling (which I do not like doing) and husking (which I do like doing).
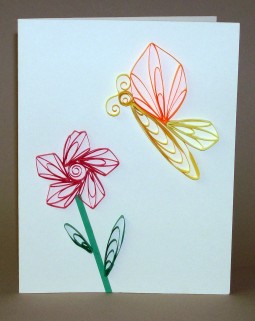
The most frustrating thing is that it is difficult to find patterns for husking. I would like to find lots of patterns and do more husking.
Several years ago I took a jewelery and metalsmithing class - several times. One of the techniques we had to work on was called metal piercing. Essentially, this is sawing shapes out of sheet metal.
I chose to make some brass stencils of shapes and/or sizes that I could not find elsewhere. These two leaf stencils are about the size of a penny. The Japanese character for happiness is avout 2 inches tall.
I've not done any more stencil cutting since leaving the class but I now have the skills and the tools to do so if I wish.
This flower illustration was much more square but I wanted to fill a longer card. So I laid a matte over it and cut behind. This allowed me to move the right and the left sides outward creating an elongated illustration.
The jeweled hummingbird is a jewelry catalog illustration that I cut out for use.
Today I would like to review for you a book on making rubber stamped cards. This 2006 publication by North Light Books uses 52 different stamps - all of which could be easily substituted by those in your own collection. The stamp styles are generally line drawings by Hero Arts stamp company.
Simply Cards by Sally Traidman (ISBN 1581806744) presents two projects for each of the stamps, each resulting in completely different styled cards. I found not a single bad idea in this 128 page volume.
Highly Recommended!
For this card I first started with making the 3D element of the pillows and jar of buttons. But however I tried to mount it on a card looked boring or contrived. I had a print of a quilt from a catalog ad but it was printed as a full, flatt, spread out quilt.
After trimming to the edges of the quilt I applied dry-line runner along all the edges and 'gathered' here and there to make it look like it was draped over the top edge of the card. By smoothing out the folds and attaching them as needed to make it lie down, I thing I succeeded in turning it into a more realistic background.
Then I set the 3D illustration at the bottom.
From our friends at Form-a-Lines come these adorable field mice. They are supposed to be on a stalk of wheat but I had already pricked them out on yellow so chose to give them a pink wildflower to perch on.
Background papers were selected to enchance the pink of the wildflower and both little guys have a black bead as an eye.
LOVE these, and they work up very quickly.
I found a beautiful image of a hydrangea on the internet and made my own 3D cutting sheet using PhotoPaint. I worked it up and mounted it up on a beautiful deep pink and that over blue to complement the colors in the flower.
I finished it off with gold peel-off corners and a greeting.
If you are shopping for paper crafting and scrapbook supplies (and who isn't?) you will ALWAYS get a good deal at www.frugalities.com
Every day, when you open their page, you get a notice of the discount of the day. Everything on their website is discounted by that percentage for the whole day. Next day - different discount! On the day I am posting this their discount is 49%.
Once you get into the store you can shop by brand, by manufacturer, or by type of product.
Some Fun!
By those topic headings you must think I'm feeling a little wacky today! But it does make sense when I disclose the featured website of the day.
If you go to http://www.millstone.com/pages/crossword/crd_home.jsp you will find that you can input your own words and list of clues and have a custom crossword automatically generated for you.
Now, what possible use could that be? Well, think of the fun your friends and family will have when you drop in such a puzzle with a birthday card - custom made with their hobbies, interests, inside jokes and the like. What about making up a little puzzle to go in Halloween treat bags, Christmas stockings, gift cards... Make one with names of party goers where the clues are things others have to find out about them (Q. Who has been skydiving? A. Debbie). Make a special puzzle as a subject test for your homeschool kids or a Bible quiz for your Sunday School class.
This card is made with the pattern recently posted free on form-a-lines. I really like the wreath itself but when I began stitching according to the directions It just looked too 'spiky' for my taste.
So I changed the stitching sequence to give them a little twist. After making the center cross I used each corner to stitch in a shell pattern using all the holes in the accompanying petals.
I printed this 3D from one of my favorite sites for free 3Ds. I had some scrapbook paper with old recipes printed on it which seemed to fit. the two borders are also scrapbook paper. The Home illustration is a sticker from a sheet of nostalgics.
I used a grey marker to create a shadow around the illustration to create a little more depth.
Some time back I entered a swap of stamped images. I am just now getting around to using them. This angel is colored with watercolor pencils and lightly wet using a watercolor brush.
I used some ribbons I had on hand to create a frame for her.
Here's another card background made by my friend using her Cuttlebug for embossing. I added a tulip sticker from the Dollar Store.
I made this card by using two identical pieces from a collage sheet. They had photoedited the original to appear three dimensional anyway, so I cut aroung the elements on the second copy and mounted them with silicone glue.
It is mounted on vellum with gold dragonflies printed on it, over printed scrapbook paper. The eyes on some of the dragonflies are little gold peel-off dots, the corners and the "congratulation" are also gold peel-offs.
I added the purple script as a vellum sticker.