« February 2008 »
S M T W T F S
1 2
3 4 5 6 7 8 9
10 11 12 13 14 15 16
17 18 19 20 21 22 23
24 25 26 27 28 29
You are not logged in. Log in
Entries by Topic
All topics
3D paperwork
A - Z challenge 5
A - Z challenge 7
A - Z challenge round 4
A to Z challenge round 3
A to Z round 2  «
A to Z round 6
A-Z round 1
Around the House
Art Challenges
Artist Trading Cards
Backgrounds
Beads
Bible Journaling
Books
Boxes
Collage
Color Challenge
Coloring
cookbook
Die Cuts
Digital Projects
Digital Stamps
Drawing
Dry Embossing
Fabric Stuff
Fantastic Folds
Field Trip
Home Decor
How Does Your Garden Grow?
Hymnal Art
In The Kitchen
In the studio
Jewelry
Lettering
Links
Multi-Technique
Music to Work By
Musings
Nail Art
New Work
Online Class
Other Hobbies
Other Projects
Painting
Paper Embroidery
Paper Piecing
Photo
Pretty Paper
Quilting
Random
reading
Scrap Recovery
scrapbooking
Sewing
Sketch Challenge
Some Backlog
Stamping
Stencils
Stickers
Supplies
Teabag Folding
Techniques
Testing
tips and tricks
Tutorial
Web resources
Welcome to my Blog
Work By My Friends
workflow
Writing
Blog Tools
Edit your Blog
Build a Blog
RSS Feed
View Profile
Group One
In & Out of Studio 3D
Friday, 1 February 2008
F is for Frames
Topic: A to Z round 2

On a cruise recently we had a great crafts person teaching short projects. This wooden frame covered with a map-printed scrapbook paper was one of them. We used Mod-Podge as a glue and a sealant. I did my corners  on the ourside by clipping and folding down and the inside corner are lined first to cover any gaps on the turned-in paper.

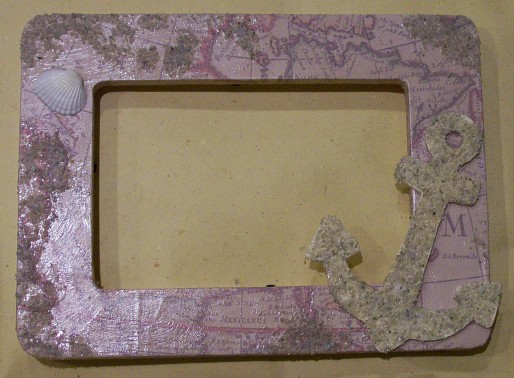
We were also given a wood piece to cover with sand before glueing onto the front along with a seashell. I also added sand around parts of the frame itself.

Ddd studio3d@ccwebster.net


Posted by studio3d@ccgmail.net at 12:01 AM PST
Updated: Sunday, 27 January 2008 12:41 PM PST
Thursday, 31 January 2008
E is for Envelope
Topic: A to Z round 2

From the outside this cardstock envelope shows only the distinctive folds and a beribboned seal.

However, upon breaking the seal one finds a party invitation for the Oscars. This is all created digitally.

Attendees are invited to dress formally and walk the red carpet. There are three categories of nominees on the outer panels on which each person can mark their votes.

(This is a non-existent event)

Ddd studio3d@ccwebster.net


Posted by studio3d@ccgmail.net at 6:00 AM PST
Wednesday, 30 January 2008
D is for Dogs
Topic: A to Z round 2

These sweet little puppies are one of the sample pictures on the back of a wall calendar. I always cut out the 12 pictures on the back for use on cards. This is from my 2007 edition. 

I added some clear stickers for a finishing touch. Unfortunately, they pick up the camera flash.

Ddd studio3d@ccwebster.net


Posted by studio3d@ccgmail.net at 6:00 AM PST
Tuesday, 29 January 2008
C is for Crayon
Topic: A to Z round 2

I used the same stamp with different colors for these two cards. The technique is crayon resist. An image is stamped with waterproof ink onto glossy cardstock and the image dried. Then selected parts are colored with a white crayon. 

The image is them brayered with dye inks and allowed to dry.


The final step is to buff the surface with a tissue to remove any ink that is on the face of the white crayon.

I tore my images out and mounted to cardstock.

Ddd studio3d@ccwebster.net


Posted by studio3d@ccgmail.net at 6:00 AM PST
Monday, 28 January 2008
B is for Boxes
Topic: A to Z round 2

I made this box following the instructions from a lesson on Craft TV Weekly. I first fell in love with the cover paper which is a set of scrapbook papers from the dollar store!


All of the instructions on Craft TV Weekly are clear and shown on a video. Some also give written guides. Although they are usually showing projects that use specific projects, in many they will give measurements for making your own 'kit' instead of buying theirs.

Ddd studio3d@ccwebster.net


Posted by studio3d@ccgmail.net at 6:00 AM PST
Sunday, 27 January 2008
A is for Aperture
Topic: A to Z round 2

I am making about 40 of these valentine cards so needed something simple but elegant. The text and the large heart are printed on the center panel of a cardstock divided into thirds. Then with the right panel folded inside the red large red heart is cut out of both layers with a craft knife. 

With the card completely folded, the removed red heart is then glued to the inside, aligning carefully with the aperture.

Before gluing the two aperture parts together a strand of stretchy nylon beading cord is glued in place at the top and bottom. Closing the glued parts sandwiches the ends, thus hiding them.

Two smaller red hearts are glued back to back on either side of this stretchy cord.

Before mailing the card the suspended hearts are twisted round and round on their cord and the card closed.

When the recipient gets the card and reads the front "In Our Hearts" they open the card which sets the hearts spinning in the aperture and they read the larger inside heart "You Are Loved".

Ddd studio3d@ccwebster.net


Posted by studio3d@ccgmail.net at 6:00 AM PST

Newer | Latest | Older