« April 2008 »
S M T W T F S
1 2 3 4 5
6 7 8 9 10 11 12
13 14 15 16 17 18 19
20 21 22 23 24 25 26
27 28 29 30
You are not logged in. Log in
Entries by Topic
All topics  «
3D paperwork
A - Z challenge 5
A - Z challenge 7
A - Z challenge round 4
A to Z challenge round 3
A to Z round 2
A to Z round 6
A-Z round 1
Around the House
Art Challenges
Artist Trading Cards
Backgrounds
Beads
Bible Journaling
Books
Boxes
Collage
Color Challenge
Coloring
cookbook
Die Cuts
Digital Projects
Digital Stamps
Drawing
Dry Embossing
Fabric Stuff
Fantastic Folds
Field Trip
Home Decor
How Does Your Garden Grow?
Hymnal Art
In The Kitchen
In the studio
Jewelry
Lettering
Links
Multi-Technique
Music to Work By
Musings
Nail Art
New Work
Online Class
Other Hobbies
Other Projects
Painting
Paper Embroidery
Paper Piecing
Photo
Pretty Paper
Quilting
Random
reading
Scrap Recovery
scrapbooking
Sewing
Sketch Challenge
Some Backlog
Stamping
Stencils
Stickers
Supplies
Teabag Folding
Techniques
Testing
tips and tricks
Tutorial
Web resources
Welcome to my Blog
Work By My Friends
workflow
Writing
Blog Tools
Edit your Blog
Build a Blog
RSS Feed
View Profile
Group One
In & Out of Studio 3D
Monday, 7 April 2008
T is for Tea
Topic: A - Z challenge round 4

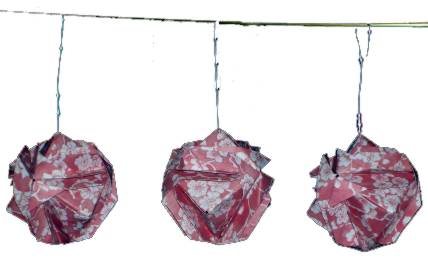
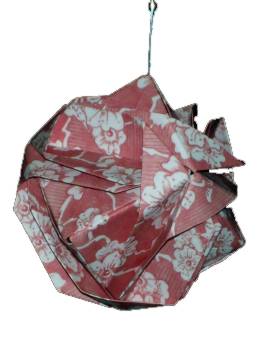
When I think of the words "tea" and "crafts" together  I get either 'tea-staining' or 'teabag folding'. You can bet that teabag folding is more up my alley so this is where I let it take me.

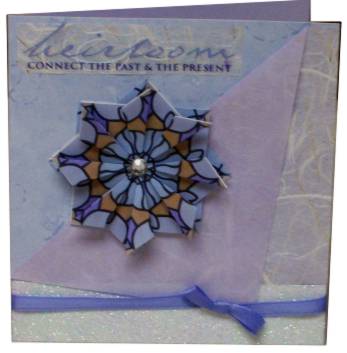
This cards layers include: blue print scrapbook paper, white mulberry paper with gold threads, violet mulberry paper, glittered paper, and ribbon - all selected to reflect the colors of the medallion.

A clear text sticker was layered onto more of the white mulberry and mounted at the top for balance.

Ddd studio3d@ccwebster.net


Posted by studio3d@ccgmail.net at 6:00 AM PDT
Sunday, 6 April 2008
S is for Shaving Cream
Topic: A - Z challenge round 4

A simple way to make marbelized backgrounds is to use a tray of shaving cream and drop ink from reinkers onto it. A skewer is used to stir around the inks into swirls and then a piece of glossy cardstock is gently pressed onto the surface, pulled away and wiped clean with paper towels.

Here are a few from my session: 

Here are three cards I made from other sheets in this session:


Ddd studio3d@ccwebster.net


Posted by studio3d@ccgmail.net at 6:00 AM PDT
Saturday, 5 April 2008
R is for Rainbow
Topic: A - Z challenge round 4

Well...not an actual rainbow - but a rainbow of colors! 

I designed this stitching pattern for a card embroidery challenge.

Ddd studio3d@ccwebster.net


Posted by studio3d@ccgmail.net at 6:00 AM PDT
Friday, 4 April 2008
Q is for Quirky
Topic: A - Z challenge round 4

This is a little off-beat! The first decision that sent the card in this direction was to stitch with orange thread on the purple cardstock. Then I decided to try a new stitch on the petals and the card started to look like art I had done in the 70s! 

I added some bands of sinple stitching and then mounted on orange cardstock to match the stitching. The text is a sticker.

Ddd studio3d@ccwebster.net


Posted by studio3d@ccgmail.net at 6:00 AM PDT
Thursday, 3 April 2008
P is for Paste Paper
Topic: A - Z challenge round 4

I made this paste paper background with purple tinted paste over green cardstock. I stamped with a handcarved dragonfly while the paste was still wet. 

For the card, I placed a silver peel-off dragonfly over each impression, mounted on purple card and trimmed the borders with more peel-off. The text is also a sticker.

Ddd studio3d@ccwebster.net


Posted by studio3d@ccgmail.net at 6:00 AM PDT
Wednesday, 2 April 2008
O is for Ornament
Topic: A - Z challenge round 4

These modular origami balls use 6 units made from 3 1/2 inch squares. I made mine of floral scrapbook paper to give them a vintage look. Here you see all three of them on their hangers made of wire.

Here is a close-up of one ornament.

These are sturdy enough that they could have some potpouri placed inside and they could be tucked in a drawer with delicate garments.

Ddd studio3d@ccwebster.net


Posted by studio3d@ccgmail.net at 6:00 AM PDT
Tuesday, 1 April 2008
N is for Night
Topic: A - Z challenge round 4

Here's a little night owl done up in origami. I used scrapbook paper for the background and rub-on letters for the text. 

Ddd studio3d@ccwebster.net


Posted by studio3d@ccgmail.net at 6:00 AM PDT
Monday, 31 March 2008
M is for Metal Tape
Topic: A - Z challenge round 4

A technique I've wanted to try since I first saw it demonstrated...

punchout or sticker letters are arranged to a base card. Metal automotive tape is laid over the text and is burnished to get it into all the creases and crevices. Alcohol ink is used to colorize it.

The finished text was trimmed and mounted to cardstock. Corner enhancements are gold peel-offs.

Ddd studio3d@ccwebster.net


Posted by studio3d@ccgmail.net at 6:00 AM PDT
Sunday, 30 March 2008
L is for Lettering
Topic: A - Z challenge round 4

I've found the way to make lettering look better, if you don't like your own handwriting, is to use caps, intentionally make uneven lines, try to make it look casual.

I wrote this out with a waterproof marker and made colored enhancements with watercolor markers and tore it out for mounting. 

Ddd studio3d@ccwebster.net


Posted by studio3d@ccgmail.net at 6:00 AM PDT
Saturday, 29 March 2008
K is for Knight
Topic: A - Z challenge round 4

Who's your white knight? This is the card to send him!

The illustration is a digital print. All enhancements are gold peel-offs. 

Ddd studio3d@ccwebster.net


Posted by studio3d@ccgmail.net at 6:00 AM PDT
Friday, 28 March 2008
J is for Juicy
Topic: A - Z challenge round 4

This photo of strawberries has been calling out to me ever since I wrote down this theme. I used gold textured foil paper as a background and layered over red mulberry paper and red glossy cardstock. 

Everything about this card says 'richness'. I will add a gold peel-off greeting when I decide on the occasion to send it.

Ddd studio3d@ccwebster.net


Posted by studio3d@ccgmail.net at 6:00 AM PDT
Thursday, 27 March 2008
I is for Iris Folding
Topic: A - Z challenge round 4

Yep, its Iris Iris Folding! LOL!

I designed this bearded iris in iris folding just for today's theme. 

I've worked it up in folded strips of tissue paper.

Want the pattern? Well, why didn't you say so? Here you go:


Ddd studio3d@ccwebster.net


Posted by studio3d@ccgmail.net at 6:00 AM PDT
Wednesday, 26 March 2008
H is for Hero
Topic: A - Z challenge round 4

If you've ever wanted to create your own superhero then this website is for you: http://www.ugo.com/channels/comics/heromachine2/heroMachine2.asp

I went through all the steps and put together this digital image which MAY go on a card for a hero of mine!

I thought it would be a good lesson to show that you don't have to be able to draw to create great (?) art!

Ddd Studio3d@ccwebster.net


Posted by studio3d@ccgmail.net at 6:00 AM PDT
Tuesday, 25 March 2008
G is for Games
Topic: A - Z challenge round 4

This table is a digital image printed on cardstock, folded and trimmed to round the corners. The balls were printed and punched out using a 1/4" punch. I built the cue from farious papers and embellished with markers and gold peel-offs. 

Ddd studio3d@ccwebster.net


Posted by studio3d@ccgmail.net at 6:00 AM PDT
Monday, 24 March 2008
F is for Fruit
Topic: A - Z challenge round 4

There are some supplies and papers that seem just too precious to use. So they get saved, then stashed, then forgotten. Such is the case with this border of fruit swags. It is from a sheet of overall print that is enhanced with gilt and is an extremely rich print. I cut carefully along the bottom on one swag for the border.

The bottom fruits are print from a table napkin. The base card was given adhesive in the Xyron and both illustrations were affixed. I then covered the exposed adhesive with verigated leafing and burnished it to a high gloss. 

Ddd studio3d@ccwebster.net


Posted by studio3d@ccgmail.net at 6:00 AM PDT
Sunday, 23 March 2008
E is for Egg
Topic: A - Z challenge round 4

I made a basic egg shape and cut out several from various scrapbook papers.

Eggs in coordinating patters were arranged on white cardstock and embellished with other cutouts, stickers and embellishments.

Ddd studio3d@ccwebster.net


Posted by studio3d@ccgmail.net at 12:01 AM PDT
Updated: Tuesday, 11 March 2008 1:34 PM PDT
Saturday, 22 March 2008
D is for Dangle
Topic: A - Z challenge round 4

This is the first time I have done any wire loops so they aren't perfect by any means. I made these angel dangles using a cap, dragonfly wings, a bead and a spacer, all strung on a headpin. I picked up the parts at the bead store. 

I was surprised to find that I had 4 sterling silver chains in my stash from long-ago jewelry-making classes!

Ddd studio3d@ccwebster.net


Posted by studio3d@ccgmail.net at 6:00 AM PDT
Friday, 21 March 2008
C is for Candy Wrappers
Topic: A - Z challenge round 4

Sometimes I struggle so long with coming up with a way to use a theme that I'm sure I won't be able to use it. Then suddenly, while I'm doing something totally unrelated, WHAM! That was how this idea came about.

The candies are adhesive-backed acrylic circles over scrapbook papers. These are trimmed close around and then wrapped in cellophane. They are attached over printed scrapbook paper and enhanced with a text sticker with a border from the same paper as one of the candies.

The cellophane is attached to the backing with glue dots behind the candy and at each end.

Ddd studio3d@ccwebster.net


Posted by studio3d@ccgmail.net at 6:00 AM PDT
Thursday, 20 March 2008
B is for Buttons
Topic: A - Z challenge round 4

I saw this idea so many years ago I can't remember where! I love the idea of using the holes in the buttons this way.

I used silicone to adhere on a backing of mulberry paper (sky) and handmade paper (snow). The noses and the hats are cut of craft foam and colored with Sharpie markers.

I used some sticky yarn to make neckscarves for each of them.

For those who find themselves in the midst of snowstorms - I'm sorry to remind you! LOL!

Ddd studio3d@ccwebster.net


Posted by studio3d@ccgmail.net at 6:00 AM PDT
Wednesday, 19 March 2008
A is for Acetate
Topic: A - Z challenge round 4

The butterflies are stamped onto acetate with black Staz-On and heated. Then I colored with Ranger alcohol inks on the back side using a paint brush. After dry they were cut out with a craft knife. 


The pansies are vellum stickers that I arranged on printed cardstock. I creased the wings at the side of the body to make them stand up ant then attached only the body with double-stick tape.

Ddd studio3d@ccwebster.net


Posted by studio3d@ccgmail.net at 6:00 AM PDT
Updated: Monday, 24 March 2008 7:05 PM PDT

Newer | Latest | Older