« April 2009 »
S M T W T F S
1 2 3 4
5 6 7 8 9 10 11
12 13 14 15 16 17 18
19 20 21 22 23 24 25
26 27 28 29 30
You are not logged in. Log in
Entries by Topic
All topics  «
3D paperwork
A - Z challenge 5
A - Z challenge 7
A - Z challenge round 4
A to Z challenge round 3
A to Z round 2
A to Z round 6
A-Z round 1
Around the House
Art Challenges
Artist Trading Cards
Backgrounds
Beads
Bible Journaling
Books
Boxes
Collage
Color Challenge
Coloring
cookbook
Die Cuts
Digital Projects
Digital Stamps
Drawing
Dry Embossing
Fabric Stuff
Fantastic Folds
Field Trip
Home Decor
How Does Your Garden Grow?
Hymnal Art
In The Kitchen
In the studio
Jewelry
Lettering
Links
Multi-Technique
Music to Work By
Musings
Nail Art
New Work
Online Class
Other Hobbies
Other Projects
Painting
Paper Embroidery
Paper Piecing
Photo
Pretty Paper
Quilting
Random
reading
Scrap Recovery
scrapbooking
Sewing
Sketch Challenge
Some Backlog
Stamping
Stencils
Stickers
Supplies
Teabag Folding
Techniques
Testing
tips and tricks
Tutorial
Web resources
Welcome to my Blog
Work By My Friends
workflow
Writing
Blog Tools
Edit your Blog
Build a Blog
RSS Feed
View Profile
Group One
In & Out of Studio 3D
Sunday, 12 April 2009
Thumb Puppies
Topic: New Work

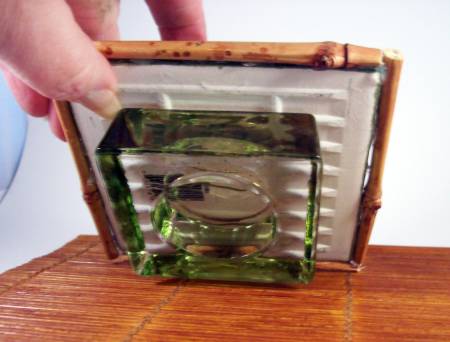
If you have one of these:

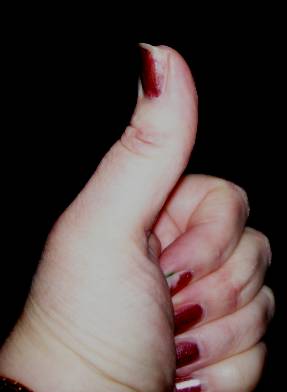
You can make a puppy card!

First lay your hand down on a card with you thumb crooked as far as you can.

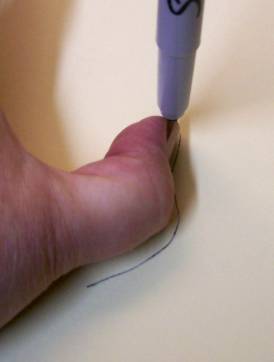
Then use a waterproof pen to trace around it.

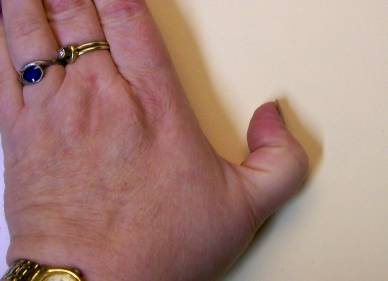
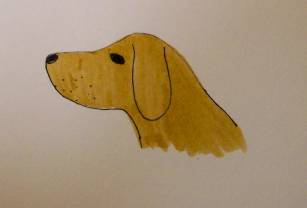
 This is what you will have when done:

Use your marker to add a floppy ear, a nose and eye. Make a few dots for whiskers.

Use a watercolor marker to color in the whole puppy.

Use a light grey marker to make a shadow under the ear and at the bottom of the chin.

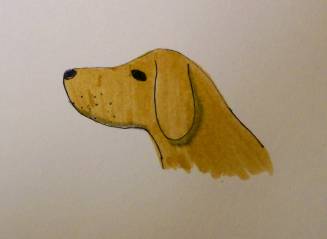
Cut around all the lines that are drawn and tear the neck area.


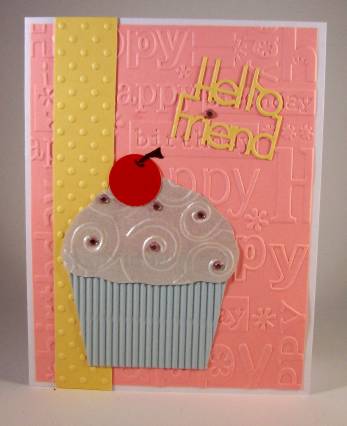
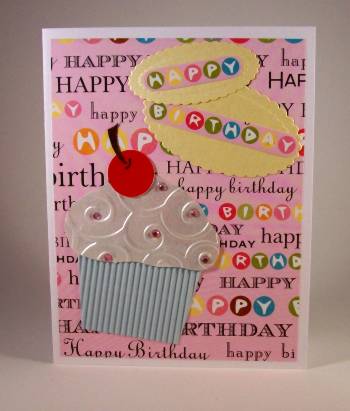
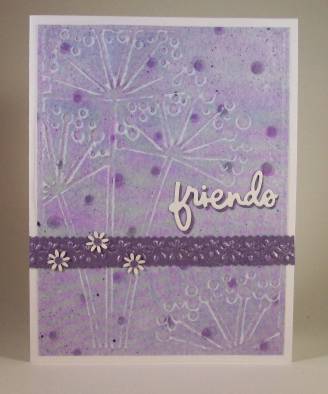
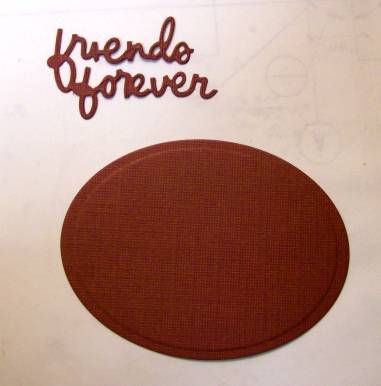
Make some elements to use on a card


Assemble on a card base, add some embellishments, and you have a simple card with a 'thumb puppy'.

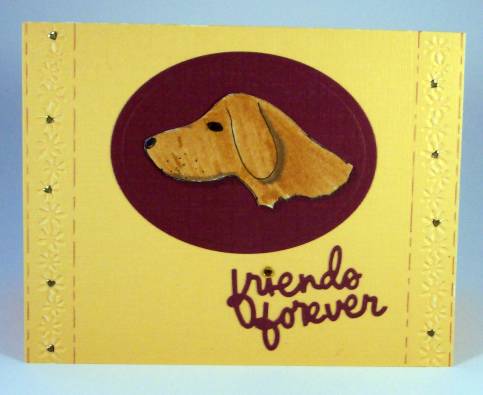
I teach kids to make these thumb puppies all the time. Everyone's puppies will look different because of the different shapes of our thumbs.

Ddd


Posted by studio3d@ccgmail.net at 6:00 AM PDT
Saturday, 11 April 2009
Little Bear's House
Topic: New Work

I have NEVER done any scenic stamping so I decided to give it a try. Two things I learned right off - Don't use a colored (gold) background cardstock as it effects all the colors you put on it and Don't use a texturized cardstock as you don't get crisp clear images.

So with those lessons in mind for the FUTURE, here's what I actually did: I used watercolor markers to color just the parts of the bear I wanted to print - basically the outline and features as he is really furry all over. I used a different marker on his bow. 'Huffed' on it and stamped. Stamped again on plain paper to cut out as a mask. Covered bear with mask and stamped field of flowers (one stamp 3.5 times).

I used markers to color in parts of the cottage stamp on the left and the stream image on the right. The mask was removed and I used markers to color in all areas of the card.

The panel was trimmed and backed with a card that I had trimmed on one side with a scallop scissor. Both were placed on a folded card and the rub-on text finishes it off.

Ddd


Posted by studio3d@ccgmail.net at 6:00 AM PDT
Friday, 10 April 2009
Field of Flowers
Topic: New Work

Two groups I belong to had challenges this month. One was to make a card combining paper embroidery and punched flowers. The other was to make a card incorporating flourishes. So I combined the two, meeting both challenges with one card. 

I used a three panel card and did my stitching on the center panel. The design is a combination of different elements of an oval pricking template. Then I folded the panels and cut through the front two making my aperture. After opening the panels back up the punched flowers were glued tip-to-tip to make a lacy insert and then the front panels were glued together. This leaves a finished backing on the embroidered panel.

The text is rub-on.

Ddd


Posted by studio3d@ccgmail.net at 6:00 AM PDT
Thursday, 9 April 2009
Seasonings
Topic: New Work

I signed up for a swap to make 4 ATCs to be sent to a single person. I chose to use a single rubber stamp in a range of colors to create the Four Seasons. Each card was toned with a very pale color and the trees stamped in a darker, but similar color. On every one, I used a brown fine-line marker to define the trunks and branches. 

 This is the SPRING card. It uses very pale greens. I used a light green gel pen to put in some light leaves, then used two-way glue to create dots and burnished in pink ultra-fine glitter. Then I used a water-brush to apply a sheen of pink Twinkling H2O.

Here's a close-up that shows the glittery bits.

Here is the Summer card. This uses a yellow background and I used a watercolor marker to add more leaves and some grasses. Again, the Twinkling H2O were added, this time in Olive.

Here is the Summer close-up.

The Fall card has a brown sky and I used a variety of markers to add leaves on the trees as well as the ground. The two-way glue was applied and I burnished on a mixture of metal leafing.


Don't you love the way these leaves shine?

The Winter card is all done in blue tones. I love this one most. I used some white gel pen to put a little snow on the ground and on the branches and then applied Stickles for the shine.

Here is the Winter close-up.

I selected a coordinating mini-tag for each card and threaded a flower brad through the hole only. These each got text added with watercolor marker and the tags were applied with mini-glue dots.

Here is a pic of the Four Seasons all together as a set.

Ddd


Posted by studio3d@ccgmail.net at 6:00 AM PDT
Wednesday, 8 April 2009
Asian Window Panels
Topic: Other Projects

I have been helping with decorations for our "Soul Spa" ladies event at church (recent posts for soap dishes and bath tea packets relate to same event). One of the ladies had picked up some garden trellis and painted it black. Then white paper was attached to the back.

I used gold spray webbing on the back of the white paper and then cut out some blossoming branches from black paper and attached with double-stick tape to the back. These were hung in the windows on either side of one of the entrances with the black cutouts facing outside.

You can see in these two pictures the right and the left panels from the inside of the church. The black cutouts show through as silhouettes. 

Then here is the view from outside. You don't see the black gridwork but only the gold spray webbing and the black branches.


Ddd


Posted by studio3d@ccgmail.net at 6:00 AM PDT
Tuesday, 7 April 2009
With a Little Help from My Friends
Topic: Other Projects

Make 175 color copies; cut 700 edges with scissors; slice 750 slits with a craft knife; make 1400 folds; cut 350 pieces of ribbon; tie 700 knots in ribbon; stir enough lavender, catnip, chamomile, and basil to make 88 cups of herb mix; spend 8 nights in front of the TV accomplishing all the above.

Then, gather together 12 friends for a couple of hours to: staple 1 ribbon end to each of 350 tabs; glue 700 seams to make envelopes; measure 1/4 cup of herb mix into 350 coffe filters; fold 350 filled filters into packets; 350 staple packets to loose end of ribbons; tuck packets into envelopes; glue 350 flaps closed.

The result is 350 Bath Tea packets to be used as table favors at an event with the theme "Soul Spa"!


Ddd


Posted by studio3d@ccgmail.net at 6:00 AM PDT
Monday, 6 April 2009
3D on 3D
Topic: Web resources

I have had some funny email requests for information on "can you give me instructions or advice on how to make a 3-dimensional xxx". I even had one who wanted to know how to paint an illustration on his son's walls so it would LOOK 3-D. I always refer them back to my home page that clearly states that the reason my site is called Studio3D is because of my initials and that I have no special knowledge of 3-dimensional construction just because my initals are DDD.

On the other hand, I do appreciate and work with illustrations that have been cut and stacked to appear 3D on cards. I have been collecting links to sites that offer free cutting sheets. Here's what I have so far:


members.home.nl/jannie57/index/knipvellen.htm


www.purple-design.nl/knipvellen1.htm


http://members.lycos.nl/tinybeijersbergen/photoalbum8.html


community.webshots.com/user/jomoud


debbycliparts.punt.nl/?gr=776854


http://home-and-garden.webshots.com/album/434924294wDpmUP


http://www.memkes-designs.nl/knip-freedownloads.htm


http://s35.photobucket.com/albums/d172/3d_Sheets/2005%20Sheets%20-%20by%20Rosemarie/


http://community.webshots.com/user/d0npen/tags/knipvellen/albums


http://www.webshots.com/search?query=knipvellen+teabag+tiles+3d+decoupage+paper+tole


http://s46.photobucket.com/albums/f148/lisab76/


http://www.3dsheets.tripod.com/


http://s36.photobucket.com/albums/e38/cathy729/


http://s34.photobucket.com/albums/d130/Craftypixiedust/


http://members.lycos.nl/tinybeijersbergen/photoalbum9.html


http://home-and-garden.webshots.com/album/551944789BnxqcZ


http://www.3dkaarten.eu/pagina8.html


http://www.basteln.machtspass.com/3d_schnittbogen.htm


http://s44.photobucket.com/albums/f3/3d_sheets2/


http://thelilacgarden.co.uk/index.html


http://s36.photobucket.com/albums/e38/cathy729/


http://members.lycos.nl/knipvellen/photoalbum.html


http://community.webshots.com/user/d0npen?start=20


http://s48.photobucket.com/albums/f216/DavidTunis/3d%20Decoupage%20Sheets/


http://s76.photobucket.com/albums/j30/helenblack/3D%20and%20Pyramid%20Sheets/


http://hobbycard.wtcsites.com/5KnipvellenTotaal.htm


http://knipvellen.come2me.nl/


http://members.lycos.nl/jessiewetzie/newpage28.html


http://members.home.nl/just.elisa/knipvellen/


http://community.webshots.com/album/469054249LZVbxy


http://www.mijnalbum.nl/Album=ANZLEWUZ


http://s70.photobucket.com/albums/i85/Mowbray-Bear/3D%20Decoupage/


http://community.webshots.com/user/nmcglynn123


http://photobucket.com/images/search/3d%20sheets/


http://s35.photobucket.com/albums/d182/3dsheets/


http://s108.photobucket.com/albums/n16/shamps30/


http://members.lycos.nl/sonjasknipvellen/


http://s58.photobucket.com/albums/g266/wimmeke001/?start=40&mediafilter=images&paginator=top


http://s10.photobucket.com/albums/a139/worm_goddess/


http://members.lycos.nl/yvonnetimmermans/Vellen%20Step%20by%20step/Step%20by%20step.htm


http://photobucket.com/images/3d%2520sheets/


http://photobucket.com/images/knipvellen/


http://photobucket.com/images/decoupage/?page=2


I have no affiliation with any of these sites and caution you to watch for any restrictions or copyrights that the artists may have posted.

Ddd


Posted by studio3d@ccgmail.net at 6:00 AM PDT
Sunday, 5 April 2009
Handy List of Lists of Lists
Topic: Web resources

Of all the blogs I read regularly, the one that references the most other sites in handy groupings is Mel Stampz. She gathers a list of 100+ ways to use one tool or another or 50+ ways to use a technique and keeps updating the entries as she gathers more links. How cool is that!

This is a list of her lists that I have found to be particularly handy and I go back to items in these lists again and again for techniques and inspiration:

“I’ve been bitten!!!…. (161things you can do with your Cuttlebug…)”

http://melstampz.blogspot.com/2008/03/ive-been-bitten.html


“Purse templates galore (154 and counting…)”

http://melstampz.blogspot.com/2008/03/purse-templates-galore-little-handbag.html


“Techniques at a glance”

http://melstampz.blogspot.com/2008/05/techniques-at-glance.html


“Templates for 3D projects at a glance”

http://melstampz.blogspot.com/2008/05/templates-3d-projects-at-glance.html


“Crafty Flowers templates and tutorials”

http://melstampz.blogspot.com/2008/05/hot-crafty-flowers-40-and-counting.html


“100+ Envelope Templates/Links”

http://melstampz.blogspot.com/2008/07/5-12-inch-square-envelope-template-lots.html


“Over 100 Things You Can Do With Your Score-Pal”

http://melstampz.blogspot.com/2008/08/scor-pal-things-you-can-do-with-your.html


“Wee Houses Templates and Tutorials”

http://melstampz.blogspot.com/2008/09/wee-houses-35-templates-tutorials.html


“Box Templates and Tutorials”

http://melstampz.blogspot.com/2008/10/box-templates-tutorials-giftcardtreat.html


“Alcohol Inks A to Z Links”

http://melstampz.blogspot.com/2009/02/alcohol-inks-to-z-links-plain-ol.html


“Vellum Links in Volume (over 100)”

http://melstampz.blogspot.com/2009/01/vellum-links-in-volume-100-vellum.html


“50+ Gift Bag Templates”

http://melstampz.blogspot.com/2008/11/50-gift-bag-templates.html


Wander around in these blog entries and get some inspiration for yourself.

Ddd


Posted by studio3d@ccgmail.net at 6:00 AM PDT
Saturday, 4 April 2009
Source of Inspiration
Topic: Web resources

Where does all that inspiration come from? I read lots of blogs dealing with stamping, scrapping, and paper crafts. Since not all post every day I get RSS feeds in my Google Reader and only see them when there are new entries. Here's the list of my regulars:


http://abc-challenge.blogspot.com      (ABC Challenge)

http://afterhoursstamper.blogspot.com      (After Hours Stamper)

http://aliedwards.typepad.com      (Ali Edwards)

http://AndreaWalford.com      (AndreaWalford)

http://karenelaine.typepad.com/appletini_time/      (Appletini Times)

http://amazingpapergrace.com      (Amazing Paper Grace)

http://www.beckyhiggins.com/blog/      (Becky Higgins)

http://feelinscrappytoday.blogspot.com      (Brooke is Feelin’ Scrappy Today)

http://sherrie-cardcreme.blogspot.com      (Card Creme)

http://ellenhutson/the_classroom_new       (CLASSroom)

http://cardpositioningsystems.blogspot.com      (Card Positioning Systems)

http://claudinehellmuth.blogspot.com      (Claudine Hellmuth)

http://crafterskitchen.blogspot.com      (Crafters Kitchen)

http://cuttlebugchallenge.blogspot.com      (Cuttlebug Challenges)

http://thecuttlebugspot.blogspot.com      (The Cuttlebug Spot)

http://rachelgreig.typepad.com/thedarkroom/      (Darkroom Door)

http://blog.ginakdesigns.com/      (A Day in the Life (Gina K Designs))

http://debbiesdiecuts.blogspot.com      (Debbie’s Die Cuts)

http://fatcatstamper.blogspot.com      (Fat Cat Stamper)

http://fred-she-said.blogspot.com      (Fred, She Said)

http://smallstudio.typepad.com/ginnycartersmallenburg/      (Ginny’s Small Studio)

http://melaniemuenchinger.blogspot.com/      (Hands, Head and Heart)

http://heroarts.com/blogs/club/      (Hero Club Blog)

http://heartfeltgreetings.blogspot.com/      (Heartfelt Greetings)

http://inkurablestampers.blogspot.com/      (Inkurable Stampers)

http://amarkintime.blogspot.com/      (A Mark in Time)

http://jennibowlin.blogspot.com/      (Jenni Bowlin)

http://justgivemestamps.typepad.com/my_weblog/      (Just Give Me Stamps)

http://www.kwernerdesign.com/blog/      (K Werner Design)

http://stamptv.ning.com/video      (Stamp TV Videos (Gina K))

http://joanne-mainlyflowers.blogspot.com/      (Mainly Flowers)

http://makingmemories.typepad.com/makingmemories/      (Making Memories)

http://maryjomcgraw.blogspot.com/      (MaryJo McGraw)

http://melstampz.blogspot.com/      (Mel Stampz)

http://melissafrances.typepad.com/my_weblog/      (Melissa Frances)

http://zindorf.blogs.splitcoaststampers.com/      (Michelle Zindorf Crafts)

http://onelittleword.typepad.com/olw/      (One Little Word)

http://kellrick.typepad.com/our_daily_bread_designs/      (Our Daily Bread Designs)

http://paperfections.typepad.com/paperfections/      (PaperFections)

http://papertakeweekly.blogspot.com/      (Papertake Weekly Challenge)

http://pattibehan.blogspot.com/      (Patti Behan)

http://pattystamps.com/pattys_stamping_spot/      (Patty’s Stamping Spot)

http://poeticartistry.blogspot.com/      (Poetic Artistry)

http://rockinrobin1973.blogspot.com/      (Robin’s Artful Musings)

http://paperplayhouse.blogspot.com/      (Paper Playhouse)

http://www.pencillines.com/      (Pencil Lines Sketches)

http://thescallopededge.typepad.com/the_scalloped_edge/      (The Scalloped Edge)

http://janellerichmond.typepad.com/sketchthis/      (SketchThis)

http://bronih.blogs.splitcoaststampers.com/      (Splashes of Watercolor)

http://stampspaperscissors.typepad.com/stamps_paper_scissors/      (Stamps, Paper, Scissors)

http://sweetmissdaisy.typepad.com/sassy_sweet_notes/      (Sassy and Sweet Notes)

http://studio490art.blogspot.com/      (Studio 490)

http://www.sunflowers-dragonflies.ca/blog/      (Sunflowers and Dragonflies)

http://suzeweinberg.typepad.com/suzeblogz/      (SuzeBlogz (Suze Weinberg))

http://patstamps.blogspot.com/      (The Technique Trail)

http://technostamper.blogspot.com/       (Techno Stamper)

http://timholtz.typepad.com/my_weblog/      (Tim Holtz)

http://twisted-chick.blogspot.com/      (Twisted Chick Creations)


When I see something that inspires me it usually takes a whole different turn by the time I get to the studio and start playing. Go have a look around at my favorite blogs.

Ddd


Posted by studio3d@ccgmail.net at 6:00 AM PDT
Friday, 3 April 2009
All Aboard
Topic: Field Trip

Some things you go looking for and some just find you. This theatre marquee in across the parking lot from where I work. Their current notice of advance ticket sales cracks me up every time I see it.

I mean, really! Where do they think I am NOW?

Ddd


Posted by studio3d@ccgmail.net at 6:00 AM PDT
Thursday, 2 April 2009
Delightful Chickens
Topic: New Work

Wow, two chicken cards in one week! This illustration is from some magazine and is an asian painting (you can faintly see the chop marks on the upper right).

The background designer paper was so striking that I wanted to highlight it just a little more. So, I cut around some of the flowers to tuck the edges of the focus pieces underneath. I backed the chicken panel with a plain coral piece and under that two black corner panels. two brads were added to each corner and a little pen-doodling to define the edges. 

I had a sheet of rub-on frames so added one of those to the front and clipped a piece of the designer paper to fill it. Then I placed two text stickers "simple delight" and added more pen doodling.

Ddd


Posted by studio3d@ccgmail.net at 6:00 AM PDT
Wednesday, 1 April 2009
Dreamy Wedding Card
Topic: New Work

I used a pre-made element for this card - the little folder on the left. I added rhinestones inside the cutout D and backed the whole with crackle finish paper. The photo is from a magazine ad and I added a white rubon text to go with the definition on the folder.

I love these little button brads and used them to attach the corners to pink cardstock. A band of irridescent blue down the right sets it off from the cream panel. I tied a blue organdy ribbon around the bottom and rounded all the corners.

The folded cardstock base is white and covered with more of the crackle finish paper. I rounded the corners before attaching all the other elements.

Ddd


Posted by studio3d@ccgmail.net at 6:00 AM PDT
Tuesday, 31 March 2009
Observant Owls
Topic: New Work

Two owls from my bird calendar make an appearance on this card. I cut each with a circle Nestability and then cut scalloped circled from butterscotch card to back them. I used a Cuttlebug folder, distressed stripes, to emboss the brown to make it look like wood. The black on the right has a tone on tone print of swirls that does not show in the photo. That chevron print cardstock down the center was run through a paper crimper before attaching.

I placed all of this on a crackle finish paper over white folded cardstock and added a text sticker.

Ddd


Posted by studio3d@ccgmail.net at 6:00 AM PDT
Monday, 30 March 2009
Rooster with a Strong Song
Topic: New Work

Mr Rooster was an advertising postcard - for what I have no idea anymore. I cut it with a Nestabilities die and mounted on blue and coral, each with the corners rounded. The yellow checkered piece was run through the Cuttlebug with the houndstooth folder. The red and gold piece on the left is a bit of leftover washi paper and off to the left edge is a scrap of paint chip.

I mounted the whole on white cardstock over which I glued a dark coral scrapbook paper. Two slits were cut into the spine to thread the ribbons through and each were tied in a knot. The text is a sticker.

Ddd


Posted by studio3d@ccgmail.net at 6:00 AM PDT
Sunday, 29 March 2009
Soap Dishes
Topic: New Work

For an upcoming event with a theme of "Soul Spa" I decided to create soap dishes for the restrooms. I make 12 of these - 2 each for the 6 restrooms.

What I was given were 12 glossy black tiles from the home improvement store. I combined two tones of Pearl-Ex powder with clear detail embossing powder. Then I used this to emboss the bamboo leaves that I had stamped in Versamark.

I used Ranger alcohol ink in Pesto and Meadow to color the sides of the tiles.


Here you can see the surface of the tile better. I used a Sharpie marker to add detail to the stamping and a Pilot gold metallic pen to enhance the design.

Bamboo was cut and glued to the sides of the tiles and they were glued to square glass candleholders as a base. I had already used the same combination of alcohol inks to color the glass. Here you can see the base.


I got placemats at the dollar store and cut them down to 8.5 x 9 mats. They came as orange so I sprayed them to get them to match the bamboo on the tiles. The last step was to tuck in a little silk flower.


Each dish will have a green bar of soap on it.

Ddd


Posted by studio3d@ccgmail.net at 6:00 AM PDT
Saturday, 28 March 2009
CuttleCake
Topic: New Work

Today's card is a Cuttlebug extravaganza! I used Cuttlebug die for the greeting, folders for the pink background, dotted yellow slip, and swirled frosting. Like yesterday, I used corrugated card for the paper, a circle punch for the cherry, and rhinestones for the sprinkles. 

These cupcakes are easier than making the real thing!

Ddd


Posted by studio3d@ccgmail.net at 6:00 AM PDT
Friday, 27 March 2009
Happy Cupcake to You
Topic: New Work

Cupcakes seem to be all the rage in the stamping and scrapping world right now. I used corrugated card for the wrapper, Cuttlebugged irridescent paper with the D'vine Swirls for the frosting, punched a cherry with a circle punch and added a hand cut stem.

Two scallopped Nestabilities were cut and embossed to feature the words cut from the background paper. 

I added rhinestones to the frosting for sprinkles.

Ddd


Posted by studio3d@ccgmail.net at 6:00 AM PDT
Thursday, 26 March 2009
Basket Case
Topic: New Work

I saw a little die-cut basket on another blog and my mind went into overdrive figuring how to do it without the diecut. I made this with a piece of cardstock cut to 12 x 10. It is creased twice on each axis with a 4 x 4 base. The leftover 12 x 2 was divided in half to create two 12 x 1 handles. 

I used big flower brads to hold it all together then created a lining of scrapbook paper with the same measurements. I used its leftovers to create the little inserts on the sides.

The lining is cut with a decorative edge scissor around the top.

Ddd


Posted by studio3d@ccgmail.net at 6:00 AM PDT
Wednesday, 25 March 2009
A Song With No Tune
Topic: Writing

Although the title of today's entry is "A Song With No Tune" I should say that it really DOES have a tune...but just in my head! This is a poem/song that I've been working on over the last week and it is done - except I don't write music.

So, I can SING it to myself and you'll have to READ it to yourself (or supply your own tune!)


MY SONG

He lived that I might die to sin.

He died that I might live again.

He rose to take me home to heav'n,

to join the angels singing,

"All glory to the Lamb."


My faith is in His holy life,

His mercy, love and sacrifice.

My prayer - to be his own delight.

His grace rests ever on me.

All glory to the Lamb! 


          Praise to the great I AM

          and to his Son, the Lamb,

          and Spirit from above -

          His comfort sent in love .


I taste the goodness of the Lord.

I'm feasting on his holy Word

and drinking in his great reward.

His spirit feeds me daily.

All glory to the Lamb!


          Praise to the great I AM

          and to his Son, the Lamb;

          and Spirit from above -

          His comfort sent in love .


Ddd


Posted by studio3d@ccgmail.net at 6:00 AM PDT
Updated: Wednesday, 25 March 2009 7:37 PM PDT
Tuesday, 24 March 2009
A Negative Impression
Topic: New Work

This card, using the same spotted paper, is much simpler than the last two. I impressed the Forever Friends folder in reverse and scuffed with sandpaper. This gives a whole new look to the 'flowers'. The band is made with a border folder on dark purple paper which I also used to cut a text script.  

I used scalloped scissors on the band and added three punched out flowers of white cardstock. I also cut the same text script of the white cardstock and layered the two as a shadowed piece. Dots of the dark purple make centers for the white flowers.

Ddd


Posted by studio3d@ccgmail.net at 6:00 AM PDT

Newer | Latest | Older