« May 2009 »
S M T W T F S
1 2
3 4 5 6 7 8 9
10 11 12 13 14 15 16
17 18 19 20 21 22 23
24 25 26 27 28 29 30
31
You are not logged in. Log in
Entries by Topic
All topics  «
3D paperwork
A - Z challenge 5
A - Z challenge 7
A - Z challenge round 4
A to Z challenge round 3
A to Z round 2
A to Z round 6
A-Z round 1
Around the House
Art Challenges
Artist Trading Cards
Backgrounds
Beads
Bible Journaling
Books
Boxes
Collage
Color Challenge
Coloring
cookbook
Die Cuts
Digital Projects
Digital Stamps
Drawing
Dry Embossing
Fabric Stuff
Fantastic Folds
Field Trip
Home Decor
How Does Your Garden Grow?
Hymnal Art
In The Kitchen
In the studio
Jewelry
Lettering
Links
Multi-Technique
Music to Work By
Musings
Nail Art
New Work
Online Class
Other Hobbies
Other Projects
Painting
Paper Embroidery
Paper Piecing
Photo
Pretty Paper
Quilting
Random
reading
Scrap Recovery
scrapbooking
Sewing
Sketch Challenge
Some Backlog
Stamping
Stencils
Stickers
Supplies
Teabag Folding
Techniques
Testing
tips and tricks
Tutorial
Web resources
Welcome to my Blog
Work By My Friends
workflow
Writing
Blog Tools
Edit your Blog
Build a Blog
RSS Feed
View Profile
Group One
In & Out of Studio 3D
Sunday, 3 May 2009
Blooms For You
Topic: New Work

These florals are from the front of a greeting card. By punching them out with a square punch I was able to mat each of them and make them look like three separate bouquets.

Several coordinating layers are added beneath and a green narrow ribbon wrapped top to bottom. Then I tied three shorter lengths of ribbon along the length and held the flat spaces in place with copper mini-brads. 

The text block is an engraved copper sheet that reads "blooms for you" and it is placed at an angle mirroring the center floral block for continuity.

Ddd


Posted by studio3d@ccgmail.net at 6:00 AM PDT
Saturday, 2 May 2009
Coffee Break
Topic: New Work

This illustration started out as another greeting card and was originally about 1/3 of a horazontal picture. I really liked the bright colors so I went simple on the background and framed out the picture with the same bright orange as the card base.

The satin ribbon goes all the way around the front cover of the card by being threaded through a slit in the spine. 

I happened to find the perfect text sticker in exactly the right colors.

Ddd


Posted by studio3d@ccgmail.net at 6:00 AM PDT
Friday, 1 May 2009
Come Near to God
Topic: New Work

I found this beautiful flower painting in my stash of magazine clippings and cut it with a large square punch. Then I gathered all sorts of papers from my scrap bins and rounded the corners of them before layering with varying margins to add interest. A satin bow was tied around the panel before mounting on the green card base. 

The text block is a sticker that I used the corner rounder on. Because of the small size of it, the second cut with the punch made a funky little curl at each end. I liked it so I kept it!

Ddd


Posted by studio3d@ccgmail.net at 6:00 AM PDT
Thursday, 30 April 2009
Cherish the Children
Topic: New Work

I needed to make a card for a swap that featured children so I turned to my stash of salvaged illustrations and found this from a quilt calendar. It is trimmed down quite a bit from the original, backed with a harlequin print scrapbook paper followed by a purple toned paper and finally green cardstock base. 

Before mounting the panels to the card, I tied an organza ribbon in light purple. The final touch is a thick acrylic text block that was the perfect shade of green. I filled the holes with Stickles.

Ddd


Posted by studio3d@ccgmail.net at 6:00 AM PDT
Wednesday, 29 April 2009
Swirly Birds
Topic: New Work

Will I NEVER run out of calendar bird illustrations? Hopefully not!

I cut these with a Nestabilities die in my Cuttlebug and then used the die to emboss the scalloped edge. The background is a printed scrapbook paper run through the Cuttlebug with a folder, twice. I used a distress ink pad to color just the raised portions and then cut the four edges with fancy scissors. The same distress pad was used to color the cut edges. 

The folded cardstock is a blue/gray parchment pattern and I used distress ink in Weathered Wood to tone the edges. Before the pieces were glued together I placed three graduated sized square rhinestone brads and a greeting cut with a Cuttlebug die. I had a rhinestone the same color as the brads so I glued that on to dot the I.

Ddd


Posted by studio3d@ccgmail.net at 6:00 AM PDT
Tuesday, 28 April 2009
Bouquet of One
Topic: New Work

Top down:

Ribbon tied around stem of image; Image stamped with black ink, colored with watercolor pencils, washed with waterbrush, torn; Mulbury paper stamped with Versamark, embossed with clear powder; Yellow handmade paper, torn; Purple textured irridescent paper, glued to folded white cardstock.

Ddd


Posted by studio3d@ccgmail.net at 6:00 AM PDT
Monday, 27 April 2009
Savory Fruit
Topic: New Work

These three fruit tile panels are from a catalog. I pulled colors from them for the backing papers. The cardstock was a scrap that had a perforation through it so I enhanced it with fake stitching (with a pen).

I used distressing ink pad (old paper) on the brick cardstock and (aged mahogany) the dotted paper.

The 'savor' title is a sticker from my stash.

Ddd


Posted by studio3d@ccgmail.net at 6:00 AM PDT
Sunday, 26 April 2009
Asian Wisdom
Topic: New Work

Two pre-printed elements were combined for this card. I had three of the purple floral panels and the one with the kanji. Since both had a purple tones I added some purple mulbury paper. Then I brought in green mulbury paper and green corrugated card. I embossed the white panel with the Cuttlebug and trimmed it all up with silver peel-offs. 

My goal was to bring together a variety of asian-feel elements to complement the kanji panel.

Ddd


Posted by studio3d@ccgmail.net at 6:00 AM PDT
Saturday, 25 April 2009
Hello Bloomers
Topic: New Work

When Spring is slow in coming - make your own!

I stamped the flowering branch on glossy cardstock with light brown ink and colored it all with watercolor markers. Then I pulled out a variety of papers with pinks, yellows, and pastel purple found a sketch I had drawn last year. The sketch was for a vertical focal piece so I made some adjustments and started cutting and layering.

The sketch actually did have the ribbon and a greeting right where these are but I added the button brads at the top. I used a range of colors to add interest.

Since I stamped the greeting directly onto the papers it looked rather flat, so I added Stickles to three of the words and then to the flower centers in the stamping.

Here you can see the glitter of the Stickles I added:


Ddd


Posted by studio3d@ccgmail.net at 6:00 AM PDT
Friday, 24 April 2009
Beach Blanket
Topic: New Work

This started with an odd combination of elements but I really like how it turned out. The photo is from my page per day calendar at work. I pulled a piece of green metallic and gold metallic cardstock, butted their edges and then glued on the photo with the split right at the horizon line, in exact opposite of the colors in the photo.

Three golden spotted scrapbook paper strips were glued behind and then a green/gold basketweave print behind that. I used some rubons of stitching to anchor four edges and mounted the whole thing on green cardstock with just the edges showing. 

I added a green seashell puffy acrylic sticker to the lower right.

Ddd


Posted by studio3d@ccgmail.net at 6:00 AM PDT
Thursday, 23 April 2009
She Celebrates
Topic: New Work

Out of a magazine or catalog some time ago I harvested this art piece. I've mounted it on cream card and then on a decorative paper from a mailing flyer. I used Sharpie on the side edges to maintain the definition between this and the diamond print scrapbook paper underneath.

The artwork actually had text in the lower right corner so I used opaque floral rub-ons to cover the words and added black mini-brads to the other three corners.


The Celebrate text is a sticker and the whole thing is mounted on cream folded cardstock.

Ddd


Posted by studio3d@ccgmail.net at 6:00 AM PDT
Wednesday, 22 April 2009
A Stitch Or Two
Topic: New Work

These 3D flowers came with a yellow rectangle background. I attached to yellow gingham paper and used a matching pink watercolor marker to create a drop shadow for it. Along the sides I applied rub-on stitches and then used sticky dots to attach three buttons which I had tied thread through. 

I used that pink marker again to make drop shadows for the buttons.

This is all applied to a folded green card.

Ddd


Posted by studio3d@ccgmail.net at 6:00 AM PDT
Tuesday, 21 April 2009
One Hug At a Time
Topic: New Work

Little basket of hugs! This 3D cutting came with an oval background and I found that I had a text sticker that exactly matched it! I also had some white punched flowers that I stacked and gave them yellow centers to match those in the bouquet. I used Stickles in all of the daisy centers and all the elements are attached to a yellow card with the fold at the top.

I rounded all the corners with a punch.

Ddd


Posted by studio3d@ccgmail.net at 6:00 AM PDT
Monday, 20 April 2009
Rosy Bear
Topic: New Work

Another little bear today - 3D again. This one came with a built-in frame of florals and beautiful colors. I placed a green polkadot paper behind and then a rosy plaid over dark green folded cardstock. 

I didn't put a greeting on this as it may then be used for a variety of ocassions.

Ddd


Posted by studio3d@ccgmail.net at 6:00 AM PDT
Sunday, 19 April 2009
Polka Dot Lady
Topic: New Work

Wow, this is SO totally not my usual style, but I love it! It is another of the 3D pictures from my stash and I mounted it on green polkadots and then on black with multi-colored dots. The card base is red.

I had a little tag 'frame' and tucked a pre-printed text behind it (forever friends) and mounted with a yellow flower brad.

Ddd


Posted by studio3d@ccgmail.net at 6:00 AM PDT
Saturday, 18 April 2009
Celebration Bouquet
Topic: New Work

Here's the second 3D element I assembled. I like the round background that was incorporated into this one. I reinforced this with the polkadots on the paper, and they were pink dots, too! Then I added three pink rhinestones as well. 

I used a green folded card base to echo the leaves in the bouquet and applied a white rub-on text.

Ddd


Posted by studio3d@ccgmail.net at 6:00 AM PDT
Friday, 17 April 2009
Baby Bear Hugs
Topic: New Work

I dipped into my big pile of 3D images and spent an evening clipping and stacking several of them and then took them into the studio to find matching designer papers to combine with each of them.

This is the first I finished: 

I call this 'Baby Bear Hugs' as I think it looks like he is holding his blankie. I added a layer of pink but tied two ribbons in blue so it can be used for either a girl or a boy baby. The yellow plaid background is supposed to be the baby blanket.

Ddd


Posted by studio3d@ccgmail.net at 6:00 AM PDT
Thursday, 16 April 2009
Sail Away
Topic: New Work

A perfect card for a guy, this stitched sailboat is from my stash of free patterns. I went with blue thread on blue textured cardstock, mounted on red and white plaid and enhanced with three star brads . The brads were too light so I colored them with Sharpie and then added stickles to them and the flag on the boat. 

The whole thing was glued on a dark red folded card base.

Ddd


Posted by studio3d@ccgmail.net at 6:00 AM PDT
Wednesday, 15 April 2009
Imagine the Good Life
Topic: New Work

Today I started with some odd materials and made this card from them. What is is? Peel-and-stick paint samples! 

I started by cutting the folded cardstock and built directly on the front. First was the blue sky. I started with this so I would have a straight line for the horizon. Then I added the teal for the ocean by butting it right up against the sky. I cut a freehand water/sand line on the light yellow and stuck it down over the water.

For the sun I cut a circle and then cut a straight line across it. This was stuck down and from the remainder I cut stripes, adhering every other one over the water. From the sky color I cut some free-form strips and added them to the water/sun area. Then I cut some free-form strips from the water color and made them into streaky clouds in the sky.

I had another darker teal which I used to add some free-form 'waves' along the beach. Then I stamped the chair and umbrella directly on the sand/water at the left and stamped it again on the coral paint-chip, cut it out, and stuck it down over the original stamping.

I used a punch to round all the corners and added two text stickers I found in my stash that matched the colors precisely.

Ddd


Posted by studio3d@ccgmail.net at 6:00 AM PDT
Tuesday, 14 April 2009
Home Tweet Home
Topic: New Work

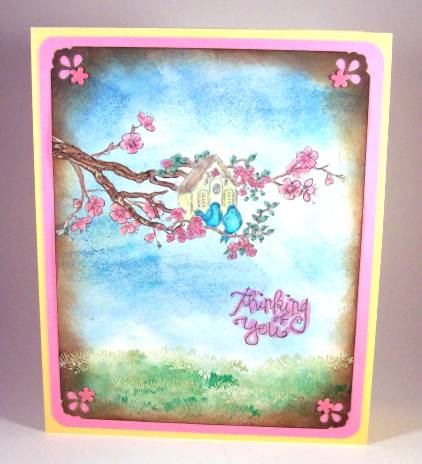
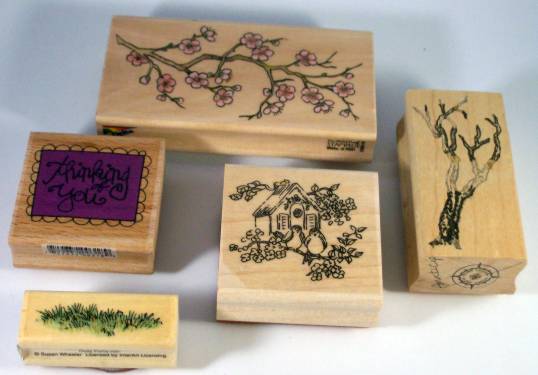
Here is a card I made today with 5 stamps and some techniques I learned from Michelle Zindorf's blog.

I used these 5 stamps

These coloring agents

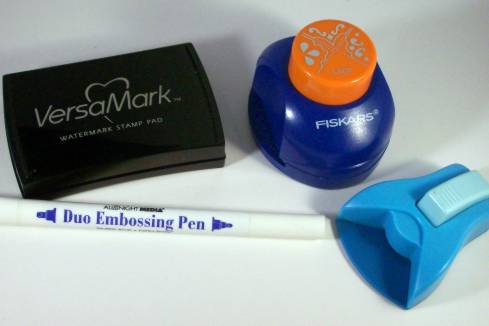
And these special tools

Here's my process:

Using glossy cardstock I stamped the birdhouse in grey, colored with watercolor markers, colored over it with an embossing pen and embossed with clear detail powder.

Then I stamped the bare tree as a branch using the same grey, colored with light brown, and embossed the same as before.

Finally I stamped three different parts of the flowering branch, just flowers, with the grey ink, colored and embossed.

I dropped down to the bottom of the panel and stamped the grass several times inking up first with Versamark then green dye ink. I embossed these with clear detail powder. Then with a darker green I stamped plain color - no embossing.

I used sponges to color the grassy area background with a third green, used another sponge to color in the sky with various shades of blue and some yellow.

I used walnut ink to sponge a shading all around the edge. I used Sharpie marker to color over the birds then used a blending tool and alcohol to remove a lot of the color off them.

I used dark grey to stamp the greeting (just inking up the center, without the border of the stamp). I used a pink marker to brush over the lettering to enhance it.

I punched the corners with the decorative corner punch. I cut the pink panel and rounded the corners with a punch. The artwork was mounted to the pink panel using pink flower brads and finally, glued these to the folded yellow card base.

Here's the card again for review.

Ddd


Posted by studio3d@ccgmail.net at 6:00 AM PDT

Newer | Latest | Older