« October 2009 »
S M T W T F S
1 2 3
4 5 6 7 8 9 10
11 12 13 14 15 16 17
18 19 20 21 22 23 24
25 26 27 28 29 30 31
You are not logged in. Log in
Entries by Topic
All topics  «
3D paperwork
A - Z challenge 5
A - Z challenge 7
A - Z challenge round 4
A to Z challenge round 3
A to Z round 2
A to Z round 6
A-Z round 1
Around the House
Art Challenges
Artist Trading Cards
Backgrounds
Beads
Bible Journaling
Books
Boxes
Collage
Color Challenge
Coloring
cookbook
Die Cuts
Digital Projects
Digital Stamps
Drawing
Dry Embossing
Fabric Stuff
Fantastic Folds
Field Trip
Home Decor
How Does Your Garden Grow?
Hymnal Art
In The Kitchen
In the studio
Jewelry
Lettering
Links
Multi-Technique
Music to Work By
Musings
Nail Art
New Work
Online Class
Other Hobbies
Other Projects
Painting
Paper Embroidery
Paper Piecing
Photo
Pretty Paper
Quilting
Random
reading
Scrap Recovery
scrapbooking
Sewing
Sketch Challenge
Some Backlog
Stamping
Stencils
Stickers
Supplies
Teabag Folding
Techniques
Testing
tips and tricks
Tutorial
Web resources
Welcome to my Blog
Work By My Friends
workflow
Writing
Blog Tools
Edit your Blog
Build a Blog
RSS Feed
View Profile
Group One
In & Out of Studio 3D
Monday, 5 October 2009
Hopeful Nest
Topic: Stamping

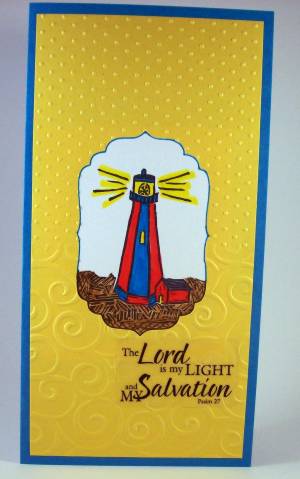
I colored up this nest with watercolor pencils and used a Nestabilities Labels die on the angle to cut it out. A layer of scrapbook paper with rounded corners backs this and a blue layer separates these from the yellow folded cardstock base. 

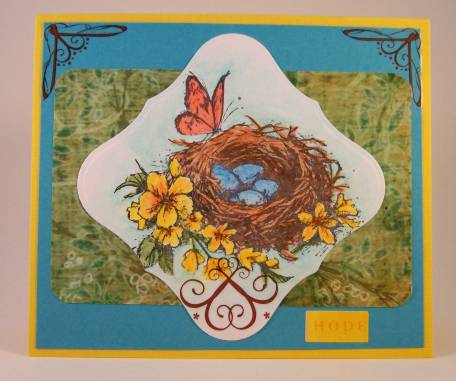
I used brown rubons at the base of the main panel as they simulated branches. Then I added coordinating corner rubons at the top.

The text block is a cardstock sticker.

Ddd


Posted by studio3d@ccgmail.net at 6:00 AM PDT
Sunday, 4 October 2009
Light For A Friend
Topic: Stamping

Oh how I do like this stamp!

Watercolor pencils, cutting with a Nestabilities Label die, and distressing around the die... I used a pre-printed tag for the main text block and a die-cut script for the two words. Lots of layering over scrapbook paper ties it all together.

I used gold peel-off stickers in two corners and along the right edge, then colored two rhinestones with Sharpie marker and used them to dot the I in the text and to give the hummingbird a sparkling eye.

Ddd


Posted by studio3d@ccgmail.net at 6:00 AM PDT
Saturday, 3 October 2009
Fragile Life
Topic: Stamping

Here's another using my hand-carved hummingbird stamp. I cut a window in a patterned paper and inserted a marbled paper behind it. Three floral stickers were stuck to the background and raised the bird up on pop-dots.

I used golden Stickles on the flowers and silvery Stickles on the bird.

Three flower brads adorn the upper left and a clear sticker provides the text.

Ddd


Posted by studio3d@ccgmail.net at 6:00 AM PDT
Friday, 2 October 2009
Best Things In Life
Topic: Stamping

Back with the hat stamp! I used a Nestabilities Labels die to cut out and emboss a panel for mounting. It and the folded card base of the same color were distressed with 'Worn Lipstick' distress ink. I used a corner punch on the cardstock base and inserted a blue panel to match the hat.

This caused the corners to look like latice so I added some flowers in these corners. 

The feature panel and the hat are both mounted with pop-dots. The text block is a cardstock sticker.


Posted by studio3d@ccgmail.net at 6:00 AM PDT
Thursday, 1 October 2009
Give Thanks
Topic: Stamping

Not quite monochrome - but close... I used watercolor pencils on the stamped image and mounted on 4 cut panels and a folded card base. Two of the layers are mounted with pop-dots.

Embellishments are silk flowers with copper brads in the center, a doodle line around the edge, and a clear scripture sticker.

The text in the upper left is hand lettered with Sharpie marker.

Ddd


Posted by studio3d@ccgmail.net at 6:00 AM PDT
Wednesday, 30 September 2009
Apple-abra
Topic: Around the House

For an autumn decoration I removed the pillar candles from this tower stand and filled the holders with apples and the spaces with grapes. A few more apples spilled around the base and, voila! 

I made this arrangement for a sideboard in my dining room.

Ddd


Posted by studio3d@ccgmail.net at 6:00 AM PDT
Tuesday, 29 September 2009
Birthday Bouquet
Topic: Stamping

Are you as surprised as I am at the sheer number of carved stamps? Only one more to go after this one, though.

This is actually a set of three roses I carved - a large rose, a medium rose, and a bud. This is, without question, the stamp set I have made the most use of.

I used masking to create layers in this bouquet and colored with three layers of watercolor markers to define the shadows and highlights in the blooms.

Green marker was used to color the bases of the buds and to add greenery around and within the bouquet. Then yellow was used to color the background. 

I used Nestabilities to cut the border, using a bit of creative finangling to make a long rectangle into a shaped wide rectangle.

Placed on a green folded card base, the bouquet was enhanced with a double-ribbon bow and a cardstock text sticker.

Ddd


Posted by studio3d@ccgmail.net at 6:00 AM PDT
Monday, 28 September 2009
I Just Had an Idea
Topic: Stamping

A tiny stamp becomes a brilliant border by stamping repeatedly with yellow ink. Just once, I stamped in black in the center.

All of the bulbs were colored with yellow watercolor marker and a panel border of grey was drawn in. I added text with individual rub-on letters and added Stickles to every one of the bulbs.

After the glitter was dry I placed black brads in the 4 corners of the panel and attached to a folded card base with a black printed scrapbook paper.

Ddd


Posted by studio3d@ccgmail.net at 6:00 AM PDT
Sunday, 27 September 2009
Smile or Smirk?
Topic: Stamping

This is one carving that I am particularly happy with, It is done on carving block with the Speedball carving tools and I simply love how it turned out. I haven't used it much since I don't have a lot of call for llamas, but I do think he is sweet.

I stamped on white card and cut/embossed the panel with a shaped rectangle Nestability. The border was distressed with ink and then mounted to a sweries of panels with rounded corners. 

The stack of panels was added to a folded purple cardstock base and the text was added with white rubons.

Ddd


Posted by studio3d@ccgmail.net at 6:00 AM PDT
Saturday, 26 September 2009
Meshing Style
Topic: Stamping

This stamp was carved based on a sketch I did in church of the pattern on the dress of a lady sitting in front of me. How fitting, then, that it be used for a scripture card!

I stamped on a folded white card base and colored with watercolor markers. I colored the background blocks with light blue marker and then drew in the mesh and the border with light grey. 

The scripture text is a clear sticker.

Ddd


Posted by studio3d@ccgmail.net at 6:00 AM PDT
Friday, 25 September 2009
Glitter-Fish
Topic: Stamping

I have no idea what species of fish this is supposed to be so I colored it up (watercolor markers) like no fish I have ever seen! The carved stamp is just the black lines, and I did repeat stamping as I often do with a smaller stamp.

The swirling water is also colored with markers and I added rubon text at the top of the card. 

I added Glossy Accents to the water and the fish eyes then applied Stickles to the fish. Here you get a better look at that effect.


Ddd


Posted by studio3d@ccgmail.net at 6:00 AM PDT
Thursday, 24 September 2009
Oh, Joy!
Topic: Stamping

So, what do you do with a stamp of a dip-pen? You write something with it!

I added a clear text sticker at the tip of my carved pen and then cut the panel down to size. After placing on a green folced card base I went to town with clear poinsettia and holly stickers from a set. 

I used gold border stickers to define the panel as a last step.

Ddd


Posted by studio3d@ccgmail.net at 6:00 AM PDT
Wednesday, 23 September 2009
Window on Home
Topic: Stamping

The scrapbook paper I chose to stamp the window on is supposed to be a basket-weave. But when the window gets stamped on it and colored with some grey marker, I magically turns to brick!

I used a Nestability shaped rectangle to cut bothe the brick panel and the underlying burgundy panel. The burgundy also has embossed edges which were distressed with color.

I cut out the windowpanes with a craft knife and glued a farm scene behind the window. 

After adding the panel to a violet folded cardstock I added clear stickers of pen and ink and then placed a carstock sticker to the top.

Ddd


Posted by studio3d@ccgmail.net at 6:00 AM PDT
Tuesday, 22 September 2009
How Do I Color?
Topic: Stamping

9 little crayons stamped in a row, colored with a variety of Whispers inkpads. I cut the strip out and then made slits to weave the ribbon through. A bow ties between to on the right.

I added a sticker of a little school-girl and a text sticker. 

Two borders of fine-tip marker doodling define some panels.

Ddd


Posted by studio3d@ccgmail.net at 6:00 AM PDT
Monday, 21 September 2009
Postcard Card
Topic: Stamping

Upper-right corner has a stamped stamp! I carved this with PoStUdIo at the bottom and 3d at the top. It has been stamped in black ink and colored with watercolor markers. I added a travel sticker in the lower left and the greeting in the upper left. The flowers in the greeting matched some others on the sticker sheet so I placed these as a bottom border. 

I pulled the colors from these elements to color in the stamp. A fine-line pen was used to add borders and the address lines.

Since this is a card rather than a real postcard, the address is left blank and any further greetings will be placed on the inside.

Ddd


Posted by studio3d@ccgmail.net at 6:00 AM PDT
Sunday, 20 September 2009
Classy Card
Topic: Stamping

This fish in the seaweed was inked up with markers and stamped three times across the bottom of folded white cardstock. I also colored in the fish and the background with markers, as well.

The border was created with stickers and some doodling was added to connect them to each other and to the card. 

The lettering was hand drawn and colored with markers.

Ddd


Posted by studio3d@ccgmail.net at 6:00 AM PDT
Saturday, 19 September 2009
Light and Salvation
Topic: Stamping

Even I didn't realize how many hand-carved stamps I had made until I started this project!

Today's entry is a lighthouse colored with watercolor markers. I extended the rocks beyond the bounds of the stamp with color and then drew in some black hashing over it. 

The yellow cardstock got an aperture cut with a Labels Nestability and then the top was embossed with dots to mimit a night sky and the bottom with swirls to represent waves.

I used marker to draw around the aperture and placed the panel on folded blue cardstock. The text is a clear sticker.

Ddd


Posted by studio3d@ccgmail.net at 6:00 AM PDT
Friday, 18 September 2009
Tulip Garden
Topic: Stamping

I carved a little grouping of three tulips for this stamp.  I stamped a repeating border on a folded white card base and colored with watercolor markers. I added a few additional leaves with black Sharpie so the border would not be so predictable.

After adding the clear cross scripture sticker, I added Glossy Accents to all the flowers and leaves. Here you can see the effect this has on the card's wow-factor.

Ddd


Posted by studio3d@ccgmail.net at 6:00 AM PDT
Thursday, 17 September 2009
Moon Man
Topic: Stamping

This is the only stamp I have carved using a rotary tool. I did the basic cutting around the image with the carving set and then reamed out the background with the rotary. Sure was faster than hackng away with the tools.

I stamped this guy on white cardstock and colored with watercolor marker and cut it out. He is raised with pop-dots on a labels Nestability panel with embossed and color-distressed edges. 

The label is also raised on pop-dots on a folded blue card base. Shimmery star stickers enhance the background and also set off two corners of a vellum scripture sticker.

Ddd


Posted by studio3d@ccgmail.net at 6:00 AM PDT
Wednesday, 16 September 2009
A Man's Man Card
Topic: Stamping

I have never make anything with this fingerprint stamp since I carved it. I could never think of anything that suited! So for this I just stamped it all over the front of a white folded cardstock and THEN thought about it!

I started by coloring them in with grey marker and then drew in a black border on the card. Still no inspiration... So I started looking through my sticker collection and came up wth this tag sticker from my 'things that go' folder. Perfect! 

I used grey marker to add the caption and a drop-shadow on the tag. I went back to the black fine-line to define the grey marker.

Ddd


Posted by studio3d@ccgmail.net at 6:00 AM PDT

Newer | Latest | Older