« October 2009 »
S M T W T F S
1 2 3
4 5 6 7 8 9 10
11 12 13 14 15 16 17
18 19 20 21 22 23 24
25 26 27 28 29 30 31
You are not logged in. Log in
Entries by Topic
All topics  «
3D paperwork
A - Z challenge 5
A - Z challenge 7
A - Z challenge round 4
A to Z challenge round 3
A to Z round 2
A to Z round 6
A-Z round 1
Around the House
Art Challenges
Artist Trading Cards
Backgrounds
Beads
Bible Journaling
Books
Boxes
Collage
Color Challenge
Coloring
cookbook
Die Cuts
Digital Projects
Digital Stamps
Drawing
Dry Embossing
Fabric Stuff
Fantastic Folds
Field Trip
Home Decor
How Does Your Garden Grow?
Hymnal Art
In The Kitchen
In the studio
Jewelry
Lettering
Links
Multi-Technique
Music to Work By
Musings
Nail Art
New Work
Online Class
Other Hobbies
Other Projects
Painting
Paper Embroidery
Paper Piecing
Photo
Pretty Paper
Quilting
Random
reading
Scrap Recovery
scrapbooking
Sewing
Sketch Challenge
Some Backlog
Stamping
Stencils
Stickers
Supplies
Teabag Folding
Techniques
Testing
tips and tricks
Tutorial
Web resources
Welcome to my Blog
Work By My Friends
workflow
Writing
Blog Tools
Edit your Blog
Build a Blog
RSS Feed
View Profile
Group One
In & Out of Studio 3D
Wednesday, 14 October 2009
A Little Hug For Your Coffee
Topic: Sewing

 I found a fabulous little book called "Pretty Little Cozies" that has patterns and instructions for making cozies for an amazing variety of things. The one that really interested me was the cover piece - a cozy for a french press coffee maker.

But they used a totally patchwork background with folk-art flowerpots, butterflies, etc. I really wanted to do a chicken theme for my D-I-L. Unfortunately, chicken fabric seems to be 'out of fashion' this season so I ended up drawing my own birds, cutting them out of a variety of fabrics and stitching them to an 'egg' printed background. I did applique decorative stitching with embroidery thread.

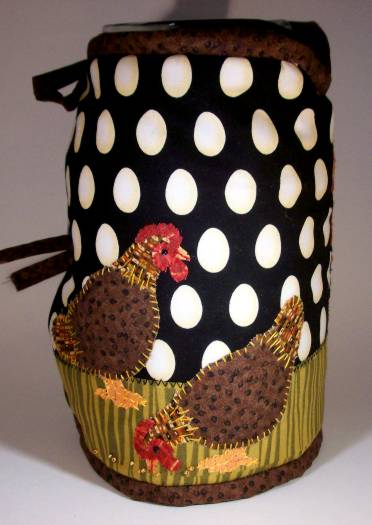
So, here's the piece in whole:

This is how it will look on the press, Viewing the side with the two hens.

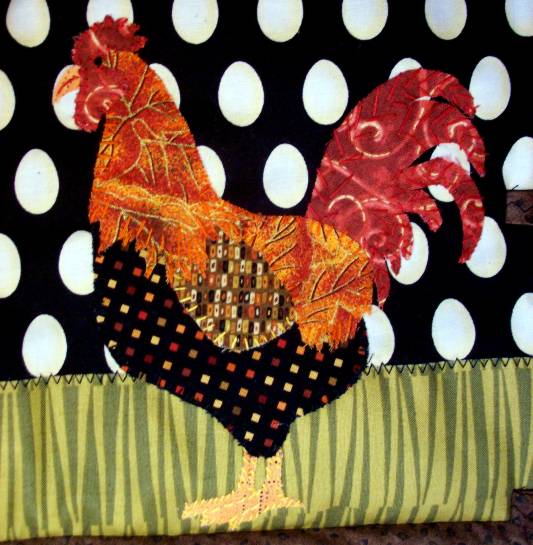
This is the side with the rooster:


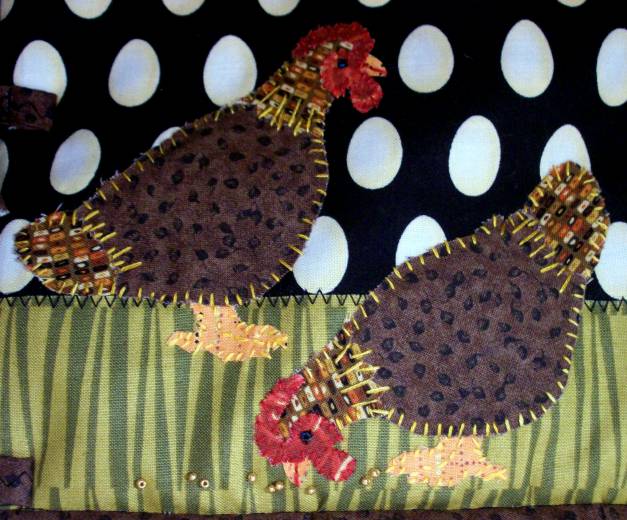
Her is a closeup of the hens. You can see the stitching better in this shot. Notice that the hens have blue beads for their eyes and I gave the lower girl a few 'seed beads' to peck at.

Here is the closeup of the rooster. He is much more colorful than the ladies! Notice the green fabric I used for 'grass'. Love this!


Hope you enjoy!

Ddd


Posted by studio3d@ccgmail.net at 6:00 AM PDT
Tuesday, 13 October 2009
Sunrise Series
Topic: Photo

We had occasion to be on a farm at daybreak a while back. The fog was beautiful across the landscape and the sunrise was spectacular. I processes the color out of the first foggy photo to create a better effect.


Ddd


Posted by studio3d@ccgmail.net at 6:00 AM PDT
Monday, 12 October 2009
A Creek Runs Through It
Topic: Photo

A little creek (name unknown) in a little park (name unknown) in a little town (name Aumsville). We were at the annual 'Corn Festival' and found this little bit of calm in the midst of the chaos.

Ddd


Posted by studio3d@ccgmail.net at 6:00 AM PDT
Sunday, 11 October 2009
On Parade
Topic: Photo

The same festival mentioned yesterday had the obligatory small-town parade. I took lots of photos but... b-o-r-i-n-g...! So this one I ran through Corel PhotoPaint and applied lots of different edits and effects and ended up with a photo that, I guarantee, nobody else has! 

This little girl was waiting for the parade participants to toss candy, so I ducked behind her to compose the shot.

Ddd


Posted by studio3d@ccgmail.net at 6:00 AM PDT
Saturday, 10 October 2009
Car Show
Topic: Photo

We had occasion to be out of town at a festival that included a car show. I've never taken any photos like this so decided to give it a whirl. Most of them have some photo editing/processing done in the computer.


Ddd


Posted by studio3d@ccgmail.net at 6:00 AM PDT
Friday, 9 October 2009
Blue Bird of Paradise
Topic: Stamping

Another late entry from the hand-carved stamp project.

I stamped the bird repeatedly on white cardstock with blue Whispers ink. It was too bright so I overlaid it with white mulberry paper. Yes, much better. The roses are silver peel-off stickers which I placed on pink and green mulberry paper and trimmed around. These are Dazzles brand as are the borders at the top and bottom of the blue folded cardstock base.

A silver peel-off greeting finishes the card in a fine coordianted style.

Ddd


Posted by studio3d@ccgmail.net at 6:00 AM PDT
Thursday, 8 October 2009
Another Year Bites the Dust
Topic: Work By My Friends

A recent birthday brought all these lovelies from friends all over the world.

From Annelies: 

From Astrid:

From Tim Holtz:

From Bev:

From Carla:

From Gerda:

From Laurie:

From Margaret:

From Mary:

From Nancy:

From Rhapsy:

From Thelma:

From Winnie:

From Yone:


Yes, you are SO right - I am one lucky girl!

Ddd


Posted by studio3d@ccgmail.net at 6:00 AM PDT
Wednesday, 7 October 2009
A Walk on the Beach
Topic: Field Trip

It's been over a year since we had been to the beach and then we went two weekends in a row! We were on different areas of the beach each time, both beautiful days with long walks on the shore.

This second weekend, I remembered to bring my camera along and snapped these two photos of a beautiful day.


Ddd


Posted by studio3d@ccgmail.net at 6:00 AM PDT
Tuesday, 6 October 2009
Faithful Bear
Topic: 3D paperwork

This 3D bear is made of cardstock and is from a punch-out sheet. Hey, I LIKE this way of doing 3D! The sheet was the gift of a friend as was the floral paper on this card. 

After assembling the bear it was a simple task to put together the papers and a cardstock sticker. I'd be surprised if this took more than 5 minutes.

Ddd


Posted by studio3d@ccgmail.net at 6:00 AM PDT
Monday, 5 October 2009
Hopeful Nest
Topic: Stamping

I colored up this nest with watercolor pencils and used a Nestabilities Labels die on the angle to cut it out. A layer of scrapbook paper with rounded corners backs this and a blue layer separates these from the yellow folded cardstock base. 

I used brown rubons at the base of the main panel as they simulated branches. Then I added coordinating corner rubons at the top.

The text block is a cardstock sticker.

Ddd


Posted by studio3d@ccgmail.net at 6:00 AM PDT
Sunday, 4 October 2009
Light For A Friend
Topic: Stamping

Oh how I do like this stamp!

Watercolor pencils, cutting with a Nestabilities Label die, and distressing around the die... I used a pre-printed tag for the main text block and a die-cut script for the two words. Lots of layering over scrapbook paper ties it all together.

I used gold peel-off stickers in two corners and along the right edge, then colored two rhinestones with Sharpie marker and used them to dot the I in the text and to give the hummingbird a sparkling eye.

Ddd


Posted by studio3d@ccgmail.net at 6:00 AM PDT
Saturday, 3 October 2009
Fragile Life
Topic: Stamping

Here's another using my hand-carved hummingbird stamp. I cut a window in a patterned paper and inserted a marbled paper behind it. Three floral stickers were stuck to the background and raised the bird up on pop-dots.

I used golden Stickles on the flowers and silvery Stickles on the bird.

Three flower brads adorn the upper left and a clear sticker provides the text.

Ddd


Posted by studio3d@ccgmail.net at 6:00 AM PDT
Friday, 2 October 2009
Best Things In Life
Topic: Stamping

Back with the hat stamp! I used a Nestabilities Labels die to cut out and emboss a panel for mounting. It and the folded card base of the same color were distressed with 'Worn Lipstick' distress ink. I used a corner punch on the cardstock base and inserted a blue panel to match the hat.

This caused the corners to look like latice so I added some flowers in these corners. 

The feature panel and the hat are both mounted with pop-dots. The text block is a cardstock sticker.


Posted by studio3d@ccgmail.net at 6:00 AM PDT
Thursday, 1 October 2009
Give Thanks
Topic: Stamping

Not quite monochrome - but close... I used watercolor pencils on the stamped image and mounted on 4 cut panels and a folded card base. Two of the layers are mounted with pop-dots.

Embellishments are silk flowers with copper brads in the center, a doodle line around the edge, and a clear scripture sticker.

The text in the upper left is hand lettered with Sharpie marker.

Ddd


Posted by studio3d@ccgmail.net at 6:00 AM PDT
Wednesday, 30 September 2009
Apple-abra
Topic: Around the House

For an autumn decoration I removed the pillar candles from this tower stand and filled the holders with apples and the spaces with grapes. A few more apples spilled around the base and, voila! 

I made this arrangement for a sideboard in my dining room.

Ddd


Posted by studio3d@ccgmail.net at 6:00 AM PDT
Tuesday, 29 September 2009
Birthday Bouquet
Topic: Stamping

Are you as surprised as I am at the sheer number of carved stamps? Only one more to go after this one, though.

This is actually a set of three roses I carved - a large rose, a medium rose, and a bud. This is, without question, the stamp set I have made the most use of.

I used masking to create layers in this bouquet and colored with three layers of watercolor markers to define the shadows and highlights in the blooms.

Green marker was used to color the bases of the buds and to add greenery around and within the bouquet. Then yellow was used to color the background. 

I used Nestabilities to cut the border, using a bit of creative finangling to make a long rectangle into a shaped wide rectangle.

Placed on a green folded card base, the bouquet was enhanced with a double-ribbon bow and a cardstock text sticker.

Ddd


Posted by studio3d@ccgmail.net at 6:00 AM PDT
Monday, 28 September 2009
I Just Had an Idea
Topic: Stamping

A tiny stamp becomes a brilliant border by stamping repeatedly with yellow ink. Just once, I stamped in black in the center.

All of the bulbs were colored with yellow watercolor marker and a panel border of grey was drawn in. I added text with individual rub-on letters and added Stickles to every one of the bulbs.

After the glitter was dry I placed black brads in the 4 corners of the panel and attached to a folded card base with a black printed scrapbook paper.

Ddd


Posted by studio3d@ccgmail.net at 6:00 AM PDT
Sunday, 27 September 2009
Smile or Smirk?
Topic: Stamping

This is one carving that I am particularly happy with, It is done on carving block with the Speedball carving tools and I simply love how it turned out. I haven't used it much since I don't have a lot of call for llamas, but I do think he is sweet.

I stamped on white card and cut/embossed the panel with a shaped rectangle Nestability. The border was distressed with ink and then mounted to a sweries of panels with rounded corners. 

The stack of panels was added to a folded purple cardstock base and the text was added with white rubons.

Ddd


Posted by studio3d@ccgmail.net at 6:00 AM PDT
Saturday, 26 September 2009
Meshing Style
Topic: Stamping

This stamp was carved based on a sketch I did in church of the pattern on the dress of a lady sitting in front of me. How fitting, then, that it be used for a scripture card!

I stamped on a folded white card base and colored with watercolor markers. I colored the background blocks with light blue marker and then drew in the mesh and the border with light grey. 

The scripture text is a clear sticker.

Ddd


Posted by studio3d@ccgmail.net at 6:00 AM PDT
Friday, 25 September 2009
Glitter-Fish
Topic: Stamping

I have no idea what species of fish this is supposed to be so I colored it up (watercolor markers) like no fish I have ever seen! The carved stamp is just the black lines, and I did repeat stamping as I often do with a smaller stamp.

The swirling water is also colored with markers and I added rubon text at the top of the card. 

I added Glossy Accents to the water and the fish eyes then applied Stickles to the fish. Here you get a better look at that effect.


Ddd


Posted by studio3d@ccgmail.net at 6:00 AM PDT

Newer | Latest | Older