« February 2010 »
S M T W T F S
1 2 3 4 5 6
7 8 9 10 11 12 13
14 15 16 17 18 19 20
21 22 23 24 25 26 27
28
You are not logged in. Log in
Entries by Topic
All topics  «
3D paperwork
A - Z challenge 5
A - Z challenge 7
A - Z challenge round 4
A to Z challenge round 3
A to Z round 2
A to Z round 6
A-Z round 1
Around the House
Art Challenges
Artist Trading Cards
Backgrounds
Beads
Bible Journaling
Books
Boxes
Collage
Color Challenge
Coloring
cookbook
Die Cuts
Digital Projects
Digital Stamps
Drawing
Dry Embossing
Fabric Stuff
Fantastic Folds
Field Trip
Home Decor
How Does Your Garden Grow?
Hymnal Art
In The Kitchen
In the studio
Jewelry
Lettering
Links
Multi-Technique
Music to Work By
Musings
Nail Art
New Work
Online Class
Other Hobbies
Other Projects
Painting
Paper Embroidery
Paper Piecing
Photo
Pretty Paper
Quilting
Random
reading
Scrap Recovery
scrapbooking
Sewing
Sketch Challenge
Some Backlog
Stamping
Stencils
Stickers
Supplies
Teabag Folding
Techniques
Testing
tips and tricks
Tutorial
Web resources
Welcome to my Blog
Work By My Friends
workflow
Writing
Blog Tools
Edit your Blog
Build a Blog
RSS Feed
View Profile
Group One
In & Out of Studio 3D
Saturday, 6 February 2010
White Tail
Topic: Die Cuts

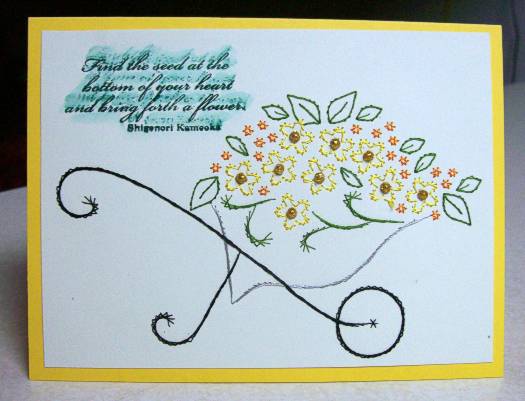
Another year over means I have calendar pictures to play with again! This white tail deer was one of a pair on November's page. I die cut with a Nestability and then layered over a brown and a cream of the same size but stacked with pop-dots for dimension. The cream is completely hidden in the straight-on view. 

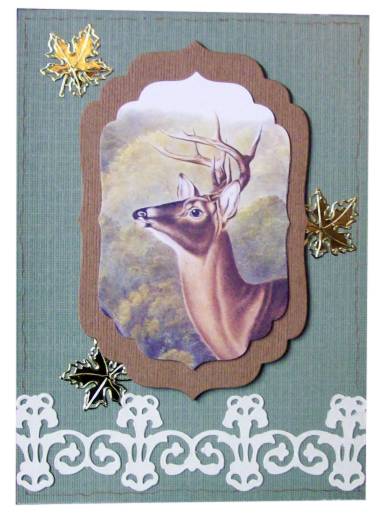
I used the Cuttlebug cutting die 'ornamental ironwork' for the bottom border, cut from cram cardstock.

The leaves are stacked gold stickers and I drew in a faint border with marker.

Ddd


Posted by studio3d@ccgmail.net at 6:00 AM PST
Friday, 5 February 2010
Criss-Cross-Valentine
Topic: Fantastic Folds

 Another challenge - make a criss-cross card. We were given a loink to instructions and this is how I made mine (not exactly by the instructions - but when do I ever) .

With a single 12 x 12 sheet of cardstock I was able to make three of these. I cut three 12 x 4 strips and scored them into 4 x 4 sections. Each outer section is cut at a 45 degree angle from the fold to the point. Then the center is lined with scrapbook paper.

The right panel is folded in and glued at the fold and at the bottom. On the left front I glued a motif from the inner paper and attached it exactly over it. I attached a matching piece in the inside of the panel as well.

Silver stickers (hearts and borders) were applied and Sharpie marker used to color in the hearts.


I made a matching tag for the inner pocket and decorated it with the same silver stickers. Matching scrapbook paper was used for the tag 'ribbon'.

Ddd


Posted by studio3d@ccgmail.net at 6:00 AM PST
Thursday, 4 February 2010
Bows Made Easy
Topic: Supplies

Several times I've come across this product called the bow-easy. If you find it hard to tie a bow and make it even, straight and laying neatly, then this product might be for you, too.

Here is a tutorial on how to use it. http://jerrikay.blogs.splitcoaststampers.com/2009/05/08/woo-hoo-i-did-it/

I recently found another tutorial on how to make your own templates out of chipboard - and if I can ever find it again I will post it, too.

Ddd


Posted by studio3d@ccgmail.net at 6:00 AM PST
Wednesday, 3 February 2010
Event Logo
Topic: Digital Projects

Here's a digital project I created for an event to be held at work. We are having a 'community read' and the book selection had food as it's major theme. I was given the title and this is what I designed for the logo to be used on the posters and the book labels. 


Ddd


Posted by studio3d@ccgmail.net at 6:00 AM PST
Tuesday, 2 February 2010
Twist-top Treat Box
Topic: Fantastic Folds

I loved this project the minute I saw it and had to run right down to the studio and try it out. A video tutorial is here: www.amazingpapergrace.com/video-tutorial-twist-top-box/

Hers used more decorative elements on the sides but I liked mine more simple because of the elaborate pattern on the cardstock. I lined mine with a folded clear transparency. 


Here you can see what the twist top looks like. Because it was a little plain, I put the butterfly cutouts on top of a wire and poked it through the top. Once I fill it with candies it will hold it in place solidly.

Isn't this fun?

Ddd


Posted by studio3d@ccgmail.net at 6:00 AM PST
Monday, 1 February 2010
Stitching a Bit of Sunshine
Topic: Paper Embroidery

After all the work stitching this card I dropped the stamp on it after making the greeting. Rats! So I used a waterbrush and wet just the secondary ink to create a shaddow behind the main text. Nice save, huh? 

The centers of these flowers are sticky backed glitter domes and I mounted on folded yellow cardstock.

Ddd


Posted by studio3d@ccgmail.net at 6:00 AM PST
Sunday, 31 January 2010
Barrow Full of Pink
Topic: Paper Embroidery

The last one I showed of this stitching was distressed and organic looking. I decided to go with a 'fresh' look for this onewith bright pink flowers. The centers of these flowers are sticky backed half-pearls. 

I stamped the greeting with Adriondak 'bottle' ink and mounted the panel on folded pink cardstock.

Ddd


Posted by studio3d@ccgmail.net at 6:00 AM PST
Saturday, 30 January 2010
Favorite Foods
Topic: cookbook

It's been quite a while since I shared some of my favorite recipes. So here are a few for you to try out.

CHESTNUT CHICKEN

Invented by Debbie Dodd

½ onion chopped

1 t. minced garlic

1/8 c. each margarine and olive oil

4 chicken breast, cubed

2 cans water chestnuts, cut match stick style

1 can bamboo shoots

1 can whole cashews

to taste: Mongolian fire oil, ginger, Yoshida’s gourmet sauce, soy sauce, Worcestershire, teriyaki sauce

Sauté onion and garlic in margarine and oil. Add chicken and cook till done. Add water chestnuts, bamboo shoots and cashews. Make sauce over all adjusting as you go. Cook 5 minutes to blend flavors.


CHICKEN & NOODLES ALMONDINE

Invented by Debbie Dodd

4 cups water

2 cubes chicken bouillon

¼ t. curry powder

1 t. garlic powder

2 T. onion flakes

2 t. tarragon

2 t. basil

1 T. sugar

1 t. cinnamon

whole chicken breast

2 cups dried noodles

1 cup whole almonds

Make stock of all liquid and spices. Bring to boil. Drop in finely cut pieces of chicken. Cook 2-3 minutes. Drop in noodles and almonds. Simmer till noodles are done. Drain. Toss with ¼ cup olive oil to coat. Serve.


TERIAKI SAUCE

Makes 1 gallon

1 quart vegetable oil

½ gallon soy sauce

3 cups brown sugar

3 Tbsp garlic powder

3 Tbsp ginger powder

2/3 cup fruit juice

            Stir well into 1 gallon container. Keeps months in fridge. Stir before each use.


Enjoy!

Ddd


Posted by studio3d@ccgmail.net at 6:00 AM PST
Friday, 29 January 2010
A Gramma's Brag Book
Topic: Books

Been doing a lot of challenges lately. This is the latest, a 'pull out album'. I made mine into a brag book for a friend who is a new gramma. She'll show off those baby pictures with pride in this little album. It holds up to 14 photos. 


I decorated it with Beatrix Potter stickers.

Ddd


Posted by studio3d@ccgmail.net at 6:00 AM PST
Thursday, 28 January 2010
Forest For The Trees
Topic: Stamping

Theme of the challenge: Trees... Did I do it?

This process was inspired by Michelle Zindorf's blog. I did direct-to-paper smearing of Whispers inkpads to create all the color in the background then used two stamps that each have multiple trees to create the distant and foreground groves. I also used 2nd generation stamping to create the tree reflections in the pond. 

I applied a clear text sticker in the open field and then added gold sticker trim and four orange brads. When mounted on a black panel over a blue folded cardstock base, the card is complete.

Ddd


Posted by studio3d@ccgmail.net at 6:00 AM PST
Wednesday, 27 January 2010
Layers of Lovliness
Topic: 3D paperwork

I've been hanging on to this 3D cutting sheet for years. It just seemed too complicated to cut. But I finally dug it out and used a fingertip craft knife to cut it and, though it took a long time, it wasn't as hard as I thought it was going to be. 

I used a Cuttlebug folder with dots behind the cutting and made a frame out of two nesting Spellbinders dies. It is mounted with pop-dots for dimension. Two silver dragonfly stickers are mounted on the same blue and cut out then glued with more pop-dots.

A polkadot paper was layered over folded blue cardstock and trimmed out with silver peel-off borders. A sticker was bordered with more of the blue and everything was assembled.

Ddd


Posted by studio3d@ccgmail.net at 6:00 AM PST
Tuesday, 26 January 2010
Garden Delight
Topic: Fantastic Folds

On assignment from one of my groups I created this folded card style for the first time. It is called a 'joy fold' (for reasons I do not know.)

I enlarged mine from the original and decorated with a floral border sticker. The small square (tucked under the ribbon and flower) lifts up and the lower front folds down.

This is the card result. I decorated with a coordinating sticker tag and added a gold peel-off greeting to it.


You can see that I carried the front bottom border right around to the inside of the flap.

Ddd


Posted by studio3d@ccgmail.net at 6:00 AM PST
Monday, 25 January 2010
Possibilities
Topic: Paper Embroidery

Another of those 'free pattern' finds that I love! This one stitched up so quickly that I did three of them at the same time... all the blacks, all the silver, all the leaves, all the flowers. Each was done on different background colors and has different colored flowers, though.

For this one I gave the flower centers some glittery dots, cut with a nestabilities die, and hit the edges with some distress ink. Mounted on a brown cardstock base.

I added two cardstock stickers for balance.

Ddd


Posted by studio3d@ccgmail.net at 6:00 AM PST
Sunday, 24 January 2010
Let Your Imagination Soar
Topic: Paper Embroidery

I made this card to answer a sketch challenge on one of my groups. The original was turned 90 degrees clockwise but didn't work so well for my hot air balloon so I rotated it.

I used a Cuttlebug border, ribbon, flower brads, a silk flower, blue rhinestones and a thick acrylic sticker. 

I pulled my color palate from the balloon stitching.

Ddd


Posted by studio3d@ccgmail.net at 6:00 AM PST
Saturday, 23 January 2010
Love on an Angle
Topic: Fantastic Folds

I started a new category for postings called fantastic folds. This is how I will note those projects that take unique creases and folds in their creation.

Today it is the diamond fold which I upsized half-again from the original instructions. I used stickers and gold peel-offs to trim this out to create a valentine. 

Love how this stands up for display.

Ddd


Posted by studio3d@ccgmail.net at 6:00 AM PST
Friday, 22 January 2010
I Looked At Clouds...
Topic: Photo

Yep, sometimes it pays to get up in the morning (I hate to admit it, though).

This was my reward for being up early last week. Isn't this just beautiful? It is the view from my dining room. 

Ddd


Posted by studio3d@ccgmail.net at 6:00 AM PST
Thursday, 21 January 2010
Fly Away
Topic: Paper Embroidery

When a challenge asked us to combine embroidery with parchment I started looking for a unique way to do it. The background is a beautiful printed paper I have been hoarding for years. Over this is laid a parchment with subtle yellow stripes and Then I pulled out some glittery stitching stickers. 

The stitching is done with verigated thread that picks up colors from the background paper and copper brads connect the corners.

I attached it to a peach folded cardstock base and added a silver greeting to the center.

Ddd


Posted by studio3d@ccgmail.net at 6:00 AM PST
Updated: Wednesday, 13 January 2010 2:10 PM PST
Wednesday, 20 January 2010
Temari Embroidery
Topic: Paper Embroidery

Temari is generally a thread winding on balls in a criss-crossing pattern. One of our group leaders challenged us to do paper embroidery with the same concept. I adapted this from someone else's pattern, adding more holes and completing the stitching a little differently as well. 

I used verigated thread for this, working on a shaving cream background. This is attached to a folded maroon card base and a gold greeting sticker was the final touch.

Ddd


Posted by studio3d@ccgmail.net at 6:00 AM PST
Tuesday, 19 January 2010
Framed Flowers
Topic: Paper Embroidery

I used part of two stitching templates to create my own frame for this 3D cutting. The background is a textured scrapbook paper and I stitched with verigated thread. 

I added little heart brads at the four corners and mounted on a maroon folded card base.

Ddd


Posted by studio3d@ccgmail.net at 6:00 AM PST
Monday, 18 January 2010
Heart Strings
Topic: Paper Embroidery

Stitching stickers on a rose printed scrapbook paper are the starting point for this card. I arranged a whole line of them and did the stitching with bright red thread. 

The stitched panel is mounted on a folded black card base and gold stickers are attached at the corners.

I don't usually decorate the inside of my cards but in this case it was necessary so a greeting could be added. I attached another piece of the red rose paper and added a plain red panel to the middle of it.

Ddd


Posted by studio3d@ccgmail.net at 6:00 AM PST

Newer | Latest | Older