« October 2012 »
S M T W T F S
1 2 3 4 5 6
7 8 9 10 11 12 13
14 15 16 17 18 19 20
21 22 23 24 25 26 27
28 29 30 31
You are not logged in. Log in
Entries by Topic
All topics  «
3D paperwork
A - Z challenge 5
A - Z challenge 7
A - Z challenge round 4
A to Z challenge round 3
A to Z round 2
A to Z round 6
A-Z round 1
Around the House
Art Challenges
Artist Trading Cards
Backgrounds
Beads
Bible Journaling
Books
Boxes
Collage
Color Challenge
Coloring
cookbook
Die Cuts
Digital Projects
Digital Stamps
Drawing
Dry Embossing
Fabric Stuff
Fantastic Folds
Field Trip
Home Decor
How Does Your Garden Grow?
Hymnal Art
In The Kitchen
In the studio
Jewelry
Lettering
Links
Multi-Technique
Music to Work By
Musings
Nail Art
New Work
Online Class
Other Hobbies
Other Projects
Painting
Paper Embroidery
Paper Piecing
Photo
Pretty Paper
Quilting
Random
reading
Scrap Recovery
scrapbooking
Sewing
Sketch Challenge
Some Backlog
Stamping
Stencils
Stickers
Supplies
Teabag Folding
Techniques
Testing
tips and tricks
Tutorial
Web resources
Welcome to my Blog
Work By My Friends
workflow
Writing
Blog Tools
Edit your Blog
Build a Blog
RSS Feed
View Profile
Group One
In & Out of Studio 3D
Friday, 12 October 2012
No More Loafing Around
Topic: In The Kitchen

Green tomatoes yielded 24 loaves of delicious bread. Yes I CAN count - we already ate one warm from the oven!


My delicious recipe uses green tomatoes and tart apples (I used Granny Smith). I used the same marathon baking method as for my zucchini bread (double batches with dry ingredients in one gallon ziplock and wet ingredients in another - combine in the mixer).

I also added two mock apple (zucchini) pies to the freezer along with these loaves of bread.

Ddd


Posted by studio3d@ccgmail.net at 12:01 AM PDT
Thursday, 11 October 2012
Who's Ready For Halloween?
Topic: Paper Embroidery

Challenge: Make a Halloween Card with Paper Embroidery

I pulled out a pattern of an owl and, though it is not a typical Halloween owl, I used Halloween colors to bring it into the right feeling. Green and orange for the window frame, purple for the sill and black for the owl. I did add some orange for the feet and beak.

I added three bat stickers around the top and mounted it all to a purple base card.

Bring on the creepy!

Ddd


Posted by studio3d@ccgmail.net at 12:01 AM PDT
Wednesday, 10 October 2012
In and Out
Topic: Backgrounds

The background on this card was created for a challenge to do something with weaving. I cut strips of paper from table scraps and wove them over a base card.

The butterfly is cut from a scrapbook paper and is ebedded with glitter. Actually, there are two identical butterflies mounted one over the other. The bodies are stuck together and the wings on the upper butterfly are raised up on foam tape.


I used peel-off sticker borders around the edges and a greeting on the center of the butterfly.

The camera refused to focus properly on the glittery surface.

Ddd


Posted by studio3d@ccgmail.net at 12:01 AM PDT
Tuesday, 9 October 2012
It's a Frame-Up
Topic: Die Cuts

Technically the die cut item is the HOLE in the frame but I guess this qualifies.  I started out just messing with things on the table left over from other projects. I started with the frame and then found a paper with spot-printed botanical groupings I pulled out a stamped greeting to use that matched the green in the illustration and a bit of stock matching the frame. With all those elements on the table I looked for a good background and chose a cream and black stripe. WHAT? Cream and Black? Yeah, I used distress inks to make it green.


It all came together so easily.

Ddd


Posted by studio3d@ccgmail.net at 12:01 AM PDT
Monday, 8 October 2012
A Different Perspective
Topic: Photo

We went on a 'nature walk' the other day to the local 'environmental center' on a college campus. It is, disappointingly, getting overgrown and looks pretty scrungy. But we did happen upon the observatory that is next to it and I took a few photos of that.


It's sad when the man-made is more photogenic than the natural elements.

Ddd


Posted by studio3d@ccgmail.net at 12:01 AM PDT
Sunday, 7 October 2012
Before They Blow Away
Topic: Photo

I so enjoy the fall colors! Every year we make a special trip in to town to view 'THE TREE'. Anyone who has lived here through the season knows about the one enormous maple tree that has the best color ever. But it's a challenge to see it at its peak because one day it is green, then yellow, then WHAM it is flaming orange and a couple of days later every single leaf is on the ground. It's like little elves go out in the night and pick them all of and throw them down.

So, when I can see it at that peak time it is quite a treat:


The other spectacular tree is right in our front yard. We actually have THREE maple trees in the yard. One turns yellow, one turns brown, and this one on the end goes nuts with color. It is so close to the house that the side that turns color is over the roof so it is hard to photograph.


You can see it's not quite 'there' yet, but it will be soon. FALL IS HERE, can winter be far behind?

Ddd


Posted by studio3d@ccgmail.net at 12:01 AM PDT
Saturday, 6 October 2012
World Card Making Day - OWH Bloghop
Topic: Sketch Challenge

I am so excited to be participating in my very first bloghop! Today is World Card Making Day and Operation Write Home challenged us to create winter cards (including holidays if we wished) using an OWH sketch.

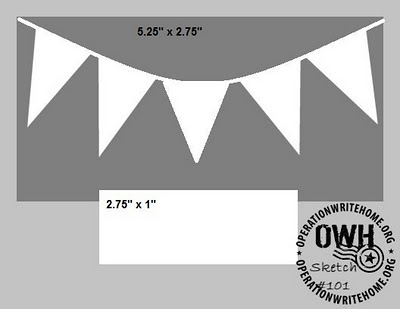
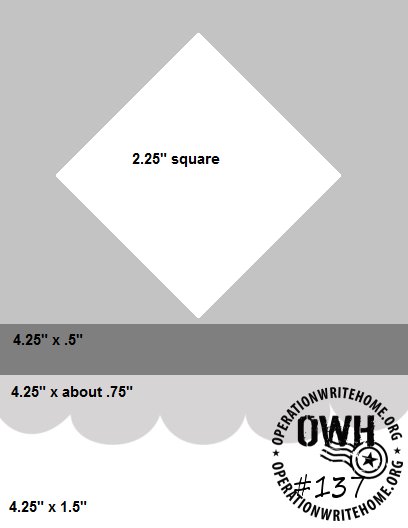
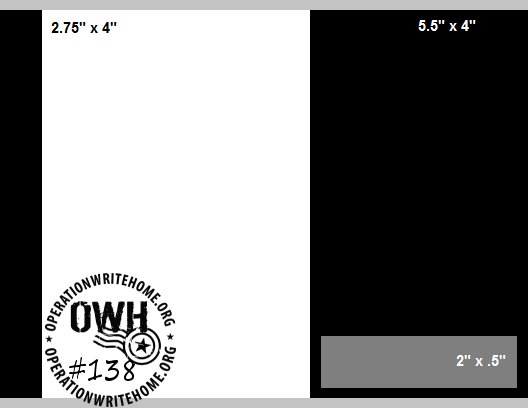
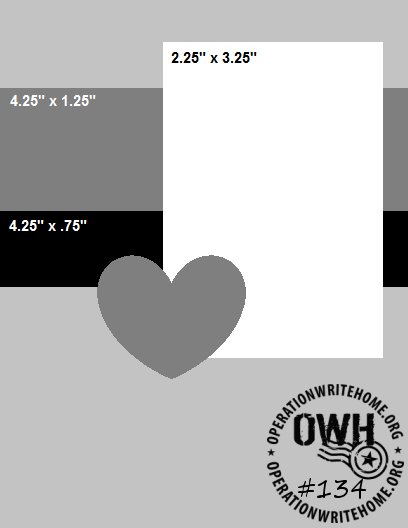
I chose to use sketch 134 seen here:


I have collected several 12 x 12 pads of Christmas papers and cardstocks over the years and use bits and pieces from them interchangeably. I keep them all together in one bin along with my Christmas stickers, greetings, rubons, etc. I gave up long ago trying to keep track of the manufacturers so won't provide any information along those lines.

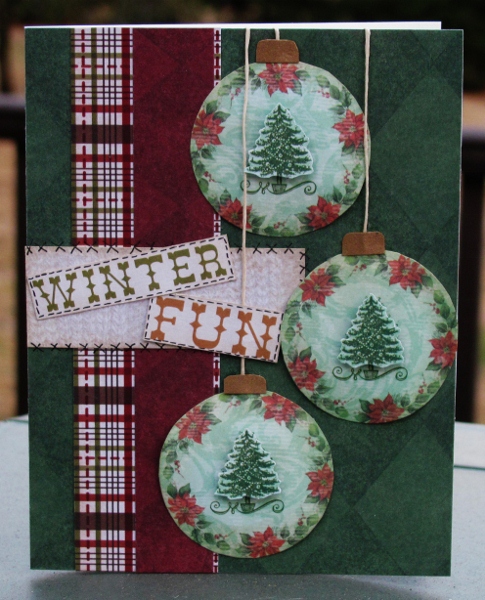
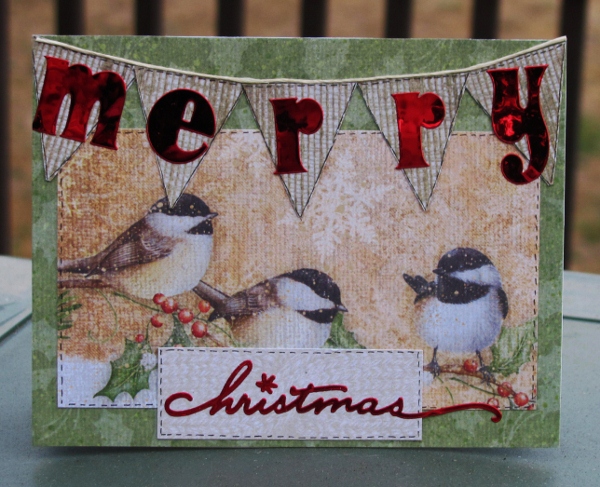
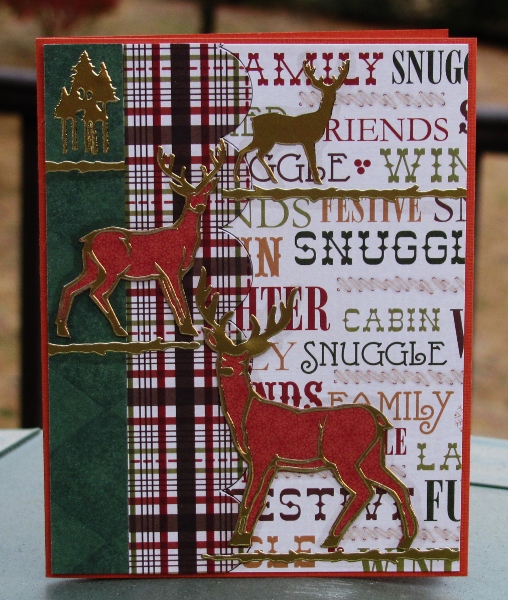
This is the card I created (enlarged to show detail):

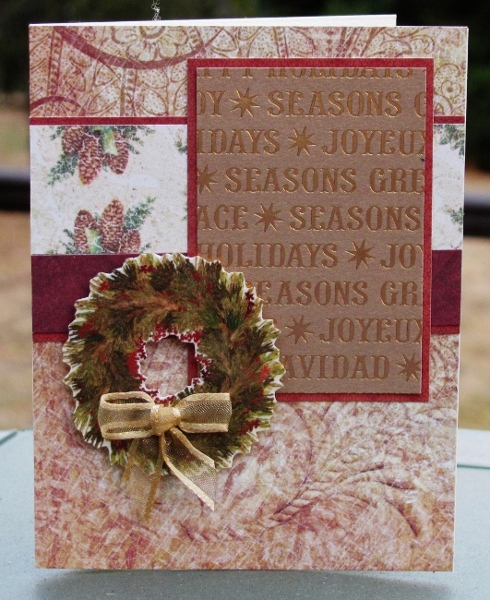
A patterned background is overlaid by two patterned paper strips which have been given a coordinating border. The panel on the right is a tone on tone metallic gold print. Since this is already a mix of Christmas words I did not add a sentiment to the card. This panel also got a coordinating border to separate it from the background.

The wreath is from a sheet of clear stickers. I mounted it to cream cardstock and trimmed it out. Then I mounted it up on foam tape and added a sheer ribbon bow using glue dots to adhere it.

Thanks for visiting my blog. Don't forget to click on the heading banner or on the link below to return to the bloghop.

http://operationwritehome.org/starsandstamps/

Ddd


Posted by studio3d@ccgmail.net at 12:00 AM PDT
Updated: Tuesday, 25 September 2012 1:01 PM PDT
Friday, 5 October 2012
Better and Better
Topic: Sketch Challenge

I think these winter and Christmas cards using OWH sketches are getting better and better as I go. I hope you agree! Don't forget - I will be featuring the best one on October 6 for an OWH bloghop for World Card Making Day. Be sure to check back then and I'll provide a link to the rest of the bloghop for you.

Sometimes the sketch itself tells you what it wants to be. That was the case the first time I saw sketch 103:


My very immediate thought was 'those should be Christmas ornaments'! I found some paper in the stach that had round elements and cut circles around three of them to create the baubles. They got their edges darkened with 'old paper' distress ink so they would appear to be spherical. I also cut out three of the little trees and opped them up on foam in the middle of the ornaments and created a little 'cap' for each out of gold cardstock. The baubles are mounted with foam tape in the center and ATG glue around the edges so they are actually 'puffy' on the card. A length of scrappers floss is caught underneath each of the caps and wrapped to the back of the front panel.


I cut the words from the paper with the overall text print and mounted them to some of the cable knit printed paper. These were attached over the background collage of masculine prints and then each was given some faux stitching. The larger one got X stitching which I think looks cozy and cute.

Ddd


Posted by studio3d@ccgmail.net at 12:01 AM PDT
Thursday, 4 October 2012
What's Up, Chickadee?
Topic: Sketch Challenge

Still working on winter and Christmas cards using OWH sketches. Don't forget - I will be featuring the best one on October 6 for an OWH bloghop for World Card Making Day. Be sure to check back then and I'll provide a link to the rest of the bloghop for you.

For today's card I chose sketch 101:


There are some times when the materials tell you what they want, despite your plans. In this case I was happy to go on their little ride, because they seemed to know what they were doing!

I started by knowing I wanted the banner to house the letters from a sticker set I had on hand. Then I found the bird print (cut down from a 12 x 12 page). After that it was a matter of shifting the elements so none of the important stuff would be covered up and weilding various glues to hold it all in place.


I provided some definition to the banner by using a little sketch black line as a border. Then I added faux stitching across the top of the banner and around the two printed papers. A bit of scrapper's floss was glued in to the top of the banner. The text sticker on the small panel is from the same set as the MERRY letters.

Cute, cute, cute!

Ddd


Posted by studio3d@ccgmail.net at 12:01 AM PDT
Wednesday, 3 October 2012
Yipes, Stripes!
Topic: Sketch Challenge

In the continuing work on winter and Christmas cards I'm still using OWH sketches. Don't forget - I will be featuring the best one on October 6 for an OWH bloghop for World Card Making Day. Be sure to check back then and I'll provide a link to the rest of the bloghop for you.

The card today came together in a snap using sketch 137:


The key to this ease of construction was starting with a print that was striped! From the top down to the top of the snowflake row is all one print. Then the row of snowflakes, the scallop and the green bottom are each separate pieces. I made it look coordinated by using three colors of the same small print in the scallop, the green and the upper diamond. For that diamond I cut it a tiny bit smaller so it would fit on the scalloped square I cut with a Spellbinders die. This relates it back to the larger scalloped strip at the bottom.


The diamond is popped up on foam tape and features some clear stickers.

Ddd


Posted by studio3d@ccgmail.net at 12:01 AM PDT
Tuesday, 2 October 2012
Do You Like This One, Deer?
Topic: Sketch Challenge

Continuing to work on winter and Christmas cards using OWH sketches. Don't forget - I will be featuring the best one on October 6 for an OWH bloghop for World Card Making Day. Be sure to check back then and I'll provide a link to the rest of the bloghop for you.

For the card today I worked with sketch 130:


Although I kept rigidly to the measurements for the sketch elements I deviated when it came to the embellishments. (Actually, I'm amazed that I lasted this long in the process without totally hammering a sketch!)

I wanted this to have a totally masculine feel so I started with a cozy plaid and a text background.  All of the pictorial elements are Dazzles brand stickers. On the outline ones, I mounted them to colored paper first and trimmed them out before adding to the card. Each element got a bit of gold stitcker trim to ground it and I also added some shadow around each piece with W3 Copic marker. I may go back and add W5 as the deer still merge into the background too much for my taste.

No sentiment was added so this can be an 'anytime' winter card.

Ddd


Posted by studio3d@ccgmail.net at 12:01 AM PDT
Monday, 1 October 2012
Inspired by Sketches
Topic: Sketch Challenge

Continuing to work on some OWH sketches, turning them into winter and Christmas cards. Don't forget - I will be featuring the best one on October 6 for an OWH bloghop for World Card Making Day. Be sure to check back then and I'll provide a link to the rest of the bloghop for you.

Today I worked with sketch 138:


I had some blue paper with a very wintery feel to use as the background. I didn't want to detract from it so I used a tone-on-tone gold metallic print text block. I added three snowflake stickers and a puffy acrylic clear sentiment. The sentiment is mounted on coordinating blue paper and trimmed out before adhering to the card.


You can almost feel the icy chill of winter coming!

Ddd


Posted by studio3d@ccgmail.net at 12:01 AM PDT
Sunday, 30 September 2012
A Little Sketchy
Topic: Sketch Challenge

I've been working on some OWH sketches, turning them into winter and Christmas cards. Some have met with limited success. I will be featuring the best one on October 6 for an OWH bloghop for World Card Making Day. Be sure to check back then and I'll provide a link to the rest of the bloghop for you.

Today I worked with sketch 97:


I started with a patterned paper to get a color scheme and then selected papers for the blocks with very subtle prints. In the process, 99% of the original paper is covered up but you still get to see flecks of colors in the cracks and creases.


All of the decor is created with clear stickers, including the text. Some of the stickers are actually layered to get a better composition.

Ddd


Posted by studio3d@ccgmail.net at 12:01 AM PDT
Saturday, 29 September 2012
Time Is On Our Side
Topic: Stamping

For a swap on the subject of 'clocks' I stamped on patterned blue paper with 4 clock face stamps and used the stamps of hand to 'set' them to all different times. I spritzed three shimmer sprays in random areas and this made the base.

I took apart an old wrist watch and used Diamond Glaze to adhere the tiny gears to the centers of the clock faces. Glue dots adhere the actual clock face to the card front. This as well as two of the stamped clocks got Diamond Glaze to make them shiny.

I stamped an appropriate sentiment on patterned paper and cut a flag end on the left before adhering to the card.

Ddd


Posted by studio3d@ccgmail.net at 12:01 AM PDT
Friday, 28 September 2012
Falling Leaves Keep Me In Stitches
Topic: Paper Embroidery

On assignment to make a paper embroidery card on the theme 'Autumn' I often come back to this leaf pattern that I designed a few years back. This time I selected a coral tone-on-tone paper with small dots and used a burgundy thread and a simple outline stitching scheme. This is an oversized card at 5.5 x 7.5 but I really did not want to shortchange the leaf by going any smaller.

The background paper is printed with cable knit like a warm sweater and I added some scraps of clock that I created for another assignment (you'll see that tomorrow). Lots of leaf peel-off stickers link the elements and the sentiment ties together the leaves and clocks.


The leaves outside my window are starting to show their colors and I am excited for them to get as brilliant as this card.

Ddd


Posted by studio3d@ccgmail.net at 12:01 AM PDT
Thursday, 27 September 2012
Can You Hear Me Now?
Topic: Other Hobbies

Anybody should be able to hear with forty-four ears!

I got FORTY-FOUR EARS OF CORN in my garden. I've mentioned before that this is the first time I have grown corn and I am totally jazzed that this crop came out so well. I blanched it all and froze it on the cob. That's the way we like it and it will be great having corn on the cob all winter long.

Yummo!

Ddd


Posted by studio3d@ccgmail.net at 12:01 AM PDT
Wednesday, 26 September 2012
Indigo, Violet, Purple or Plum
Topic: Other Hobbies

I harvested my first plant of purple potatoes! I had no idea what size they would turn out and I was excited to see that they are at least as big as the russets. Not sure how I will be cooking these - first I have to admire them for a few days, though.

Aren't these awesome?

Ddd


Posted by studio3d@ccgmail.net at 12:01 AM PDT
Tuesday, 25 September 2012
Color Me Blue (and green)
Topic: Sketch Challenge

Yes, I'm back with more of OWH sketch 39, just like the last two days.

I switched to papers in blue green and cream for this set. This time NONE of them are exactly like the sketch. That's just how I roll. But this one is the closest to it. I tucked two of the triple blocks under the ends of the next largest one and then dropped the center block down to the bottom. This left an open place for the peel-off sticker greeting. The dragonflies are 'Dazzles' stickers that the body only has stickum and the wings float free. That's exactly how I like to have my dragonflies and butterflies anyway so these make me happy.


This one uses copper butterfly stickers, one for each of the triple blocks. Classy.


More peel-off stickers on this one - going for a masculine card this time. The center panel is popped up on foam so the image of the moose is cut so part is on the raised panel and part on the base card.

I pulled this bird image from my stamped bin and colored it up to match the papers. I also colored up a pre-stamped greeting and colored it as well. I backed it with some coordinating scraps. Both the bird and the greeting are popped up on foam.

The key to a project like this is choosing the right papers. Every one of them needs to be capable of being the feature on the front but not being so busy that an image is overshadowed.

I can't wait till Club Scrap comes up with another formula for us.

Ddd


Posted by studio3d@ccgmail.net at 12:01 AM PDT
Monday, 24 September 2012
Switching Up Papers
Topic: Sketch Challenge

I continued using the sketch and cutting formula from yesterday and switched to pink and brown papers. I've always liked that color combination.

I totally whacked out the layout on this one and decorated it with clear stickers. Love these little hedgehogs! The greeting is part of the sticker sheet. 

This one follows the sketch exactly and it looks very nice this way! I like the overriding look of chocolate! I used two floral sticker sprays and no greeting.

I moved the triple block off to the side so I could see more of the paisley paper. These three blocks were very plain so I used them to be a calm background for three sprays of butterfly stickers. They are pink and shiny and oh-so elegant. The greeting is also peel-off stickers.

With all the paisley on the triple blocks this had such a cute feel. I found a cute stamped image and colored it up with alcohol markers to match the papers. I trimmed it out with a thin border and popped it up on foam tape. The greeting, of peel-off stickers, was mounted on a matching scrap and cut like a little flag.

Cute, cute, cute!

Ddd


Posted by studio3d@ccgmail.net at 12:01 AM PDT
Sunday, 23 September 2012
OWH and Club Scrap CutUp
Topic: Sketch Challenge

Every now and again Club Scrap comes up with a cutting formula for one of the OWH sketches. This time they posted one for sketch 39:

With their plan you start with 4 pieces of 8.5 x 11 coordinating cardstock pieces and whack them by the forula and have all the parts to construct 4 cards on the sketch. You also end up with a few scraps and, since I start with 12x12 papers that I cut down to the 8.5 x 11 I end up with even more scrap pieces. With this plan in hand (http://clubscrapcreates.blogspot.com/2012/09/new-formula-for-owh-sketch-39.html) I selected my cardstocks and set to work:

You know, I just can't seem to follow directions so the parts are rearranged on alost every card I made. This one I decorated with puffy fish stickers. The one on the far left is also popped up on foam tape. I used gold peel-off stickers for a greeting.

One of the papers I cut up the other day had these great glittered feathers on it so I cut them out right to their edges and popped them up on foam tape. The pre-stamped greeting is also popped up.

Another  sheet of puffy stickers was full of hearts. I created a meandering line of them and connected them with a double-dashed line up and over the raised center panel.

The fourth one got more of the feathers, this time cut with a thin border. For the greeting I used a pre-stamped sentiment on white that I tinted using 'old paper' Distress ink. I mounted it on an angle over the corner and trimmed away along the card edges. This is the only one that follows the sketch faithfully.


That went quickly!

Ddd


Posted by studio3d@ccgmail.net at 12:01 AM PDT

Newer | Latest | Older