« February 2013 »
S M T W T F S
1 2
3 4 5 6 7 8 9
10 11 12 13 14 15 16
17 18 19 20 21 22 23
24 25 26 27 28
You are not logged in. Log in
Entries by Topic
All topics  «
3D paperwork
A - Z challenge 5
A - Z challenge 7
A - Z challenge round 4
A to Z challenge round 3
A to Z round 2
A to Z round 6
A-Z round 1
Around the House
Art Challenges
Artist Trading Cards
Backgrounds
Beads
Bible Journaling
Books
Boxes
Collage
Color Challenge
Coloring
cookbook
Die Cuts
Digital Projects
Digital Stamps
Drawing
Dry Embossing
Fabric Stuff
Fantastic Folds
Field Trip
Home Decor
How Does Your Garden Grow?
Hymnal Art
In The Kitchen
In the studio
Jewelry
Lettering
Links
Multi-Technique
Music to Work By
Musings
Nail Art
New Work
Online Class
Other Hobbies
Other Projects
Painting
Paper Embroidery
Paper Piecing
Photo
Pretty Paper
Quilting
Random
reading
Scrap Recovery
scrapbooking
Sewing
Sketch Challenge
Some Backlog
Stamping
Stencils
Stickers
Supplies
Teabag Folding
Techniques
Testing
tips and tricks
Tutorial
Web resources
Welcome to my Blog
Work By My Friends
workflow
Writing
Blog Tools
Edit your Blog
Build a Blog
RSS Feed
View Profile
Group One
In & Out of Studio 3D
Tuesday, 19 February 2013
In The Neighborhood
Topic: Other Projects

Tired of chilly weather, I was inspired to work on a 'spring' project. I gathered the three remaining wooden birdhouses I had bought a while back for altering. The common element on all of these houses is that they have two entrance holes for the birds.

I selected a variety of bird and spring printed cardstocks to use on these. I trimmed the papers to fit the flat surfaces  - two per house - and attached them using Scor-Tape (it holds like nobody's business).

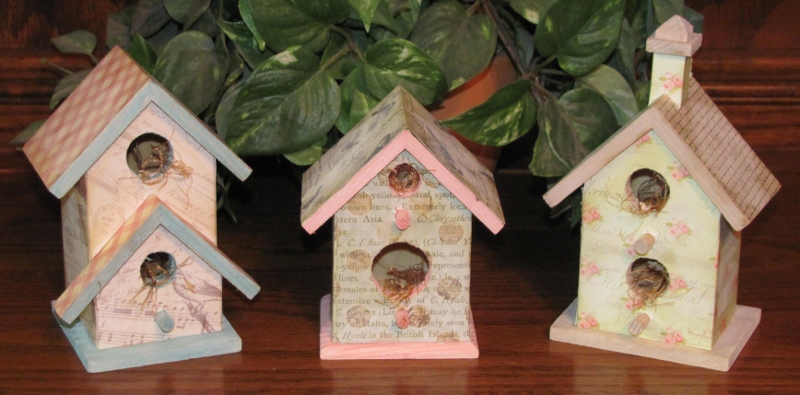
I used Distress Markers to color the exposed wooden surfaces - roof edges, bases, perches, and inside the holes. The markers were pretty bold even though I used pastels - a matter of how the wood soaked in the color - so I went over all these wood surfaces with Picket Fence (white) Distress Stain.


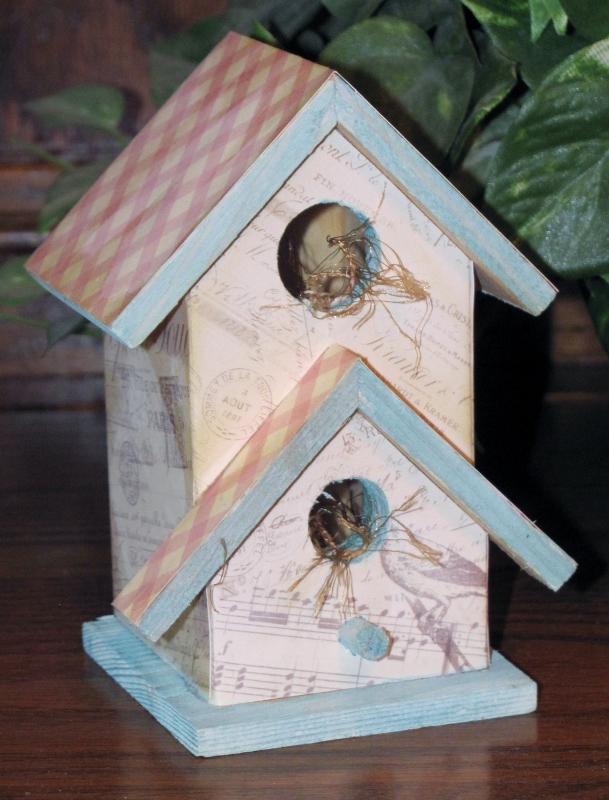
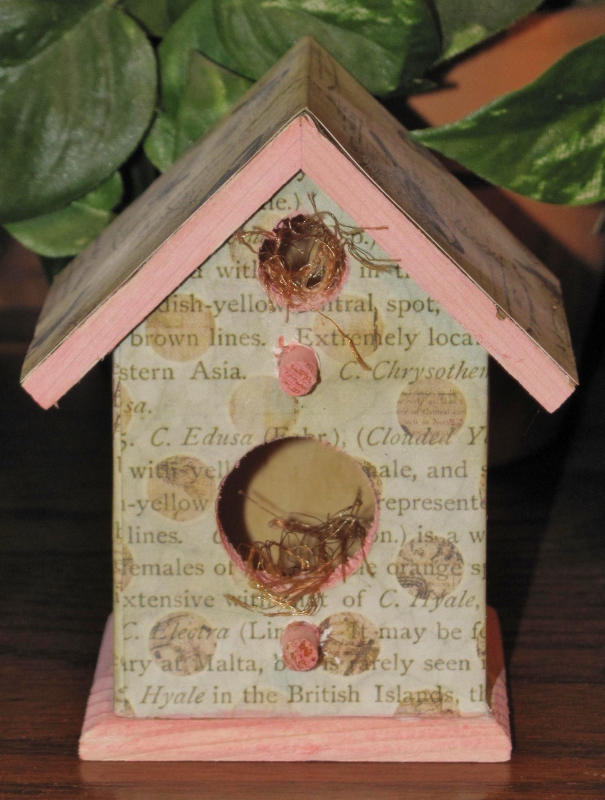
I used Distress Ink pad and a foam blender to darken the edges of all the paper corners for a shabby chic look.

As a last step I took beige eyelash yarn and cut a length to glue in the opening of each hole to look like nesting material.

Ddd


Posted by studio3d@ccgmail.net at 12:01 AM PST
Monday, 18 February 2013
Buttoned Up Birds
Topic: Backgrounds

The  circular elements on this waxed paper background provided a perfect layout to add button stickers down the left side. I placed one button in each circle and then layered another button over the top of each, popped up on foam tape. The yellow illustrated panel is a sticker tag that fit perfectly. But it had white birdcages on it that did not show up well. I used a fine-line pen in brown the trace them out. Then I stamped the text in the center, bordered it and mounted it on foam tape.

I used second and third generation stamping to repeat the text on the background and added two coppery puffy hearts over the tiny stamped ones.

Ddd


Posted by studio3d@ccgmail.net at 12:01 AM PST
Sunday, 17 February 2013
Countin' Flowers On The Wall
Topic: Backgrounds

I'm still searching for the perfect use for the brick embossing folder - I don't think I found it today either.

I used it for a waxed paper background and colored with fired brick. Then I ran it back through the folder to raise the bricks. Next I used gathered twigs distress ink to darken the bricks. Hmmm. I went looking for feature elements and came up with these metal-rimmed tags in two colors and two sizes. The two reds are mounted with large glue dots and the pewter is mounted on foam tape.

The camera did NOT like focusing on this card!

I added silver peel-off greetings inside the tags and two silver borders across the bottom of the card.

Ddd


Posted by studio3d@ccgmail.net at 12:01 AM PST
Saturday, 16 February 2013
Sunshine And Flowers
Topic: Backgrounds

This waxed paper background of daisies got colored up with bright yellow Distress Ink for a cheery spring card. I found some sunflower stickers in graduated sizes and layered them. Then I added some diecut white corner brackets for framing and rounded two opposing corners.

I found a thick acrylic heart sticker with text and a daisy and placed that in the lower right of the floral grouping.

Ddd


Posted by studio3d@ccgmail.net at 12:01 AM PST
Friday, 15 February 2013
Just Because of Roses
Topic: Backgrounds

The waxed paper background on this card is very subtle in coloring so I chose to feature pastel rose stickers for the focal. I added some antique script tissue tape as borders.

A nice script text peel-off sticker in gold provides a sentiment.

Ddd


Posted by studio3d@ccgmail.net at 12:01 AM PST
Thursday, 14 February 2013
Hearts-A-Plenty
Topic: Backgrounds

Can't let Valentine's Day go by without featuring a little love!

I used a waxed paper background (created Two diecut white corner brackets are featured in the corners and 3D peel-off heart stickers flutter through the center. I added a red puffy heart to each gold heart center.

A gold peel-off greeting rests on the lower corner bracket.

Ddd


Posted by studio3d@ccgmail.net at 12:01 AM PST
Wednesday, 13 February 2013
Lottsa Poppies
Topic: Backgrounds

I pulled out the rest of the diecut poppies cardstock and decided to just use it all up in one session. I chose a variety of card bases from cream to golden and used a variety of stickers to decorate their fronts.

This first one uses two canvas stickers with a birthday theme. I also cut out one of the extra poppies and featured it up on foam tape.

This next one uses a large text sticker and two popped up flowers.

Three of the cards use a bright patterned paper ounted on foam and feature text/graphic stickers over that.

The third also has a chipboard swirl.

Next I used three tick acrylic stickers of daisies and one of the trimmed out poppies.

And, finally, liberal use of gold peel-off stickers including borders and a church window.

Quite a bit of variety from those two 12 x 12 diecut sheets.

Ddd


Posted by studio3d@ccgmail.net at 12:01 AM PST
Tuesday, 12 February 2013
A Little Early For Christmas
Topic: Paper Embroidery

I'm going to try, again this year, to create two Christmas cards per month to get a jump on the holiday season. I started with more of the stitching stickers (wich I will probably do for the whole year).

First this month I used a couple of snowflakes and a border on purple dot cardstock and stitched with white thread. Some of the holes are just designated for french knots. I rounded the two right corners and mounted flush left to a lavender card base, also with right rounded corners.

Another of the sticker sheets had Christmas baubles. I mounted two of them on a neon red cardstock with shimmer and stiched with lime green thread. This called for a lime green card base. So I rounded the corners on both and centered the stitched panel.

This is not showing NEARLY as bright as real life which is 'hurt your eyeballs' bright.

Ddd


Posted by studio3d@ccgmail.net at 12:01 AM PST
Monday, 11 February 2013
Winter Shine
Topic: Paper Embroidery

I bought several sheets of stitching stickers in Winter and Christmas themes and it was time to use one - for an assignment to stitch a winter card. I decided to go with the snowflake design mounted onto a shiny gold cardstock. There is very little to stitch on these stickers so it is very minimal. I stitched with a bright blue thread and added some bright blue peel-off stickers for more decoration.

A dark blue card base works to enhance the thread and sticker color. I used several smaller snowflake stickers to improve the composition.

Ddd


Posted by studio3d@ccgmail.net at 12:01 AM PST
Sunday, 10 February 2013
Egg Stand
Topic: Paper Embroidery

Next paper embroidery was to stitch an Easter egg. I actually combined two patterns for this: one for the egg and stand and another for the floral spray. I went with Easter colors and changed up the stitching design for the flowers and leaves.

I used a tent-fold card base so it could be displayed and selected yellow for it to pull out the tiny flowers.

Ddd


Posted by studio3d@ccgmail.net at 12:01 AM PST
Saturday, 9 February 2013
Musical Bouquet
Topic: Paper Embroidery

On assignment to make paper embroidery cards on the theme 'music' I went back to my original pattern for a harpsichord. This time I wanted a romantic feel so I pricked it out on a floral paper. I decided to use black thread for contrast. Dark irridescent beads provide the details.

I used a scallop border and a coral card base to pull out colors from the patterned paper.

Ddd


Posted by studio3d@ccgmail.net at 12:01 AM PST
Friday, 8 February 2013
Color Shine
Topic: Quilting

I followed a recomended link on Facebook to a quilting class on Craftsy.com by Anita Grossman Solomon called Traditional Blocks Made Easy. This workshop is aptly named as she presents completely innovative methods of constructing blocks. My mind was blown and I was immediately off to try out the technique of the first of the five blocks demonstrated.

I selected scraps of Fairy Frost fabric from a previous quilt and set out to create 25 blocks of bright mixed colors. These got arranged in color blocks and bordered with a dark purple with a silver glitter finish.

You can also see that I used a scrappy approach to the binding.

I used the same border fabric for the backing and used scraps to create a  strip of flying geese for the back.

Quilting is stitch-in-the-ditch on the diagonal using invisible thread.

This quilt will go the the Passages program at the hospital.

Ddd


Posted by studio3d@ccgmail.net at 12:01 AM PST
Thursday, 7 February 2013
Starring Horses
Topic: Quilting

Way back when, my second quilt was from the Attic Windows pattern and featured fields of running horses. I had just a little of that fabric left over so I combined it with other scraps from quilts I have made and created a 46-inch square star quilt with sashing and cornerstones.

I had just enough to fussy cut four dark horse groups, four light horse groups, and one oddball block. Then I used the leftover scraps to cut the cornerstones featuring just horse heads.

I backed it with cream tone on tone and wrapped it to the front for binding. This will go to the hospital Passages program.

Ddd


Posted by studio3d@ccgmail.net at 12:01 AM PST
Wednesday, 6 February 2013
Cloud Cover
Topic: Backgrounds

I had a hard time deciding what topic label to put on this series. I went with a generic label as so many techniques were used.

First I used the clouds embossing folder on glossy cardstock and went over the whole thing with distress ink. When that was dry I used Picket Fence Distress Stain on the clouds only to lighten them. I tore a green patterned paper to create a grassy area and you might recognize those sheep and rainbow from a previous card. I added the vellum sun sticker this time and a clear text sticker on the ground.

Then I used the clouds folder to emboss some waxed paper and made some waxed paper backgrounds. I used Distress Ink to color it and then embossed the background. Finally, I used Picket Fence Distress Stain on the raised clouds. The torn ground is the setting for a clear nest sticker and a chipboard bird. The sky is filled with clear sticker text.

This one uses the reverse of the waxed paper background so embossing it makes the clouds indented. In trying to rework this I inked after using the white distress stain so they now are light blue. Ah well. I tore the ground and added peel-off stickers of an outline deer, backed with designer paper, and some trees. The text in the ground is a clear SRM sticker.


This started out the same size as the rest of them but I messed it up over and over and over and kept hacking away the ratty bits until this is all that was left! I had already added the peel-off deer and trees so I just framed it out and mounted it landscape on plain white cardstock. It was very plain so I added gold peel-off borders and corners. Much better, but the ground was so much larger that I went looking for a large text sticker. I actually used a combination of stickers to create the text.


Now I can get my head out of the clouds and go onto another project.

Ddd


Posted by studio3d@ccgmail.net at 12:01 AM PST
Tuesday, 5 February 2013
Poppy Field
Topic: Backgrounds

At a recent closeout sale I found several sheets of diecut 12 x 12 sheets. I cut them into quarters to use as backgrounds for cards. For this one I backed it with a green patterned paper and trimmed it to size before rounding the corners and mounting to a tan card base with rounded corners.

The text medallion is from a sticker sheet and includes the 3D butterfly.

Ddd


Posted by studio3d@ccgmail.net at 12:01 AM PST
Monday, 4 February 2013
Maroon Medallion
Topic: Paper Embroidery

One of the upcoming swap themes is to stitch a medallion. I chose a tone on tone houndstooth paper and stitched in maroon to keep it all in the same color family. I added an extremely fine maroon border as well.

The text strip is a clear sticker from an SRM sheet.

Ddd


Posted by studio3d@ccgmail.net at 12:01 AM PST
Sunday, 3 February 2013
Dotty Corner
Topic: Paper Embroidery

Next challenge up was to paper embroidery a corner pattern. I decided to go graphic by stitching bright red and yellow on a black dotted background. I added a 3D rose in yellow foil.


I decided to leave off a greeting and not clutter this up.

Ddd


Posted by studio3d@ccgmail.net at 12:01 AM PST
Saturday, 2 February 2013
Chinese New Year Kanji
Topic: Paper Embroidery

On assignment to make a card for Chinese New Year I REALLY wanted to stay away from the zodiac sign for 2013 so I used a Kanji 'good luck' pattern that I designed a few years back. I stitched it up in red on a metallic gold background and placed on a red folded card base.

I used gold peel-off stickers to add corners, borders and text.

Ddd


Posted by studio3d@ccgmail.net at 12:01 AM PST
Friday, 1 February 2013
Gracious Get Well
Topic: 3D paperwork

The card that started this whole 3D marathon was this one for the challenge ("make a card using 3D sheets"). This is another of the images that looks like a woodcut and includes the strip of lace with 'woven' ribbon. I placed this over a lattice background and added two butterflies from elsewhere on the 3D sheet.

The text is silver peel-off sticker.

Ddd


Posted by studio3d@ccgmail.net at 12:01 AM PST
Thursday, 31 January 2013
Chocolate and Peppermint
Topic: 3D paperwork

We had a challenge to make a card with brown and pink. This is one of my personal favorite color combinations so I had fun with this challenge.

I used 3D roses from the same sheet as yesterday and placed it on a tone on tone brown dot cardstock ofer a pink folded card base.


The text is a silver peel-off script. I used a butterfly from a set of 3D stickers rather than from the 3D image sheets.

Ddd


Posted by studio3d@ccgmail.net at 12:01 AM PST

Newer | Latest | Older